
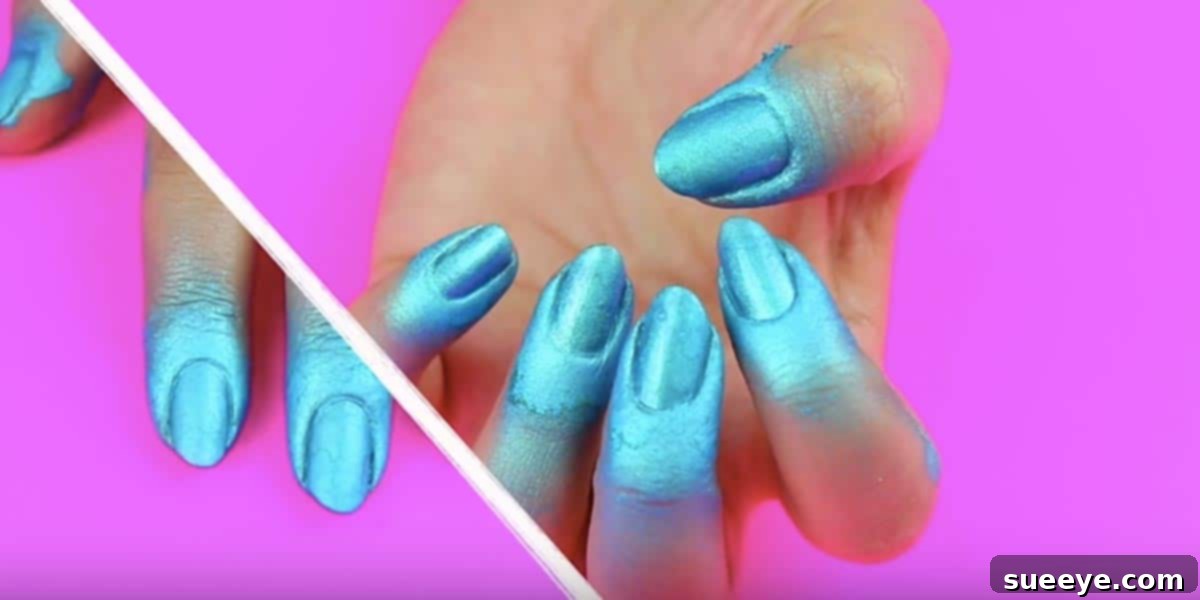
The Revolutionary DIY Spray Manicure: Perfect Nails in Minutes for Just $5!
Are you constantly battling the clock and your own dexterity when it comes to painting your nails? The painstaking process of meticulously applying polish, avoiding cuticles, and then enduring an agonizing wait for drying often leads to smudges, uneven coats, or a frustrating mess. We’ve all been there: the aspiration for perfectly polished nails clashing with the sheer effort required to achieve them. But what if we told you there’s a groundbreaking method that can utterly transform your nail care routine, making it faster, easier, and astonishingly affordable? Prepare to have your mind blown, because this ingenious DIY beauty hack promises to redefine everything you thought you knew about achieving a salon-quality manicure from the comfort of your home.
For countless beauty enthusiasts, the dream of a quick, flawless manicure often feels out of reach due to either cost or complexity. While innovative products like commercial spray nail polishes (such as those from Nails Inc) have emerged, promising rapid application and a clean finish, their price tag typically hovers around $35 for just one color and its mandatory top coat. This makes them an impractical choice for anyone seeking a regular, budget-friendly solution. However, a brilliant and resourceful individual has uncovered a way to achieve the coveted “spray-on” effect for a mere fraction of that cost – we’re talking an incredible total of approximately $5! This isn’t a fantasy; it’s a clever, creative solution that ingeniously employs an unexpected beauty product: temporary hair color. The sheer brilliance behind this hack is truly remarkable, and once you witness its simplicity and effectiveness, you’ll undoubtedly ask yourself why this wasn’t discovered sooner!
The Persistent Manicure Dilemma: Time-Consuming, Messy, and Demanding Precision
Let’s face it, traditional nail polishing can often feel more like a chore than a pampering ritual. The process involves a series of steps that demand patience and a steady hand: precisely applying a base coat, carefully painting two or three layers of color without touching the skin, and then, the ultimate test, waiting seemingly endlessly for each coat to dry without incurring any dreaded smudges. The struggle often intensifies when attempting to paint with your non-dominant hand, frequently resulting in a less-than-perfect finish. Furthermore, the inevitable clean-up around the nail edges with cotton swabs and nail polish remover can be both tedious and frustrating.
These recurring challenges often discourage busy individuals or those with limited patience from maintaining consistently polished nails. Recognizing this widespread problem, the beauty industry has continually sought innovations, from long-lasting gel polishes (which typically require UV/LED lamps and specialized removal processes) to the more recent introduction of spray-on nail polishes. While these commercial spray polishes do offer a quicker application compared to traditional brush-on methods, their premium pricing often places them beyond the budget of the average consumer, effectively diminishing their appeal as an everyday beauty solution. They also frequently necessitate proprietary base and top coats, further inflating the overall expense. This is precisely where the DIY spray manicure method excels, presenting a resourceful, cost-effective alternative that delivers similar impressive results without imposing a financial burden.
Unveiling the $5 Manicure Marvel: The Power of Temporary Hair Dye!
The secret weapon at the heart of this incredibly budget-friendly spray manicure is none other than temporary spray hair color, with products like Beyond the Zone Color Bomb 2 being a popular choice. This ingenious discovery capitalizes on the distinctive properties of temporary hair dye: it possesses a remarkable affinity for porous surfaces, such as hair and, crucially, natural nails. Conversely, it has a minimal adherence to smooth, non-porous surfaces like human skin, especially when a clear top coat is applied to the nails, acting as a barrier. This characteristic allows it to be effortlessly washed away from the skin, leaving behind only the perfectly defined polish on your nails. The visionary who first conceptualized and perfected this technique truly deserves widespread recognition for their groundbreaking contribution to accessible and affordable beauty hacks!
This method brilliantly bypasses many of the typical frustrations associated with conventional nail painting. Instead of the delicate and precise act of brushing, you simply spray. The seemingly alarming overspray that lands on your fingers and surrounding skin? It’s designed to be easily removed, resulting in an exceptionally clean, crisp manicure line without the usual painstaking effort. It might feel inherently counter-intuitive initially, given our ingrained habit of avoiding skin contact with nail polish, but its effectiveness is undeniable. Envision effortlessly transforming your nails with vibrant, captivating color in a matter of minutes, followed by the simple act of washing away the excess. It feels akin to magic, yet it’s a tangible result of clever material science and an exceptionally resourceful approach to personal grooming.
Your Comprehensive Step-by-Step Guide to the DIY Spray Manicure
Ready to experience this revolutionary nail hack for yourself? Here’s a detailed, easy-to-follow guide that will walk you through every stage of achieving a flawless and speedy manicure using temporary hair color. Before you begin the process, ensure you have gathered all the necessary materials. For a successful DIY spray manicure, you will need:
- A high-quality base coat nail polish (essential for nail protection and color adhesion)
- A can of temporary spray hair color (such as Beyond the Zone Color Bomb 2) in the shade of your choice
- A durable clear top coat nail polish (crucial for sealing the color and adding shine)
- Soapy water (prepare a small bowl or fill a sink with warm water and a gentle hand soap)
- An old towel, newspaper, or a protective sheet to cover your work surface
- Optional: Hand moisturizer or petroleum jelly (to provide an extra barrier for your skin, though not strictly mandatory with this method due to the temporary nature of the dye)
Preparation is Paramount: Setting the Stage for Success
- Clean and Prep Your Nails: Begin by ensuring your nails are impeccably clean, dry, and entirely free of any residual old polish. Take the time to file and shape your nails to your desired style, and gently push back your cuticles for a neat appearance. A perfectly prepared, clean nail surface is fundamental for optimal adhesion of both your base coat and the temporary hair color.
- Apply a Quality Base Coat: This is a critically important and non-negotiable step. A good base coat serves multiple vital functions: it protects your natural nails from potential staining by the hair dye, creates a smooth and uniform canvas, and provides an ideal surface for the temporary hair color to adhere to, which in turn promotes a longer-lasting manicure. Apply a thin, even layer to all your fingernails and allow it to dry completely. Patience here is key, as proper drying ensures the integrity of the subsequent layers.
- Protect Your Workspace: While the temporary hair dye is designed to wash off skin, it can potentially stain porous surfaces like fabrics or untreated wood. To prevent any accidental messes, lay down an old towel, newspaper, or a disposable plastic sheet on your work area. Furthermore, it’s highly advisable to perform this step in a well-ventilated space to disperse any fumes from the spray.
The Spray Application: The Heart of the Innovative Hack
- Spray on the Temporary Hair Color: Hold the can of temporary hair color approximately 6 to 8 inches away from your nails. With a steady, controlled motion, spray an even and comprehensive coat over your entire nail plate. At this stage, do not be overly concerned about the overspray landing on the skin around your nails—this is an intentional part of the process. The primary objective here is to ensure your nails are fully and uniformly covered with the chosen color. If you desire a more opaque or intensely vibrant finish, you may apply a second thin coat, but always ensure the first layer is dry to the touch before proceeding.
- Allow to Dry: Permit the temporary hair color to dry thoroughly. One of the significant advantages of this method is that the hair dye typically dries remarkably quickly, often much faster than traditional nail polish. You will know it’s completely dry when it no longer feels tacky or wet to the touch.
- Seal with a Clear Top Coat: Once the temporary hair color is completely dry, apply a generous and even layer of clear top coat over each nail. This step is absolutely critical for the success and longevity of your manicure. The top coat serves to seal in the vibrant color, imparts a desirable glossy finish, and most importantly, creates a protective barrier that prevents the temporary hair dye from washing off your nails when you perform the clean-up step. Allow the top coat to dry thoroughly and completely. This particular stage will account for the majority of your overall drying time, but it still represents a significant time saving compared to waiting for multiple layers of conventional polish to dry.
The Grand Reveal: Effortlessly Washing Away the Excess
- Wash Your Hands: Once your top coat is indisputably dry (you can test this by gently tapping your nails together to ensure they are hard and non-tacky), submerge your hands into the bowl of warm, soapy water you prepared earlier. Gently rub your hands together and softly massage the skin around your nails. You will observe that the temporary hair color that landed on your skin will begin to effortlessly dissolve and wash away, leaving behind only the perfectly defined, crisply shaped polish on your nails. For any particularly stubborn small spots, a soft nail brush or a cotton swab can be used, but in most cases, simple soap and water are all that’s required.
- Pat Dry and Admire: Carefully pat your hands dry with a clean, soft towel. And just like that, in a fraction of the time and at a remarkably lower cost than conventional methods, you have achieved a perfectly manicured set of nails with impeccably crisp lines. Voila! Revel in your beautiful, quickly acquired manicure.
Understanding the Science: Why This Ingenious Hack Works So Well
The underlying magic of this DIY spray manicure hinges on the differential surface properties of your nails versus your skin. Your natural nail plates are composed of keratin, which gives them a slightly porous texture. This porosity allows the pigments from the temporary hair dye to effectively adhere and embed themselves onto the nail surface. In stark contrast, human skin is considerably smoother and far less porous, particularly when it’s clean and moisturized. This fundamental difference means that while the water-soluble temporary hair dye readily clings to the nails, it lacks the necessary grip on the smooth skin. When combined with the protective barrier of the base coat and the sealing action of the top coat on the nail itself, the excess dye on the skin can be easily rinsed off with soap and water, leaving a clean edge.
This distinct interaction with different surfaces is precisely what makes spray-on nail polishes, both commercial versions and this brilliant DIY adaptation, feel so wonderfully counterintuitive. We are inherently conditioned to painstakingly avoid getting nail polish on our skin at all costs, often viewing it as a cardinal sin of manicuring. However, with this innovative method, overspray isn’t just an acceptable byproduct; it’s an integral and advantageous part of the entire process. It dramatically simplifies the application, virtually eliminating the need for the tedious and time-consuming clean-up procedures that typically involve cotton swabs, brushes, and harsh polish remover.
Pros and Cons of Embracing the DIY Spray Manicure
As with any beauty technique, the temporary hair dye spray manicure presents both compelling advantages and a few considerations. A clear understanding of these aspects will help you determine if this groundbreaking hack aligns with your personal beauty routine and preferences.
Distinct Advantages:
- Unbeatable Cost-Effectiveness: With a single can of temporary hair dye costing approximately $5 and lasting for numerous manicures, this method offers a drastic cost saving compared to expensive commercial spray polishes or frequent salon visits.
- Incredible Speed and Efficiency: The actual application of the spray takes mere seconds. While drying times for the base and top coats are still necessary, the overall time commitment for the entire process is significantly reduced compared to the layered application and prolonged drying associated with traditional nail polish.
- Effortless Application: Bid farewell to shaky hands and the frustrating challenge of perfecting your non-dominant hand. With this method, you simply spray over your nails, and the unwanted excess washes away with remarkable ease.
- Unique & Engaging Experience: This is an unconventional and exciting approach to doing your nails, making it an ideal choice for those who relish experimenting with innovative beauty hacks and unique aesthetics.
- Reduced Precision Requirement: Forget the painstaking effort of trying to paint perfectly within the lines. The “overspray and wash” technique expertly handles the precision for you, delivering clean edges with minimal effort.
- Vast Color Palette: Temporary hair dyes are available in an expansive array of vibrant, often bold, and trend-setting colors, providing immense creative freedom to match your mood, outfit, or artistic vision.
Potential Considerations and Drawbacks:
- Potential for Mess (Overspray on Surfaces): While the overspray on skin is easily removed, the spray can inevitably get on your immediate work surface or surrounding areas. Adequate protection (e.g., newspaper, old towel) for your workspace is highly advisable.
- Subtle Precision Differences: Although the edges around your nails will be impeccably clean, some individuals might perceive the overall finish to be slightly less “perfect” or refined than a meticulously hand-painted, multi-layered manicure or a professional gel application. However, for sheer speed and convenience, it’s an unparalleled method.
- Odor: Temporary hair dyes can possess a distinct chemical scent. Therefore, it is imperative to perform the application in a well-ventilated area to ensure comfort and safety.
- Adherence without Proper Base: Without the crucial initial layer of a quality base coat, the temporary hair dye might not adhere optimally to your nails, potentially impacting the longevity and finish. The top coat is equally essential for sealing the color effectively.
- Durability Variability: The overall longevity and chip-resistance of this manicure largely depend on the quality of the base and top coats used, and how thoroughly the color is sealed. It might not offer the same extended wear as some professional gel or long-wear polishes.
Expert Tips for Achieving a Flawless DIY Spray Manicure Finish
To maximize your chances of achieving the best possible results from your DIY spray manicure, consider incorporating these additional expert tips into your routine:
- Prioritize Ventilation: Always ensure you are working in a well-ventilated room to allow any fumes from the spray to dissipate quickly and safely.
- Moisturize Post-Manicure: After you’ve completed the washing process and removed all excess hair dye, apply a rich, hydrating hand moisturizer. This will replenish your skin and leave your hands feeling soft and smooth.
- Embrace Practice: Don’t be disheartened if your very first attempt isn’t absolutely flawless. Like mastering any new technique, a little practice and familiarity with the spray application will significantly help you refine your process and achieve increasingly perfect results.
- Experiment with Colors and Creativity: Temporary hair dyes are renowned for their wild and wonderfully diverse range of shades. Seize this opportunity to have fun experimenting with different colors, creating unique combinations, or matching your nails to specific moods or outfits.
- Consider a Peel-Off Base Coat: For an even simpler removal process when you’re ready for a fresh look, you could experiment with a peel-off base coat. While a regular base coat works perfectly for the application, a peel-off option might make the eventual change even quicker.
Watch and Learn: Your Essential Visual Guide
For a hack as uniquely innovative as this, seeing truly is believing! While this article provides a comprehensive written guide, supplementing your understanding with a visual tutorial can significantly enhance your grasp of the technique. Many dedicated beauty enthusiasts and content creators have shared their experiences and detailed demonstrations of this method online. We highly recommend searching for a step-by-step video tutorial, similar to the one originally referenced by Hello Maphie, to visually observe the precise spraying technique, gauge the drying times, and witness the satisfyingly effortless clean-up process. A visual demonstration offers invaluable insights that can boost your confidence and prepare you thoroughly before you embark on your own DIY spray manicure journey.
Final Thoughts: Embrace the Future of Fast and Affordable Manicures
This ingenious DIY spray manicure, leveraging the surprising utility of temporary hair dye, is far more than just a fleeting beauty trend; it stands as a powerful testament to human creativity and resourcefulness within the ever-evolving beauty world. It presents a compelling, accessible, and highly effective alternative to prohibitively expensive commercial products and time-consuming traditional nail care methods. It unequivocally proves that achieving stunning, perfectly polished nails does not require a significant financial investment or a lengthy, tedious commitment of time. If you are someone who cherishes the look of manicured nails but consistently dreads the process of achieving them, then this revolutionary hack is truly tailor-made for you.
So, do yourself a favor: procure a can of temporary hair color in your favorite shade, gather your trusty base and top coats, and prepare to fundamentally revolutionize your personal nail care routine. You might just discover that this innovative method becomes your new go-to for achieving impeccable nails. Say a definitive goodbye to frustrating smudges and uneven application, and wholeheartedly embrace perfectly colored nails in record time, all for the incredible, budget-friendly price of just a few dollars. Don’t simply take our word for it – dare to try it yourself and witness the transformative magic unfold right at your own fingertips!