
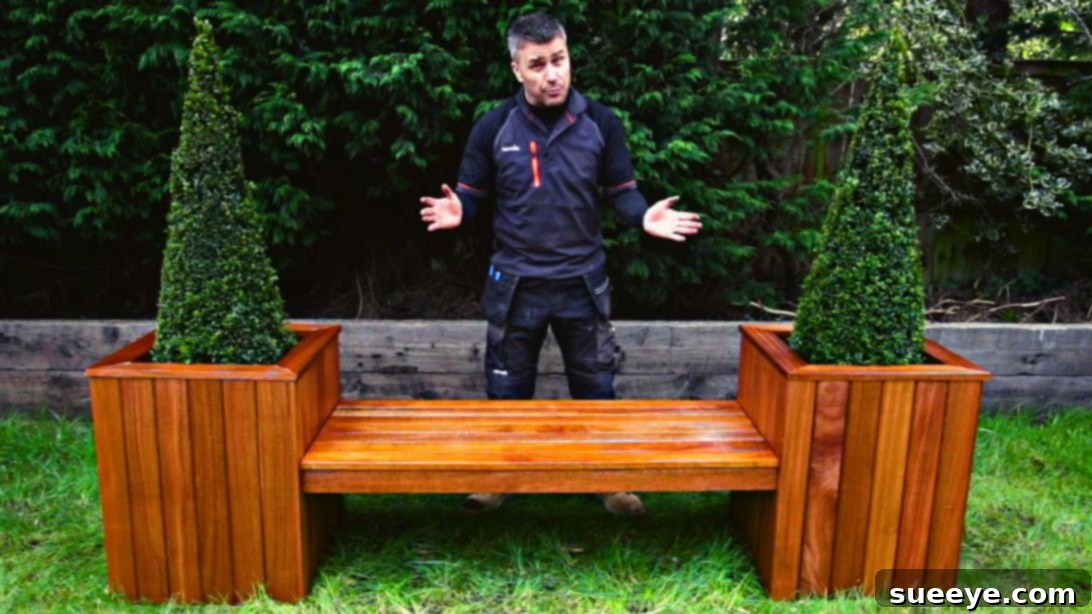
How To Build A Garden Bench With Planters
Elevate your garden or patio with a charming and highly functional outdoor bench, cleverly integrated with planter boxes. This fantastic DIY project, inspired by the clear tutorial from Silverline Tools on YouTube, provides a perfect blend of seating and greenery. Ideal for beginners and seasoned DIY enthusiasts alike, this guide walks you through the process of constructing a durable and aesthetically pleasing piece of outdoor furniture. Imagine relaxing on your custom-built bench, surrounded by vibrant flowers or fragrant herbs thriving in the attached planters. This project is not only rewarding to build but also an excellent way to maximize your outdoor space, creating a focal point that is both practical and beautiful.
Our comprehensive instructions aim to make this woodworking endeavor as smooth as possible. We’ve refined the steps for clarity, removed any unnecessary jargon, and focused on using simple language to ensure a straightforward building experience. By following this guide, you’ll gain the confidence to create a stunning garden bench with built-in planters that will serve as a cherished addition to your outdoor living area for years to come. Let’s gather your tools and materials, and get ready to bring your vision to life!
Why Build an Outdoor Bench with Integrated Planters?
Creating your own garden bench with integrated planters offers a multitude of benefits that extend beyond mere aesthetics. Firstly, it’s a brilliant space-saving solution, especially for smaller patios or balconies, as it combines two essential outdoor elements into one cohesive unit. You get comfortable seating without sacrificing valuable ground space for separate planters. Secondly, it allows for unparalleled customization. You can choose the exact dimensions to fit your area perfectly, select your preferred wood type, and even personalize the finish with paints or stains to match your existing outdoor décor.
Furthermore, this DIY project provides a deeply satisfying sense of accomplishment. There’s a unique pride that comes with furnishing your home with something you’ve crafted yourself. It’s also an eco-friendly option, as you can source sustainable lumber and ensure the quality of materials used. The planters offer a fantastic opportunity to add a burst of color with seasonal flowers, grow fresh herbs right at arm’s reach, or cultivate small vegetables, enhancing your connection to nature. This garden bench isn’t just a piece of furniture; it’s an invitation to enjoy your outdoor sanctuary more fully, offering a serene spot for relaxation and enjoyment.
Essential Materials and Tools:
Before embarking on your woodworking journey, ensure you have all the necessary materials and tools at hand. Having everything organized will streamline the building process and make it much more enjoyable.
- Miter Saw: Essential for making precise and accurate cuts at various angles, crucial for the structural integrity of your bench and planters.
- Ruler or Tape Measure: For precise measurements of all lumber pieces. Accuracy is key in woodworking.
- Cordless Drill/Driver: To pre-drill holes and drive screws efficiently. A good quality drill will make fastening much easier.
- Pencil: For marking cut lines and screw placement.
- Wood Screws: Exterior-grade screws are recommended for durability and resistance to rust in outdoor conditions.
- Wood Glue: Provides extra strength and stability to your joints, ensuring a long-lasting structure. Use with a caulk gun for easy application.
- Hammer: Useful for tapping pieces into place or securing nails if preferred for certain parts, though screws are primary fasteners here.
- Spirit Level: To ensure all surfaces are plumb and level, resulting in a professional-looking and stable final product.
- 2×2 Lumber: Primarily for the internal framing of your planter boxes.
- 2×3 Lumber: For additional structural support within the frames and possibly for the bench seat frame.
- Hardwood Planks (or Treated Softwood): For the cladding of the planter boxes and the slats of the bench seat. Choose a wood type suitable for outdoor use, such as cedar, redwood, treated pine, or a durable hardwood.
Pro Tip: When selecting lumber, look for straight, knot-free pieces that are free from warping or splitting. This will make your construction much easier and result in a stronger, more attractive finished product. Always wear appropriate safety gear, including eye protection and gloves, when using power tools.
Step-by-Step Directions: Building Your Outdoor Bench with Planters
Follow these detailed steps carefully to construct your beautiful and functional garden bench with integrated planter boxes.
Step 1: Constructing the Planter Boxes
The foundation of your project begins with building two sturdy planter boxes. Each box will be composed of four identical frames that are then joined together. Start by preparing your 2×2 lumber. For one planter box, you’ll need two pieces cut to approximately 650mm (25.5 inches) tall and two pieces cut to 500mm (19.6 inches) wide. These will form one side frame. Lay out the two longer pieces parallel to each other. Position the two shorter pieces horizontally between them, one at the top and one at the bottom, creating a rectangular frame. Before securing, apply a generous amount of wood glue to all contact surfaces, then use your drill to pre-drill pilot holes and drive screws to firmly fasten them together. This combination of glue and screws ensures maximum strength and durability for outdoor conditions.
To enhance the stability of this initial frame, cut a piece of 2×3 lumber and attach it horizontally across the center of the frame, again using glue and screws. This central support will prevent bowing and add rigidity. Now, you need to create a slightly narrower version of this frame: two 650mm (25.5 inches) tall pieces and two 400mm (15.7 inches) wide pieces. Assemble this smaller frame in the same manner, with a central 2×3 support. In total, you’ll need two of the wider frames (500mm width) and two of the narrower frames (400mm width) for a single planter box. Once all four frames are complete, arrange them to form a box shape – the two wider frames opposite each other, and the two narrower frames connecting them. Apply wood glue to all joining edges, then screw them together securely at all corners to create a robust, open-topped planter box. Repeat this entire process to construct your second identical planter box.
Step 2: Building the Bench Seat and Assembling the Unit
With your two planter boxes constructed, it’s time to create the connecting bench seat and bring the whole unit together. First, decide on the desired length of your bench seat, which will also dictate the distance between your two planter boxes. Measure this gap precisely. Cut three pieces of 2×3 lumber to this exact length. These will serve as the main support beams for your bench seat. Lay these three pieces out parallel to each other, ensuring they are evenly spaced. To create a stable frame for the seat, cut two shorter wood pieces and attach them horizontally across the ends of these three beams, using glue and screws. For additional stability, especially for a longer bench, you may wish to add more small pieces of wood in between the gaps, acting as cross-braces, further reinforcing the seat frame.
Next, focus on cladding the exterior of your planter boxes. Cut hardwood planks (or your chosen exterior-grade wood) to the height of your boxes. Attach these planks vertically or horizontally around all four sides of both planter boxes, creating a finished, attractive exterior. Ensure the planks are evenly spaced and securely fastened with exterior screws, leaving small gaps for drainage if desired. To give your planters a polished look, cut four pieces of hardwood to create a top trim for each box. These pieces should be slightly wider than the box edges, forming a small overhang. Glue and screw these trim pieces around the top perimeter of each planter box, mitering the corners for a clean, professional finish.
Now, prepare the slats for the bench seat itself. Cut several hardwood pieces to the same length as your bench seat frame. Begin by attaching a slat to each end of the bench seat frame, flush with the outer edges. Then, proceed to fill the remaining gap in the middle with the rest of your cut slats, ensuring they are evenly spaced for both comfort and aesthetics. Use glue and screws for each slat to ensure a durable seating surface. Finally, it’s time for the grand assembly. Position your two clad planter boxes in their desired location. Carefully lift the completed bench seat structure and place it precisely between the two planter boxes. Ensure the height aligns perfectly. Apply generous amounts of wood glue to the ends of the bench seat frame where it will meet the planter boxes. Then, securely screw the bench seat into the interior frame of each planter box, making sure the screws are long enough to provide a strong connection without protruding through the exterior cladding. Use a spirit level one last time to confirm everything is level and stable. Congratulations, your beautiful and functional garden bench with planters is complete!
Tips for Success and Customization
To ensure your DIY garden bench with planters not only looks great but also stands the test of time, consider these additional tips:
- Wood Treatment: For maximum longevity, especially if using softwood like pine, treat all wood with a good quality exterior wood preservative or sealant before assembly. This will protect against rot, insects, and moisture damage.
- Drainage: For the planter boxes, it’s crucial to add drainage holes to the bottom to prevent waterlogging and root rot. You can also line the inside with a durable landscape fabric before adding soil to keep the soil contained while allowing water to pass through.
- Finishing Touches: Once assembled, consider sanding any rough edges and applying an outdoor-grade paint or stain. A weather-resistant finish will not only enhance its appearance but also provide an extra layer of protection against the elements. Choose colors that complement your garden’s aesthetic.
- Personalization: Get creative with your planters! You can add hooks for gardening tools, install small lights for evening ambiance, or even incorporate decorative stencils on the wood. Consider adding comfortable outdoor cushions to the bench for enhanced seating comfort.
- Material Choices: While the tutorial suggests specific dimensions, you can adjust these to fit your space. Experiment with different types of weather-resistant wood, such as recycled composite decking for the slats, for varying aesthetics and maintenance requirements.
Maintenance and Care for Your Outdoor Bench
To keep your newly built garden bench looking its best and serving you for many years, regular maintenance is important. Annually, inspect the bench for any signs of wear, loose screws, or damaged wood. Tighten any fasteners as needed. Reapply a fresh coat of sealant, stain, or paint every 1-3 years, depending on your climate and the product used, to protect the wood from UV damage and moisture. Keep the planters clean of debris and ensure drainage holes remain clear. During harsh winter months, especially in regions with heavy snow or prolonged freezing temperatures, consider covering the bench or moving smaller versions to a sheltered area to prolong its lifespan.
Conclusion
Building your own garden bench with integrated planters is a rewarding project that adds both beauty and functionality to any outdoor space. By following these detailed steps, even a beginner can achieve professional-looking results. You’ve not only created a comfortable seating area but also a vibrant home for your favorite plants, all in one stylish unit. Enjoy countless hours relaxing on your custom-built bench, surrounded by the natural beauty of your garden. This project truly transforms an ordinary patio or garden into an inviting oasis, demonstrating that with a little effort and the right guidance, you can craft truly impressive pieces for your home.