Furniture
27 DIY Outdoor Furniture Ideas to Build This Year
DIY outdoor furniture ideas for the backyard: 27 benches, sofas, tables, loungers, bars and swings you can build with basic tools and cheap lumber.
Outdoor furniture is priced as though it will last forever and then falls apart in two summers, which is the best argument there is for building your own. These 27 DIY outdoor furniture ideas cover the whole yard: cedar sofas and loveseats built from 2x4s, dining tables with free downloadable plans, a bench that goes together with glue and no screws at all, a side table with an ice bucket sunk into the top, a hammock stand you can put up in an afternoon, a hose holder with a planter on the lid and a cabana big enough to sleep in. Most of them run on a miter saw, a drill and a pocket hole jig. Several come in under fifty dollars in lumber.
1. $80 DIY Outdoor Lounge Chair
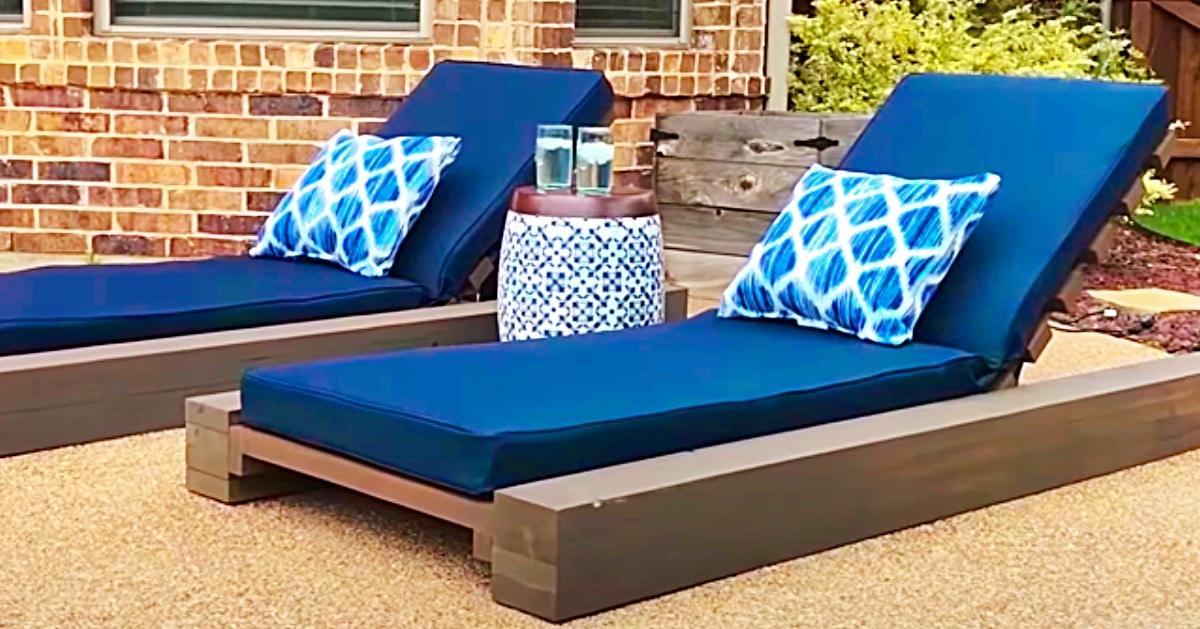
A pair of chaise loungers with adjustable backs, built from downloadable free plans so all the measurements and cut lengths come ready worked out. Materials are wood, screws, hinges, stain or varnish and cushions, and the plans price the whole thing under a hundred dollars at a big box store. The hinges are what let the back rack up and down, which is the difference between a lounger and a low bench. It is a genuinely good first furniture build because the plan does the thinking, and painting or staining is where you make it your own.
Get the full tutorial at Sueeye.
2. Outdoor Storage Ottoman
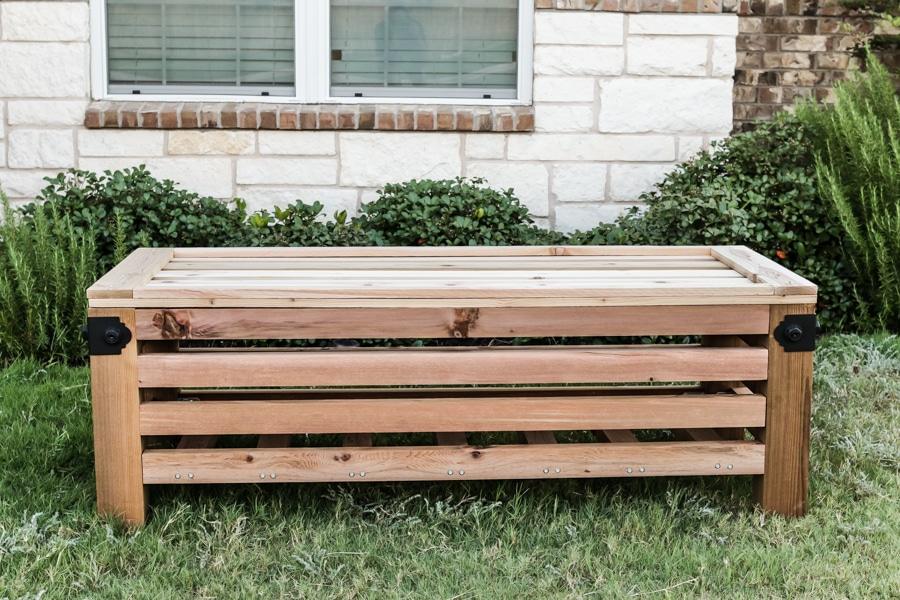
One box that works as a footrest, a coffee table and the place the cushions live over winter, which is more than most single pieces of outdoor furniture manage. It is built from rough cut cedar, chosen because cedar resists rot without treatment, and assembled with black powder coated 90 degree connectors and structural screws rather than hidden joinery, so the hardware becomes the look. The lid lifts straight off. One thing worth catching before you cut: the bottom slats want to be a full twenty and a half inches, since twenty and a quarter leaves them short. Seal it with an exterior deck stain.
Get the full tutorial at Jen Woodhouse.
3. DIY Pallet Sectional For Outdoor
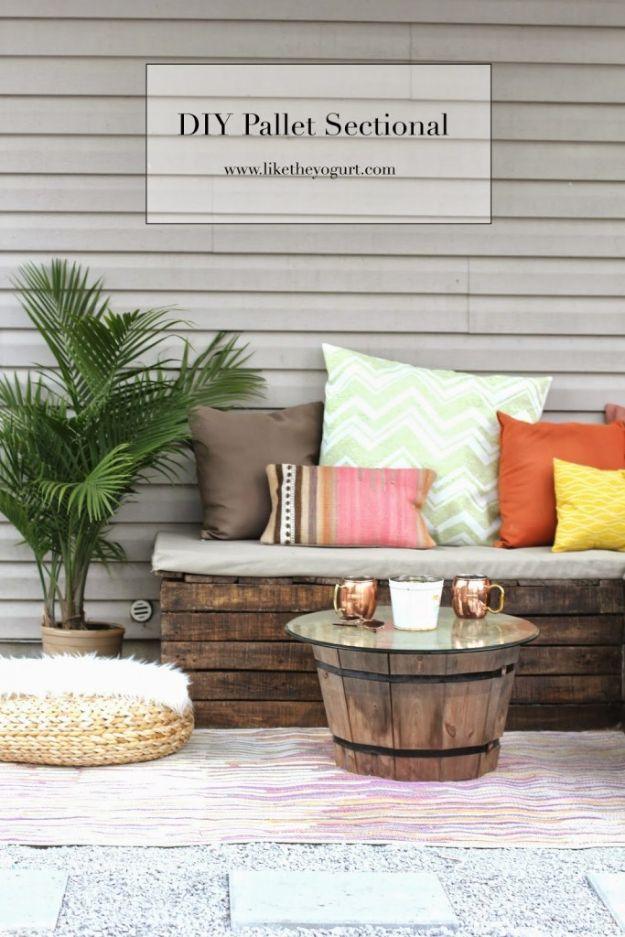
Stacked pallets make the base, and the part most people skip is what turns it into furniture: hinges on the top pallet so the seat lifts and the space underneath becomes storage. Once the frame is stable, custom cushions do the rest. The maker’s own sizing is a useful shortcut, a seventy inch length and a forty eight inch length of three inch foam covered in outdoor fabric. Fold the fabric over the foam, pin it, sew as close to the foam as you can get and trim, then run liquid stitch along the seam and a fray preventative over it.
Get the full tutorial at Like The Yogurt.
4. DIY Modern Outdoor Sofa
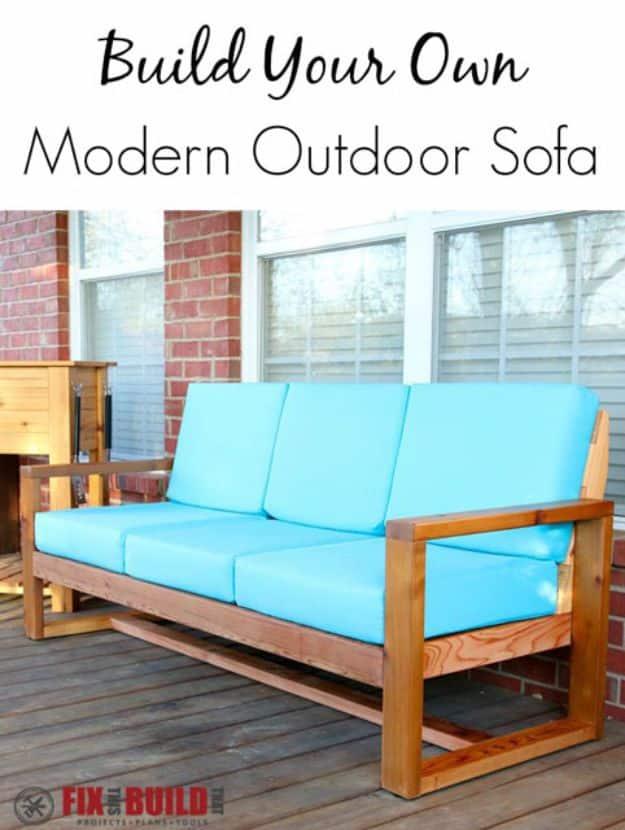
This is the build to attempt if you want something that looks bought. It is all cedar, seven eight foot 2x4s plus 1x4s for the slats, joined with exterior rated screws and finished in outdoor spar urethane with rubber feet underneath. The detail that lifts it is the plugs: drill oversized holes in the armrest tops, drive the screws down inside them, then glue cedar plugs in proud and sand them flush so the fasteners disappear into matching grain. The 69 inch base stretcher that links the two sides started as a design flourish and ended up carrying the stability.
Get the full tutorial at Fix This Build That.
5. Industrial Wood and Steel Console
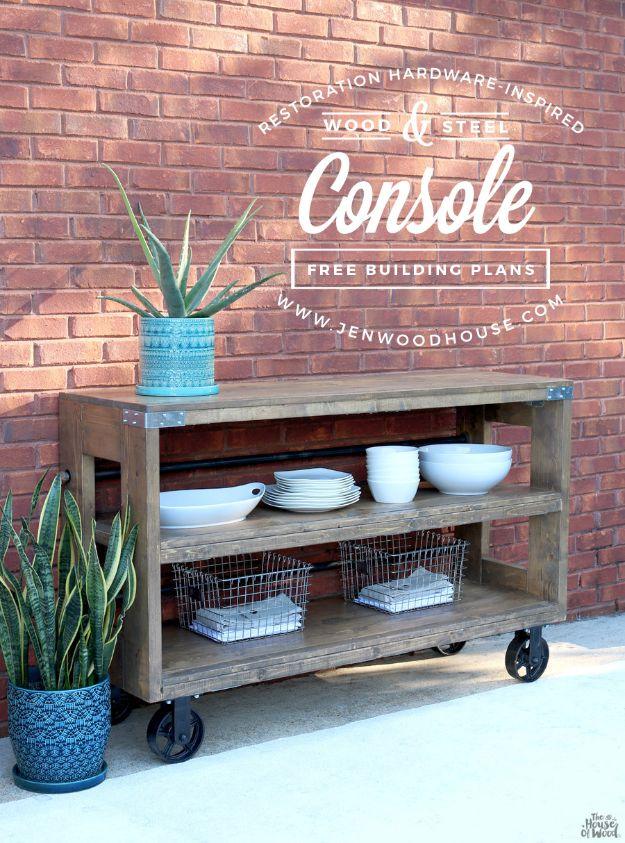
A rolling console for the patio that started life as a much more expensive showroom piece. The frame is standard dimensional lumber, 2x4s and 2x2s with 1×6 planks for the top and shelves, joined with rigid tie connectors, gusset angles and wafer head screws rather than fussy joinery. Six inch steel casters carry it, three quarter inch steel pipe with end caps runs through as the industrial detail, and carriage bolts and locking nuts hold it together. Wood filler in the countersunk holes, then a dark stain. The whole build comes in around two hundred and sixty dollars.
Get the full tutorial at Jen Woodhouse.
6. DIY Outdoor Loveseat Seating
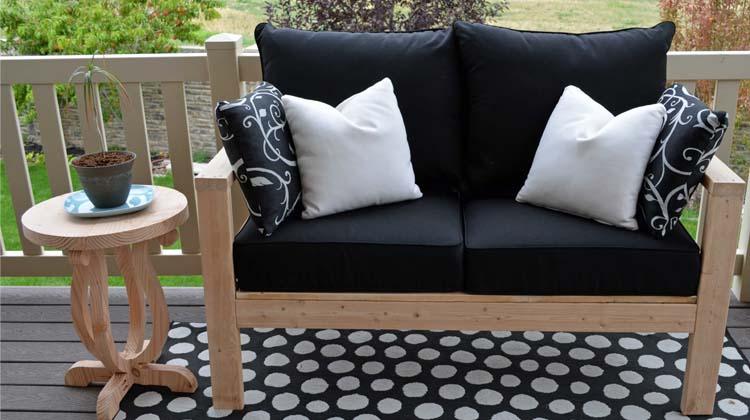
Built almost entirely from 2x4s, which is why the wood comes in around twenty four dollars. The joinery is pocket holes and self tapping screws with wood glue throughout, and the cut list is short enough to read in one go. One change worth copying: the maker swapped the seat slats from 2x4s to 1x4s after sitting on the original at a show, because thinner slats flex a little and a rigid bench does not. She also added a board to raise the back support once thicker cushions went on. Seal it with a water sealer once the glue is dry.
Get the full tutorial at Her Tool Belt.
7. DIY Pallet Outdoor Coffee Table
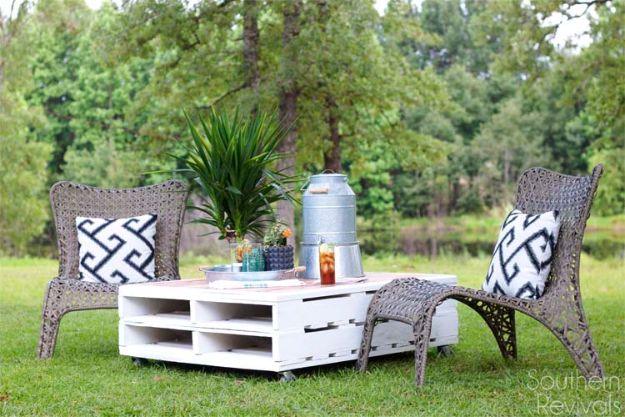
A painted pallet base with a cedar planked top, and the top is what makes it look deliberate rather than thrifty. Lay the planks out dry first and fit them together like a puzzle before any glue goes down, trimming ends only where you have to. Then slide long strips of wood underneath the whole arrangement so you can move it off the work surface in one piece, glue the base, and slide the planking back into position instead of relaying every plank. Spray the pallet rather than brushing it, and seal the cedar with tung oil.
Get the full tutorial at Southern Revivals.
8. DIY Farmhouse Patio Table
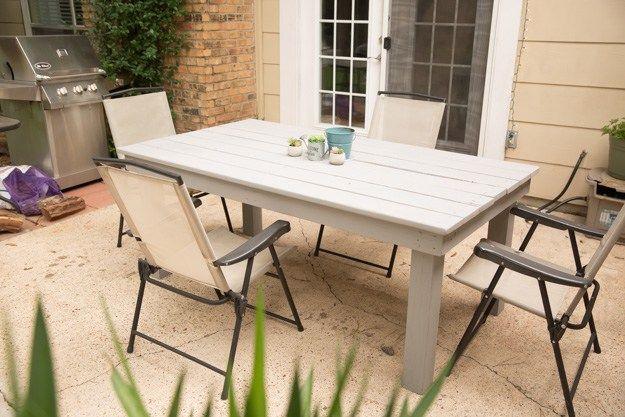
A plain rectangular farmhouse table finished in a soft whitewash, which is the right call outdoors because a pale finish does not scorch the way a dark stain does in full sun. The build is the simplest table there is: four square legs, an apron joining them, and a top of wide boards laid with a slight gap so rain drains through instead of sitting in a puddle. Use pocket screws driven up through the apron into the top so the fixings stay hidden, and prime every face including the undersides before the color coat goes on.
Get the full tutorial at positivelybeautifullifeblog.
9. DIY End Table with Built-In Planter or Ice Bucket
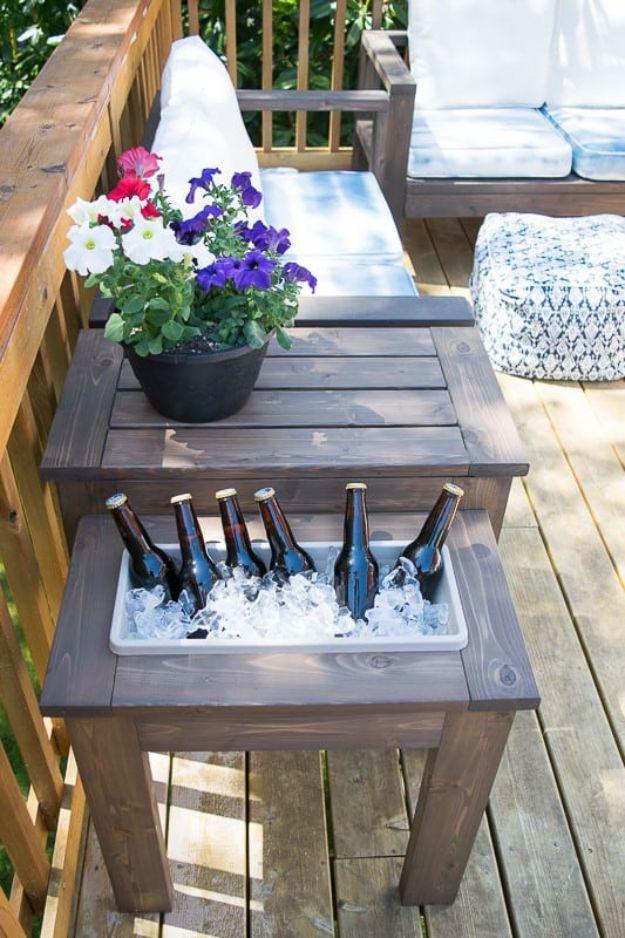
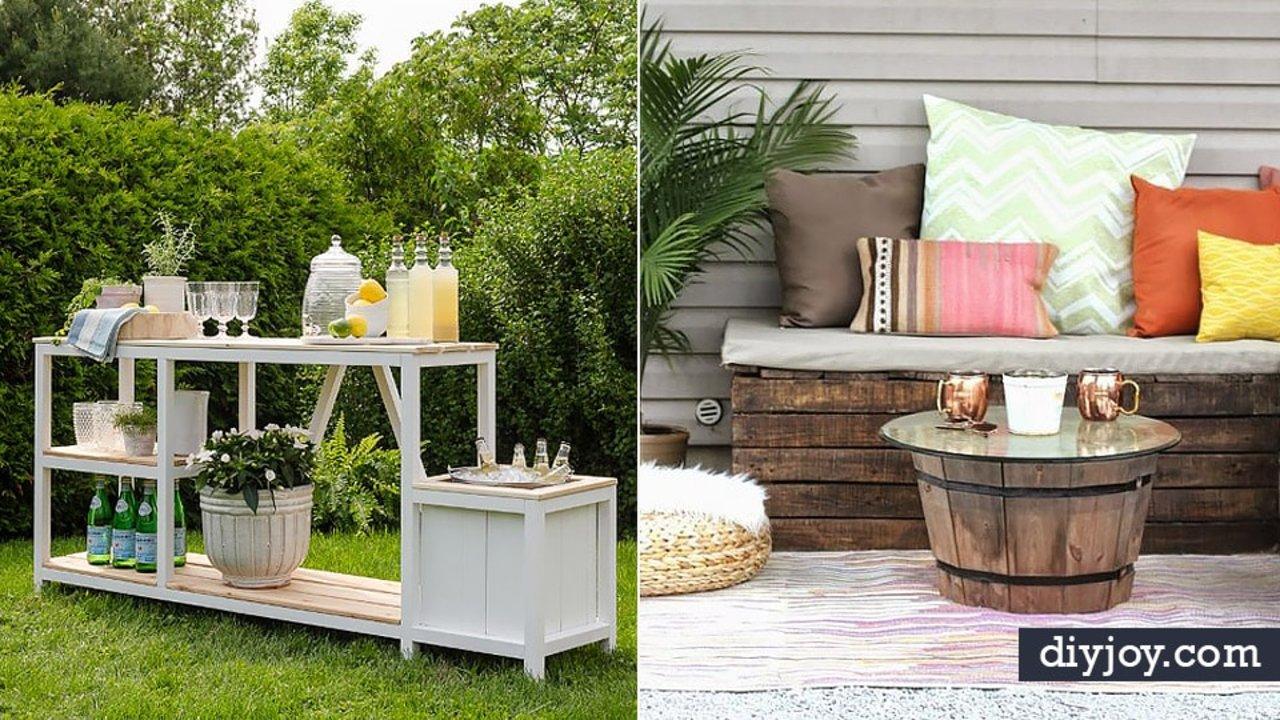
Two tiers of cedar with a recess in one top, so the same table holds flowers most of the year and a bucket of iced drinks when people come over. Everything is cedar, two 1x4s and three 2x4s at eight feet, joined with pocket holes throughout using exterior screws. The top slats go on with a quarter inch gap between them, and the planter side leaves a wider gap in the middle for the lip of an eighteen inch plastic planter box to rest on. Buy two boxes if you plan to swap flowers for ice, unless you enjoy dirt in your drinks.
Get the full tutorial at The Handyman's Daughter.
10. Modern DIY Outdoor Bench
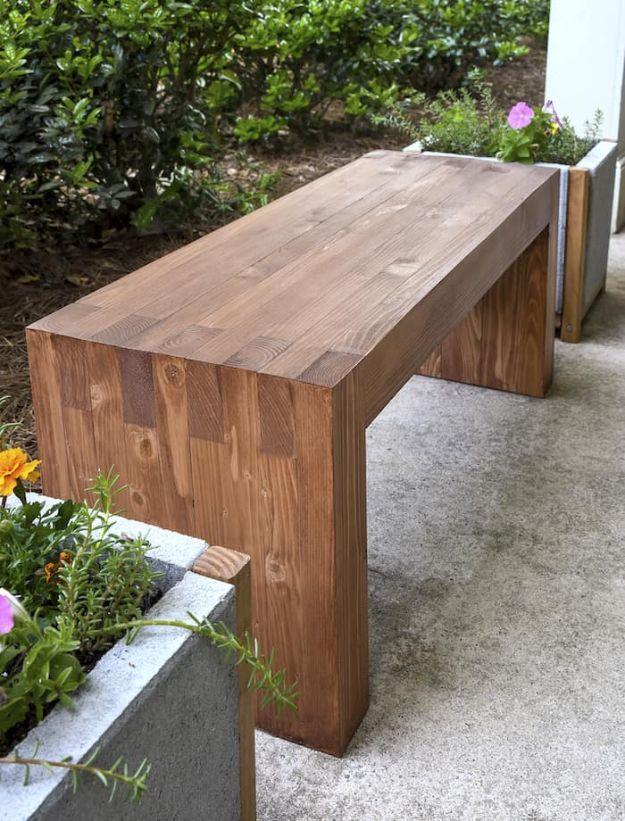
No screws and no nails anywhere in this one, which is why it looks the way it does. It is built from regular pine 2x4s milled square on the edges with a table saw, because losing the factory rounded edge is what makes a cheap board read as modern. The pieces interlock in a modified box joint, long piece then short piece alternating, glued and clamped overnight. Then belt sand everything flush, stain, seal and add furniture feet. Finished size is sixteen inches high by forty long by thirteen and a half deep, and around fifty dollars in wood.
Get the full tutorial at DIY Candy.
11. DIY Outdoor Dining Table
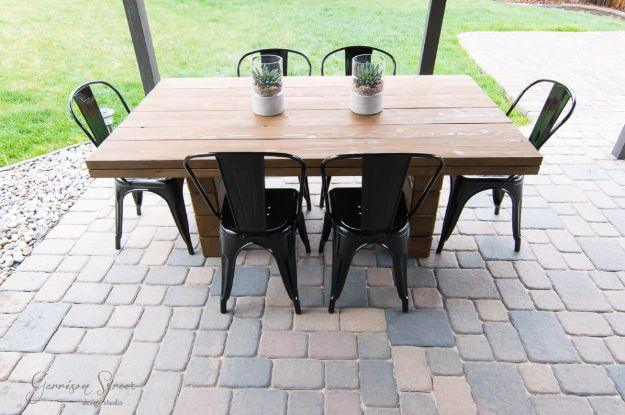
Chunky 6×6 legs under a plank top, which is the shortcut to a table that looks like it cost several thousand dollars. The legs are cut to twenty inches and stacked, screwed together from underneath through holes bored halfway into each layer with a spade bit so nothing shows on top, and the finished table runs seventy inches by forty. No special exterior grade wood was used here; it is ordinary lumber stained and sealed with an outdoor deck stain. That is a fair trade in a dry climate and a risk in a wet one, so reseal it yearly and cover the top over winter.
Get the full tutorial at Garrison Street Design Studio.
12. Outdoor Convertible Coffee Table and Bench
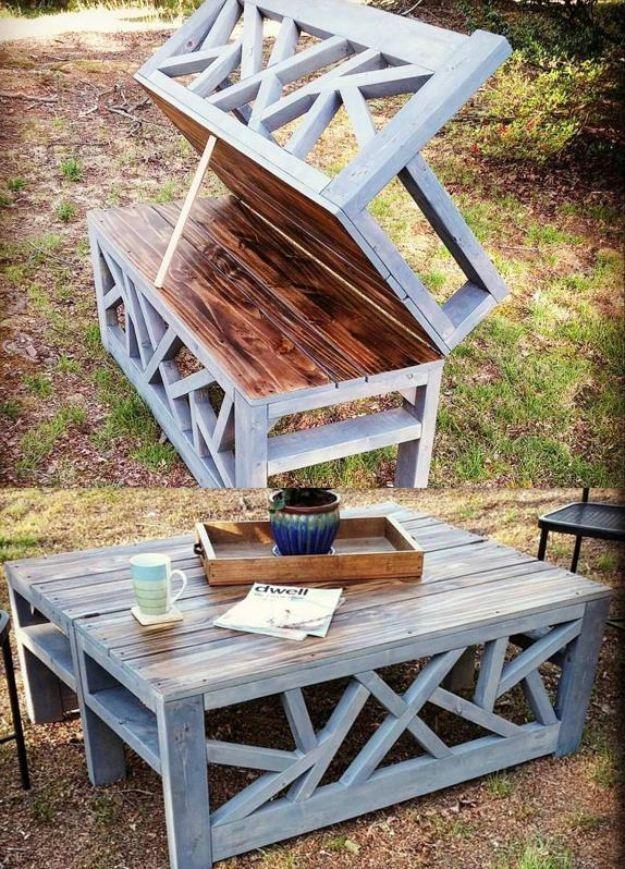
One piece that flips from a bench with a back into a flat coffee table, which is worth the extra joinery if the space has to do two jobs. It runs on 2x4s with 1x8s and a 1×3 for the top surface, all joined with a pocket hole jig on the inch and a half setting using two and a half inch pocket screws and glue. The seat boards sit a quarter inch apart and the back inset three quarters of an inch. Take the time to get the two halves identical, since anything out of square shows the moment it is folded over.
Get the full tutorial at Handmade Haven.
13. Wraparound Corner Deck Bench
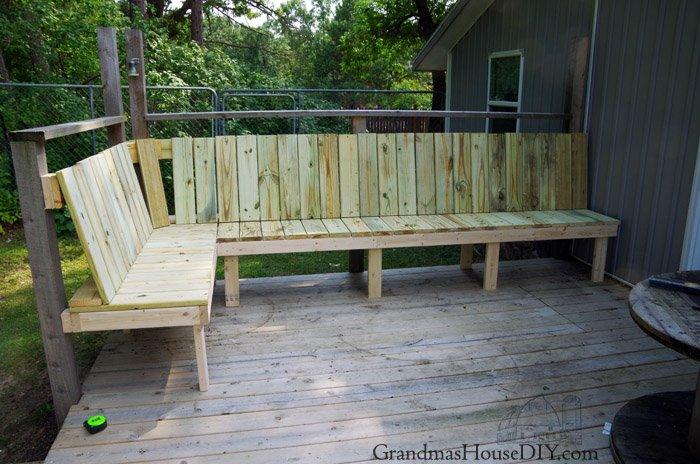
Built in seating along two sides of a deck corner, which gains you a lot of seats without a single chair taking up floor space. The structure is a simple ladder frame of uprights and rails fixed back to the deck rail posts, with slats laid across the top for the seat and run vertically for the backrest. Build the long run first and let the short return meet it, because getting the corner tidy is easier when only one joint has to be fitted. Leave gaps between the seat slats so rain drains straight through.
Get the full tutorial at Grandma's House DIY.
14. DIY X-Stool or Table
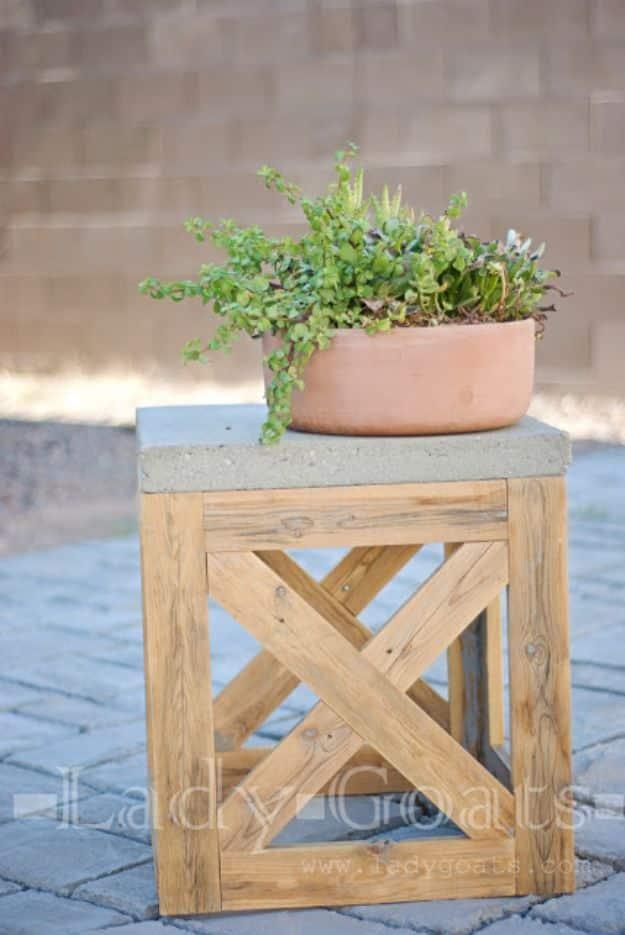
A small open frame stool with an X on two opposing sides, topped with a seventeen inch concrete paver, which is what makes it read as far more expensive than it is. The shopping list is three 1x3s at eight feet, one 1×2 at six feet, pocket hole screws, outdoor glue and the top. Two plain sides and two X sides, assembled by screwing through the face of the X sides into the plain ones. Bed the slab down with a line of clear silicone around the perimeter rather than leaving it loose, and check the cut list carefully since the maker revised it.
Get the full tutorial at Lady Goats.
15. Hammock Chair DIY
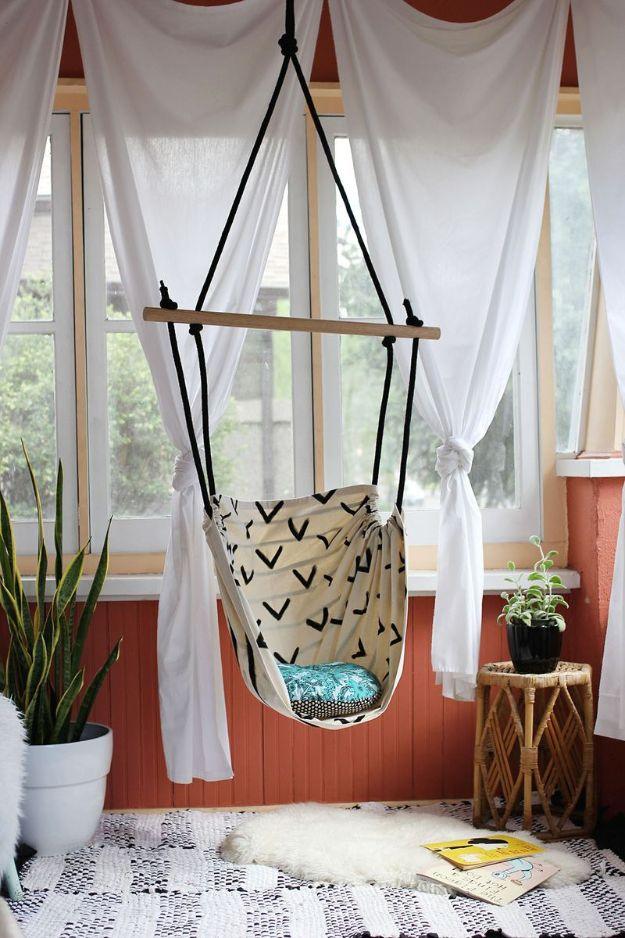
A hanging chair made from one length of heavy canvas or duck cloth with a wooden dowel through a channel at each end, the top spreader holding the seat open and the lower edge falling into the pouch you sit in. Rope runs from the ends of the top dowel to a single hanging point. Two things carry the safety of this build: the fabric has to be a heavy upholstery weight rather than a quilting cotton, and the hanging point has to be a ceiling joist or a proper beam, never plasterboard. Add a floor cushion in the base.
Get the full tutorial at A Beautiful Mess.
16. DIY Plant Stands
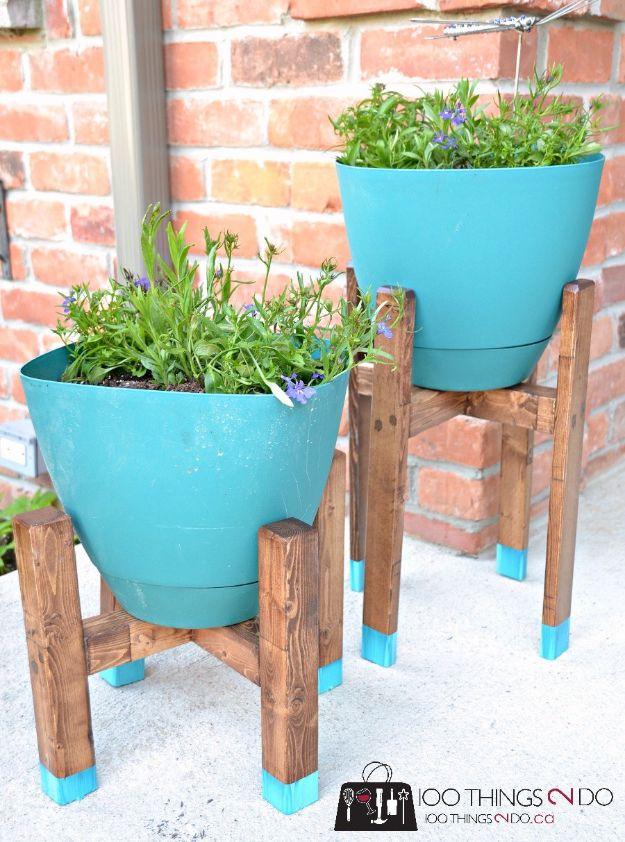
Mid century plant stands from 2x2s, built to carry a pot rather than to be one. Measure the widest part of your pot by standing a board either side of it and measuring the gap, then take that number, subtract an inch and a half and halve it to get your short pieces. Fill the screw holes, sand everything and bevel the leg tops slightly with the sander itself. Stain rather than paint so the plants stay the focal point, and dip the leg bottoms in a can of paint for color. Prop the legs up to dry or the paint pools into a gloppy foot.
Get the full tutorial at 100 Things 2 Do.
17. DIY Outdoor Benches Using Cinder Blocks and an Old Headboard
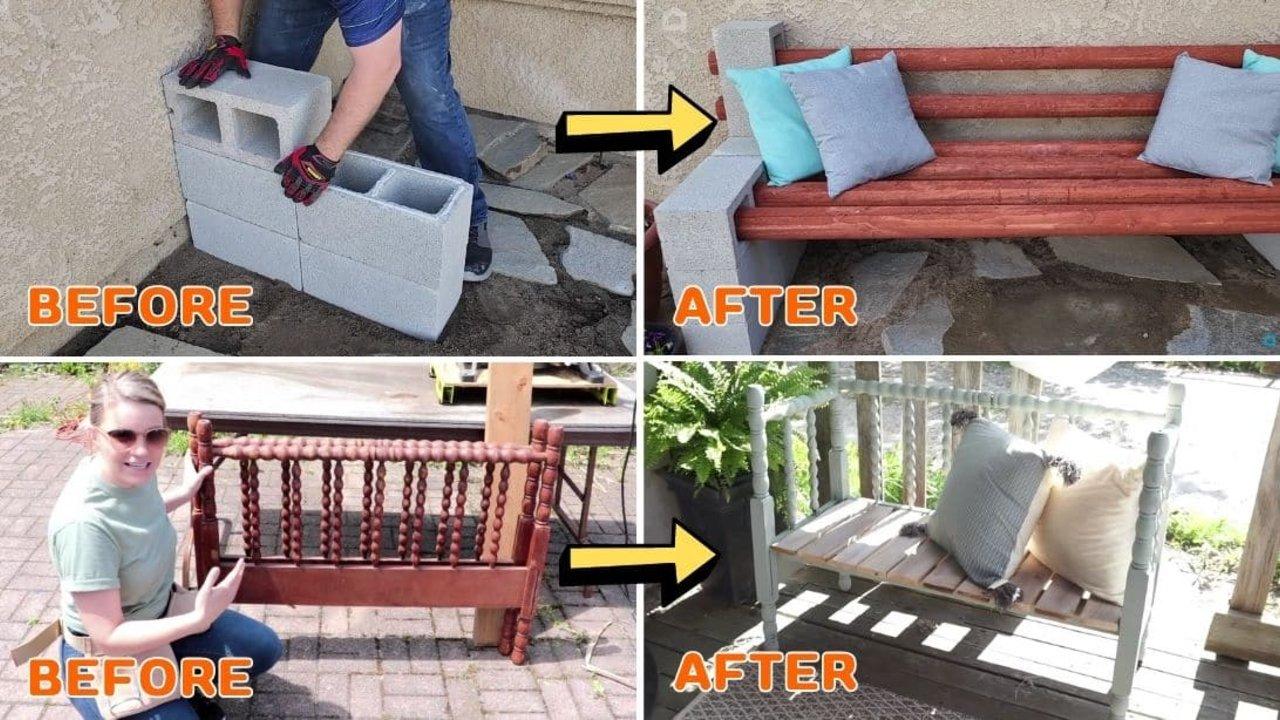
Two repurposed benches, and the cinder block one is the fastest seat in this whole roundup. Stack two blocks flat, glue another pair beside them with all purpose construction adhesive, repeat on the far side, then lay a block on top of each pair with the holes facing sideways and thread stained timbers through. Nothing is cut. The second bench turns a cot headboard and footboard into a settle: cut the footboard down the middle with a jigsaw for the two sides, pilot drill, screw the sides to the headboard, then build a plank seat inside and paint the lot.
Get the full tutorial at Sueeye.
18. $125 Curved Fire Pit Bench
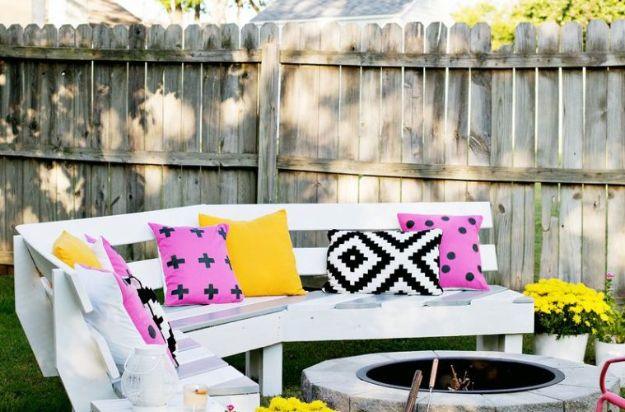
Straight benches around a round fire pit leave awkward gaps, which is the whole argument for a curved one. It is built as straight segments angled to follow the arc, from pressure treated lumber: 1x6s for the seats, 4x4s for the legs and 2x6s for the framing, with two and a half inch exterior screws and six inch lag bolts holding the back braces on. The maker worked to standard seating dimensions, eighteen inches deep, high and back, and cut the back braces to lean at twenty degrees. Painting it one color is what makes the run read as a single piece.
Get the full tutorial at A Beautiful Mess.
19. DIY Pallet Wood Hose Holder with Planter
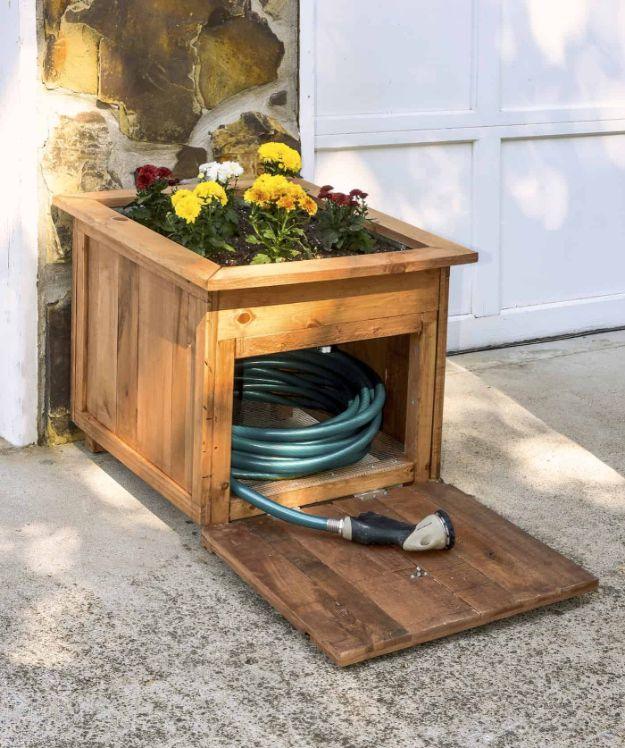
A box that hides the hose and grows flowers on the lid, which is a genuinely good use of a corner nobody wants to look at. Everything comes from two pallets planed down to about half an inch thick, and the one instruction worth obeying is the drying: let the planed wood sit somewhere dry for a few weeks before you build, because it will shrink and the maker learned that the hard way. Four panels at seventeen by twenty inches, a 2×2 internal skeleton, hardware cloth and landscaping fabric lining the planter box, and a hinged door at the front.
Get the full tutorial at DIY Candy.
20. DIY Concrete Side Table
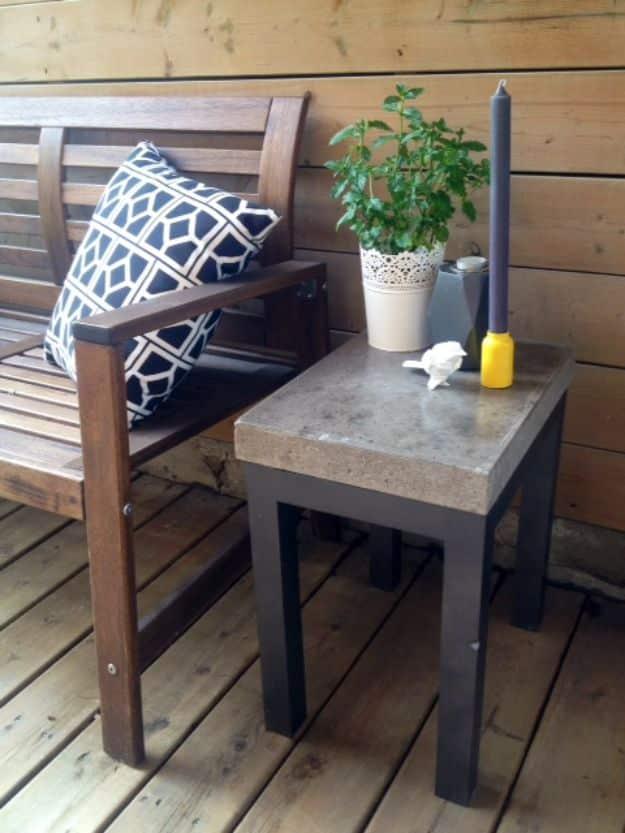
A poured concrete top on a slim painted frame, and the shortcut for anyone who does not want to pour: buy a prefab concrete patio stone from a builders merchant and flip it upside down so the raw side shows instead of the molded texture. The base here is one 2x2x10 of kiln dried pine, joined with two and a half inch pocket hole screws, primed and sprayed in a flat metallic soft iron so the wood reads as steel. Seal the concrete properly. Forty dollars all in, against more than a thousand for the showroom piece it copies.
Get the full tutorial at Storefront Life.
21. DIY Outdoor Loveseat and Sofa
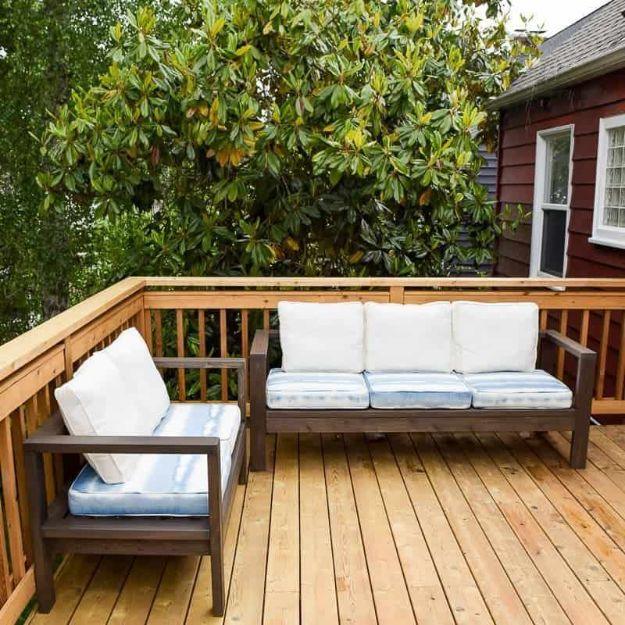
A matching sofa and loveseat in 2×4 cedar, which is the pair that actually furnishes a deck rather than decorating a corner of one. Cedar is the right call because it resists rot through a wet season, and pressure treated lumber is the substitute where cedar is hard to find; plain pine is not, unless the furniture is fully sheltered. Use pocket holes wherever the design allows and weather resistant coated screws throughout so nothing rusts. Two coats of a dark semitransparent exterior stain took longer than the building did. Buy cushions on winter clearance and ignore the print.
Get the full tutorial at The Handyman's Daughter.
22. Free-Standing Hammock Stand
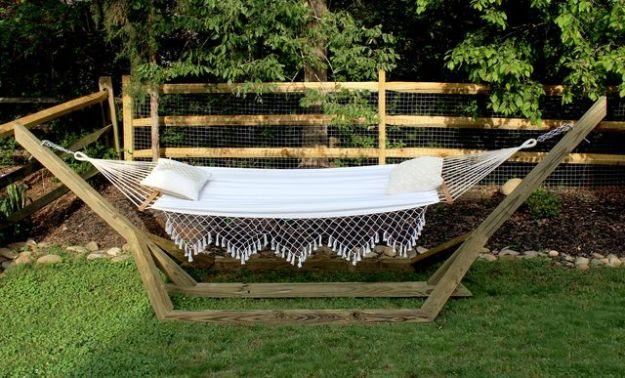
A hammock without two conveniently spaced trees, built from pressure treated posts and deck screws. Cut two six foot posts into four three foot pieces, then miter every end at forty five degrees using a scrap offcut as the template, with the cuts angling inward toward each other on the same face. Assemble it flat on the ground where it will live, since the finished frame is heavy enough that you will not want to move it. Four inch deck screws at every joint, then drill through each angled post about forty eight inches up and thread a half inch eye bolt with a washer and hex nut.
Get the full tutorial at Hunker.
23. DIY Outdoor Bar
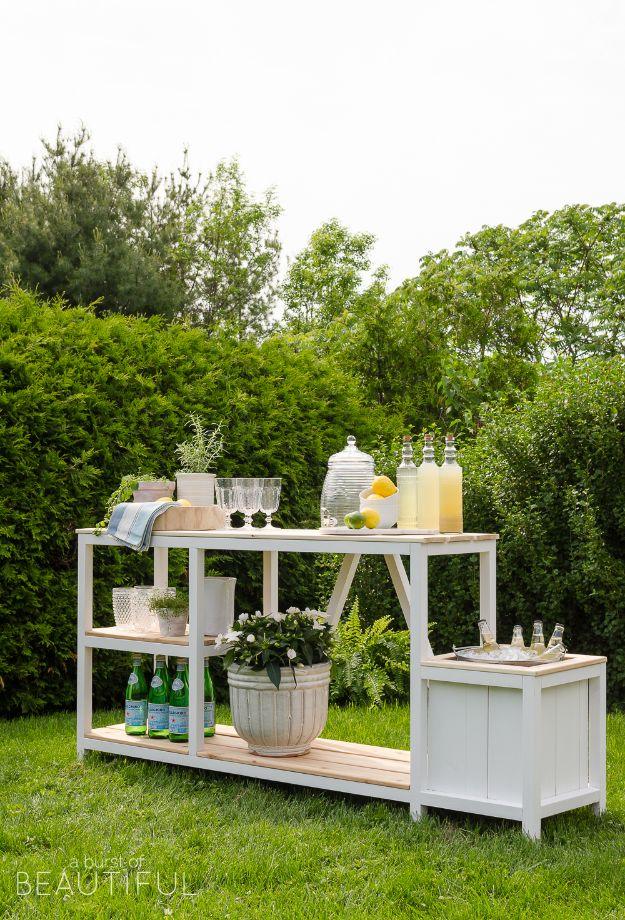
A long serving bar with open shelving underneath, a built in ice bucket at one end and a planter at the other, so it works as a drinks station in July and a potting bench in March. It is finished in white outdoor paint with the shelves left as natural cedar, and the choice of untreated cedar over pressure treated is deliberate: food and drinks are served off it and herbs are planted in it, so nothing with chemicals in it goes anywhere near. Overall dimensions run seventy four inches wide with the planter, sixteen and a half deep and thirty five and a half high.
Get the full tutorial at Nick and Alicia.
24. Outdoor Cabana
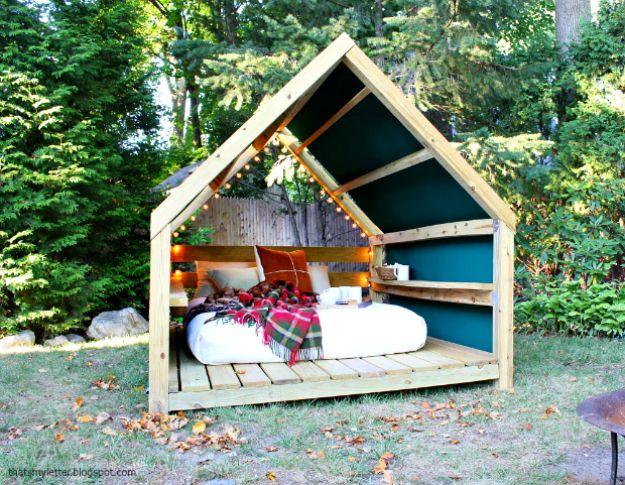
A gabled open sided cabana on a slatted deck floor, sized to take a daybed mattress, and the free plan is unusually complete. The shopping list runs six 4x4s, twelve 2x4s, sixteen 2x6s and two 2x8s, all at eight feet, with exterior decking screws, pocket hole screws, post connectors and pier blocks. Build the floor first and get it level in its final position before anything goes up, because you will not move it afterward. The leg tops and the gable pieces both get notched so the roof frame laps together at the peak rather than butting.
Get the full tutorial at Ana White.
25. DIY Potting Table
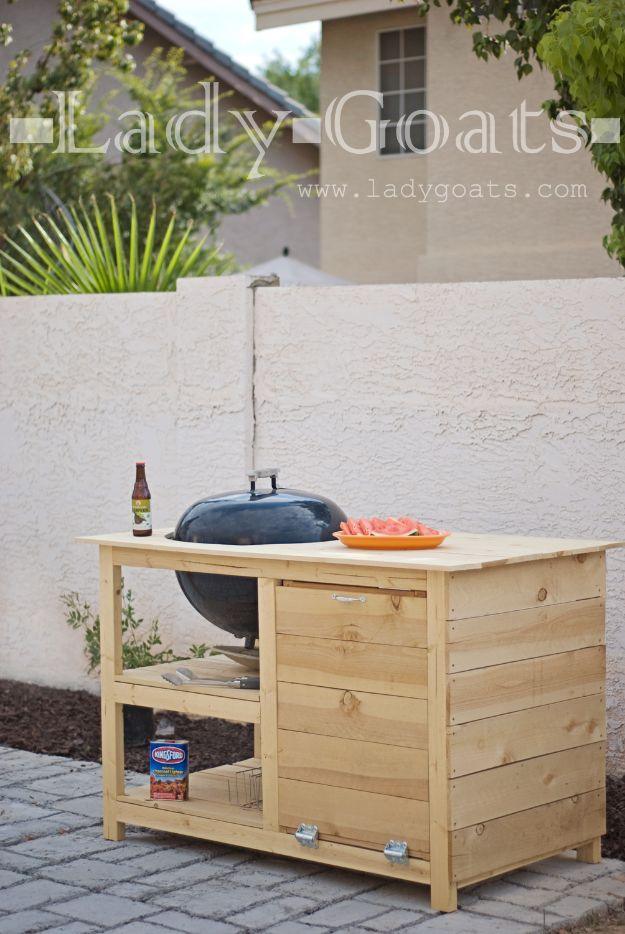
A cedar work table with an open shelf, a solid side and a tilt out bin, which is what makes it a potting bench rather than a table with legs. The bin is the whole idea: it swings out to hold soil while you work and shuts flat afterward. Cut the top opening to suit whatever you want dropped into it, whether that is a bag of compost, a tub or a kettle grill. The build runs on 2x3s and cedar fence pickets with pocket hole joinery throughout, finished at fifty six and a half inches wide by thirty deep and thirty three and a half high.
Get the full tutorial at Lady Goats.
26. Garden Slat Bench
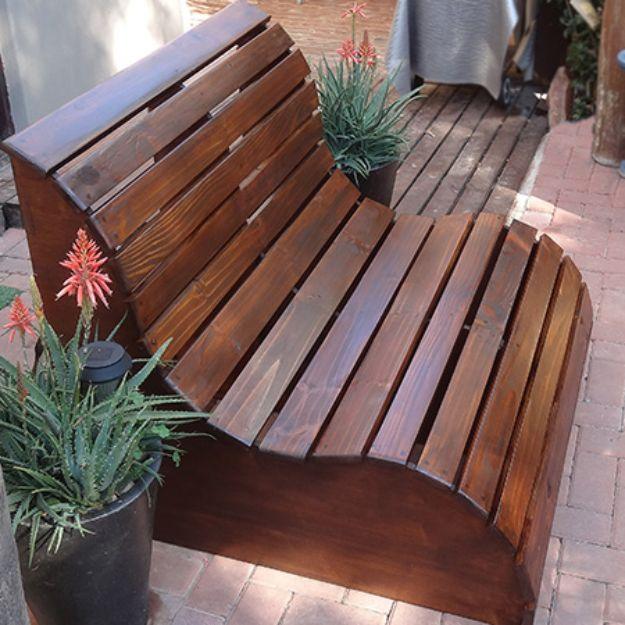
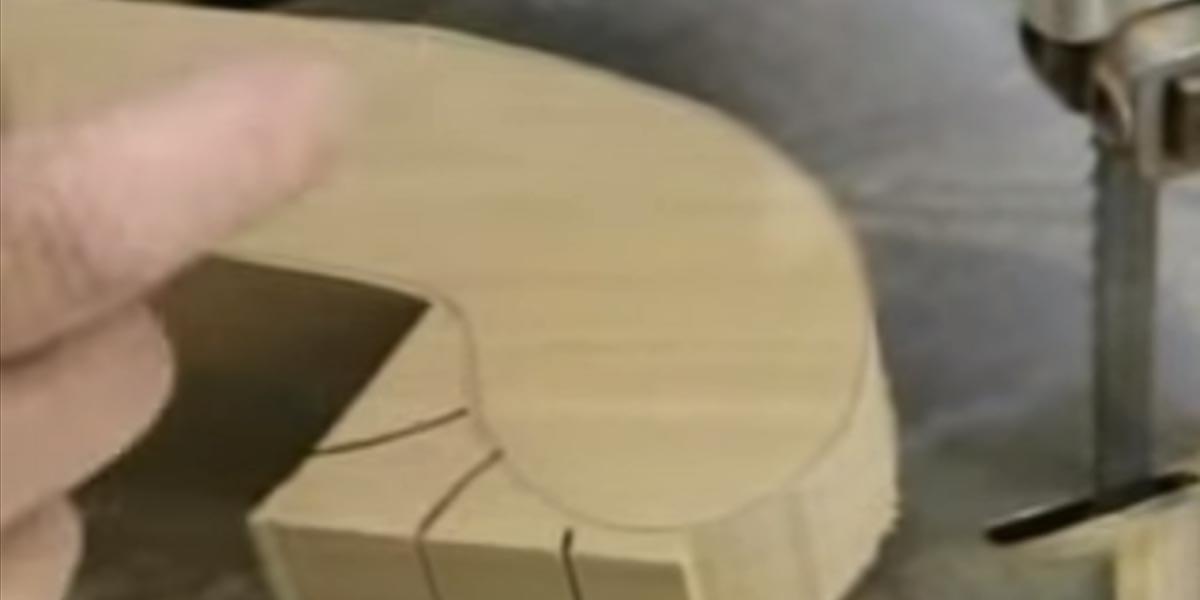
A curved two seater cut from marine plywood sides with pine slats running across them, and the curve is what makes it comfortable without a cushion. The sides and center support come out of a single nine hundred millimeter square of marine plywood, with the curve drawn around any large circular object as a template. Cut slots along the back of each support for the back rails, drill pilot holes before every screw, and dry fit the seat slats with spacers so the gaps stay even before anything is fixed. Fill the holes, sand through sixty, one twenty and two forty grit, then seal.
Get the full tutorial at Home Dzine.
27. DIY Picnic Table
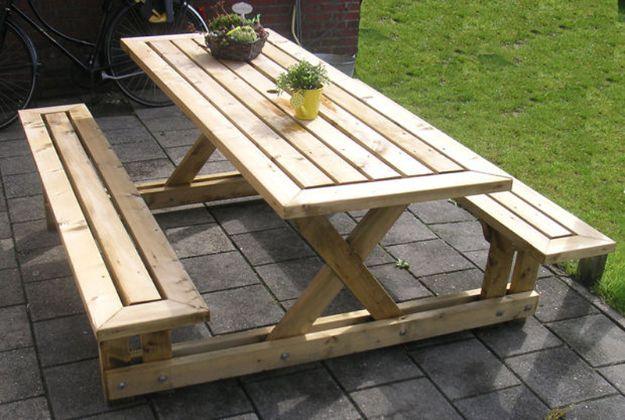
A full size picnic table with attached benches, built from 2x4s and joined with eighty millimeter wood screws and threaded rods rather than any specialist hardware. Build the benches first, then the table with its X legs, then connect the two. The X legs are the only fiddly part: mark where the two pieces cross, cut a groove about two thirds of the way through each, and lap them together so they sit flush instead of stacked. Drill pilot holes for every screw, and fix the connecting rails two inches off the ground so the ends stay out of standing water.
Get the full tutorial at The Owner Builder Network.