
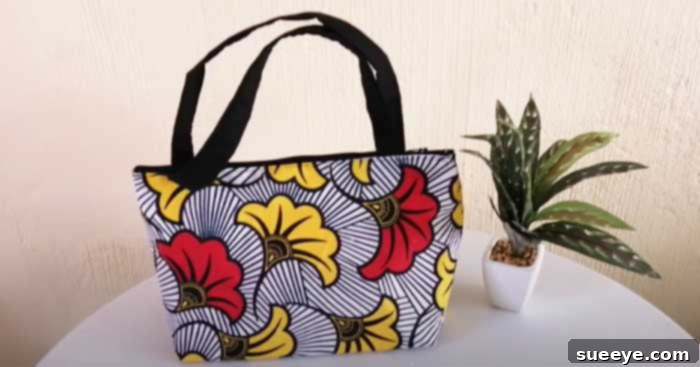
Get ready to revolutionize your accessory game this summer! We’re calling it now: the DIY fabric box tote bag is set to be the ultimate trend, combining practicality with undeniable style. Forget mass-produced bags; crafting your own allows for personalization that truly stands out. Imagine a chic, custom-made tote that perfectly complements your summer wardrobe, all while showcasing your creative flair. This incredibly adorable and surprisingly simple project, inspired by the fantastic tutorial from beautarie on YouTube, is a must-try for both seasoned sewers and enthusiastic beginners alike.
What makes this particular tote bag design so captivating? Its genius lies in its simplicity and efficiency. Unlike many sewing projects that require multiple fabric pieces, intricate pattern matching, and extensive stitching, this design beautifully utilizes just one main piece of fabric. This innovative approach drastically minimizes the amount of sewing needed, making the process quick, enjoyable, and much less intimidating. Whether you’re looking to create a sturdy grocery tote, a stylish beach bag, or a unique gift for a friend, this DIY fabric box bag offers endless possibilities for customization and a satisfying handmade result. Dive into this step-by-step guide and discover how you can craft your very own trendy, functional, and effortlessly stylish tote bag this season.
Essential Materials for Your DIY Box Tote Bag:
Before you embark on your sewing adventure, gathering the right materials is crucial for a smooth and successful project. This carefully curated list ensures you have everything on hand to create a beautiful and durable fabric box tote bag.
- Fabric: The heart of your tote bag. For the main body, choose a durable, medium-to-heavy weight fabric like canvas, duck cloth, denim, or home decor fabric. These choices will give your bag structure and longevity. Consider fun prints, vibrant solids, or even upcycled materials to personalize your creation. You might also want a lighter, coordinating fabric for the optional inner lining and pocket.
- Sewing Machine: A reliable sewing machine will be your best friend for this project. Ensure it’s in good working order and you have suitable needles (e.g., universal or denim needles, depending on your fabric weight) and thread that matches or complements your fabric color.
- Sharp Fabric Scissors or Rotary Cutter: Precision is key! A good pair of fabric scissors will make clean cuts, or for even greater accuracy and speed, a rotary cutter with a self-healing mat is highly recommended.
- Coordinating Thread: Select a high-quality polyester thread that matches your fabric or provides a subtle contrast. Strong thread is essential for a durable bag that will withstand daily use.
- Zipper (Optional): If you desire a secure closure for your bag, a zipper is an excellent addition. Choose a zipper that is at least 16 inches long, or slightly longer than the width of your bag opening. A standard coil zipper or a more robust handbag zipper would work well.
- Iron and Ironing Board: Don’t underestimate the power of pressing! An iron is vital for crisp seams, neat folds, and bonding interfacing.
- Measuring Tape or Ruler: Accuracy in measurements will ensure your bag comes out perfectly symmetrical and well-proportioned.
- Fabric Marker or Tailor’s Chalk: For marking cutting lines, seam allowances, and strap placements directly on your fabric.
- Pins or Fabric Clips: To hold fabric layers in place before sewing, preventing shifting and ensuring accurate stitching.
- Optional: Fusible Interfacing/Backing: For added structure and durability, especially if your main fabric is lighter weight. Choose a medium-to-heavy weight fusible interfacing for the bag body and a lighter weight for the handles to prevent bulk.
Step-by-Step Guide to Crafting Your Fabric Box Tote Bag:
Follow these detailed instructions to create your stunning DIY fabric box tote bag. Take your time with each step, and don’t hesitate to pause and review if something isn’t clear. The video tutorial by beautarie is an excellent visual aid to accompany these written instructions.
Step One: Prepare Your Fabric and Backing
Begin by cutting your main fabric piece to a precise measurement of 16 inches by 24 inches. This will form the core of your tote bag. Next, cut a piece of backing material to the exact same dimensions. The choice of backing is crucial for the bag’s final structure. If you desire a tote bag that stands up independently and maintains a crisp shape, opt for a heavier weight fusible interfacing or stabilizer. This will provide the necessary rigidity. Conversely, if you prefer a softer, more pliable bag, a medium-weight interfacing will suffice. Once both pieces are cut, meticulously iron the main fabric onto the chosen backing, ensuring a smooth, wrinkle-free bond across the entire surface. This step creates a single, more substantial piece of material, preparing it for the subsequent construction stages and giving your bag a professional finish.
Step Two: Create the Boxed Corners
Carefully fold your prepared material in half, aligning the shorter 16-inch edges perfectly. Press the fold gently to create a crease, but avoid a harsh line. Along this folded edge, measure and mark a 3-inch by 3-inch square from each corner. These squares represent the material you’ll remove to create the distinctive boxy bottom of your tote bag. Using your sharp fabric scissors or rotary cutter, precisely cut out these two squares. This seemingly small cut is fundamental to the bag’s structure, transforming a flat piece of fabric into a three-dimensional form. Accurate cutting here ensures a well-proportioned and symmetrical base for your bag.
Image by. beautarie via YouTube video.
Step Three: Mark Top Edge Details
With your fabric still folded or carefully laid flat, measure two inches down from the top raw edge of the fabric. Using your fabric marker or tailor’s chalk, draw a straight line across the entire width of the fabric at this 2-inch mark. This line indicates the fold line for the top hem of your bag. Next, from the ends of this 2-inch line, draw diagonal lines extending outwards to the top corners of the square cutouts you made in Step Two. These diagonal lines will guide you in shaping the upper sides of your bag, particularly if you plan to incorporate a zipper or a specific top edge finish. Precision in marking these lines will contribute to a clean, professional finish at the bag’s opening.
Step Four: Craft Your Handles
The handles are a key functional and aesthetic component of your tote bag. Begin by cutting two fabric strips for your handles, typically around 2 inches wide and 20-24 inches long, depending on your desired handle length. To ensure comfort and prevent the handles from feeling too bulky, apply a lighter weight fusible interfacing to one side of each fabric strip. This adds durability without excessive thickness. Once the interfacing is fused, follow the detailed folding technique demonstrated in the beautarie video. Generally, this involves folding the long edges inwards to meet the center, pressing firmly, and then folding the strip in half lengthwise again, encasing the raw edges. Topstitch along both long edges of each handle to secure the folds and give them a finished, robust appearance. You can experiment with different widths and lengths here to customize the feel and look of your handles.
Step Five: Position and Secure the Straps
Now it’s time to attach your beautifully crafted handles to the main bag body. Lay your main fabric piece flat, with the right side facing up. Carefully measure and mark the desired placement for each strap on both sides of the bag’s opening. A common placement is to center each strap roughly 3-4 inches from the side edges, ensuring they are evenly spaced and symmetrical. Pin the ends of each handle firmly in place, making sure they are not twisted. Before sewing, double-check that the handles are positioned correctly and are not too close to the edge where your top hem or zipper will be attached. Secure the straps with a sturdy box stitch or an ‘X’ stitch within a box for extra durability, which is especially recommended for a bag that will carry heavier items. Stitch them securely to the bag, making sure to backstitch at the beginning and end of each seam for reinforcement.
Step Six: Finish Raw Edges and Add Zipper (Optional)
To give your tote bag a professional, durable finish, you’ll want to cover any exposed raw edges at the top opening. Cut two pieces of fabric, preferably from the same material as your handles or a coordinating fabric, ensuring they are slightly wider than your bag’s opening and about 2-3 inches deep. These pieces will serve as facing strips. Hem one long edge of each strip by folding it under twice and pressing. Then, align the un-hemmed raw edge of one facing strip with the top raw edge of the bag (right sides together). Sew them together. Repeat for the other side. Press the facing upwards, then fold it over to the inside of the bag, enclosing the raw edges. Topstitch along the top edge of the bag to secure the facing. If you choose to add a zipper, this is the ideal step. Install your zipper between the facing and the main bag fabric at the top opening, following standard zipper installation techniques, ensuring it is centered and functions smoothly. This step adds security and a polished look to your finished tote.
Step Seven: Assemble the Bag Body
It’s time to bring your bag to life! Fold your fabric in half again, right sides together, aligning the side seams. Pin the sides down, being careful to only sew down to the end of the 3-inch cutouts you made in Step Two. Do NOT sew the bottom three inches of fabric at this stage. Stitch each side seam from the top down to the marked line, backstitching at the beginning and end for strength. Once the side seams are sewn, it’s time to create the boxy bottom. At each bottom corner, you’ll see a small opening created by your 3-inch cuts. Flatten this opening, bringing the side seam together with the bottom fold, creating a straight line. Pin these raw edges together meticulously. This step can be a bit tricky, so pinning is highly recommended for accuracy. Sew across these pinned edges, creating a secure seam for each box corner. Trim any excess seam allowance and consider finishing these seams with a zigzag stitch or serger to prevent fraying.
Step Eight: Add an Inner Lining and Pocket (Optional, but Recommended)
For a truly polished and functional tote bag, adding an inner lining and a pocket is a fantastic optional step that significantly enhances the bag’s utility and finish. Cut another piece of fabric for your lining, using the same dimensions as your main exterior fabric (16×24 inches) and repeat Steps Two and Seven to create an identical, but separate, lining bag. Before assembling the lining, you can create a simple patch pocket. Cut a rectangle of fabric (e.g., 6×8 inches), hem the top edge, press the other three edges under, and topstitch it onto one side of your lining fabric. Once your lining bag is sewn, turn your main exterior bag right side out. Then, slip the lining bag into the exterior bag, with wrong sides together. Align the top raw edges of both bags. Fold the top edge of the exterior bag over the lining, or neatly tuck the raw edges in between the layers. Pin securely all around the opening. Finally, topstitch around the entire outer edge of the bag’s opening to secure the lining in place, ensuring a clean, neat finish and hiding all raw edges. This gives your bag a professional, store-bought quality.
Image by. beautarie via YouTube video.
Step Nine: The Grand Reveal – Flip and Enjoy!
Congratulations, you’re almost done! With all the sewing complete, it’s time for the most satisfying part. Reach inside your bag and gently push out the corners, ensuring they are fully formed. Carefully flip the bag right side out. Take a moment to smooth out any creases and admire your handiwork. For an extra crisp, professional look, give your finished bag a final press with a warm iron, paying special attention to the seams and the top opening. You’ve successfully transformed a single piece of fabric into a stylish, functional, and durable box tote bag! Now, it’s ready to be filled with your essentials, show off at the market, or gifted to a lucky friend. Enjoy the pride of creating something beautiful and practical with your own hands!
Your Stylish, One-Piece Fabric Tote Bag Awaits!
And there you have it – a magnificent, custom-made box tote bag, born from just a single piece of fabric and a touch of sewing magic! This project isn’t just about creating a functional accessory; it’s about the joy of making, the satisfaction of a handmade item, and the confidence gained from mastering a new skill. The clever design, utilizing minimal sewing, makes it an accessible and rewarding project for anyone, regardless of their sewing experience. From selecting your perfect fabric to carrying your finished creation, every step is an opportunity for personal expression.
Whether you envisioned it as a chic companion for your daily errands, a sturdy vessel for your market hauls, or a thoughtful, personalized gift, your new tote bag is ready to serve. Don’t stop here – think about different fabric patterns, handle variations, or even adding more pockets to truly make it your own. We encourage you to share your creations and inspire others in the crafting community. Happy sewing, and enjoy your beautiful, handmade fabric box tote bag!