
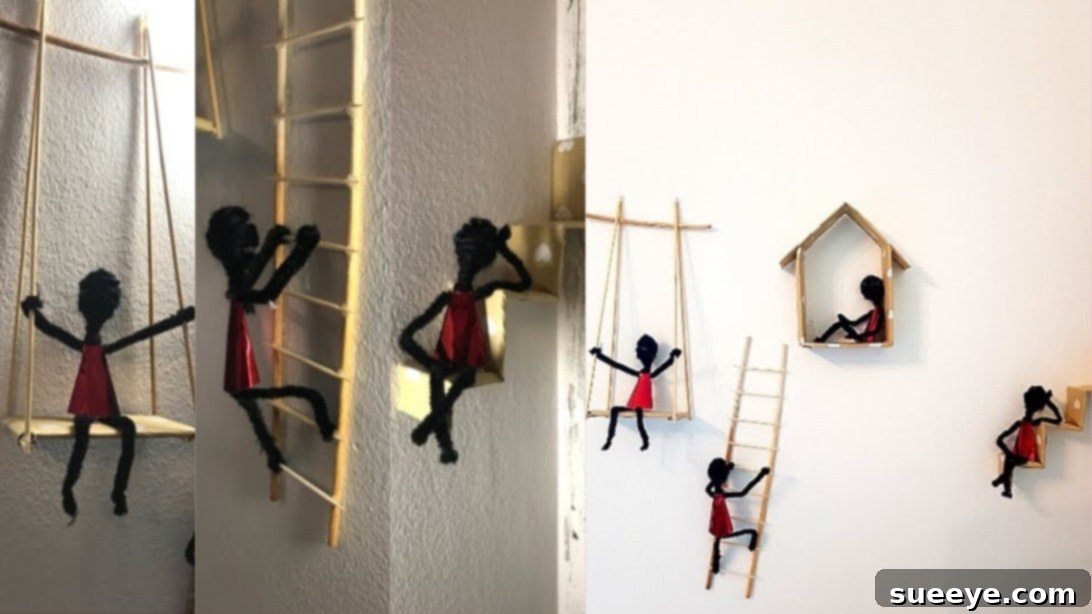
Transforming your living space into a reflection of your unique style doesn’t always require a hefty budget or a professional interior designer. With a touch of creativity and a few simple materials, you can craft captivating pieces that become instant conversation starters. This guide unveils a truly enchanting modern wall art DIY decor project, inspired by the innovative minds at DIYA – Do It Yourself Always. Forget blank, uninspired walls; this intricate design will infuse your home with personality, charm, and a contemporary aesthetic that guests are sure to admire. Whether you’re an experienced crafter or just dipping your toes into the world of DIY, the comprehensive, step-by-step instructions provided here will empower you to create a magnificent statement piece that is both personal and visually striking. Prepare to elevate your home decor with this engaging and rewarding artistic endeavor, turning ordinary materials into an extraordinary display.
Materials and Tools You’ll Need for Your Modern Wall Art
Embarking on any DIY project begins with gathering your supplies. For this extraordinary modern wall art, you’ll need a collection of easily accessible and affordable items, many of which you might already have around your house. The beauty of this project lies in its simplicity and the ingenious way everyday materials come together to form something truly artistic and eye-catching. Having all these materials and tools at hand before you begin will ensure a smooth and enjoyable crafting experience, allowing you to focus purely on the creative process.
- Long Thin and Thick Wooden Sticks: These versatile sticks will form the structural backbone and key architectural elements of your art piece. The thin sticks are ideal for delicate railings and supports, while the thicker ones provide robust framing. Consider using craft sticks, bamboo skewers, small dowels, or even carefully selected, repurposed twigs for an organic touch.
- Toothpicks: Small but mighty, toothpicks are essential for creating intricate joints and smaller structural elements, providing precision and subtle detail in your constructions. They’re perfect for linking smaller components.
- Hot Glue & Hot Glue Gun: Your primary adhesive for this project. A hot glue gun offers quick bonding, which is crucial for building the various components swiftly and securely. Ensure you have plenty of glue sticks to last through the entire project.
- Cardboard: Extremely versatile and readily available, cardboard will be used for various foundational elements, including panels, geometric shapes, and the base structure for your miniature house. Old packaging boxes, cereal boxes, or craft cardboard sheets work perfectly and are an eco-friendly option.
- Pencil: An indispensable tool for marking, measuring, and planning your cuts and placements, ensuring accuracy and symmetry in your design. Don’t underestimate its importance for clean results.
- Printed Paper (to cover cardboard): This allows you to add texture, color, or a specific pattern to your cardboard elements, significantly enhancing the visual appeal and seamlessly integrating the art piece with your existing interior design. Choose patterns that complement your home’s aesthetic or provide a striking contrast.
- Pipe Cleaners: These flexible, fuzzy wires are key to creating the charming and whimsical figures that will inhabit your wall art. Having a variety of colors can add unique personalities to your miniature characters.
- Foil: Lightweight yet moldable, aluminum foil is used to sculpt the heads of your figures, providing a stable and easy-to-shape base for subsequent layers.
- Red Paper Sheet: For crafting the distinctive capes of your figures, adding a vibrant pop of color and a touch of whimsical flair that makes each character stand out.
- Black Yarn: Essential for adding detail, texture, and a finished look, particularly for covering the figures’ heads and creating hair or hood-like coverings.
- Additional Tools (Highly Recommended):
- Sharp Scissors or Craft Knife: For precise and clean cutting of cardboard and paper.
- Ruler or Measuring Tape: For accurate measurements, ensuring all your structural components fit together perfectly.
- Cutting Mat: To protect your work surface when using a craft knife.
- Patience and Creativity: The most important “tools” for any DIY enthusiast!
Step-by-Step Guide to Crafting Your Modern Wall Art
Now that your workspace is prepared and all materials are within reach, let’s dive into the creative process. Follow these detailed steps to construct your stunning modern wall art. Take your time with each stage, paying attention to detail, and don’t hesitate to personalize elements to truly make this piece your own. Each step builds upon the last, transforming simple materials into a captivating display.
Step 1: Constructing the Miniature Wooden Staircase
Begin by creating a charming and functional ‘stair’ element that will serve as an integral part of your wall art’s narrative. Take two equally long, thin wooden sticks. These will form the main vertical supports or railings of your miniature staircase. Next, select several toothpicks – these will become the individual steps. The number of toothpicks will determine the length and number of steps in your staircase. Carefully apply a small dot of hot glue to both ends of each toothpick and attach them horizontally between the two long wooden sticks. Ensure even spacing between each toothpick to create a uniform and aesthetically pleasing staircase. Aim for symmetry and a neat appearance, as this piece will be a prominent feature in your finished artwork. The hot glue provides immediate adhesion, allowing you to quickly build this delicate structure. Once assembled, set your miniature ladder or stair-like component aside to fully dry, ready to be integrated into your larger design later.
Step 2: Building the Cardboard Miniature House Structure
This step focuses on creating a multi-dimensional ‘house’ structure that will serve as an intriguing dwelling or focal point within your art piece, adding depth and architectural interest. Start by cutting three identical rectangular pieces from your cardboard. These three pieces will form the base and two sides of your open-ended box house. Next, cut a fourth, slightly longer rectangular piece of cardboard, ensuring its width precisely matches that of the first three pieces. This longer piece will eventually form the distinctive pitched roof of your house. Take the three identical rectangles and, using hot glue, carefully glue them together at their edges to form an open-ended box. This will be the main body of your house. Now, take the long rectangular piece designated for the roof, fold it precisely in half along its length to create a crisp crease, and then glue its ends onto the open top edges of your cardboard box. This will create a charming and realistic pitched roof. Ensure all seams are securely glued and hold the pieces firmly in place until the glue sets completely. This process results in a charming, minimalist house that offers a dynamic, three-dimensional element to your overall composition.
Step 3: Assembling the Geometric Triangle and Base Structure
Next, we’ll craft another foundational element for your wall art, combining elegant geometric triangles with a stable rectangular base. Select four long wooden sticks and two toothpicks. To form the first triangle, take two long wooden sticks and glue one toothpick horizontally between their ends, creating a wide ‘V’ shape. Then, bring the other, unglued ends of these same two sticks together and glue them securely at the top to form a complete, sturdy triangle. Repeat this exact process with the remaining two long wooden sticks and the second toothpick to create a second, identical triangle. These triangles will add significant geometric interest and architectural flair to your piece. Now, cut a rectangular piece of cardboard. The crucial aspect here is to ensure this rectangle’s length perfectly fits between the *bottom* edges of your two completed wooden triangles. This precise fit is essential, as this cardboard rectangle will serve as a strong connecting base, linking the two triangles. Once measured and cut, carefully apply hot glue along the bottom edges of both triangles and attach them to the cardboard rectangle, creating a stable, interconnected structure. This assembly provides another distinct and visually appealing architectural element for your wall art.
Step 4: Unifying the Triangle Structures with a Connecting Stick
To further unify and strengthen the two triangle structures you just created, select a small, thick wooden stick. This piece will act as a central bridge, enhancing both the stability and the visual continuity of your geometric forms. Apply hot glue to both ends of this thick stick and carefully attach it to the tips (the apex) of each triangle. Ensure it’s centered and perfectly aligned to maintain the symmetry and balance of your design. This small but significant step physically links the two triangular elements, transforming them from separate components into a single, cohesive unit. This connection not only adds structural integrity, preventing any unwanted movement, but also provides a finished, polished look to this particular segment of your artwork, preparing it for seamless integration into the larger art piece.
Step 5: Preparing the Folded Cardboard Background Panel
This step introduces an element of visual rhythm, layering, and dynamic background to your wall art. Take a very long rectangular piece of cardboard. The exact dimensions of this panel will depend on the overall scale and proportion you envision for your finished art piece, but ensure it’s substantial enough to create a noticeable background, a textured surface, or even a tiered platform. With precision, you will fold this long rectangle into six equal parts, creating a series of crisp, accordion-like segments. To achieve this, it’s highly recommended to first mark out six equally spaced lines across the length of the cardboard with your pencil and ruler before carefully folding along each line, ensuring crisp, clean creases. This multi-faceted, folded panel can serve as a dynamic backdrop, adding significant depth and visual interest to your composition. For an extra touch of design flair, cover it with your chosen printed paper, aligning the pattern carefully across the folds to create an integrated look.
Step 6: Crafting the Charming Pipe Cleaner Figures
Now for the charming and whimsical inhabitants of your miniature world – the pipe cleaner figures! You’ll be making four of these delightful characters, each with its own unique personality emerging from the twisting process. Start with four individual pieces of pipe cleaner. Take one pipe cleaner and bend it precisely in half, creating a loop at the top. This loop will eventually form the ‘shoulders’ of your figure. Then, select a pipe cleaner of a different color (or the same color if you prefer uniformity), cut it exactly in half, and set one of these half-pieces aside for later. Take one of the remaining half-pieces, bend it in half as well, and insert it through the loop created by the first bent pipe cleaner. This will form the initial structure for the figure’s arms. Begin twisting the two pipe cleaners together firmly, working your way down from the loop. This twisting motion forms the main body and torso of your figure. Just before you reach the end of the twisted section, insert the *other* half-piece from the initial pipe cleaner you cut (if you used a different color for the arms, now use a piece of the original body color again). Continue twisting to complete the body, creating two distinct ‘legs’ at the bottom. This method ensures a sturdy, flexible, and symmetrical figure. Repeat this entire process three more times to create a total of four identical pipe cleaner bodies, each ready for further embellishment and character development.
Step 7: Adding the Foil Heads to Your Figures
With your pipe cleaner bodies complete and standing ready, it’s time to give them their distinct heads! Take four separate pieces of aluminum foil, ensuring each piece is roughly the size of a large marble when crumpled. Begin crumpling each piece tightly and firmly into a compact, spherical ball. The goal is to create dense, round ‘heads’ for your figures that will hold their shape. Once you have four well-formed and firm foil balls, apply a small dab of hot glue to the ‘neck’ area of each pipe cleaner body, right above where the ‘shoulders’ would be. Carefully press one of the foil balls onto the glue, holding it in place until the glue sets completely. Ensure the heads are securely attached and that they appear proportional to the pipe cleaner bodies, maintaining a balanced silhouette. These foil heads provide a lightweight yet stable base for the final covering and give your figures their basic and identifiable form, adding a crucial human-like element to your miniature characters.
Step 8: Designing and Attaching Vibrant Red Capes
Give your figures a touch of drama, mystery, and visual flair by adding vibrant red capes! From your red paper sheet, cut four small rectangular pieces. The size of these rectangles should be carefully considered to be appropriate and proportional to the scale of your pipe cleaner figures, ensuring they don’t overpower the characters. To transform these simple rectangles into flowing capes, carefully trim two of the corners from one of the shorter sides of each rectangle. This creates a more natural, tapered shoulder line. Then, gently curve the opposite, longer side of the rectangle. This subtle shaping will help the paper drape more naturally and elegantly, truly resembling a flowing cape. Once shaped, apply a thin line of hot glue along one of the untrimmed, straight edges of each cape. Carefully wrap and glue this edge around the ‘neck’ area of each figure, just below the foil head and above the pipe cleaner body, forming a gentle cone shape that opens downward. Repeat this precise process for all four figures, ensuring each cape is securely attached and positioned to enhance the dynamic and heroic look of your characters. The red capes add a wonderful splash of color, personality, and a sense of movement to your miniature world.
Step 9: Adding Yarn Hair and Detailing to the Figures
To bring your figures further to life and add essential texture and a finished appearance, we will now cover their heads and necks with black yarn. Take a length of black yarn – you’ll need enough to wrap around each head multiple times. Starting from the base of the foil head, apply a very small dot of hot glue to secure the initial end of the yarn. Begin wrapping the yarn tightly and neatly around the entire foil ball, working your way upwards in concentric circles, and then potentially back down if needed, to completely cover the head. You can experiment with different wrapping patterns to create various ‘hairstyles’ or simply aim for a smooth, uniform covering. Extend the yarn slightly down the neck area to meet the top edge of the red cape, creating a seamless and integrated transition between the head and body. Secure the final end of the yarn with another tiny, discreet drop of hot glue, ensuring no loose ends. Repeat this meticulous process for all four figures. This step not only conceals the foil and pipe cleaner structure but also adds a sophisticated, tactile finish and visual weight to your characters, making them feel more substantial and complete.
Step 10: Arranging Your Figures and Structures into a Cohesive Scene
This is where your wall art truly comes alive as you carefully arrange your crafted figures within their architectural environment, bringing a narrative to your decorative piece. Take one of your finished pipe cleaner sculptures and carefully position it to ‘sit’ on the wooden ‘swing’ or stair element you created in Step 1, ensuring its hands appear to be holding onto the long sticks for a realistic pose. Use small, discreet dabs of hot glue to secure it firmly in place. Next, take the remaining figures. Arrange them strategically within the cardboard ‘house’ from Step 2, allowing some to ‘climb’ the stairs (if you choose to integrate the staircase here) or simply sit posed inside the house’s open interior. You might also use the folded cardboard panel from Step 5 as a multi-tiered platform or additional steps for other figures. Play with different arrangements and poses until you achieve a visually engaging narrative and a balanced composition. The goal is to create a sense of interaction, movement, and storytelling within your miniature world, turning individual components into a cohesive and captivating art piece that sparks imagination.
Step 11: Final Wall Mounting and Display
The final and most exciting step is to bring your masterpiece to its permanent home on your wall! Before applying any adhesive, carefully hold the entire assembled art piece against your chosen wall area. Step back and visualize its placement, considering the surrounding decor, furniture, and lighting to ensure your unique artwork makes the maximum visual impact. Take this opportunity to make any last-minute adjustments to the arrangement of your figures or structures for perfect harmony. Once you’re completely satisfied with the positioning, apply a generous but strategic amount of hot glue to the back of the larger, stable components of your wall art – such as the house, the interconnected triangles, and any major background panels that will bear the weight. Press the entire piece firmly against the wall for a minute or two until the hot glue sets completely and securely. For heavier pieces or added long-term security, you might consider reinforcing the attachment by using strong double-sided mounting tape or discreet small picture hanging nails in conjunction with the hot glue. Ensure the wall surface is clean, dry, and free of dust for optimal adhesion. Step back and admire your unique, handmade modern wall art, a true testament to your creativity and skill!
Embrace Your Creativity: Your Unique Modern Wall Art DIY Decor Awaits!
Congratulations! You’ve successfully transformed an array of simple, everyday materials into a magnificent, personalized statement piece for your home. This modern wall art DIY decor project, inspired by the brilliant creators at DIYA – Do It Yourself Always, is more than just a craft; it’s a testament to your creativity, attention to detail, and the profound joy of making something beautiful and meaningful with your own hands. This unique artwork not only adds undeniable aesthetic appeal to any room but also injects a wonderful sense of whimsy, narrative, and individual character into your living space. Every time a guest marvels at its intricate details, the charming figures, and the imaginative miniature world you’ve constructed, you’ll have a wonderful story to share about your artistic journey. So, embrace your inner artist, celebrate your accomplishment, and let your walls tell a story of imagination, personal style, and the incredible power of DIY!