Organizing Ideas
19 DIY Mail Organizers to End Paper Clutter
DIY mail organizers for the entryway: 19 builds, from a wall mail sorter and a shutter rack to upcycled formula tubs and a five dollar scrap wood set.
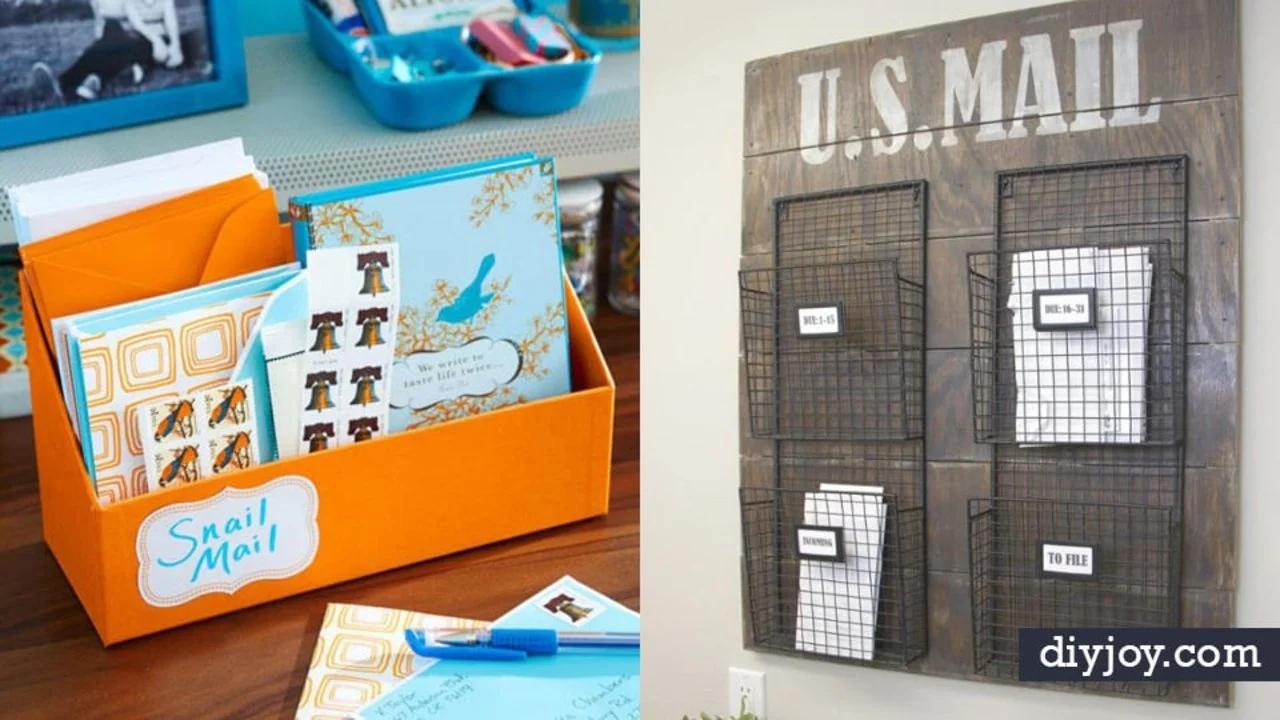
Mail is the one pile that refuses to be dealt with. It lands on the counter, moves to the table, moves back, and somewhere in it is a bill with a date on it. DIY mail organizers fix that by giving every piece of paper a named home before anybody has to decide anything: bills here, coupons there, shred, file, out. These 19 run from a stretched canvas and two file folders held together with tape, which takes fifteen minutes and costs about six dollars, up to a proper four pocket wall sorter built from a sheet of quarter inch plywood for around twenty five. In between there are old shutters, hardback books, formula tubs, IKEA magazine bins and a scrap wood set that came in at five dollars. Every project links back to the maker who worked it out.
1. DIY Wall Mail Sorter
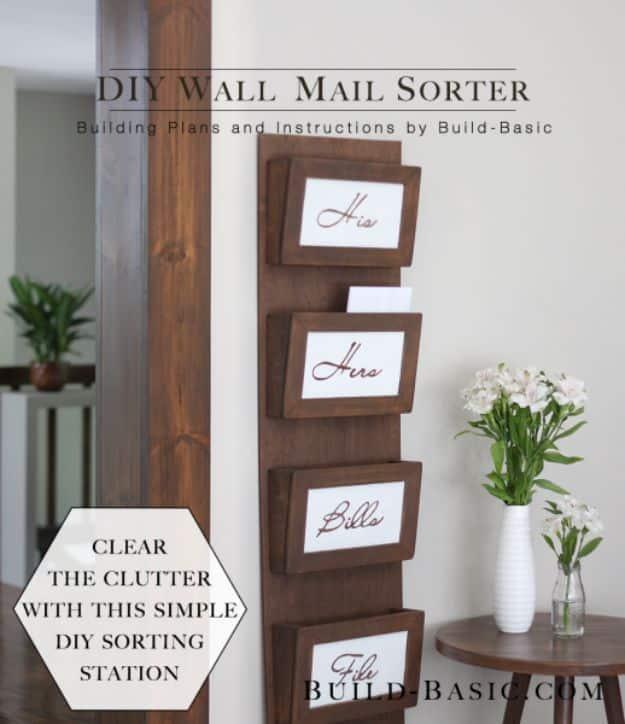
Four shallow boxes on a fourteen by forty eight inch backer board, stained dark and labelled by category, and it is a proper build rather than a hack. Box sides are one by three cut to eight inches, bottoms are one by two at eleven, and the fronts are quarter inch plywood at twelve and a half by eight, framed with mitred quarter by two trim. The trick that makes it look bought is blind nailing: the boxes attach from behind the backer board, so there is not a single nail head showing on the front. About twenty five dollars and three hours.
Get the full tutorial at Build Basic.
2. DIY Hanging Organizer
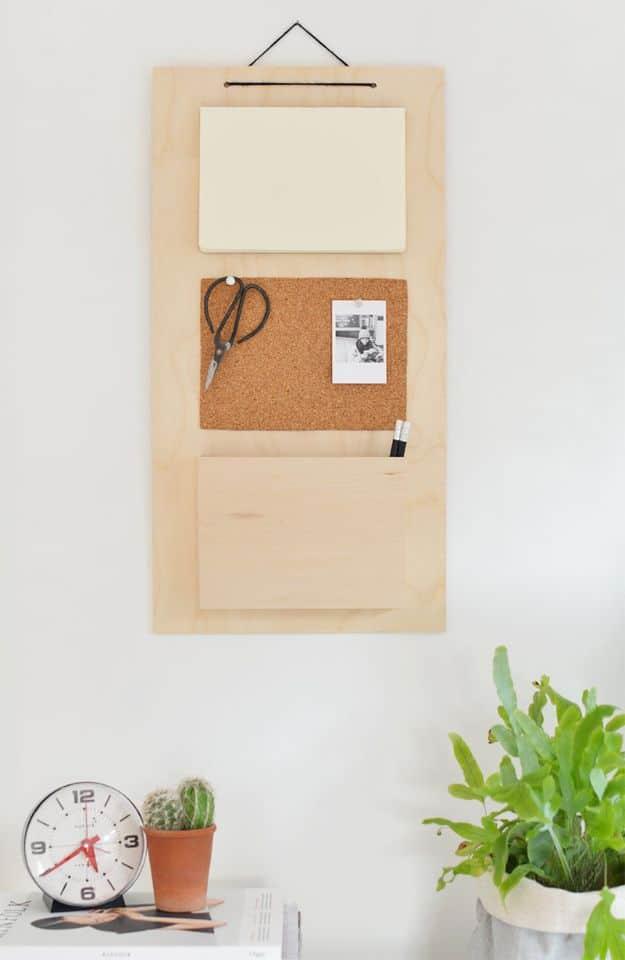
A thirty by sixty centimeter plywood board carrying three things: a notebook with its cover cut away, a piece of cork cut to match, and a balsa wood pocket underneath, all glued straight on and hung from a leather cord through two drilled holes. Removing the notebook cover but keeping the spine intact is the detail that makes it work, because the pages then sit flush against the board like a built in notepad. The pocket is four pieces of balsa: a twenty one by fifteen back and three narrow strips. Sand every balsa edge before gluing.
Get the full tutorial at Burkatron.
3. Mail Center – Upcycled Formula Tubs
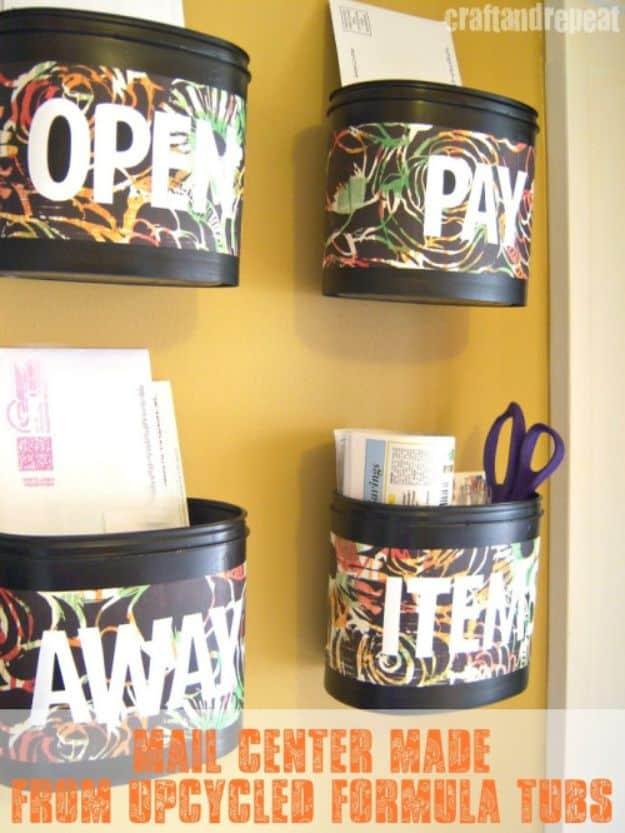
Plastic formula tubs spray painted, wrapped in scrapbook paper and hung on the wall by soda can tabs, each one labelled for a different job. Two details make the difference between this looking thrifty and looking deliberate: use spray paint actually formulated for plastic, and paint the insides as well as the outsides so the original label color never shows when a tub is empty. Paper strips cut roughly twelve by three and a half inches wrap a standard tub front. Bend each can tab slightly before hot gluing it on, and build up extra layers of glue behind it.
Get the full tutorial at Craft and Repeat.
4. Anthropologie Wall Organizer
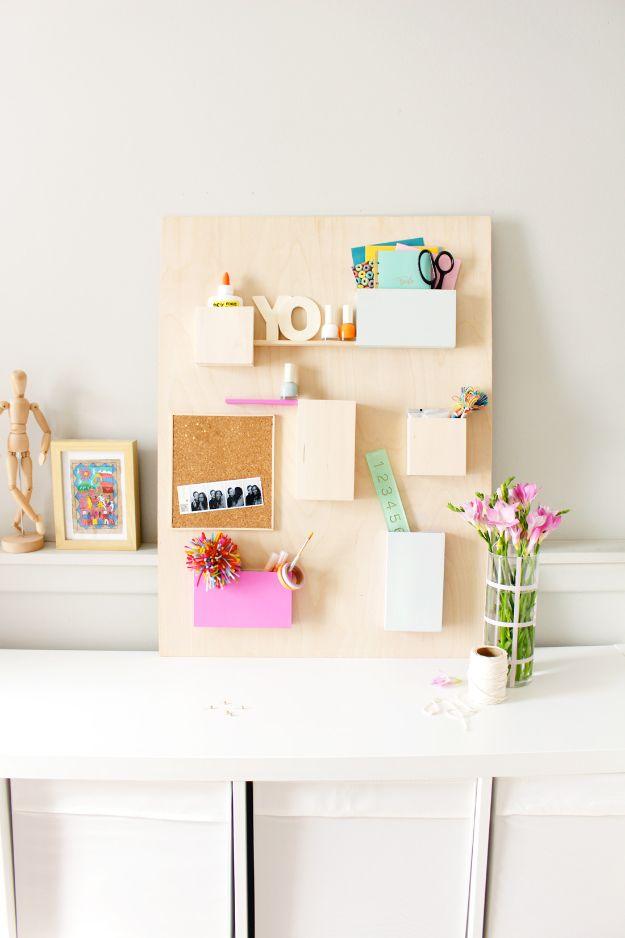
A plain plywood panel with small open boxes, a narrow ledge, a cork square and a couple of shallow trays screwed onto it in a loose asymmetric arrangement, each piece painted a different flat color. The asymmetry is the design. Line the boxes up in a neat grid and it reads as a shelving unit; scatter them at different heights with gaps between and it reads as the expensive shop version. No power tools are needed for the update itself, just a brush, a steady hand and at least two coats of acrylic on each box including the sides.
Get the full tutorial at Fish and Bull.
5. Mail Holder Makeover
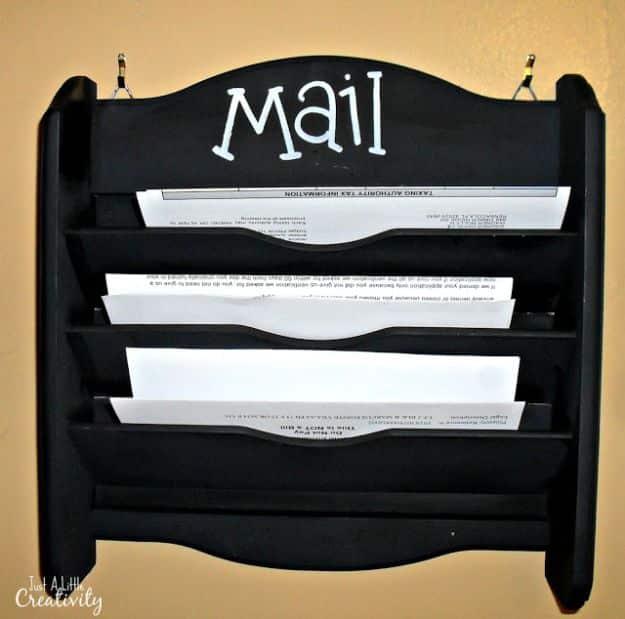
A two dollar thrift store wooden mail rack with broken hooks, spray painted black and lettered in white so each slot has a job. The honest part of this tutorial is the first attempt: a deep red brushed on took roughly a million coats, never evened out, got distressed to hide the mess, and then hand written initials finished it off badly enough that the whole thing nearly went in the bin. Spray paint in one color solved it. Lettering that names a category rather than a person is also far easier to live with than initials.
Get the full tutorial at Just A Little Creativity.
6. Sew a Fabric Mail Organizer for the Wall
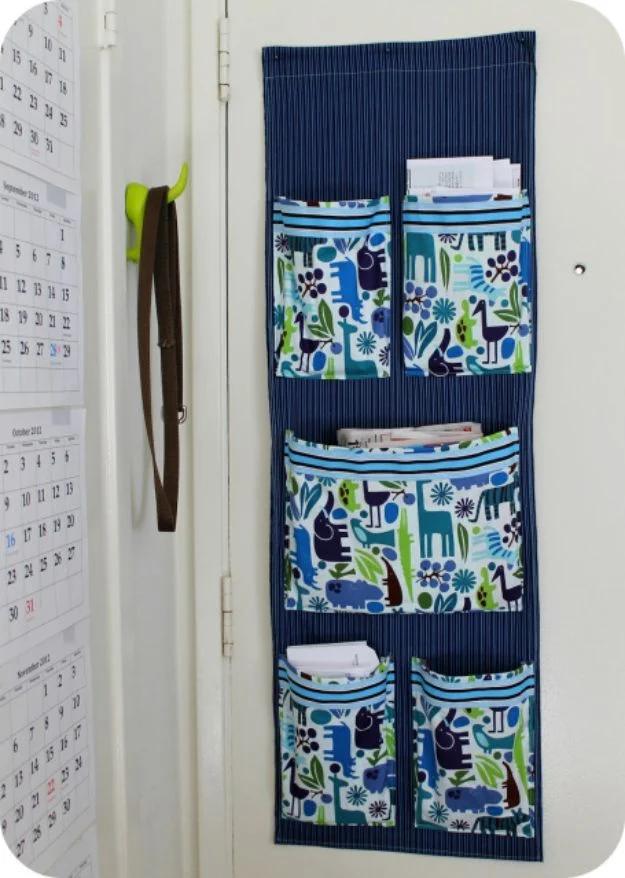
A fourteen by forty two inch fabric panel with five gusseted pockets, four small ones roughly six by nine inches and one large at twelve and a half by nine, hung on the back of a door with two nails in the top corners. The gusset is what separates this from a flat pocket: sewing the bottom seam with the excess fabric tucked evenly into the corners gives each pocket real depth, so a stack of post sits in it rather than slipping out. Double the back panel for stiffness. Finish every raw edge before any pocket goes on.
Get the full tutorial at The Left Coast Mama.
7. Desktop Bill Organizer
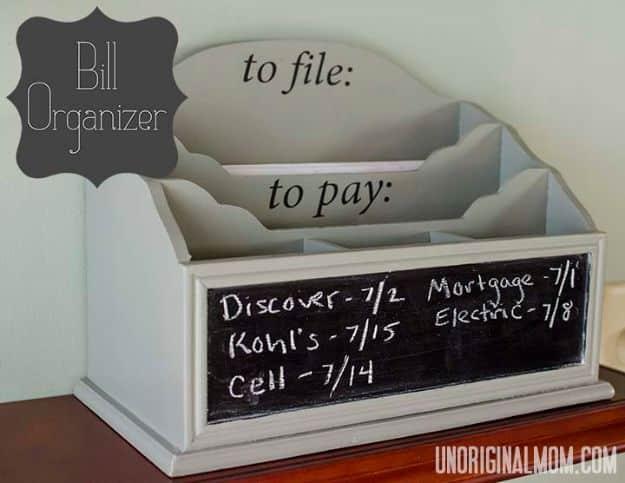
A plain gray wooden desk organizer given two changes: vinyl lettering naming each slot, and a band of chalkboard paint across the front for writing due dates on. The chalkboard strip is the useful half. Sorting bills into a slot tells you nothing about when they are due, but a wipeable surface listing five dates in a row does, and it sits on the desk where you already are rather than on a calendar in another room. Cut the vinyl on a machine if you have one, or use stick on letters. Prime the area before the chalkboard paint.
Get the full tutorial at unOriginal Mom.
8. Easy Personalized Mail Organizer
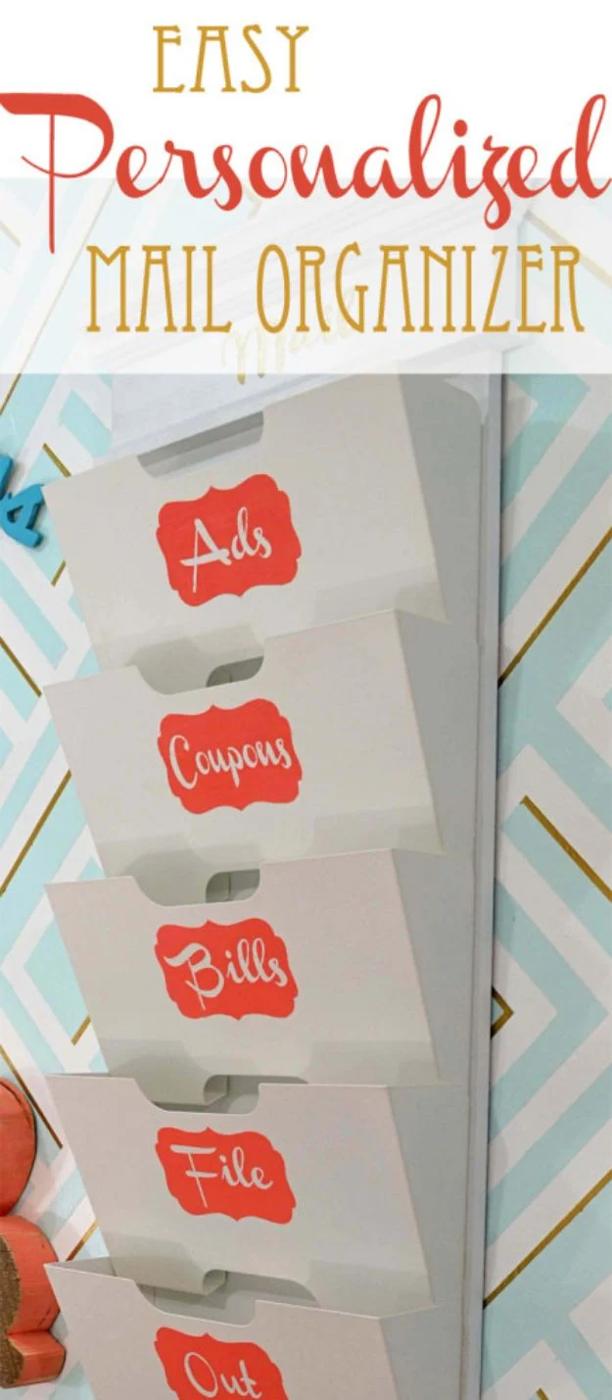
Five IKEA magazine bins bolted to a thirty six by thirteen inch piece of half inch MDF, each one stencilled with a category, and the whole board hung on a routed keyhole. Bolts through the board with the nuts on the inside of the bins is what makes this rock solid, which matters when five metal bins full of paper are hanging off a wall. The stencilling method is tidy: layer painters tape over the bin face, tape the printed label on top, cut the letters with a knife through the tape only, then paint thin coats so nothing bleeds.
Get the full tutorial at Her Tool Belt.
9. Wall Mail Organizer
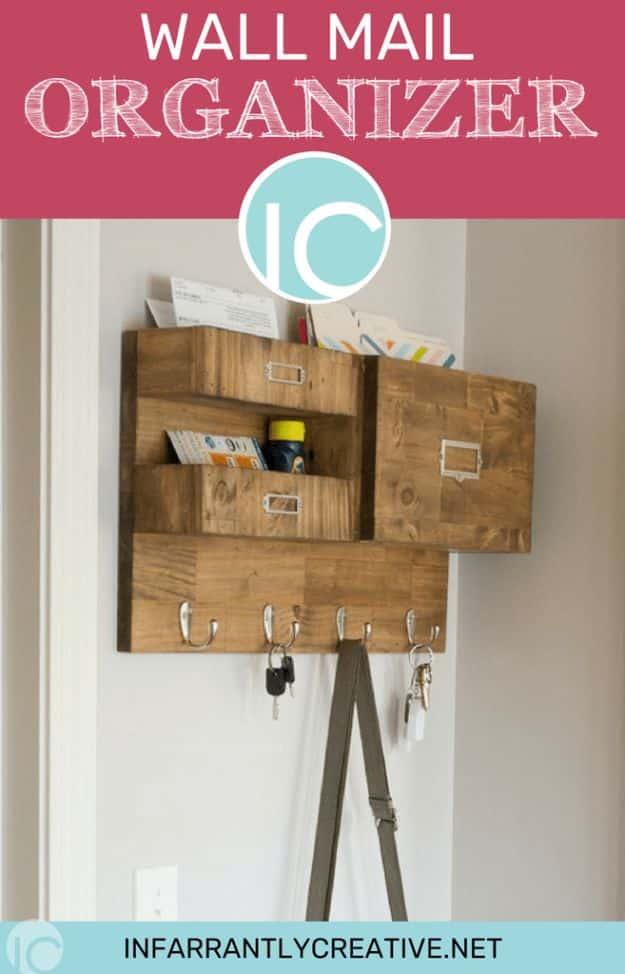
A stained wood wall unit with two small boxes stacked on the left, a wide file folder section on the right, library label plates on the fronts and four hooks along the bottom rail for keys and a bag strap. It is a scrap pile build: lengths of one by three and one by four, a piece of one by eight and a twelve by twenty four inch backing board, glued and air nailed. Stain every piece before the final assembly rather than after, because reaching inside a finished box with a brush is miserable. A pre stain conditioner keeps the tone even and a finishing paste seals it.
Get the full tutorial at Infarrantly Creative.
10. Pottery Barn Knock Off Mail Sorter
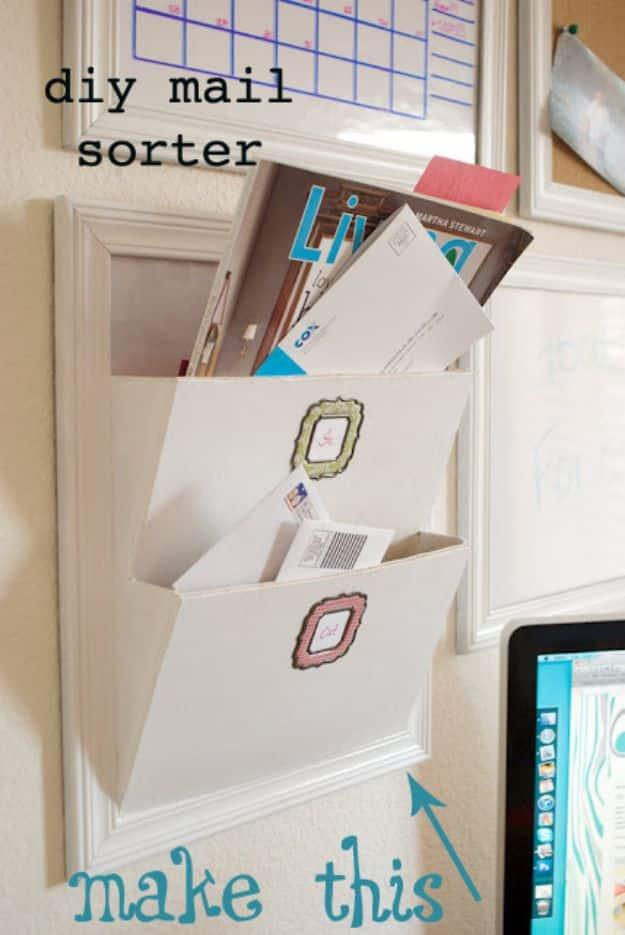
Wooden pockets built to sit inside eleven by fourteen picture frames, which is the whole idea and the reason the finished wall looks like the catalogue version. The fronts are cut to the inside width of the frame and stand five and six inches high, so a frame with a pocket in it hangs alongside a frame holding cork or a whiteboard and the set reads as one system. Measure the inside of your own frames before cutting anything. Paper templates assembled inside a frame first will save you a wasted board.
Get the full tutorial at Lady Goats.
11. Old Book Mail Organizer
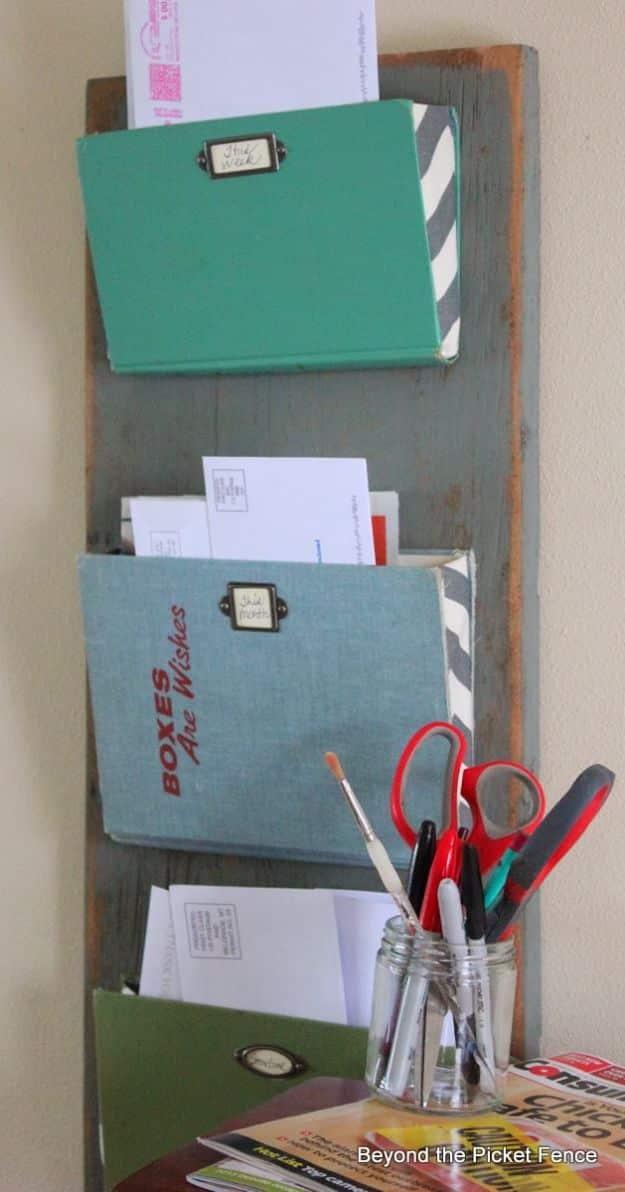
Three hardback covers screwed at an angle to a gray painted board, each one backed with a folded fabric trapezoid so the cover and the fabric together form a deep pocket. The angle is the engineering: screw the covers on square and post falls straight out, so they go in leaning back. Cut the fabric about an inch wider than the book and double it so the top edge has a clean fold rather than a raw one. Scrapbook label holders with mini brads name each pocket, and old cloth bindings in green and blue do the rest.
Get the full tutorial at Beyond The Picket Fence.
12. Turn a Window Shutter Into a Mail Organizer
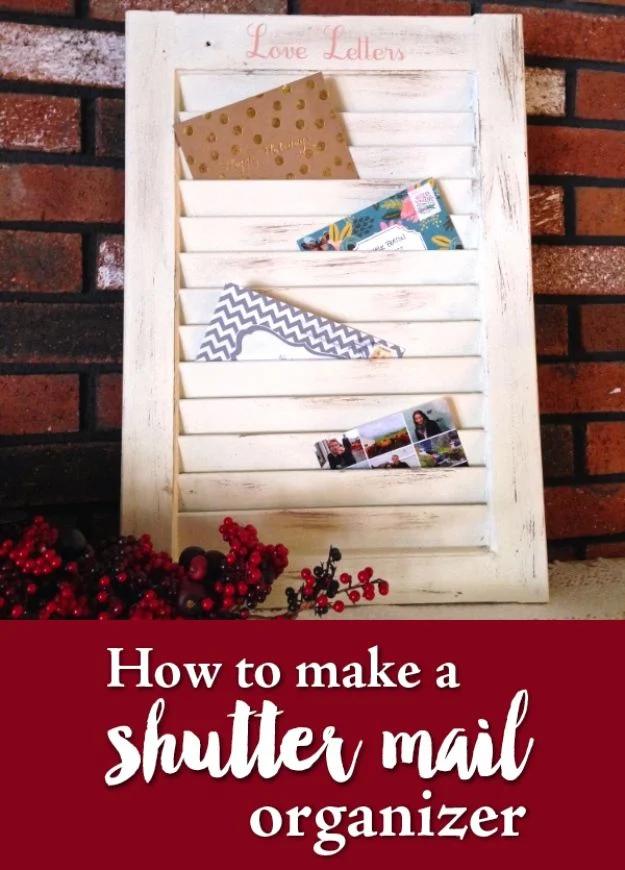
A shutter cut in half, painted with two coats of chalk paint, waxed for a distressed finish and backed with plywood stapled behind every third slat so the open sections become deep pockets. Stopping the backing every third louver is the part worth copying, because it turns one long gap into four separate usable slots. Get the paint down between the slats and then check the back for drips. A vinyl phrase across the top is optional, and if you are cutting your own letters, weld the script into one shape rather than cutting each letter separately.
Get the full tutorial at Weekend Craft.
13. No Sew Fabric Wall Organizer
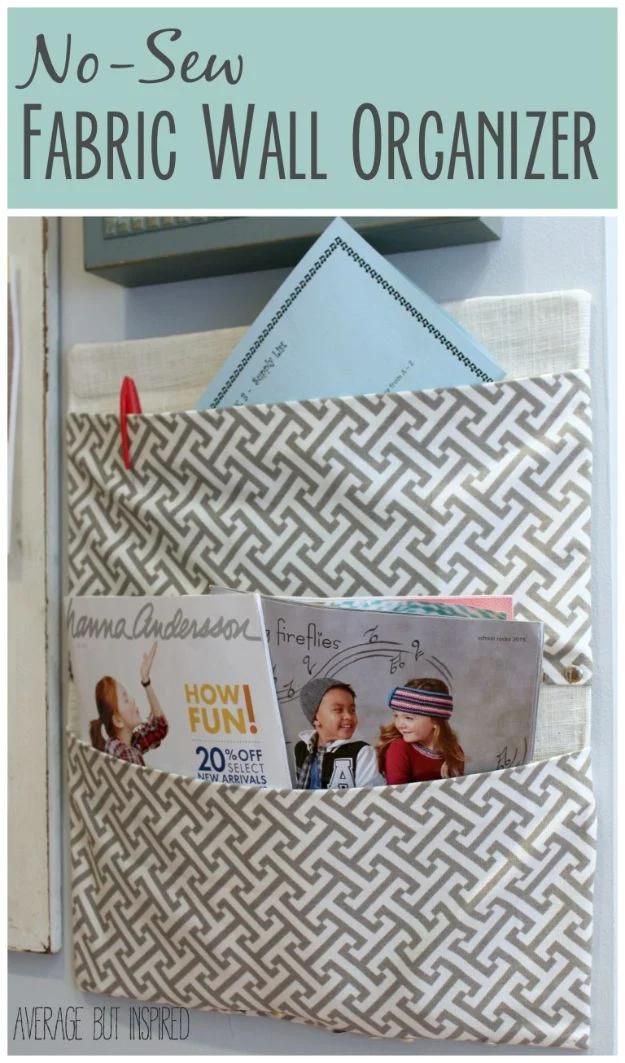
A flat sheet of cardboard covered in gray geometric cotton, with two fabric pockets glued across the front and not a stitch anywhere. Spray adhesive holds the fabric to the board, then the overhang gets a diagonal snip at each corner so it folds cleanly and hot glues down on the back. The pockets are separate pieces about eight inches deep, cut a couple of inches wider than the board, with the raw edge folded half an inch and ironed flat before gluing. Pull the fabric tight along the bottom and leave a little slack at the top, which is what gives a pocket room for a catalogue.
Get the full tutorial at Average But Inspired.
14. Easy DIY Wall Organizer to Stop the Paper Clutter
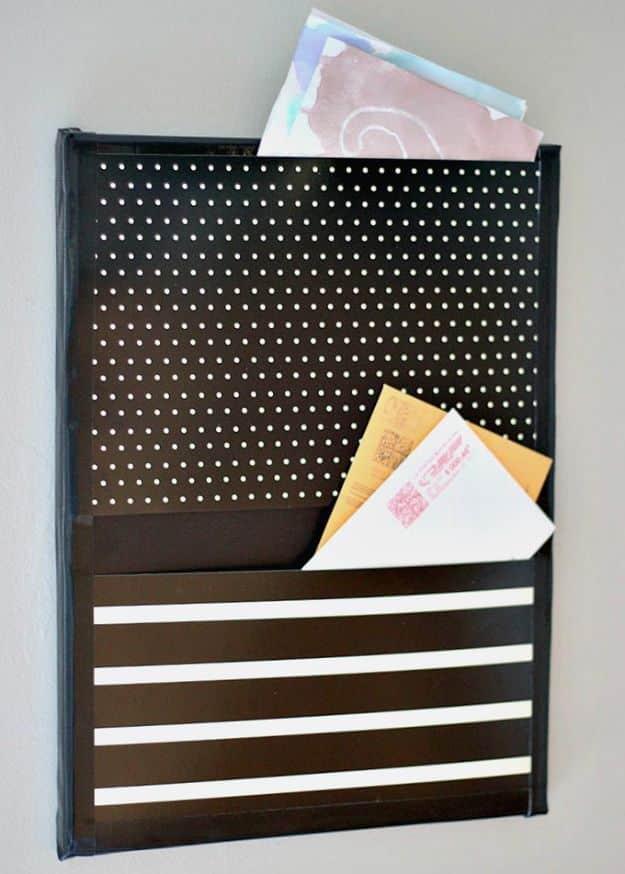
A twelve by sixteen stretched canvas, two letter size file folders and a roll of strong tape, and that is the entire supply list. Trim the front of the bottom folder to six inches so the pocket sits open, tape its back to the canvas, then trim the second folder to eight inches and line its top edge with the top of the canvas. Tape the top edge around the back for a clean finish, then tape both sides to close the pockets. Fifteen minutes, hangs on one hook, and it looks nothing like stationery when it is done.
Get the full tutorial at Sunny Day Family.
15. Cardboard Mail Sorter
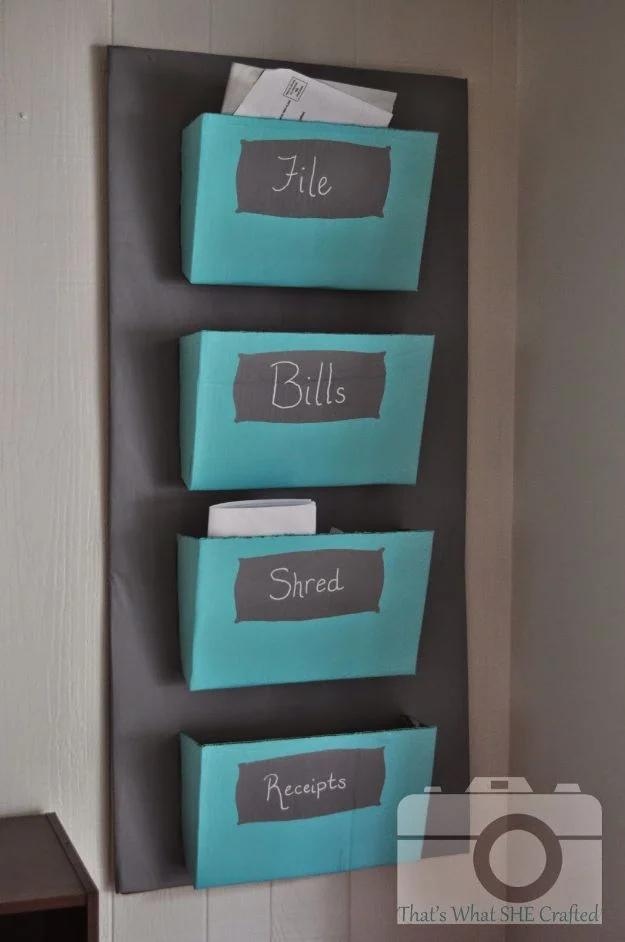
Four turquoise pockets slotted into a gray painted cardboard backboard, built entirely from three large moving boxes and labelled in chalk style lettering. The construction is smarter than it sounds: pockets are not glued onto the face, they are cut with tabs and pushed through slits in the board, then folded flat and glued on the reverse, so nothing can peel away under weight. Cut slits of about two and three quarter inches for the bottom tabs and two inches for the side ones. Wrap the front in brown paper before painting for a smooth finish.
Get the full tutorial at That's What She Crafted.
16. Mail Organizer Tutorial
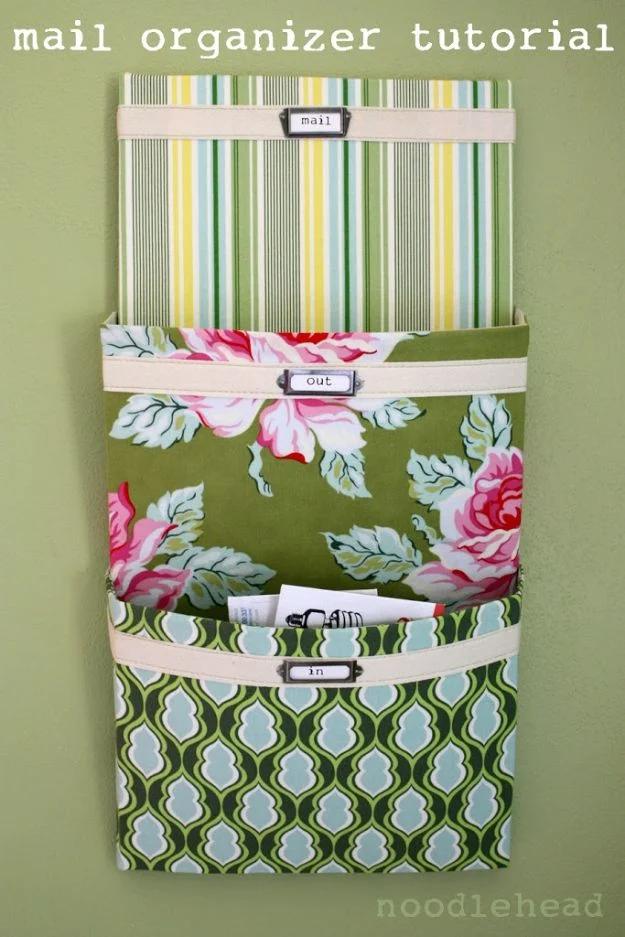
A twelve by twenty four artists canvas covered in fabric and fitted with two structured mail slots, each one stiffened with heavy double sided fusible interfacing so the pockets stand out from the board rather than sagging. That interfacing is the whole reason this looks like a shop piece. Cover the canvas with spray adhesive and staples, sew each slot from an exterior and a lining with the interfacing fused between, then trim it with cotton twill tape and a small metal label holder hand stitched on. Hot glue and staples fix the finished slots to the canvas.
Get the full tutorial at Noodlehead.
17. Make Your Own School Papers Organizer
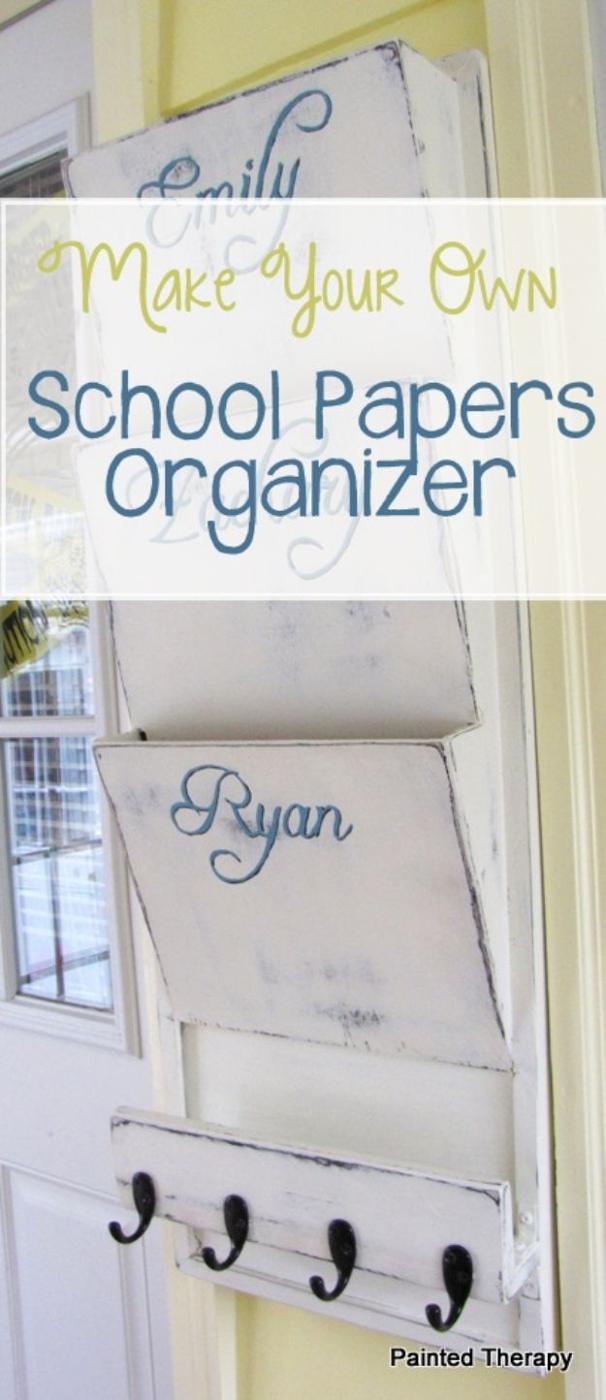
A tall wooden wall unit with two angled pockets and a hook rail underneath, built from a free plan, spray painted black and then top coated in creamy white latex so that sanding the edges brings dark through pale rather than bare wood. That two layer paint order is the single most useful thing here, because distressing over raw timber reads as scruffy while distressing over black reads as age. Painting the mail holder brackets the same white makes the hardware disappear into the piece. Names on the pockets sort school paper per child.
Get the full tutorial at Painted Therapy.
18. Clean Out the Paper Clutter
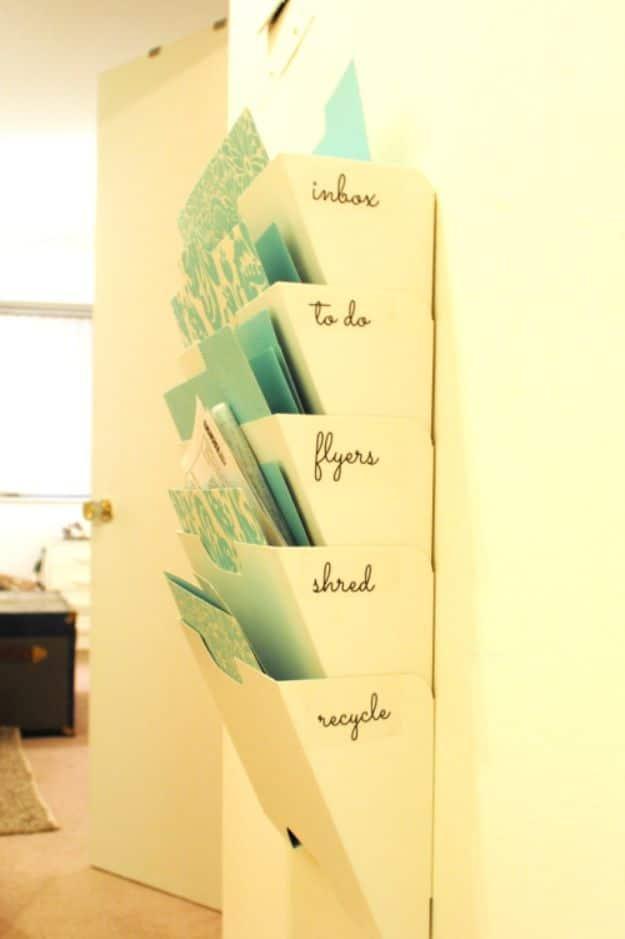
Five labelled sections in an IKEA magazine rack mounted on the wall by the door, each one named for an action rather than a category: inbox, to do, flyers, shred, recycle. That naming is the whole system. Mail gets divided the moment it comes through the door, so nothing ever lands on a counter, and the recycle section is kept deliberately small so it has to be emptied often. Clear label decals keep the rack looking like furniture rather than admin. Around twenty five dollars for the rack, folders and labels together.
Get the full tutorial at L'Amour Chez Nous.
19. Organization Bins
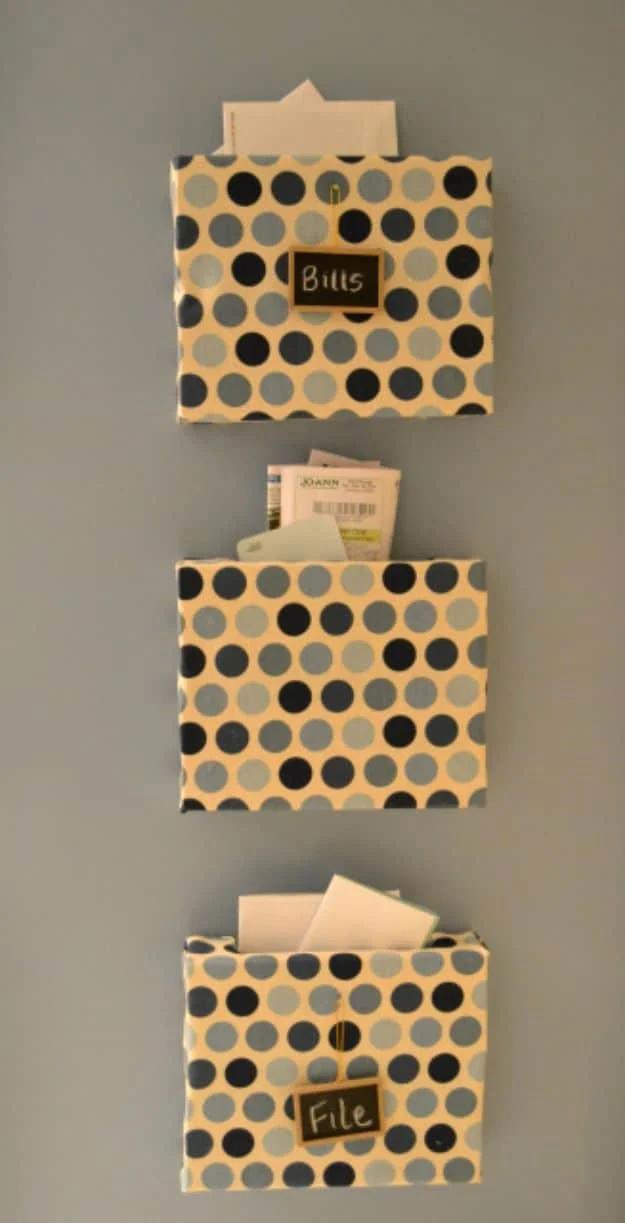
Three open fronted boxes built from scrap one by four and two by two offcuts cut to ten inches, wrapped in polka dot fabric like presents and hung five inches apart with a small chalkboard tag on each. Five dollars covered the lot, three fifty of it fabric. The wrapping method is exactly what it sounds like: fold, staple, cut where it bunches, and keep every fold and staple on the inside or the back. Chalkboard tags rather than painted labels mean the categories change whenever the household does, which is the point of a paper system.
Get the full tutorial at Tatertots and Jello.