
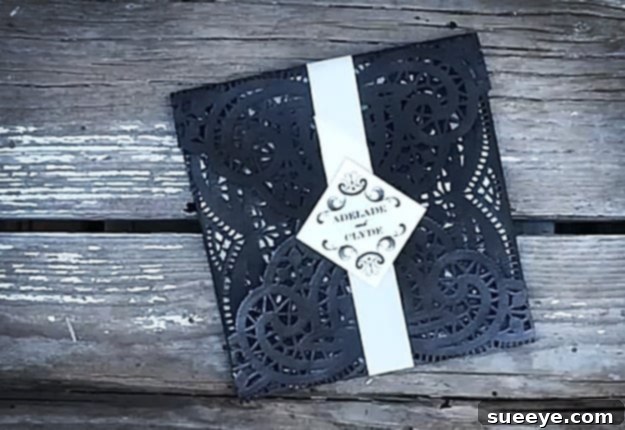
DIY Rustic Wedding Invitations: Crafting Vintage Charm on a Budget
Planning a wedding often comes with a myriad of decisions, and for many couples, finding ways to personalize their celebration while staying within budget is a key priority. For those envisioning a romantic and earthy rustic wedding, the invitations are the perfect opportunity to set the tone, hinting at the warm, natural, and timeless aesthetic of their special day. But what if you could create truly unique, beautiful, and personalized rustic wedding invitations without spending a fortune or dedicating months to intricate crafts?
This comprehensive guide unveils a wonderfully creative, simple, and surprisingly quick DIY method to craft stunning vintage-inspired invitations that your guests will not only admire but also cherish as a keepsake. Forget any preconceived notions that handmade wedding invitations must be overly complicated or demand excessive time. We’re about to explore a brilliant technique that seamlessly combines vintage charm with incredible ease and affordability. The secret lies in transforming simple, everyday materials into something truly spectacular – a faux vintage iron look achieved with ordinary spray paint and delicate paper doilies. Prepare to impress your loved ones with your ingenuity and artistic flair, all while significantly reducing your wedding stationery expenses and infusing your celebration with a deeply personal touch.
The Irresistible Appeal of DIY Wedding Invitations for Your Rustic Theme
Choosing to craft your own wedding invitations offers a wealth of advantages, particularly for couples drawn to the organic beauty and laid-back elegance of a rustic aesthetic:
- Significant Cost Savings: One of the most compelling reasons to embrace the DIY route is the remarkable potential for financial savings. Professionally designed and printed custom invitations can quickly become a substantial line item in your wedding budget. By carefully sourcing materials and investing a little of your own time and effort, you can achieve a high-end, bespoke look for a mere fraction of the cost, freeing up funds for other important wedding elements.
- Unmatched Personalization and Uniqueness: Your wedding day is a unique reflection of your love story. DIY invitations empower you to infuse every single detail with your distinctive personality, tastes, and shared journey. From the carefully chosen paper and font styles to the specific embellishments and overall design, this level of bespoke customization is virtually impossible to replicate with generic, off-the-shelf options. Each invitation becomes a tiny canvas telling your story.
- Heartfelt Sentimental Value: There is an undeniable magic in presenting your guests with an invitation that you have crafted with your own hands. This personal effort adds a profound layer of warmth, sincerity, and authenticity, transforming the invitation itself into a cherished memento that guests will want to keep long after the wedding day. It’s a tangible symbol of the care and love you’ve poured into preparing for your big day.
- Setting the Perfect Tone and Theme: The wedding invitation serves as the very first glimpse your guests get into your impending celebration. A handmade rustic invitation immediately communicates the overarching theme, the anticipated atmosphere, and the specific style of your event. This early preview builds excitement and anticipation, preparing your guests for the unique experience you’ve thoughtfully curated.
- A Rewarding Creative Outlet: For those who genuinely enjoy crafting and creative projects, undertaking DIY wedding invitations can be a truly delightful and profoundly rewarding experience. It offers a welcome creative respite from the more administrative or stressful aspects of wedding planning, allowing you to relax, express yourself, and create something beautiful.
Unveiling the “Vintage Iron” Doily Invitation: A Rustic Masterpiece
Our featured DIY wedding invitation concept brilliantly marries the delicate, intricate beauty of paper doilies with the rugged, industrial chic of aged iron. This unique combination creates an aesthetic that is both authentically rustic and elegantly vintage, delivering a dramatic impact that will surely captivate your guests. The most exciting part? This project is surprisingly straightforward to execute and yields results that look far more complex and expensive than they actually are.
Essential Materials for Your Vintage Iron Wedding Invitations:
Gathering your supplies is the exciting first step in bringing this vision to life. The true beauty of this project lies in the accessibility and affordability of its core components:
- Printed Wedding Invitation Text: This forms the central message of your invitation.
- Paper Choice: Select a sturdy cardstock, typically ranging from 100-120 lb cover stock. This weight provides a luxurious feel and prevents buckling. Neutral tones like cream, off-white, ivory, or even a light brown kraft paper will enhance the rustic feel. Consider cardstock with a subtle texture for added tactile appeal.
- Font Selection: Opt for fonts that perfectly complement a rustic or vintage aesthetic. Elegant scripts, classic serif fonts, or even a subtly distressed typewriter font can work wonders. Crucially, ensure that your chosen fonts are clear and easily legible to all your guests.
- Printing: You have the option to print these at home if you possess a high-quality printer, or for a truly professional and crisp finish, utilize the services of a local print shop. Ensure all ink is completely dry before moving to the next steps.
- Square Paper Doilies: These delicate paper items are the magical ingredient that allows us to achieve the convincing vintage iron effect.
- Size: Choose doilies that are slightly larger than your main invitation text cards. This will allow for a beautiful, decorative border once they are attached, mimicking a wrought-iron frame.
- Type: Standard paper doilies are ideal for this project, being both inexpensive and readily available. You can easily find them in craft stores, party supply shops, or through various online retailers.
- Spray Paint: The transformative element that gives your doilies their aged “iron” appearance.
- Color: For the most authentic vintage iron effect, consider matte black, a deep oil-rubbed bronze, dark charcoal grey, or an antique metallic bronze. Experiment with different metallic finishes if you wish to add a subtle shimmer that catches the light.
- Finish: A matte or satin finish typically appears more genuine and aged than a high-gloss finish when aiming for a weathered metal look.
- Brand: Any reputable, good-quality spray paint formulated for craft projects will yield excellent results.
- Safety Precautions: It is imperative to always use spray paint in a very well-ventilated area, ideally outdoors. Furthermore, wear a protective mask to prevent inhaling fumes and gloves to protect your hands.
- Ribbon or Twine: This element adds a touch of refined elegance and helps to neatly secure all parts of your invitation together.
- Material: Natural jute twine, delicate satin ribbon, rustic lace, or textured burlap ribbon would all harmoniously complement a rustic wedding theme.
- Width & Color: Select a ribbon width that balances well with your overall design and a color that seamlessly coordinates with your wedding’s specific palette.
- Adhesive: Essential for securely attaching the painted doily to your invitation card.
- Type: A strong craft glue, reliable double-sided tape, or even a hot glue gun (used very sparingly and with precision) will work effectively. Ensure that your chosen adhesive dries clear and will not cause the paper to buckle or warp.
- Optional: Seals or Embellishments: For a truly polished and bespoke finish.
- Wax Seals: These offer a classic, timeless vintage touch. You can purchase custom stamps featuring your initials, wedding date, or a simple elegant design.
- Foil Seals: Silver or gold foil seals can instantly inject a touch of glamour and sophistication.
- Custom Stickers: Design your own personalized stickers with your wedding logo, a meaningful motif, or a complementary pattern for a unique flourish.
- Basic Craft Tools: A sharp pair of scissors, a protective cutting mat, a precise ruler, and potentially a bone folder for creating crisp, professional-looking creases.
Step-by-Step Guide: Crafting Your Exquisite Vintage Iron Wedding Invitations
Now, let’s transform these materials into beautiful, tangible invitations with a straightforward, easy-to-follow process:
- Print and Prepare Your Invitations: Begin by ensuring that your main invitation text, along with any necessary inserts (such as RSVP cards, directions, or details cards), are perfectly printed and trimmed to their desired size. Allow all ink to dry completely to prevent smudging before proceeding to the next steps.
- Prepare Your Doilies for Painting: Lay out your square paper doilies flat on a well-protected surface in a thoroughly ventilated area. Old cardboard boxes, sheets of newspaper, or a dedicated drop cloth are excellent for protecting your workspace. Arrange the doilies with sufficient space between each one to ensure even and unobstructed spray paint application.
- Apply the Spray Paint for the “Iron” Effect:
- Thoroughly shake the spray paint can according to the manufacturer’s specific instructions, typically for about one minute, to ensure the paint is well mixed.
- Hold the can at a consistent distance of approximately 6-8 inches away from the doilies.
- Apply the paint in light, even, sweeping motions. It is always preferable to apply several thin coats rather than one heavy coat, as this technique prevents unsightly drips and runs, and crucially, ensures that the intricate lace-like pattern of the doily remains distinct and visible.
- Allow each coat to dry completely to the touch before applying the subsequent coat. Always refer to the spray paint can for precise drying times.
- If you desire the “iron” effect on both sides of the doily, carefully flip them over once the first side is dry and repeat the painting process. However, for most applications, only the front-facing side is necessary.
- Assemble the Invitation Components: Once your painted doilies are absolutely dry and no longer tacky to the touch:
- Carefully center your trimmed, printed invitation text card onto the back of a painted doily.
- Apply a thin, consistent line of adhesive around the edges of the printed invitation card, or use small, strategically placed dots of glue in each corner to firmly attach it to the doily. Press gently but firmly to ensure good adhesion. The delicate, now “iron-look” edges of the doily will beautifully frame your invitation text, creating that striking and sophisticated vintage iron frame effect.
- Add the Ribbon Embellishment:
- Cut a length of your chosen ribbon or twine that is long enough to gracefully wrap around your assembled invitation.
- Wrap the ribbon around the center of the invitation (you can choose to wrap it horizontally or vertically, depending on your preferred aesthetic) and tie it into a neat bow or a simple, elegant knot on the front.
- For an extra personal touch, you can slide a small, custom-made tag featuring your guests’ names, your wedding date, or a sweet message like “Together Forever” under the ribbon before securing the knot or bow.
- Seal Your Creations (Optional but Highly Recommended): For that ultimate touch of sophistication and to securely hold multi-part invitations together:
- Apply your chosen seal – whether it’s a traditional wax seal, a shimmering foil sticker, or a personalized custom sticker – to the back of the envelope. Alternatively, you can apply it directly onto the ribbon for an extra decorative element. This step adds a truly bespoke and luxurious finish.
- Prepare for Mailing: Gently insert your exquisite, handmade invitations into their corresponding envelopes. Given the added thickness of the doily and ribbon, consider using a slightly larger envelope to ensure a comfortable fit. Remember to accurately check postage requirements, as any extra thickness or weight may necessitate additional postage.
Expert Tips for Success and Inspiring Personalization Ideas
To ensure your DIY invitation project is a smooth, enjoyable, and ultimately successful endeavor, consider these helpful tips and creative personalization ideas:
- Always Test First: Before committing to your entire batch, always conduct a test run with one doily and a piece of scrap paper. This invaluable step allows you to get a precise feel for the spray paint application, drying times, and the effectiveness of your chosen adhesive.
- Optimize with Batch Processing: To significantly maximize your efficiency, spray paint all your doilies in one session. Once they are thoroughly dry, you can establish an organized assembly line for attaching the invitations, tying the ribbons, and applying seals, streamlining the entire process.
- Embrace Unique Imperfections: Remember that handmade items possess a distinct and inherent charm. Don’t strive for machine-like perfection; the subtle, natural variations in each invitation will only enhance its rustic appeal and individuality.
- Thoughtful Layering: Consider adding an extra layer of depth to your main invitation card. You can mount it onto a slightly larger piece of colored cardstock that complements your wedding colors before attaching it to the doily. This creates visual interest and an additional pop of color or texture.
- Explore Beyond Doilies: While paper doilies are fantastic, let your creativity flow! Think about other delicate materials you could spray paint for a similar effect: intricately laser-cut paper designs, small metal charms, or even delicate, pressed dried leaves for a truly organic touch.
- Elegant Envelope Liners: Elevate the “unboxing” experience for your guests by incorporating a custom envelope liner. This could be in a complementary pattern, a solid color that matches your wedding palette, or even a subtle texture.
- Cohesive Stationery Suite: Extend the enchanting vintage iron doily theme across all your wedding stationery. Apply similar design elements to your RSVP cards, thank you notes, ceremony programs, and reception menus for a truly cohesive and professional wedding suite.
- Guest Count Considerations: For exceptionally large weddings, realistically assess the time commitment involved. If your guest list is extensive, consider enlisting the help of friends, family, or even hosting a “crafting party” to make the process more manageable and fun.
Additional Rustic Wedding Invitation Ideas to Spark Your Imagination
If the vintage iron doily look has sparked your creative spirit but you’re also keen to explore other charming avenues, here are a few more beloved rustic DIY invitation concepts to inspire you:
- Kraft Paper & Natural Twine: This combination is the epitome of simple, elegant, and quintessentially rustic. Pair natural kraft cardstock with earthy jute or hemp twine. You could further embellish them with a tiny sprig of dried lavender, a small wooden charm, or a simple personalized tag.
- Lace & Burlap Accents: Utilize strips of raw burlap and delicate lace to adorn plain or textured cardstock. These rich textures instantly evoke the cozy, inviting feel of a farmhouse, barn, or woodland wedding celebration.
- Wood Veneer & Engraved Details: For a truly unique and luxurious rustic invitation, consider incorporating thin wood veneer sheets (readily available at most craft supply stores). These can be professionally printed with your text or even laser-engraved for an extraordinary, tactile effect.
- Botanical & Floral Elements: Bring the beauty of nature directly into your invitations by incorporating carefully pressed flowers, elegant watercolor floral designs, or simple, understated greenery illustrations. These elements add an organic and fresh touch.
- Mason Jar Theme: The iconic mason jar is a hugely popular motif in rustic decor. Design your invitations to feature a charming mason jar graphic, perhaps illustrated as if it’s filled with twinkling fairy lights, delicate wildflowers, or even your wedding date in a whimsical font.
Conclusion: Your Dream Rustic Invitations Await!
Embarking on the journey of creating your own DIY rustic wedding invitations, particularly with the innovative faux vintage iron doily technique, is far more than just a clever way to manage your wedding budget. It’s a deeply rewarding opportunity to infuse your heart, personality, and unique love story into every single detail of your special day. This project beautifully demonstrates that crafting stunning, handmade stationery doesn’t require advanced artistic skills, an extensive crafting background, or endless hours of painstaking labor. With a handful of readily available, simple materials, a dash of your personal creativity, and this easy-to-follow, detailed guide, you possess everything you need to craft invitations that are as unique, memorable, and captivating as your love story itself.
Your cherished wedding guests are sure to be utterly enchanted by the beauty, thoughtfulness, and personal touch evident in these handcrafted keepsakes. So, gather your chosen supplies, find a comfortable and well-lit workspace, and enthusiastically embark on the incredibly rewarding journey of transforming your dream rustic wedding invitations into a beautiful reality. Happy crafting and congratulations on your upcoming wedding!