
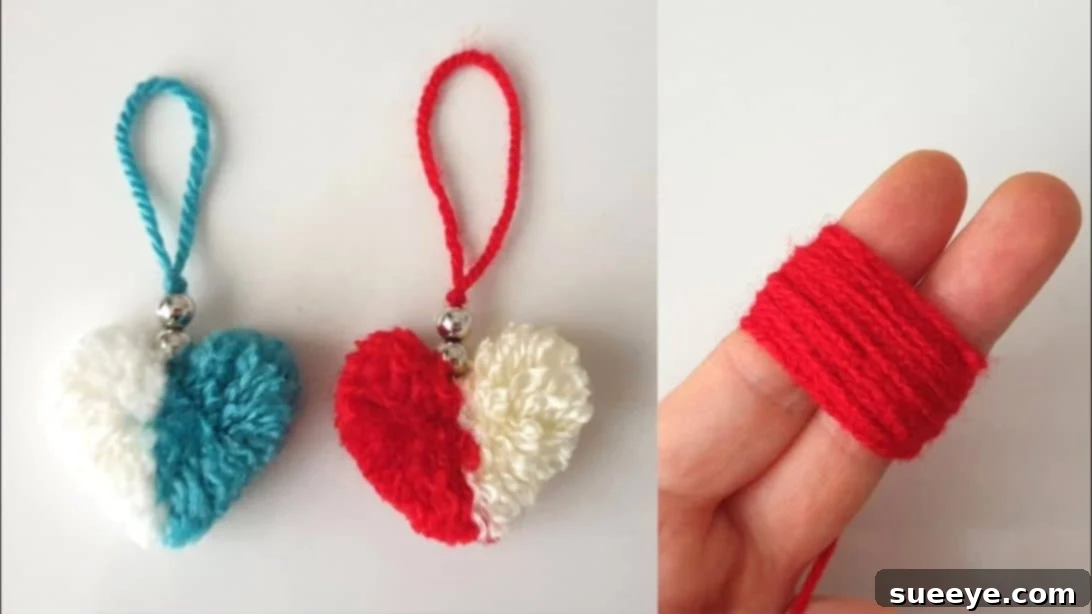
Craft the Perfect Valentine’s Day Gift: A Super Easy DIY Pom Pom Heart Tutorial
Are you searching for a unique and heartfelt gift idea for Valentine’s Day, or simply looking to add a touch of handmade charm to your home decor? Look no further! Creating something by hand imbues it with a special kind of warmth and personal touch that store-bought items simply can’t replicate. This super easy pom pom heart tutorial, inspired by the wonderful Meryemce Hobiler on Youtube, offers a delightful way to craft a truly memorable present.
Whether you prefer a minimalist single-color design or a more vibrant two-toned creation, this project is incredibly versatile and straightforward. While a single-color pom pom heart offers classic elegance, the two-toned version truly adds depth and visual interest, making it exceptionally charming. It’s a fantastic project for crafters of all skill levels, requiring only a few basic materials and a little bit of patience. Get ready to transform simple yarn into an adorable, fluffy symbol of love!
Below, you’ll find a detailed, step-by-step guide that walks you through every part of the process, from creating your pom poms to shaping them into a perfect heart and adding a lovely decorative handle. For those who prefer visual learning, the original video provides an excellent companion. Let’s gather our supplies and begin crafting a beautiful, handmade pom pom heart that will surely bring joy to anyone who receives it.
Materials You’ll Need:
Before diving into the creative process, ensure you have all the necessary tools and materials readily available. Gathering everything beforehand makes the crafting experience much smoother and more enjoyable.
- Two Yarns in Different Colors: Opt for soft, fluffy yarns in colors that complement each other or evoke a romantic theme. Medium-weight acrylic yarn is often easiest to work with for pom-poms, but feel free to experiment with different textures for unique results.
- Sharp Scissors: A good pair of sharp scissors is crucial for clean cuts, especially when trimming the pom-poms into a neat heart shape. Dull scissors can lead to frayed edges and a less refined finish.
- Yarn Needle (or Tapestry Needle): This is essential for securely tying your pom-poms together and adding the decorative beads. Look for one with a large eye that can easily accommodate yarn.
- Comb: A simple comb (a pet brush with fine bristles or a regular hair comb works well) will help fluff up your pom-poms and reveal any stray strands that need trimming, ensuring a perfectly even and plush texture.
- Two Decorative Beads: These will form an elegant handle for your pom pom heart, allowing it to be hung or simply adding a touch of embellishment. Choose beads that match or contrast beautifully with your chosen yarn colors.
Step-by-Step Instructions for Your Fluffy Pom Pom Heart:
Follow these detailed steps carefully to create your beautiful two-toned pom pom heart. Precision and patience are key to achieving a perfectly shaped and wonderfully fluffy finished product.
Step 1: Preparing Your First Pom Pom (Color A)
Begin by taking one of your chosen yarn colors. Cut a small, separate strand of this yarn, approximately 6-8 inches long. This piece will be used to tie off your pom pom later, so ensure it’s long enough to work with comfortably. Carefully insert this small strand between your index finger and middle finger, laying it across the palm side, close to the base of your fingers. This strategic placement ensures it will be perfectly positioned to cinch the center of your yarn loop.
Step 2: Crafting the First Pom Pom Base
Now, take the working end of your first yarn roll. Begin wrapping the yarn around your index and middle fingers. Consistency is vital here: wrap the yarn firmly but not too tightly, ensuring an even tension with each loop. Continue wrapping the yarn around your fingers approximately 40 times. The more wraps you make, the denser and fluffier your pom pom will be, so feel free to adjust this number slightly based on your desired fullness. Once you’ve completed 40 wraps, carefully cut the yarn from the roll, leaving a short tail.
Next, take the small strand of yarn you placed between your fingers in Step 1. Carefully bring its ends together and tie it loosely around the center of the wrapped yarn loop. Make sure the knot is centered. Once tied, gently slide the entire wrapped loop off your fingers. Immediately tighten the small strand as much as possible, pulling firmly to create a secure cinch in the middle of your yarn bundle. Tie several more tight knots (a double knot or square knot is recommended) to ensure it’s extremely secure and won’t unravel. Trim any excess length from this tying strand, leaving just a tiny bit close to the knot.
Step 3: Preparing Your Second Pom Pom (Color B)
Now, repeat the exact same process from Step 1 with your second chosen yarn color. Cut another small strand (6-8 inches) of this second yarn and insert it between your index and middle fingers. This consistency in preparation will ensure both pom poms are ready for their primary wrapping phase and will create a symmetrical final heart.
Step 4: Crafting the Second Pom Pom Base
Just as you did with the first color, take the end of your second yarn roll and wrap it around your index and middle fingers approximately 40 times. Again, maintain an even tension and count carefully for consistency. Cut the excess yarn from the roll. Use the small strand you placed earlier to loosely tie around the middle of the wrapped loop. Carefully remove the entire loop from your fingers, then tighten the small strand as firmly as possible to cinch the center. Secure it with several strong knots to prevent loosening. Finally, trim any excess from this tying strand. You now have two distinct pom pom bases, each ready for the next stage of transformation!
Step 5: Connecting the Pom Poms to Form the Heart’s Foundation
With both pom pom bases prepared, it’s time to transform them from simple bundles of yarn into the beginnings of a heart. First, take each pom pom and, using your sharp scissors, carefully cut through all the yarn loops around the edges. This will create many individual strands, giving your pom pom its characteristic fluffy texture. Be thorough, ensuring all loops are cut open.
Now, select a medium-length strand from the first pom pom (Color A) – ideally, one of the original tying strands or a newly cut one from the pom pom itself. Thread this strand through your yarn needle. Carefully insert the needle through the very center of the first pom pom, passing it completely through to the other side. Then, using the same needle and strand, meticulously thread it through the center of the second pom pom (Color B). Position the two pom poms side-by-side, pressing their flat, tied centers together. Pull the strand taut and tie the two pom poms together tightly, ensuring they are firmly joined at their cores. Create several strong, secure knots to keep them from separating. This connection forms the critical foundation for your heart shape. Trim any excess tying yarn close to the knots.
Step 6: Sculpting Your Pom Pom into a Perfect Heart Shape
This step is where your pom pom truly begins to take on its lovable heart form! Start by drawing a small, symmetrical heart shape on a piece of paper. This will serve as your trimming pattern. The size of your paper heart should be roughly the size you envision your finished pom pom heart to be.
Carefully place your paper heart pattern over your connected pom poms. Using your sharp scissors, begin to trim the excess yarn around the edges, following the outline of your paper pattern. Work slowly and patiently, rotating the pom pom frequently to ensure an even trim from all angles. Don’t try to cut too much at once; instead, take small snips, gradually shaping and sculpting the yarn. Remember, you can always trim more, but you can’t put yarn back! Aim for smooth, rounded curves at the top and a defined point at the bottom.
Once you’ve achieved a basic heart shape, take your comb and gently brush through the yarn strands. This action not only fluffs up the pom pom, making it wonderfully soft and full, but also helps to reveal any hidden longer strands or uneven areas. After combing, give your heart one final trim, snipping away any loose, straggling strands or areas that appear lumpy. Continue combing and trimming until you are satisfied with the neatness, symmetry, and overall fluffiness of your pom pom heart. This careful shaping is what will make your handmade gift truly special.
Step 7: Adding the Elegant Beaded Handle
The final touch for your beautiful pom pom heart is adding a charming handle, perfect for hanging or simply adding a decorative flourish. Cut a long strand of yarn, approximately 12-18 inches, depending on how long you want your handle to be. Thread this long strand through your yarn needle.
Now, carefully thread your two decorative beads onto this yarn strand. Position them at the desired length for your handle – perhaps a few inches from the end. Once the beads are in place, tie a secure knot directly below them to fix their position on the strand. You can make a simple overhand knot or a double knot to ensure they won’t slide.
Next, take the needle with the beaded strand and carefully insert it through the very middle of your freshly sculpted pom pom heart. Push the needle all the way through until the yarn emerges from the other side. Adjust the loop created by the yarn to your preferred handle length. Once you’re happy with the loop, tie the two ends of the yarn strand together tightly, securing it to the heart. Make several firm knots to ensure the handle is durable and won’t come undone. Trim any excess yarn close to the knot, and voilà! Your super easy and utterly adorable pom pom heart is complete!
Tips for Success and Creative Variations
To ensure your pom pom heart project goes smoothly and to inspire further creativity, consider these helpful tips and variations:
- Yarn Choices: Experiment with different yarn textures! Fluffy chenille yarn creates an incredibly soft heart, while chunky wool yarn offers a more rustic, substantial feel. Variegated yarns can also add interesting color shifts without needing two separate colors.
- Color Combinations: Don’t limit yourself to just two colors. You could create an ombre effect with shades of the same color, or use three distinct colors for a vibrant, playful look. Consider using glitter yarn for a touch of sparkle!
- Sizing Up or Down: To make smaller pom pom hearts for a garland or gift tags, simply wrap the yarn fewer times around your fingers (or use a smaller pom pom maker). For a larger decorative piece, you might wrap more times or use a wider object than your fingers for wrapping, like a piece of cardboard.
- Troubleshooting Uneven Pom Poms: If your pom poms seem uneven after the initial cut, don’t worry! This is where the comb and careful trimming come in handy. Keep combing and slowly snipping away until you achieve the desired roundness or heart shape. Patience is key for a polished finish.
- Adding More Embellishments: Beyond beads, you could sew on small sequins, attach a tiny charm, or even embroider small initials onto your finished heart for an extra personal touch.
- Display Ideas: These pom pom hearts are perfect as ornaments, keychains, bag charms, or even strung together to create a charming garland. They also make lovely decorative accents for gift wrapping.
Making handmade gifts is a truly rewarding experience, allowing you to pour your love and effort into something unique and meaningful. This super easy pom pom heart is not just a craft project; it’s a tangible expression of affection. We hope you enjoyed creating this charming piece!
Don’t forget to share your beautiful creations with us and inspire fellow crafters. Happy crafting!