
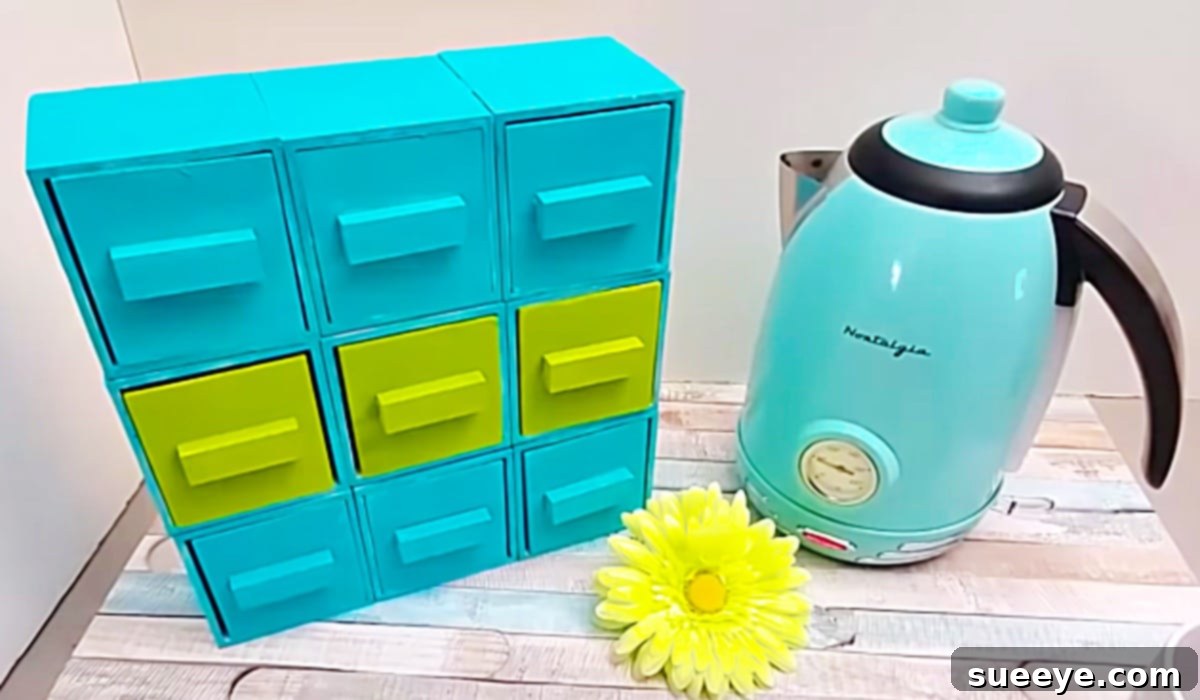
Are you looking for an incredibly affordable yet stylish way to organize your home? Look no further than this brilliant Dollar Tree wood cube organizer project, inspired by the creative minds at Life At 50 & Beyond on YouTube. This DIY solution is not only budget-friendly but also highly versatile, transforming simple Dollar Tree finds into a functional and beautiful storage unit. Whether you need a dedicated space for your essential oil collection, an elegant jewelry box, or a compact organizer for kitchen essentials, craft supplies, or office items, this customizable chest fits the bill perfectly. Its design offers individual compartments, making it ideal for keeping smaller items neatly tucked away and easily accessible. Plus, for sensitive items like essential oils, storing them in a dark, enclosed space is crucial, and this organizer provides just that.
Craft Your Own Custom Storage: The Ultimate Dollar Tree Wood Cube Organizer
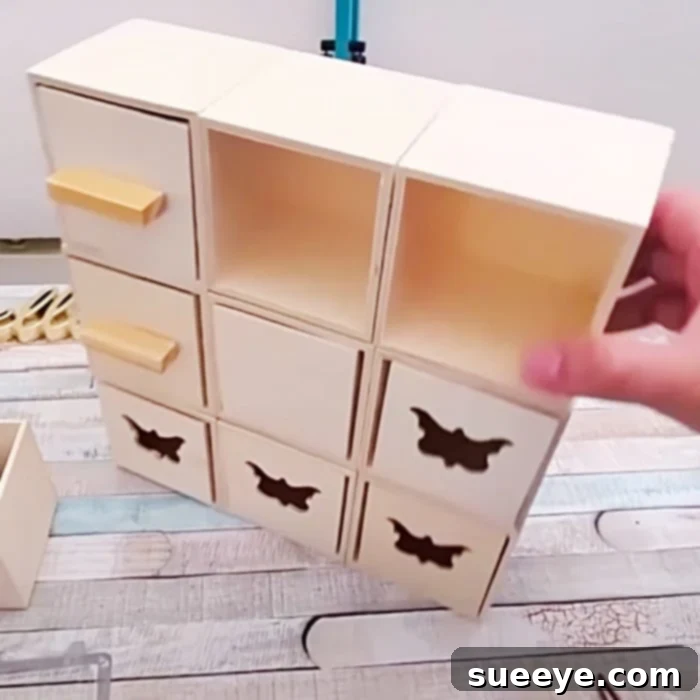
The beauty of this project lies in its simplicity and the potential for endless personalization. Using readily available Crafter’s Square wooden boxes from Dollar Tree, you can construct a charming mini chest that reflects your personal style. While these boxes come with pre-cut designs, a clever twist involves turning them around to create a smooth front surface, allowing you to add your choice of drawer pulls – from rustic tumbling tower game pieces to elegant hardware store finds. This project is a testament to the power of DIY: you are the master, dictating every detail from the layout to the finish, ensuring the final outcome is exactly what you envision for your home organization needs.
Essential Materials for Your Dollar Tree Wood Cube Organizer
Gathering your supplies for this project is part of the fun, especially knowing most items can be found at your local Dollar Tree, keeping the overall cost incredibly low. Here’s what you’ll need to bring this custom storage solution to life:
- Crafter’s Square Wooden Boxes (from Dollar Tree): These are the foundation of your organizer. Purchase as many as you need to achieve your desired number of compartments and overall size. They often come in various shapes and sizes, so select those that best fit your vision.
- Chalk Paint: A vital component for achieving that popular farmhouse, rustic, or shabby-chic aesthetic. Chalk paint adheres well to wood without extensive prep and offers a lovely matte finish. Choose a color that complements your home decor.
- Gorilla Glue (or other strong wood adhesive): For a durable and long-lasting bond between your wooden boxes. This glue is excellent for structural integrity.
- Hot Glue Gun: Handy for quick temporary holds while the stronger Gorilla Glue sets, or for attaching decorative elements.
- Glue Sticks: For your hot glue gun.
- Tumbling Tower Game (from Dollar Tree): An ingenious and super affordable option for creating rustic, unique drawer pulls. The small wooden blocks are perfect for this purpose.
- Alternative Drawer Pulls (Optional): If you prefer a different aesthetic, explore your local hardware store or craft shop for various knobs, handles, or decorative pulls that match your style.
- Small Paint Brushes: For applying your chalk paint smoothly and evenly.
- Sandpaper (fine-grit, optional): For light sanding before painting or for distressing techniques.
- Sealer/Topcoat (optional): To protect your painted finish and enhance durability, especially for frequently used organizers.
Crafting Your Custom Organizer: Detailed Directions
Creating this awesome Dollar Tree wood cube organizer, as demonstrated by Life At 50 & Beyond on YouTube, is a rewarding process that can be completed in a few easy steps. The key is to plan your layout and take your time with each stage to ensure a sturdy and beautiful finished product.
Step 1: Plan Your Layout and Arrange the Boxes
Begin by envisioning the final shape and size of your organizer. Take your Crafter’s Square wooden boxes and arrange them on a flat surface in the configuration you desire. Common layouts include a 2×2 square, a 2×3 rectangle, or a staggered design. Remember, for most applications, you’ll want to turn the boxes around so the pre-cut designs face inwards, allowing for a flat front surface where you can attach your chosen pulls. Experiment with different arrangements until you find the perfect one that suits your space and storage needs. Consider how many compartments you require and the overall dimensions.
Step 2: Securely Glue the Boxes Together
Once you’ve finalized your layout, it’s time to bond the boxes. Apply a generous amount of strong wood adhesive, like Gorilla Glue, to all the connecting surfaces of the wooden boxes. Press them firmly together, ensuring they are perfectly aligned. For added stability and to hold the boxes in place while the Gorilla Glue cures (which can take several hours), use a hot glue gun to apply small dabs of hot glue to the seams. Hot glue sets quickly, providing an immediate hold. Wipe away any excess glue that squeezes out before it dries completely. Allow ample time for the primary wood adhesive to fully cure according to the manufacturer’s instructions, ensuring a robust and lasting structure for your organizer.
Step 3: Attach Your Drawer Pulls
Now for the handles! This step truly allows for customization. If you’re opting for the budget-friendly and charming Tumbling Tower game pieces, simply glue one piece to the center of each drawer front using strong adhesive. For a more traditional or elegant look, select drawer pulls from a hardware store. These typically require drilling small pilot holes through the front of each box (drawer) and then securing the pull with screws from the inside. Whichever option you choose, ensure the pulls are firmly attached and centered for a polished appearance. If you want to use the original cut-out design as a pull, you can simply skip this step, but for a smoother, customizable front, adding new pulls is recommended.
Step 4: Paint and Personalize Your Organizer
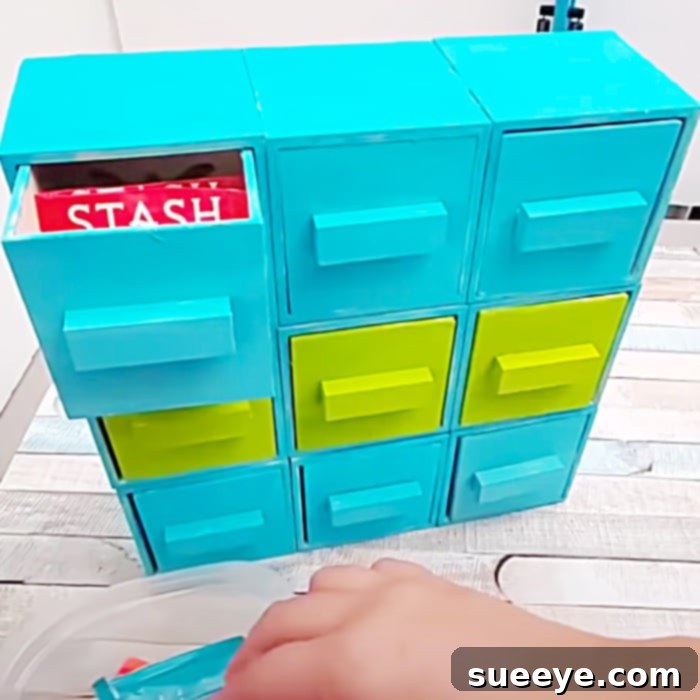
With the structure and pulls in place, it’s time to bring your vision to life with paint. Begin by ensuring the entire surface of your assembled organizer is clean and dust-free. If desired, a light sanding with fine-grit sandpaper can help the paint adhere better and achieve a smoother finish. Then, apply your chosen chalk paint. Chalk paint is forgiving and often requires little to no priming, providing excellent coverage. Apply thin, even coats, allowing each coat to dry thoroughly before applying the next. You might need two or three coats for complete coverage. For a classic farmhouse look, consider lightly distressing the edges with sandpaper once the paint is dry, revealing hints of the wood beneath. To protect your beautiful finish, especially if the organizer will see frequent use, apply a clear topcoat or wax sealer. This will enhance durability and make it easier to clean.
Beyond Essential Oils: Versatile Uses for Your DIY Organizer
While this Dollar Tree wood cube organizer is ideal for essential oils, offering a dark and compartmentalized space for protection and easy access, its functionality extends far beyond. The individual drawers are perfect for a multitude of organizational challenges around your home. Let’s explore some popular and creative ways to utilize your new custom storage unit:
A Stunning DIY Jewelry Box
Transform your organizer into a beautiful and functional jewelry box. The separate compartments are perfect for sorting various types of jewelry. Dedicate one drawer to rings, another to earrings, and perhaps a third for delicate necklaces, preventing tangles and making it easy to find what you’re looking for. You can even line the drawers with felt or decorative paper for an extra touch of luxury and to protect your precious items.
Craft Supply Haven
Crafters, rejoice! This organizer is a dream for keeping small supplies in order. Store beads, buttons, spools of thread, small embellishments, embroidery floss, or miniature tools like scissors and crochet hooks. No more rummaging through cluttered boxes; everything will have its own designated spot, making your crafting sessions more efficient and enjoyable.
Desk & Office Organizer
Declutter your workspace by using this mini chest for desk essentials. Pens, pencils, paper clips, sticky notes, small notepads, USB drives, and even charging cables can be neatly stored away, keeping your desk tidy and productive. Its compact size means it won’t take up too much valuable desk real estate.
Kitchen Convenience
In the kitchen, this organizer can hold tea bags, coffee pods, sugar packets, small spice blends, or even small baking supplies like sprinkles and food coloring. Keep it on your countertop or inside a pantry for easy access to frequently used items, adding a touch of farmhouse charm to your culinary space.
Bathroom Beauty & Toiletries
Organize your bathroom vanity with ease. Use the drawers for cotton balls, Q-tips, hair ties, small tubes of creams, travel-sized toiletries, or makeup items like lipsticks, eyeliners, and eyeshadow singles. It’s a stylish way to keep your bathroom essentials organized and within reach without cluttering surfaces.
Kid’s Room & Playroom Storage
Teach kids the importance of organization with their own mini chest. Perfect for small toys, building blocks, craft supplies like crayons and markers, or even tiny collectible figures. The easy-to-open drawers make cleanup a breeze for little hands.
Beyond the Basics: Customization Tips
- Stencils & Decals: Add decorative stencils, labels, or vinyl decals to the drawer fronts to clearly identify contents or to add an artistic touch.
- Patterned Paper: Line the inside of the drawers with decorative scrapbook paper or fabric for an extra pop of color and texture.
- Distressing Techniques: If you love the shabby-chic look, after painting, use fine-grit sandpaper to lightly distress the edges and corners, revealing the wood beneath for an aged, farmhouse aesthetic.
- Color Blocking: Paint each drawer a different complementary color for a vibrant and playful organizer.
- Legs or Feet: For a more furniture-like feel, consider adding small wooden bun feet to the bottom of the entire unit.
Why Choose Dollar Tree DIY for Home Organization?
The appeal of Dollar Tree DIY projects, especially for home organization, is multifaceted. Primarily, it’s about incredible affordability. When you can source the foundational elements for a functional and beautiful storage solution for just a few dollars, it empowers you to tackle organizational challenges without breaking the bank. This makes custom decor accessible to everyone.
Secondly, Dollar Tree items often provide a fantastic blank canvas. The Crafter’s Square wooden boxes are simple, unfinished pieces that are perfect for painting, staining, or embellishing. This allows for immense creative freedom. You’re not just buying a product; you’re buying the raw materials for a personalized piece that truly reflects your style and needs. Unlike mass-produced organizers, your DIY creation will have a unique charm and story.
Finally, there’s the immense satisfaction of creating something with your own hands. Completing a DIY project, especially one that improves the functionality and aesthetics of your home, provides a sense of accomplishment. It’s an opportunity to relax, be creative, and transform ordinary items into extraordinary home solutions. This Dollar Tree wood cube organizer project embodies all these benefits, proving that elegance and efficiency don’t have to come with a hefty price tag.
Conclusion: Your Perfect Storage Solution Awaits
This mini wooden chest is undeniably cute, incredibly functional, and remarkably affordable. By following these simple steps, you can create a custom Dollar Tree wood cube organizer that not only solves your storage dilemmas but also adds a personalized touch to your home decor. Whether you’re safeguarding precious essential oils, neatly arranging your jewelry, or tidying up craft supplies, this DIY project offers a versatile and budget-friendly solution.
So, head to your nearest Dollar Tree, grab those Crafter’s Square boxes, and embark on a fun and rewarding DIY journey. Unleash your creativity, choose your colors, and customize your organizer to perfection. You’ll be amazed at what you can achieve with a little imagination and a few dollars. Share your creations and inspire others to discover the joy of crafting their own unique storage solutions!