
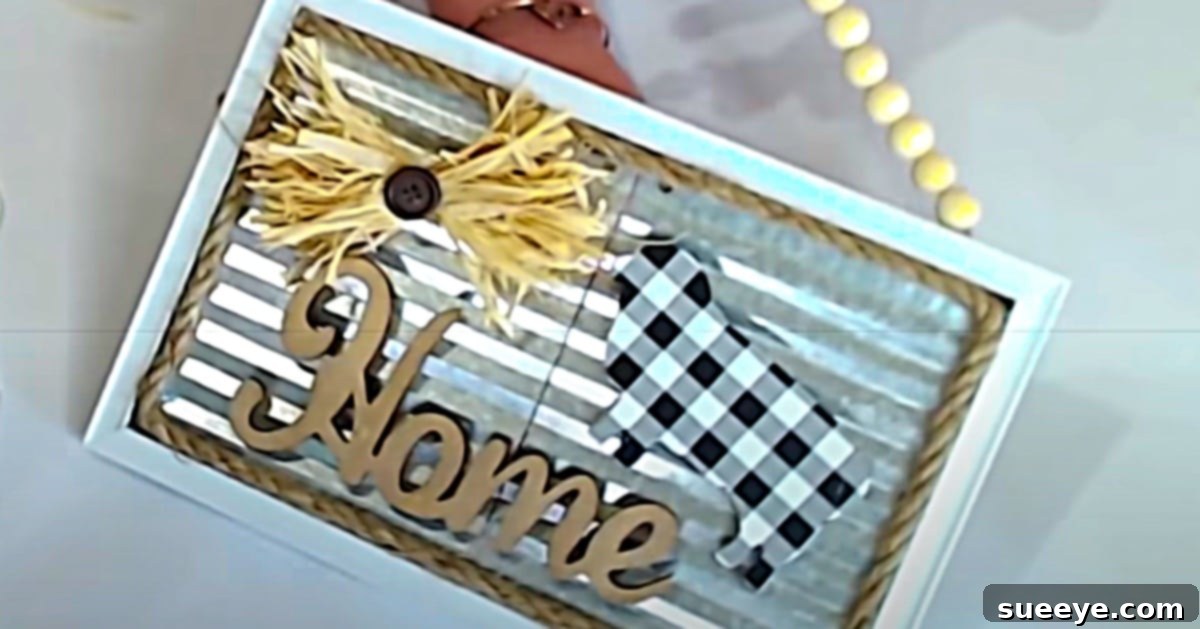
Dollar Tree Farmhouse Magnet Sign: Create Your Own Rustic & Functional Decor
Transform your kitchen or any living space with a touch of charming farmhouse style! This DIY magnet sign project is an absolute delight, perfectly designed to infuse your home with warmth and a welcoming atmosphere, ideal for displaying notes, recipes, or even children’s artwork. We recently stumbled upon an inspiring magnet sign video tutorial by DIY with Amber Strong on YouTube, and her step-by-step guidance makes crafting this beautiful piece look incredibly simple and rewarding. Using readily available and affordable materials, primarily from Dollar Tree, you can create a personalized decor item that looks professionally made.
The core of this delightful DIY magnet board involves repurposing a standard picture frame from Dollar Tree. This frame then becomes the sturdy base for a piece of corrugated galvanized metal, which serves as the perfect magnetic surface. The beauty doesn’t stop there; the magnetic decorations themselves are a creative endeavor, often made from decorative letters, animal cut-outs, or any other charming shapes you desire, all elegantly adorned using Mod Podge. To complete the authentic farmhouse aesthetic, the project includes a fantastic lesson in bead threading, adding a homespun, rustic cuteness that elevates the entire magnet sign to a superb level of craftsmanship and charm.
Why a DIY Farmhouse Magnet Sign is a Must-Have for Your Home
In an age where personalized home decor is highly valued, a handmade farmhouse magnet sign stands out. It’s more than just a place to stick magnets; it’s a statement piece that reflects your style and creativity. The farmhouse aesthetic, with its emphasis on natural textures, warm colors, and a cozy ambiance, has captured the hearts of many homeowners. This project perfectly embodies that spirit, bringing a touch of rustic elegance without breaking the bank. Imagine a dedicated spot in your kitchen for important reminders, cherished family photos, or even a rotating display of inspirational quotes – all held securely by charming, handmade magnets on your custom-built board.
Beyond its aesthetic appeal, a DIY magnet board offers incredible functionality. It helps declutter countertops and refrigerators by providing a centralized, stylish location for all those small notes and reminders. It’s also an excellent way to organize recipes, shopping lists, or to display invitations and school notices in an attractive manner. The satisfaction of creating something beautiful and useful with your own hands is truly unparalleled, making this project not just a craft, but a meaningful addition to your home environment.
Essential Materials for Your Farmhouse Magnet Board Craft
One of the most appealing aspects of this farmhouse magnet sign project is the accessibility and affordability of its materials. Most items can be sourced from dollar stores or craft supply retailers, ensuring that this DIY endeavor remains budget-friendly. Here’s a detailed look at what you’ll need:
- A Small Picture Frame (from Dollar Tree): This forms the structural base of your magnet sign. Opt for a simple, sturdy frame that complements the farmhouse aesthetic. The size can vary based on your preference and the space you intend to hang it. Look for frames with a decent depth to accommodate the corrugated metal.
- A Piece of Corrugated Metal: This is the star of the show, providing the magnetic surface. You can often find small sheets of corrugated metal at craft stores, hardware stores, or even online. Ensure it’s thin enough to fit within your picture frame’s opening but sturdy enough to hold magnets securely. Galvanized metal is ideal for that classic rustic look.
- Mod Podge Glue: An essential crafting adhesive, Mod Podge serves multiple purposes here. It’s perfect for attaching fabric or decorative paper to your magnet cut-outs and for sealing them with a protective, clear finish. Choose a matte or satin finish depending on your desired look.
- Some Gingham Fabric: This classic checkered fabric instantly adds a touch of farmhouse charm. It’s used to cover your magnet cut-outs, giving them a cohesive, rustic appearance. You’ll only need a small scrap, so check your fabric stash or look for fat quarters at craft stores.
- Some Raffia Straw: Raffia is a natural, rustic material that can be used for embellishing the sign or tying elements together. It adds to the homespun feel of the project. A small bundle will be more than enough.
- Small Round Magnets: These will be the functional backings for your decorative elements. You can typically find strong neodymium or ceramic magnets in various sizes at craft stores like Michael’s or online. Ensure they are strong enough to hold your decorated cut-outs as well as notes or photos on the corrugated metal.
- Wooden Beads (for the hanger): While not explicitly listed in the original short list, the beaded hanger is a prominent feature of the farmhouse style and mentioned in the description. You’ll need an assortment of wooden beads, possibly in different sizes or natural colors, and some strong twine or jute for threading them.
- Crafting Tools: Scissors, a utility knife (for cutting metal if necessary, with caution), strong adhesive (like E6000 or hot glue for attaching metal to frame), a paintbrush or sponge brush for Mod Podge, and a ruler or measuring tape.
Step-by-Step Directions: Crafting Your Farmhouse Magnet Sign
While the magnet sign video tutorial by DIY with Amber Strong on YouTube offers a comprehensive visual guide, let’s break down the general process involved in creating this captivating farmhouse magnet sign. These steps outline the creative journey from a simple Dollar Tree frame to a charming piece of home decor:
Step 1: Prepare Your Picture Frame and Corrugated Metal
Begin by disassembling your Dollar Tree picture frame. Remove the backing, glass, and any matting, as you will only be using the frame itself. Clean the frame thoroughly. Next, measure the opening of your frame accurately. You’ll need to cut your piece of corrugated metal to fit snugly within this opening. If your metal piece is too large, carefully trim it using metal snips or a utility knife (always wear protective gloves and eyewear). The goal is a piece that fits perfectly inside the frame’s rabbet, where the glass would normally rest.
Step 2: Secure the Corrugated Metal to the Frame
Once your corrugated metal piece is the correct size, it’s time to attach it to the picture frame. Apply a strong adhesive, such as E6000, construction adhesive, or even hot glue (for quicker but potentially less permanent adhesion), to the inner edges of the frame where the glass would normally sit. Carefully place the corrugated metal into the frame, pressing down firmly to ensure good contact with the adhesive. Allow ample time for the adhesive to cure completely, following the manufacturer’s instructions. This step is crucial for the stability and longevity of your magnet board.
Step 3: Craft Your Decorative Magnets
Now for the fun part – creating your personalized magnets! Gather your decorative letters, animal cut-outs, or any other shapes you wish to use. Cut pieces of gingham fabric slightly larger than your chosen shapes. Apply a layer of Mod Podge to the front of your cut-out, carefully place the gingham fabric over it, and smooth out any bubbles or wrinkles. Trim the excess fabric around the edges once it’s dry. For a polished look, you can also apply another thin layer of Mod Podge over the fabric to seal and protect it. Once these decorated pieces are dry, attach small, strong magnets to the back of each using a strong adhesive. This allows them to stick to your newly created corrugated metal surface.
Step 4: Create the Beaded Hanger and Add Embellishments
To give your magnet sign that quintessential farmhouse look, thread wooden beads onto a piece of strong twine or jute. You can experiment with different patterns and sizes of beads to create a unique design. Once you have a desired length of beaded string, securely attach each end to the top corners of your picture frame. You can drill small holes or use eye hooks for a sturdy attachment. Additionally, you can tie small bows of raffia straw or gingham fabric to the corners or along the beaded hanger for extra decorative flair, further enhancing the homespun charm. This step truly gives your project the full effect of farmhouse cuteness.
Step 5: Final Touches and Display
Once all components are dry and securely attached, give your farmhouse magnet sign a final inspection. Ensure all magnets are firmly in place on your decorative cut-outs and that the beaded hanger is strong enough to support the weight of the sign. You can now hang your magnificent creation in your desired location. This magnet sign was the exact decoration needed to make any kitchen or entryway look warm, friendly, and beautifully organized. Just follow the simple instructions in Amber’s fabulous video, and you will have a gorgeous metal farmhouse sign in no time at all.
Customizing Your Farmhouse Magnet Sign: Endless Possibilities
While the basic tutorial provides a fantastic foundation, the beauty of DIY lies in customization. Here are some ideas to make your magnet sign truly unique:
- Theme Variations: Instead of gingham, try buffalo plaid, floral patterns, or even solid burlap for your magnets. You could also choose seasonal themes, like autumn leaves for fall or snowflakes for winter.
- Magnet Designs: Explore different cut-out shapes beyond letters and animals. Think mini picture frames, small wooden shapes, or even scrabble tiles for a vintage feel. Use family photos decoupaged onto magnets for a truly personal touch.
- Frame Finish: Paint your Dollar Tree frame with chalk paint, distress it for an aged look, or stain it in a rustic wood tone. The possibilities are endless to match your existing decor.
- Additional Embellishments: Add small metal findings, tiny silk flowers, or even artificial greenery around the frame. You could also stencil a phrase like “Our Home” or “Farm Sweet Farm” directly onto the metal (after a primer, if needed).
- Functionality Focus: Design the board specifically for recipes, adding small clips or hooks for measuring spoons. Or make it a family message center with designated magnet-backed pens.
The Joy of DIY and Its Impact on Your Home
Engaging in DIY projects like this farmhouse magnet sign offers numerous benefits beyond just acquiring new decor. It’s a therapeutic activity that allows you to express creativity, learn new skills, and feel a profound sense of accomplishment. Furthermore, handmade items infuse your home with character and a story that mass-produced decor simply cannot replicate. Each time you glance at your magnet sign, you’ll be reminded of the effort and love you poured into creating it, making your living space feel even more personal and inviting.
This project is also incredibly cost-effective. By utilizing affordable supplies, especially from stores like Dollar Tree, you can achieve a high-end look without a hefty price tag. It’s an excellent way to update your home decor on a budget, proving that beautiful design doesn’t have to be expensive. So, whether you’re an experienced crafter or just starting your DIY journey, this farmhouse magnet sign is a rewarding project that promises both aesthetic appeal and practical utility.
Ready to add this charming and functional piece to your home? Gather your materials, watch Amber Strong’s inspiring tutorial, and embark on a delightful crafting adventure that will leave you with a beautiful, personalized farmhouse magnet sign that makes your house feel even more like a home.