
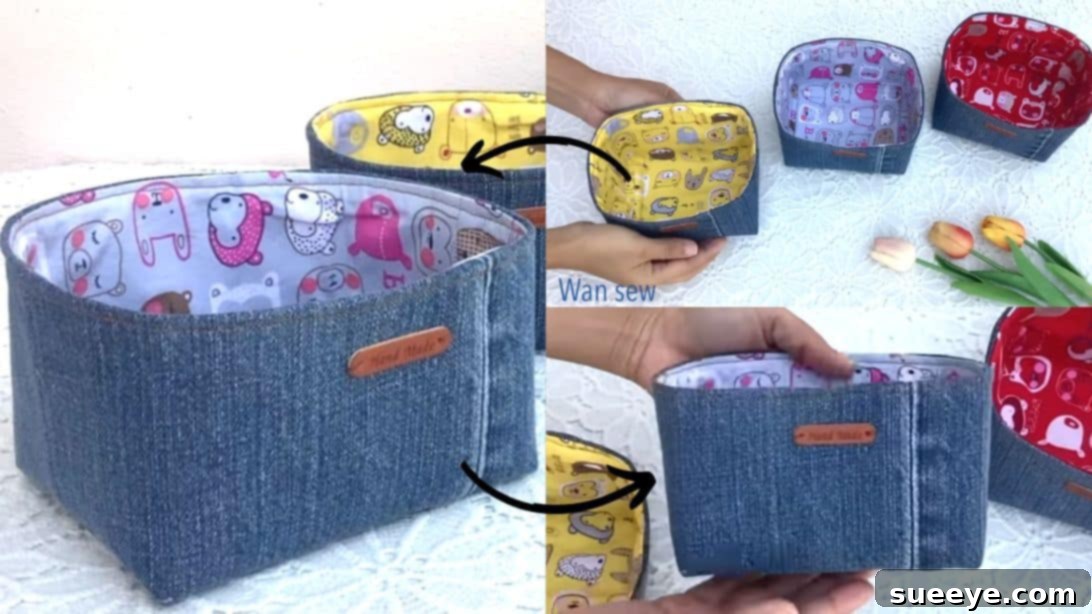
Are you looking for a creative and sustainable way to give your old, worn-out denim jeans a new lease on life? Instead of discarding them, imagine transforming that durable fabric into something incredibly useful and stylish for your home. This comprehensive tutorial will guide you through the process of sewing a charming and robust denim storage box, perfect for organizing small items, adding a decorative touch, or simply showcasing your crafting skills.
Repurposing old jeans is not only an eco-friendly choice, reducing textile waste, but it also allows you to create unique, personalized items that reflect your style. Denim is an excellent material for storage boxes due to its inherent strength and durability, ensuring your finished product will stand the test of time. This particular project is surprisingly straightforward, making it an ideal craft for both seasoned sewers and enthusiastic beginners looking to tackle a rewarding DIY endeavor.
Our easy-to-follow instructions, inspired by the clear guidance from wandee easy sewing on Youtube, will break down each step. You’ll learn how to prepare your fabric, create a precise pattern, assemble the box, and finish it with professional-looking details. The entire process is designed to be completed efficiently, often in under an hour, so you can enjoy your new handmade denim box almost immediately. Get ready to turn those beloved old jeans into a practical piece of home decor!
Materials You’ll Need
To embark on this exciting denim box project, gathering your materials beforehand will ensure a smooth and enjoyable crafting experience. Most items can be found around your home or at your local craft store. The specified dimensions for the main fabric pieces are crucial for achieving the finished size of approximately H: 3 1/4″, L: 5 1/8″, W: 4″.
- Old Jeans: The star of our project! Choose a pair of jeans that are clean and provide enough fabric for your box. Denim scraps from previous projects can also work.
- Lining Fabric: A piece of cotton, canvas, or any sturdy fabric of your choice measuring 11 1/2″ x 12 1/4″. This will give the inside of your box a neat and finished look.
- Fusible Interfacing (2 pieces): Two pieces, each measuring 11 1/2″ x 12 1/4″. Medium-weight fusible interfacing is recommended as it provides essential structure and stability to both the denim and the lining, helping the box maintain its shape.
- Sewing Label (Optional): One small label for personalization or branding. This adds a professional touch to your handmade item.
- Basic Sewing Supplies:
- Sewing machine (equipped with a denim needle if possible)
- Thread (matching your denim or a contrasting color for accent)
- Fabric scissors or rotary cutter
- Iron and ironing board
- Pins or fabric clips
- Measuring tape or ruler
- Fabric marker or tailor’s chalk
- Cardboard or stiff paper for pattern making
Having these materials ready will make your sewing journey seamless and enjoyable, ensuring your denim box turns out perfectly structured and beautiful.
Step-by-Step Guide to Sewing Your Denim Box
Follow these detailed steps carefully to craft your very own stylish and functional denim storage box. Precision in cutting and sewing will lead to a professional-looking finished product.
Step 1: Prepare the Denim Fabric with Interfacing
Begin by taking your chosen rectangle of denim fabric (measuring 11 1/2″ x 12 1/4″) and lay it down on your ironing board with the wrong side facing up. Carefully place one piece of fusible interfacing of the same size on top of the denim, with the adhesive side facing down onto the fabric. Using a hot iron, press firmly according to the interfacing manufacturer’s instructions. This step is crucial for giving your denim fabric the necessary stiffness and body to hold the box shape, preventing it from sagging over time. Ensure the interfacing is completely fused to prevent bubbling.
Step 2: Prepare the Lining Fabric with Interfacing
Next, take your rectangle of lining fabric (also 11 1/2″ x 12 1/4″) and place it on your ironing board, again with the wrong side facing up. Position the second piece of fusible interfacing on top, adhesive side down. Apply heat and pressure with your iron, just as you did with the denim, to securely fuse the interfacing to the lining fabric. This reinforces the lining, adding to the overall stability and crispness of your finished denim box, ensuring a sturdy interior.
Step 3: Create Your Box Pattern
To form the distinctive shape of your box, you’ll need a precise pattern. While the exact dimensions aren’t provided in the original short instructions, a common box pattern involves cutting out squares from each corner of a rectangle. You can either draw this pattern directly onto stiff cardboard or paper, or print a template if you have one. For a box with the specified finished dimensions (H: 3 1/4″, L: 5 1/8″, W: 4″), this pattern will guide your cuts. If you’re adapting, remember that the size of the corner squares directly impacts the height and width of your box. Accuracy here is key for a symmetrical final product.
Step 4: Cut Your Fabric Pieces
Carefully place the pattern you just created onto your interfaced denim fabric. Using a fabric marker or tailor’s chalk, trace the pattern outline onto the denim. Once traced, use sharp fabric scissors or a rotary cutter to precisely cut along these lines. The goal is to cut out the main box shape, which typically involves removing squares from the four corners of your rectangle. Repeat this exact tracing and cutting process for your interfaced lining fabric. Having identical shapes for both the denim exterior and the fabric lining is essential for the box to fit together perfectly.
Step 5: Attach Your Label (Optional)
Take your denim cutout and fold it in half lengthwise, ensuring the right side of the fabric is facing out. Gently finger-press or mark the center fold. From this center point, measure approximately 1 inch upwards (or to your desired placement) and make a small mark. This will be the position for your label. Carefully place your label on this mark and sew it securely in place. You can use a straight stitch or a small zigzag stitch. This personalized touch adds a professional and custom look to your denim box, making it uniquely yours.
Step 6: Sew the Side Seams of Both Box Pieces
Now, take your denim cutout and fold it in half crosswise, ensuring the right sides of the fabric are together. Align the raw side edges perfectly and secure them with pins or fabric clips. Using your sewing machine, sew down these two side seams with a consistent 3/8-inch seam allowance. Backstitch at the beginning and end of each seam to reinforce it. Repeat this entire process for the lining fabric cutout, folding it in half crosswise, right sides together, pinning, and sewing the two side seams with the same 3/8-inch seam allowance. You will now have two fabric tubes, one denim and one lining.
Step 7: Form the Box Corners (Boxing Out)
To create the three-dimensional box shape, you’ll “box out” the corners. Begin by taking the denim piece. Gently press your side seams open with your fingers or an iron to reduce bulk. Now, flatten each bottom corner of the denim piece so that the side seam aligns perfectly with the bottom fold. This creates a triangular shape. Pin these corners securely. Sew across each corner with a 3/8-inch seam allowance, reinforcing with backstitches. Trim the excess fabric from the seam allowance to reduce bulk. Repeat this process for the lining cutout. This step is critical for forming the flat, square base of your denim box.
Step 8: Assemble the Denim and Lining Boxes
Now it’s time to bring the two parts of your box together. Flip the denim box right side out. Take the lining box (which should still be wrong side out) and carefully place the denim box inside it. The right sides of both fabrics should now be facing each other. Align the top raw edges of both boxes, matching the side seams as closely as possible. Secure the edges all around with pins. Before sewing, mark a 3-inch opening along one of the longer sides; this opening is essential for turning the box right side out later. Sew around the entire top edge with a 3/8-inch seam allowance, remembering to skip the 3-inch opening you marked. Backstitch at the beginning and end of your stitches, especially around the opening, to secure them.
Step 9: Finish and Topstitch Your Denim Box
Once you’ve sewn the top edges, carefully reach through the 3-inch opening and gently pull the entire box right side out. Take your time with this step, pushing out all corners to achieve a crisp shape. Once turned, use your fingers to carefully push out and smooth the seam allowance of the opening. Press the entire top edge with a hot iron, paying special attention to the opening, ensuring it lies flat. To close the opening and add a professional, decorative finish, topstitch around the entire top edge of the box. Use a 3/8-inch seam allowance for this topstitch, ensuring your stitches are even and neat. This final stitch not only secures the opening but also adds strength and a refined look to your handmade denim storage box.
Benefits of Your DIY Denim Box
Creating your own denim storage box offers a multitude of advantages beyond just having a neat place for your belongings. Here’s why this project is so rewarding:
- Sustainable Living: By repurposing old jeans, you’re actively participating in sustainable crafting, reducing textile waste and extending the life cycle of fabric.
- Cost-Effective Storage: Instead of buying new storage solutions, you’re utilizing materials you already own, saving money while creating a custom item.
- Unique Home Decor: Your handmade denim box will be a one-of-a-kind piece, adding a touch of rustic charm or modern flair to any room. It’s a conversation starter!
- Versatile Organization: Perfect for organizing craft supplies, toiletries, remote controls, keys, or even as a decorative planter cover. The possibilities are endless.
- Skill Development: This project is an excellent way to practice fundamental sewing techniques like applying interfacing, straight stitching, creating box corners, and topstitching.
- Personalized Gift Idea: A handmade denim box makes for a thoughtful and practical gift for friends and family, showing them you put effort and creativity into their present.
Tips for a Perfect Denim Box
To ensure your denim box turns out beautifully and functions flawlessly, consider these additional tips:
- Use the Right Needle: Denim is a thick fabric. Switch to a denim or jeans needle on your sewing machine. These needles are sharper and stronger, preventing skipped stitches and broken needles.
- Pressing is Key: Don’t underestimate the power of your iron. Pressing seams open, fusing interfacing correctly, and flattening edges before topstitching makes a significant difference in the final appearance and crispness of your box.
- Consistent Seam Allowance: Maintaining a consistent 3/8-inch seam allowance throughout the project is vital for the pieces to fit together accurately and for the box to be square and symmetrical.
- Trim Seam Allowances: After sewing seams, especially in the corners, trim down the excess fabric. This reduces bulk, allowing the seams to lie flatter and resulting in sharper corners and edges.
- Slow and Steady: Especially when sewing through multiple layers of denim and interfacing, sew slowly. This gives you more control and helps prevent your machine from struggling.
- Thread Choice: While all-purpose polyester thread works, using a slightly stronger topstitching thread (or doubling your regular thread) for the final topstitch can give it a more defined and durable finish.
- Double Check Measurements: Before cutting, always double-check your measurements against the pattern. “Measure twice, cut once” is an old but gold sewing adage.
Customization Ideas for Your Denim Box
Once you’ve mastered the basic denim box, feel free to unleash your creativity and personalize it even further:
- Different Sizes: Adjust the initial fabric dimensions and corner cutouts to create smaller trinket boxes or larger storage bins for toys or laundry.
- Embellishments: Add decorative patches, embroidery, fabric paint, studs, or even old denim pockets from your jeans to the exterior for extra flair and functionality.
- Mixed Fabrics: Experiment with contrasting fabrics for the lining – a vibrant print, a soft flannel, or even faux fur can add a surprising touch when the box is open.
- Handles: Sew small fabric loops or leather handles onto the top edges before assembling the box for easy carrying.
- Dividers: For larger boxes, consider sewing fabric dividers into the lining to create separate compartments for better organization.
- Zipper Closure: For a lidded box, you could adapt the pattern to include a flap with a zipper or magnetic snap for secure closure.
The possibilities for customization are truly endless, allowing you to create a denim box that perfectly suits your needs and aesthetic.
Congratulations! You’ve successfully transformed a pair of old jeans into a functional and stylish denim storage box. This project not only provides a practical item for your home but also celebrates the joy of sustainable crafting and the satisfaction of creating something beautiful with your own hands. Whether you use it to tidy up your desk, organize your crafting supplies, or gift it to a loved one, your handmade denim box is a testament to creativity and resourcefulness.
We hope this detailed tutorial has inspired you to look at your old jeans with a new perspective and dive into more upcycling projects. Happy sewing!