
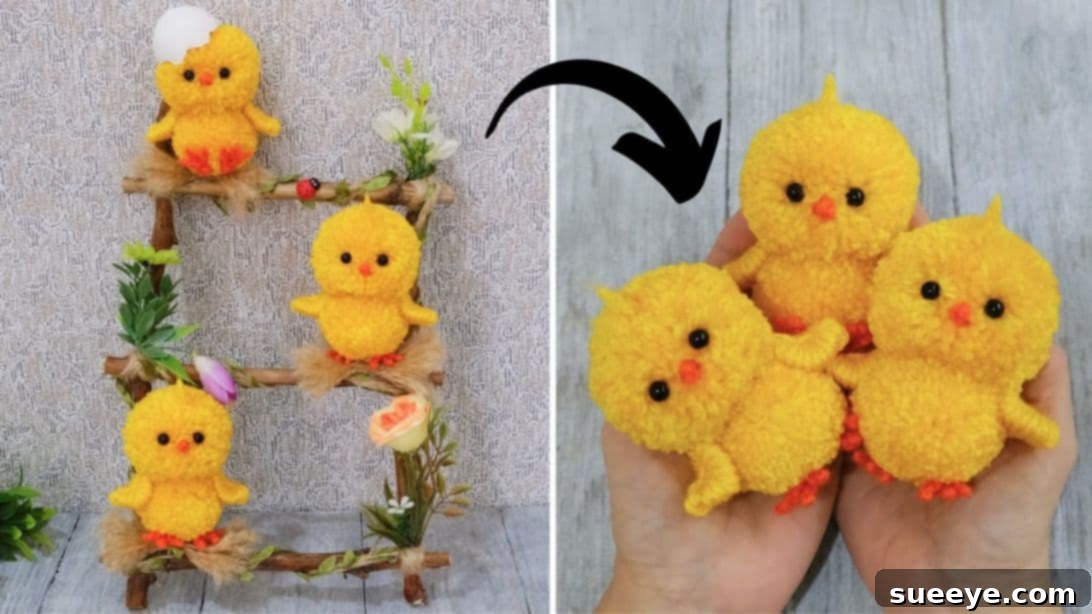
Embrace the vibrant spirit of spring and get your home ready for the season with this incredibly charming DIY project. Crafted by the talented Moth Art on YouTube, these adorable yarn chicks are not only simple to make but also add a heartwarming touch to any space. Requiring just two basic colors of yarn, a few common craft supplies, and a minimal amount of time, you can quickly create a flock of these fluffy friends. Whether you’re decorating for Easter, sprucing up your home for spring, or looking for a delightful handmade gift, this craft tutorial provides everything you need to get started. Dive into this fun and rewarding project, and prepare to be enchanted by your own handmade creations. Let’s bring some spring cheer into your home!
Why You’ll Adore Crafting These DIY Yarn Chicks
There’s something uniquely satisfying about creating beautiful decorations with your own hands, and these DIY yarn chicks are no exception. This project stands out for several compelling reasons, making it a favorite among crafters of all skill levels:
- Effortlessly Adorable: The final product is undeniably cute, guaranteed to bring a smile to anyone’s face. Their fluffy texture and bright colors instantly evoke the joyful essence of spring.
- Budget-Friendly Fun: You only need a few inexpensive materials, primarily yarn, which makes this an incredibly economical way to enhance your seasonal decor without breaking the bank.
- Beginner-Friendly Craft: Don’t have much crafting experience? No problem! The steps are straightforward and easy to follow, making it an excellent project for novices and experienced crafters alike.
- Quick to Complete: Unlike more intricate crafts, you can whip up one of these charming chicks in just a few minutes, making it perfect for last-minute decorating or crafting with a group.
- Perfect for Any Occasion: While ideal for Easter and general spring decor, these versatile yarn chicks can also be used as charming party favors, delightful gifts, or even as embellishments for other craft projects.
- Customizable Creativity: With endless yarn color possibilities, you can personalize your chicks to match any decor style or color scheme, adding a unique touch to each creation.
This project is more than just making a decoration; it’s about enjoying the creative process and seeing a delightful creation come to life from simple strands of yarn. Get ready to fall in love with these little bundles of joy!
Essential Materials for Crafting Your Charming Yarn Chicks
Gathering your supplies is the first exciting step in any DIY project. For these adorable yarn chicks, you’ll find that most of the items are likely already in your craft stash, or easily obtainable from any craft store. Here’s what you’ll need to create your fluffy spring friends:
- Yellow Yarn: This will be the primary color for your chick’s body, bringing that classic, cheerful appearance. Any acrylic or wool yarn of medium weight (worsted weight) will work wonderfully.
- Orange Yarn: Used for the beak and feet, a contrasting pop of orange completes the iconic chick look. A thinner yarn might be easier to work with for these smaller details, but standard yarn is also fine.
- Sharp Scissors: Essential for cleanly cutting yarn and trimming your pom-poms into the perfect shape.
- Cardboard or Thick Paper: You’ll need this to create the templates for wrapping your yarn. Cereal boxes or cardstock are ideal for their sturdiness.
- Hot Glue Gun and Glue Sticks: Your trusty tool for securely assembling all the components of your chick, from attaching the body sections to placing the tiny eyes.
- Small Black Beads: These will serve as the bright, expressive eyes of your chicks, giving them personality. Alternatively, you can use small black buttons, felt cutouts, or even permanent marker dots.
With these simple materials at hand, you’re all set to embark on a delightful crafting journey that promises adorable results!
Step-by-Step Guide to Crafting Your Adorable Yarn Chicks
Follow these detailed instructions to transform simple yarn into enchanting decorative chicks. Each step is designed to be clear and easy, ensuring a delightful crafting experience from start to finish.
Step 1: Crafting the Chick’s Body (The Large Pom-Pom Base)
The foundation of your charming chick begins with creating two pom-pom-like sections. This first part focuses on the larger body component:
- Prepare Your Templates: Begin by cutting two pieces from your cardboard or thick paper. One should be a rectangular template, approximately 6 cm (about 2.3 inches) wide, and the other a round template of the same width. For the rectangular piece, make a small cut along its center, extending about half its length. This slit will be crucial for securing the yarn later.
- Initiate Yarn Wrapping: Take your yellow yarn. Cut a small, separate piece of yellow yarn (about 6-8 inches long) and gently insert it through the central cut of your rectangular template. This piece will be used to tie off your wrapped yarn. Now, begin wrapping the main yellow yarn around the entire width of the rectangular template. Wrap it neatly and evenly, aiming for approximately 150 times. The more wraps you make, the denser and fluffier your pom-pom will be.
- Secure the Wrapped Yarn: Once you’ve completed your wraps, take the small piece of yarn you inserted earlier. Use it to tightly tie the entire bundle of looped yarn in the center, securing it with a double knot. Ensure this tie is as tight as possible to prevent the pom-pom from falling apart.
- Form the Pom-Pom: Carefully slide the entire tied yarn bundle off the cardboard template. You will now have a tightly tied loop of yarn. Locate the central tie and pull it even tighter, knotting it once more to ensure maximum security.
- Shape and Trim: Now, take your scissors and carefully cut through all the loops of yarn on both sides of your tied bundle. This will create the fluffy pom-pom. Once all loops are cut, place the round cardboard template on top of your pom-pom and begin trimming the yarn. Trim meticulously around the template, shaping the yarn into a neat, round, and uniformly sized pom-pom. This will form the larger part of your chick’s body.
Step 2: Creating the Smaller Body Section and Chick Feet
Next, we’ll create a slightly smaller pom-pom for the chick’s head and then move on to crafting its distinctive feet.
- Craft the Smaller Pom-Pom: Using the same technique as in Step 1, create another pom-pom. This time, use a smaller rectangular template, measuring approximately 5 cm (about 1.9 inches) wide, and a corresponding round template. Wrap the yellow yarn around this smaller template, perhaps about 100-120 times, depending on your desired head size. Follow the same steps for tying, removing from the template, cutting the loops, and trimming into a neat, smaller pom-pom. Set both your large and small yellow pom-poms aside.
- Prepare for the Feet: For the chick’s feet, you will use orange yarn. Find a sturdy pin and push it into your work surface to hold it securely. This pin will act as a temporary anchor for wrapping the yarn.
- Form the First Set of Toes (Double Strand): Take a double strand of orange yarn. Wrap this double strand around the pin approximately 5 times. While the yarn is still around the pin, carefully tie it into a tight knot. You might want to make a double knot to ensure it’s secure. Trim the excess yarn, leaving a small tail. This creates the base of one set of toes.
- Form Additional Toes (Single Strand): Repeat the wrapping and knotting process, but this time use a single strand of orange yarn. Wrap it around the pin about 5 times and tie a secure knot. Leave a longer excess tail on this one. You will need to make two more of these single-strand, knotted wraps. So, in total for one foot, you’ll have one double-strand element and two single-strand elements.
- Assemble the Foot: Carefully gather all three of these orange yarn elements (one double-strand, two single-strand) together at their base. Use the longer excess tail from one of the single-strand elements to tie all three tightly together. Knot it several times to secure the “toes” of your chick’s foot. Trim any overly long excess yarn to neaten the appearance. Repeat this entire process to create a second identical foot for your chick.
Step 3: Creating the Beak and Final Assembly
With all the components ready, it’s time to bring your adorable chick to life through careful assembly.
- Craft the Beak: Take your orange yarn again. Cut a small piece of cardboard or use your fingers to create a small template, approximately 2 cm (about 0.8 inches) wide. Neatly wrap the orange yarn flatly around this small template a few times, perhaps 5-7 wraps. Then, carefully slide the wrapped yarn off and tie it tightly in the middle with another small piece of orange yarn, forming a small, flat bow-like shape. Trim the ends to create a neat, triangular beak shape. You will need one beak for each chick.
- Initial Assembly of Body: Heat up your hot glue gun. Take the larger yellow pom-pom (the body) and the smaller yellow pom-pom (the head). Apply a generous dab of hot glue to the top center of the larger pom-pom and carefully press the smaller pom-pom onto it, ensuring it’s centered and securely attached. Hold it in place for a few seconds until the glue sets.
- Attaching the Feet: Apply a small amount of hot glue to the top knot of one of the orange feet you created. Carefully position it on the bottom of the larger yellow pom-pom, towards the front, ensuring the “toes” face forward. Press firmly to secure. Repeat this for the second foot, positioning it next to the first. Allow the glue to dry completely.
- Adding the Beak: Apply a tiny dot of hot glue to the center front of the smaller yellow pom-pom (the head). Carefully position your orange yarn beak onto this spot, pressing gently until it adheres. Ensure the beak is facing outwards and is securely attached.
- Bringing in the Eyes: Finally, for the most expressive part, take your small black beads. Apply a tiny dot of hot glue where you want each eye to be on the chick’s head, just above the beak. Carefully place a black bead onto each glue dot, pressing gently. Be mindful not to use too much glue to avoid a messy look. Allow all glued components to dry thoroughly before handling your finished chick.
Tips for Success and Customization of Your Yarn Chicks
To make your DIY yarn chick crafting experience even more enjoyable and to unleash your creativity, consider these helpful tips and customization ideas:
- Yarn Choices Matter: While acrylic yarn is standard and affordable, experimenting with different yarn types can yield unique textures. Fuzzy or chenille yarns will create an extra soft and cuddly chick, while cotton yarn might give a slightly denser, more defined look.
- Experiment with Colors: Don’t limit yourself to classic yellow! Create a pastel rainbow of chicks in light blues, pinks, greens, or even variegated yarns for a whimsical touch. Imagine a tiny purple chick or a blue one with speckled yarn!
- Vary Sizes for a Flock: Make chicks of various sizes by simply adjusting your cardboard template widths and the number of yarn wraps. A family of chicks in different dimensions creates a more dynamic display.
- Add Accessories: Give your chicks extra personality! You can glue tiny bows, small fabric flowers, or even miniature hats to their heads. A little dab of glitter glue on their beaks or eyes can add a subtle sparkle.
- Safety First with Hot Glue: Always exercise caution when using a hot glue gun, especially if crafting with children. Supervise closely and ensure proper ventilation. Low-temperature glue guns are a safer option for younger crafters.
- Alternative Eyes: If small black beads aren’t available, don’t worry! You can use small black buttons, tiny felt circles cut out, or even a permanent marker to draw on simple dots for eyes.
- Display Creativity: Think beyond just sitting them on a shelf. Attach a string to the top of their heads to hang them as ornaments, create a charming garland, or nestle them in a decorative Easter basket filled with faux grass and eggs.
- Crafting with Kids: This project is fantastic for engaging children in a fun, hands-on activity. Pre-cut the cardboard templates and supervise the hot gluing, letting them handle the yarn wrapping and bead placement (if age-appropriate).
These simple adjustments and creative ideas can elevate your yarn chick project from a basic craft to a truly personalized and delightful decoration that reflects your unique style.
Inspiring Display Ideas for Your Handmade Chicks
Once you’ve crafted your adorable flock of yarn chicks, the fun continues with finding the perfect spots to showcase their charm. Here are some creative ideas to display your handmade creations and brighten up your home for spring and Easter:
- Easter Basket Fillers: Tuck them into Easter baskets alongside chocolate eggs and other treats. They make wonderful, reusable additions.
- Table Centerpieces: Arrange a collection of chicks in varying sizes on a tray with some faux grass, spring flowers, and decorative eggs for an eye-catching table centerpiece.
- Shelf and Mantel Decor: Line them up on a windowsill, bookshelf, or fireplace mantel to add a whimsical touch to any room. They look delightful peeking out from behind books or potted plants.
- Wreath Enhancements: Hot glue a few chicks onto a spring or Easter wreath for your front door. Pair them with faux flowers, greenery, and ribbon for a welcoming entrance.
- Plant Pot Companions: Place a chick or two at the base of your indoor plants or spring flower arrangements to bring a playful garden feel indoors.
- Gift Toppers: Instead of a traditional bow, use a small yarn chick to adorn wrapped gifts for birthdays, baby showers, or as a host gift.
- Nursery or Kids’ Room Decor: These soft, cheerful chicks are perfect for adding a cozy and playful element to a child’s bedroom or nursery decor.
- Garlands and Mobiles: String several chicks together with colorful beads and small pom-poms to create a charming garland or a whimsical mobile.
Let your imagination guide you. These little yarn chicks are versatile and can bring a touch of handmade joy to almost any corner of your home.
Frequently Asked Questions (FAQs) About Making Yarn Chicks
Here are some common questions crafters often have when making these adorable yarn chicks:
- Q: Can I use a pom-pom maker instead of cardboard templates?
- A: Absolutely! A pom-pom maker will work just as well, if not more easily, for creating the body and head sections. Simply follow the instructions for your specific pom-pom maker, ensuring you create two different sizes.
- Q: What if I don’t have black beads for the eyes?
- A: No problem at all! You can get creative with alternatives. Small black buttons, tiny pieces of black felt cut into circles, or even a black permanent marker can be used to add eyes to your chicks. Just ensure whatever you use is securely attached.
- Q: My chicks keep toppling over. How can I make them stand upright?
- A: The key is to ensure the feet are flat and evenly spaced when glued. If they’re still unstable, you can try gluing a small, flat cardboard disc or a coin to the very bottom of the larger pom-pom before attaching the feet. This adds a bit of weight and a stable base.
- Q: Are these yarn chicks safe for young children?
- A: While the yarn itself is soft, the small beads used for eyes can be a choking hazard for very young children. If making these for toddlers or infants, it’s best to embroider the eyes with black yarn or use felt eyes securely glued on, rather than beads, to ensure safety.
- Q: How do I make my pom-poms really fluffy?
- A: The secret to extra fluffy pom-poms is more yarn wraps and thorough trimming. Don’t be shy with the wrapping – more wraps lead to a denser pom-pom. After cutting, don’t be afraid to give it a good trim, shaping it like you would a haircut, until it’s perfectly round and fluffy.
We hope these FAQs help you on your crafting journey!
Craft Your Way to Spring Cheer!
Creating these adorable DIY yarn chicks is more than just a craft project; it’s an invitation to bring warmth, whimsy, and the vibrant energy of spring into your home. With simple materials and an easy-to-follow guide, you can quickly craft a delightful flock of these charming creatures, perfect for enhancing your Easter decorations or simply brightening up your space. Whether you’re a seasoned crafter or just starting, the joy of seeing these little yellow bundles come to life is truly rewarding. So, gather your yarn, unleash your creativity, and get ready to enjoy a season filled with handmade charm. Happy crafting!
*All image credit belongs to Moth Art via YouTube. Follow and subscribe to her channel for more inspiring DIY projects!