
Craft Your Dream Kitchen: A Comprehensive Guide to DIY Concrete Countertops
Concrete, often associated with robust construction, is rapidly emerging as a favorite material for imaginative DIY home decor projects. Its raw, versatile aesthetic lends itself beautifully to creating pieces that are both functional and visually striking. Having explored numerous concrete craft ideas for outdoor spaces like gardens and patios, the allure of bringing this dynamic material indoors for a truly impactful statement became irresistible. The industrial chic appeal of concrete is particularly captivating, promising to elevate any interior space with a touch of modern sophistication.
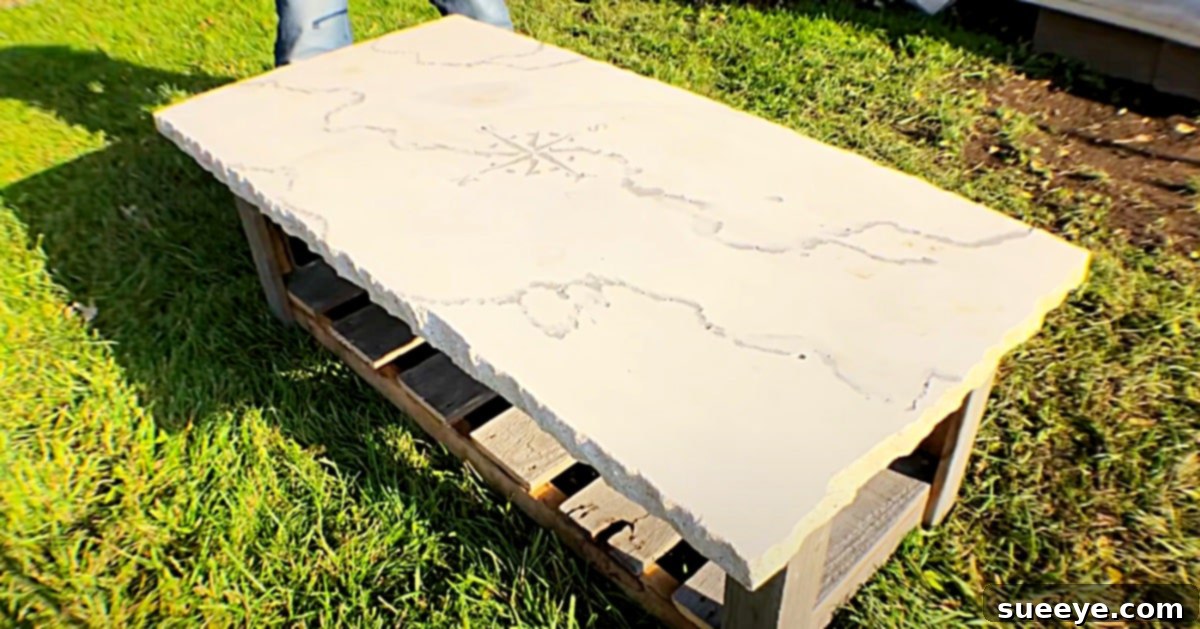
My latest inspiration struck while watching an exceptional concrete countertop video tutorial by Michael Builds on YouTube. Michael’s detailed approach and the stunning result immediately convinced me that this was the next DIY project for my home. The idea of crafting a durable, custom concrete countertop for our kitchen’s bar area perfectly aligns with the contemporary vision I have for the space. What truly sets Michael’s design apart are the unique artistic details he incorporates, such as an intricately ingrained compass pattern within the concrete surface and a distinctive, rugged finish applied to the edges, offering a bespoke charm that manufactured alternatives simply cannot replicate. This project isn’t just about creating a countertop; it’s about crafting a focal point that reflects personal style and offers enduring functionality.
Why Choose DIY Concrete Countertops?
Opting for DIY concrete countertops offers a myriad of advantages, making them an increasingly popular choice for homeowners looking to upgrade their spaces with character and durability. Beyond the undeniable aesthetic appeal, which ranges from minimalist modern to rugged industrial, concrete provides exceptional resilience. It stands up to daily wear and tear, heat, and moisture, making it an ideal surface for busy kitchens and entertaining areas. Furthermore, the customization potential is virtually limitless. Unlike pre-fabricated options, concrete allows you to dictate the exact size, shape, color, and finish, integrating unique elements like embedded objects, textures, or even custom patterns, as seen in Michael Builds’ tutorial. This level of personalization ensures your countertop is a true one-of-a-kind creation.
From a financial perspective, DIY concrete countertops can be significantly more cost-effective than high-end materials like granite, marble, or quartz, especially when labor costs are factored out. While the initial investment in materials is modest, the value added to your home, both in terms of functionality and unique style, is immense. It’s a project that empowers you to achieve a luxurious look without the luxury price tag, all while gaining the immense satisfaction of having built something beautiful and lasting with your own hands. The process, though requiring careful attention to detail, is accessible to most DIY enthusiasts, making it an incredibly rewarding endeavor.
Essential Materials for Your Concrete Countertop Project
Before diving into the creation process, gathering the right materials and tools is paramount. Quality ingredients ensure a superior finish and longevity for your concrete countertop. Here’s a comprehensive list of what you’ll need, with insights into their specific roles:
- 55 pounds of Mortar Mix: This forms the base of your countertop. Mortar mix is ideal for countertops due to its fine aggregate, which results in a smoother finish compared to standard concrete mixes. You can typically find high-quality mortar mix at home improvement stores like Home Depot. Ensure you purchase enough for your project, accounting for the dimensions of your form and a little extra for any unforeseen needs.
- Flow Control Admixture: Often found near the concrete and mortar mixes, flow control is a crucial additive. It improves the workability and pourability of the concrete without requiring additional water, which can weaken the final product. By reducing the water-to-cement ratio while maintaining slump, it helps create a denser, stronger, and less porous concrete, minimizing air bubbles and ensuring a smooth finish.
- A Heavy-Duty Drill: Essential for mixing the mortar and flow control thoroughly. A drill with a good amount of torque is necessary to handle the thick consistency of the mix.
- A Mixing Paddle: Attach this to your drill. A robust paddle designed for concrete or mortar mixing will ensure all ingredients are evenly incorporated, which is critical for a consistent strength and finish.
- A Trowel: Used for smoothing the surface of the wet concrete. A high-quality steel trowel will help you achieve a perfectly flat and polished finish.
- A Bucket Trowel (or Margin Trowel): Useful for scooping concrete from the mixing bucket and filling the form, especially in corners and tight spaces. Its smaller size and pointed tip offer greater precision.
- Stone Care and Granite Sealer: An absolute must for concrete countertops. Concrete is naturally porous, and without a good sealer, it will stain easily. A high-quality stone or granite sealer will penetrate the concrete, creating a protective barrier against liquids, oils, and acids, thus ensuring the longevity and pristine appearance of your countertop.
- A Pick Hammer (or Chipping Hammer): As demonstrated by Michael Builds, this tool is used to create a distinctive, rugged, and industrial edge finish. It allows you to carefully chip away at the edges after the concrete has cured, revealing a unique texture.
- Safety Gear: Always prioritize safety. This includes safety glasses, gloves, a dust mask (especially when mixing dry mortar), and appropriate protective clothing.
- Form Building Materials: You’ll need materials for your mold, such as melamine-faced particle board (for smooth sides), silicone caulk for sealing seams, and screws/braces to hold the form securely.
- Measuring Tools: Tape measure, straight edge, level.
- Buckets: For mixing and transporting water.
- Vibrator (optional but recommended): A concrete vibrator or even just a rubber mallet can be used to tap the sides of the form, helping to release trapped air bubbles and consolidate the mix for a denser, stronger countertop.
Step-by-Step Directions: Crafting Your Professional-Looking Concrete Countertop
Creating a professional-looking concrete countertop might seem daunting, but by following these detailed steps, inspired by experts like Michael Builds, you can achieve impressive results. Patience and precision are key!
Step 1: Design and Build Your Form
The form is the mold that will shape your countertop, so its accuracy is critical. Begin by precisely measuring the area where your countertop will be installed. Use melamine-faced particle board for the form’s sides and bottom. Melamine provides an incredibly smooth, non-stick surface, ensuring a sleek finish on your concrete and making demolding easier. Cut the melamine pieces to your exact dimensions. Assemble the form using screws, ensuring all corners are perfectly square and joints are tightly secured. Apply a bead of silicone caulk along all interior seams and corners to prevent concrete slurry from seeping out, which could lead to unsightly edges. Allow the caulk to fully cure before proceeding. Reinforce the form with external bracing to prevent bowing or bulging once it’s filled with heavy concrete.
Step 2: Prepare Your Work Area and Mix the Concrete
Set up your workspace in a well-ventilated area, preferably outdoors or in a garage, ensuring you have enough room to mix and pour. Lay down plastic sheeting to protect the floor from spills. Don your safety gear: gloves, safety glasses, and a dust mask. In a large, sturdy mixing bucket, combine your mortar mix with the recommended amount of water, starting with slightly less water than specified and gradually adding more. Incorporate the flow control admixture according to the manufacturer’s instructions. Using your heavy-duty drill fitted with a mixing paddle, thoroughly mix the components until you achieve a consistent, lump-free batter-like consistency. The mix should be workable but not too runny; it should hold its shape when scooped. Proper mixing is crucial for uniform strength and appearance.
Step 3: Pour the Concrete into the Form
Carefully begin pouring the mixed concrete into your prepared form. Distribute the concrete evenly across the entire surface, ensuring it fills all corners and edges without gaps. Once the form is approximately halfway full, gently vibrate the concrete to release any trapped air bubbles. This can be done by lightly tapping the sides and bottom of the form with a rubber mallet or using an orbital sander (without sandpaper) on the underside of the form. This process, known as consolidation, is vital for achieving a dense, strong, and smooth surface free of pinholes. Continue pouring the remaining concrete, overfilling the form slightly, and repeat the vibration process until air bubbles stop rising to the surface.
Step 4: Screed and Trowel the Surface
After pouring and vibrating, use a straight edge (like a piece of lumber or a metal bar) to “screed” the excess concrete off the top of the form, leveling the surface. Drag the straight edge across the form with a sawing motion, removing any high spots. Once screeded, wait for the concrete to begin setting up – it should still be wet but firm enough that water doesn’t pool on the surface. Then, use your steel trowel to meticulously smooth the entire surface. Work in broad, sweeping motions, applying light pressure. The goal is a perfectly flat and glass-like finish. For a truly professional look, you might need to perform several passes as the concrete stiffens. Any decorative elements, like Michael Builds’ compass pattern, should be carefully pressed into the surface during this stage, ensuring they are flush and well-defined.
Step 5: Curing the Concrete
Proper curing is paramount for the strength and durability of your concrete countertop. Once the surface has been troweled smooth, cover the entire form with plastic sheeting (e.g., visqueen or a plastic tarp). This prevents rapid moisture loss, which can lead to cracking and weaken the concrete. The plastic creates a humid environment, allowing the concrete to cure slowly and develop maximum strength. Keep the concrete covered for at least 7 days, ideally longer (up to 28 days for full strength). You may occasionally lift the plastic and lightly mist the surface with water, especially in drier climates, to ensure it remains damp.
Step 6: Demolding and Edge Finishing
After the initial curing period (typically 48-72 hours for demolding, but full strength takes longer), it’s time to carefully remove the form. Gently unscrew the sides and bottom pieces of your melamine mold. Exercise extreme caution during this step to avoid damaging the still-hardening concrete. Once demolded, you can begin the edge finishing process. As seen in Michael Builds’ tutorial, a pick hammer can be used to create a distinctive, rugged, industrial-style edge. Hold the pick hammer at an angle and lightly tap along the edges, chipping away small pieces to create a textured, natural stone-like appearance. This technique adds significant character and a unique, custom feel to your countertop. Alternatively, for a smoother edge, you could use sandpaper or a grinder with diamond pads, working your way through progressively finer grits.
Step 7: Sealing for Protection and Longevity
Once your countertop is fully cured (which can take up to 28 days for optimal strength) and all finishing touches are complete, the final and most critical step is sealing. Concrete is inherently porous, making it susceptible to stains from food, liquids, and oils. Applying a high-quality stone or granite sealer is non-negotiable. Clean the surface thoroughly before sealing, ensuring it’s free of dust and debris. Apply the sealer according to the manufacturer’s instructions, typically using a clean cloth or foam roller, in thin, even coats. Allow each coat to dry completely before applying the next. You may need several coats to achieve maximum protection. The sealer will fill the pores, creating a durable, stain-resistant, and water-repellent surface that will protect your beautiful creation for years to come. Some sealers also enhance the concrete’s natural color, giving it a richer, deeper tone.
Customization and Design Potential
Beyond the fundamental steps, the true beauty of DIY concrete countertops lies in their boundless customization potential. Michael Builds’ ingenious inclusion of a compass pattern engraved directly into the concrete is a testament to this versatility. Imagine embedding small glass pieces, decorative stones, or even unique metallic objects into the wet concrete for a sparkling, personalized effect. Pigments can be added to the mix to achieve a wide spectrum of colors, from subtle earth tones to vibrant hues. You can experiment with different troweling techniques for varied surface textures – from a perfectly smooth, polished sheen (achieved through extensive grinding and polishing) to a more rustic, slightly textured feel. Acid etching can create unique marbled or mottled patterns, adding another layer of visual interest. Every concrete countertop project can be a unique artistic expression, perfectly tailored to your home’s aesthetic.
Maintaining Your Concrete Masterpiece
With proper care, your DIY concrete countertop will remain a stunning focal point for decades. Regularly clean the surface with mild soap and water, avoiding harsh abrasive cleaners or chemicals that could strip the sealer. Promptly wipe up spills, especially acidic ones like lemon juice or vinegar, to prevent etching or staining. Depending on usage, re-sealing your countertop every 1-3 years is recommended to maintain its protective barrier. Minor scratches or dull spots can often be buffed out, and in some cases, the entire surface can be refinished or re-polished if desired, offering a long-term solution that other materials can’t match. This commitment to maintenance ensures your investment continues to pay dividends in beauty and functionality.
The Rewarding Journey of DIY Concrete Countertops
Embarking on a DIY concrete countertop project is more than just a home improvement task; it’s an opportunity for creative expression and a rewarding challenge. The satisfaction of transforming raw materials into a functional, beautiful, and highly personalized piece for your home is immense. With its attractive, modern aesthetic and unparalleled durability, a concrete countertop will undoubtedly become a cherished feature in your kitchen or bar area. This project, while requiring careful planning and execution, is incredibly accessible and promises to deliver results that are both visually stunning and enduringly practical. I am incredibly excited to bring this vision to life in my own home, and I encourage you to explore the vast potential of concrete for your next DIY endeavor!