
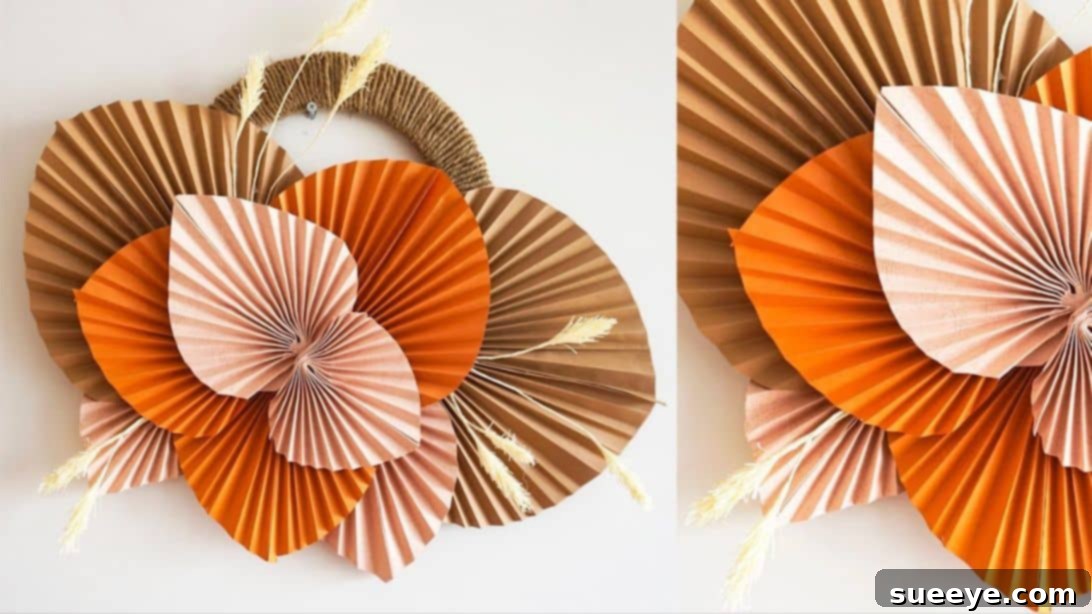
Are you looking to infuse a touch of bohemian charm into your home without breaking the bank? Discover how incredibly simple and satisfying it is to create your own eye-catching **Boho Palm Leaves Wall Decor**. This captivating DIY project offers a fantastic way to add vibrant texture and a personalized aesthetic to any room, turning plain walls into a statement of style and creativity. Perfect for those who appreciate handmade beauty, this craft uses readily available and inexpensive materials such as colored papers, crepe paper, and sturdy cardboard.
Inspired by the brilliant minds at Million Ideas on Youtube, this tutorial guides you through crafting a truly unique piece of art. Beyond home adornment, these versatile paper palm leaves can also serve as magnificent decorations for parties, events, or even photo backdrops. Simply adapt the color palette of your chosen papers to match any theme – from tropical celebrations to elegant bohemian gatherings. Dive into this tutorial to unleash your inner artist and craft a piece that reflects your personal flair. Read on for the full instructions, tips, and ideas to make your project truly spectacular.
Materials You’ll Need:
Gathering your supplies is the first exciting step in any DIY adventure. For this particular **Boho Palm Leaves Wall Decor** project, you’ll find most items are easy to acquire, often already lurking in your craft drawer or easily found at your local stationery or craft store. Here’s a detailed list of what you’ll need:
- A4 Colored Papers: These will form the main leaves. Choose a variety of colors that complement your home decor or event theme. Opt for slightly thicker paper for better durability, but standard printer paper works wonderfully for a delicate look.
- Ruler: Essential for precise measurements and straight lines, ensuring your leaf shapes are symmetrical and consistent.
- Pencil: For marking lines and shapes before cutting. A light touch is key so your marks don’t show on the final product.
- Pair of Scissors: A sharp pair of craft scissors will make cutting intricate shapes and fine details much easier and cleaner.
- Double Adhesive (Double-Sided Tape): This is crucial for securely folding and sealing your paper leaves without visible glue marks, offering a neat finish.
- Crepe Paper: Used to create the realistic, textured stems for your palm leaves. Green or brown shades are ideal for a natural look, but feel free to experiment with other colors.
- Floral Wire: Provides the necessary structure and flexibility for your crepe paper stems, allowing you to shape and position your leaves effectively.
- Cardboard: A sturdy piece of cardboard will form the base of your wall decor. Recycled cardboard boxes are perfect for this, making the project even more eco-friendly.
- Twine: Used to wrap and decorate your cardboard base, adding a rustic, natural, and truly bohemian touch.
- Hot Glue Gun and Glue Sticks: Your best friend for secure and instant adhesion, especially when attaching the leaves and twine to the cardboard base. Always exercise caution when using a hot glue gun.
Having all your materials ready before you begin will ensure a smooth and enjoyable crafting experience, allowing you to focus on the creative process of bringing your **Boho Palm Leaves Wall Decor** to life.
Step-by-Step Instructions: Crafting Your Boho Palm Leaves Wall Decor
Embark on your creative journey with these detailed instructions. Each step is designed to be easy to follow, ensuring a successful and rewarding crafting experience. Take your time, enjoy the process, and watch your beautiful **Boho Palm Leaves Wall Decor** come to life!
Step 1: Preparing Your Paper Leaf Blanks
The first step involves creating the foundational shape for your paper palm leaves. Begin by taking one sheet of A4 colored paper. Fold this paper in half crosswise, ensuring the edges align perfectly for a crisp crease. This fold will serve as the central vein of your leaf. Next, starting from the bottom right corner of the folded edge, draw a diagonal line extending upwards towards the middle of the top edge. This line defines one side of your palm leaf shape. From that point in the middle of the top edge, gently curve your pencil line downwards towards the top left corner. The curve should be subtle, mimicking the natural flow of a palm leaf. Once satisfied with your drawn lines, carefully cut along these pencil marks with your scissors. Remember to cut through both layers of the folded paper simultaneously to ensure symmetry. This initial cut will yield a symmetrical, elongated half-leaf shape when unfolded, providing the perfect canvas for the next step.
Step 2: Folding and Shaping Your Paper Palm Leaves
Now that you have your basic leaf shape, it’s time to add the iconic pleated texture that gives these leaves their distinctive character. Open the paper leaf you just cut. You will see a straight edge on one side and the curved edge on the other. Begin folding along the straight end, creating an accordion-style pleat. Make your first fold about half an inch wide, folding it forward. Then, flip the paper over and fold it backward to create the next pleat of the same width. Continue this back-and-forth folding motion repeatedly until you reach the opposite end of the paper leaf. Precision in your folds will result in a more uniform and visually appealing texture. Once all folds are complete, gather the folds at the straight end. Apply a strip of double-sided adhesive tape to one side of this straight end, then press the two sides together firmly to seal the pleated sections and form a unified leaf structure. To further enhance the natural appearance, you can gently cut the very tips of the edges of the pleated sections into small, V-shapes or scallops to give the leaf a more defined and feathery look, mimicking real palm fronds. Repeat this process to create multiple leaves in various colors and sizes. Experiment with different A4 paper sizes (e.g., cutting an A4 in half lengthwise before folding) to achieve a dynamic range of leaf dimensions, adding depth and interest to your final decor piece.
Step 3: Crafting the Crepe Paper Stems
No palm leaf is complete without its stem! To create these, first, cut a long strip of crepe paper, approximately 1 to 1.5 inches wide, and ensure it’s long enough to wrap around your floral wire. Apply a thin strip of double-sided adhesive tape along one end of this crepe paper strip, lengthwise. This will help secure the initial wrap. Before you start wrapping, cut small, short fringe-like strips along one of the long edges of the crepe paper strip. These small cuts will create a more organic, textured look when wrapped. Now, take a length of floral wire (about 6-8 inches, or adjust according to your desired stem length). Starting from one end, begin to roll the prepared crepe paper strip (with the small cuts facing outwards) around the floral wire. Roll it downward, ensuring the crepe paper is snug and smooth around the wire. Once you’ve covered the initial wire, continue wrapping the rest of the crepe paper strip around, layering it slightly to create a thicker, more substantial stem. You can add a tiny dab of hot glue at the beginning and end of the wrap for extra security. Make sure to cover the entire length of the floral wire so that no metal is visible. For this project, aim to create about 6 of these charming, flexible stems to support your paper palm leaves.
Step 4: Assembling Your Wall Decor Base and Attaching Leaves
This is where your **Boho Palm Leaves Wall Decor** truly comes together! Start by creating the base. Take your piece of cardboard and draw a hollow circle or a crescent shape on it. The size of this shape will determine the overall footprint of your decor. Carefully cut out this hollow shape. Once cut, begin wrapping the entire cardboard base with twine. Apply a small dot of hot glue to secure the start of the twine, then wrap it tightly and neatly around the cardboard, adding tiny dots of hot glue periodically to keep the twine secure and prevent unraveling. Once the entire base is covered, trim the twine and secure the end with hot glue. Now for the exciting part: arranging your paper leaves! Lay out your finished leaves and crepe paper stems on a flat surface, experimenting with different arrangements within the half-circle or crescent base you created. Play with varying sizes and colors, overlapping them slightly to create depth and a beautiful, organic, flower-like or fanned design. You might cluster smaller leaves together to mimic a bloom, or fan larger ones out to suggest natural palm fronds. Once you’ve achieved a design that you love, carefully lift each leaf-and-stem combination and attach it to the back of your twine-wrapped cardboard base using hot glue. Press firmly until the glue sets. For displaying your stunning creation, attach a loop of twine or a sturdy piece of string to the back of the cardboard base with ample hot glue. This will create a reliable hanging mechanism, allowing you to easily hook your new **Boho Palm Leaves Wall Decor** onto any wall.
Customization Ideas for Your Boho Palm Leaves Wall Decor
One of the greatest joys of DIY is the freedom to customize. Your **Boho Palm Leaves Wall Decor** can be tailored to perfectly match your unique style and needs. Here are some ideas to spark your creativity:
- Color Palettes: While natural greens and browns are classic, consider vibrant blues, soft pastels, or even metallic papers for a glamorous touch. Ombre effects can be achieved by using papers that subtly shift in hue.
- Leaf Shapes and Sizes: Don’t limit yourself to just one type of palm leaf. Experiment with broader, more rounded shapes, or narrow, feathery designs. Varying the length and width of your initial paper cuts will give you endless possibilities.
- Adding Embellishments: Incorporate elements like small wooden beads, macrame tassels, dried flowers, or even subtle glitter accents on the leaf tips for extra sparkle and texture.
- Different Bases: Instead of a hollow cardboard circle, you could use a straight wooden dowel, a piece of driftwood, or even a woven placemat as your base.
- Event-Specific Themes: For a baby shower, use soft pinks, blues, or yellows. For a wedding, choose elegant whites, creams, and golds. The possibilities are truly endless!
- Groupings: Instead of one large piece, consider making several smaller clusters of leaves and arranging them as a gallery wall.
Why Choose DIY Boho Decor?
Embracing DIY projects like this **Boho Palm Leaves Wall Decor** offers a multitude of benefits beyond just having a beautiful decoration:
- Cost-Effectiveness: Crafting your own decor is significantly cheaper than purchasing ready-made pieces from boutiques. You use simple, affordable materials, making high-style decor accessible on any budget.
- Personalization: You have complete control over the design, colors, and overall aesthetic, ensuring the final product perfectly reflects your taste and complements your existing decor. No mass-produced item can offer this level of customization.
- Sense of Accomplishment: There’s immense satisfaction in creating something beautiful with your own hands. This project is not just about the end result, but the joyful process of creation.
- Stress Relief: Engaging in creative activities like crafting can be a wonderful way to unwind, de-stress, and practice mindfulness.
- Unique Home Decor: Your home will boast truly unique pieces that are conversation starters, showcasing your creativity and individuality.
Displaying Your Masterpiece
Once your **Boho Palm Leaves Wall Decor** is complete, it’s time to find its perfect spot. This versatile piece can enhance almost any area of your home:
- Living Room: Hang it above a sofa, fireplace, or as a focal point on an accent wall. Its natural textures and soft colors will create a welcoming ambiance.
- Bedroom: Place it above your headboard for a serene and bohemian bedroom retreat.
- Nursery or Kids’ Room: Choose playful colors for a charming and whimsical touch that stimulates creativity.
- Home Office: Add a splash of nature and inspiration to your workspace.
- Entryway: Create a warm and inviting first impression for guests.
- Event Backdrops: Utilize it for photo booths, dessert tables, or as part of a larger decorative scheme for parties, weddings, or bridal showers.
Consider pairing your paper palm leaves with other natural elements like macrame hangers, woven baskets, or potted plants to complete the bohemian look.
Caring for Your Paper Decor
To ensure your beautiful **Boho Palm Leaves Wall Decor** lasts for a long time, here are a few simple care tips:
- Keep Dry: Paper is susceptible to moisture. Avoid hanging your decor in high-humidity areas like bathrooms or directly near windows where condensation might occur.
- Avoid Direct Sunlight: Prolonged exposure to direct sunlight can cause colored papers to fade over time. Position your decor in a spot with indirect light to preserve its vibrancy.
- Dust Gently: To clean, use a soft, dry cloth or a feather duster. A soft brush or even a can of compressed air can help remove dust from between the pleats.
- Handle with Care: While relatively sturdy, paper crafts can tear if mishandled. Be gentle when moving or cleaning your decor.
Create Your Own Boho Oasis Today!
Crafting your own **Boho Palm Leaves Wall Decor** is more than just a craft project; it’s an opportunity to inject personality, warmth, and artistic flair into your living space. With simple materials, clear instructions, and your own creative vision, you can produce a stunning piece that not only saves you money but also brings immense satisfaction. Whether you’re a seasoned crafter or just starting your DIY journey, this project is accessible, enjoyable, and incredibly rewarding. So gather your supplies, find a comfortable workspace, and get ready to transform your home with this beautiful, handmade bohemian accent. We encourage you to share your creations and inspire others to embrace the joy of DIY!