
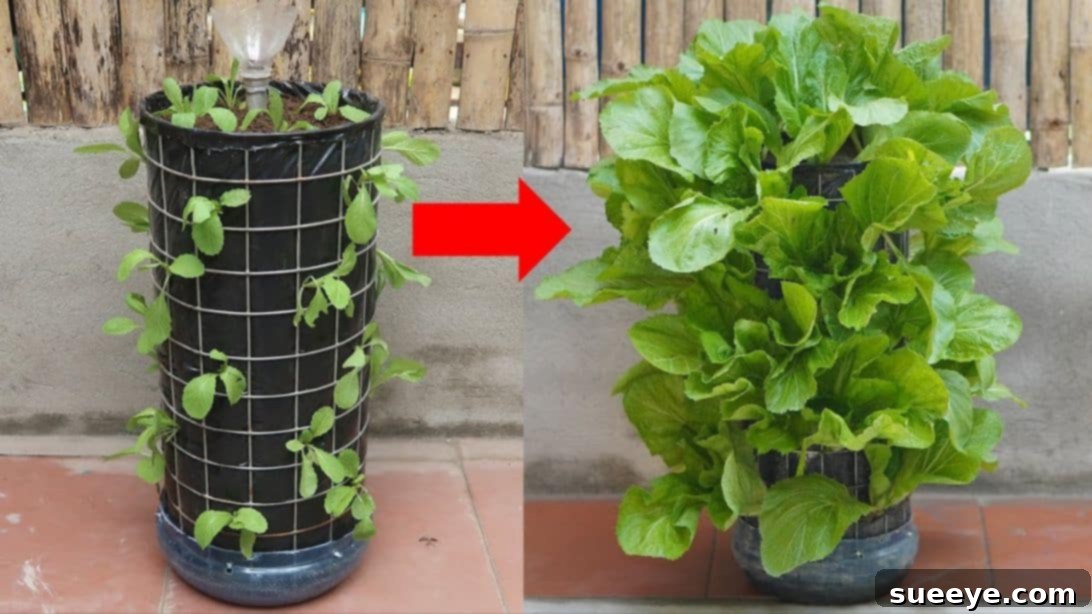
Do you dream of cultivating your own fresh vegetables but find yourself limited by space? Many aspiring gardeners face the challenge of a tiny yard, apartment balcony, or compact patio. The good news is that you don’t need a sprawling backyard to enjoy the rewards of home-grown produce. With innovative solutions like vertical gardening, even the smallest areas can be transformed into productive green spaces. This comprehensive tutorial will guide you through creating a DIY vertical garden specifically designed for vegetables, complete with an ingenious automatic watering system. This project, inspired by practical designs, prioritizes efficiency and sustainability, utilizing common household scraps to build a thriving garden. It’s a testament to how creative repurposing can lead to beautiful and functional gardening solutions. Get ready to maximize your growing potential and enjoy an abundance of fresh, healthy vegetables right at your fingertips!
Essential Materials for Your DIY Vertical Garden
One of the most appealing aspects of this vertical garden project is its reliance on readily available and often recycled materials. This not only makes it cost-effective but also a fantastic way to contribute to a more sustainable lifestyle. Gather these items to begin building your self-watering vertical planter:
- Big Water Gallon Bottle: This serves as the primary structure and the external container for your vertical garden tower. Its size provides ample space for multiple planting pockets and stability.
- Round Wire Mesh (matching bottle diameter): The wire mesh will form the internal core, providing crucial support for the soil and creating the foundational structure for your plants. It’s important that its diameter is similar to that of your gallon bottle for a snug fit.
- Zip Ties: These robust fasteners are essential for securely attaching the wire mesh to the gallon bottle, ensuring the stability and integrity of your vertical garden structure.
- Plastic Bottles (various sizes): Smaller plastic bottles will be repurposed to create the internal automatic watering system, acting as reservoirs and conduits for water.
- Cloth (absorbent material): Strips of absorbent cloth are key to the automatic watering system. They will act as wicks, drawing water from the reservoir up to the soil through capillary action. Old cotton t-shirts or towels work perfectly.
- Metal Tube: This tube will serve as the filling port for your automatic watering system, allowing you to easily replenish the water reservoir without disturbing the plants or soil.
- Trash Bag (heavy-duty): A durable trash bag will line the inside of the wire mesh, creating the contained environment for your soil and preventing it from falling out, while also protecting the plastic structure.
- Potting Soil: High-quality, nutrient-rich potting soil is crucial for the health and growth of your vegetables. Choose a mix that provides good drainage and aeration.
- Hot Glue Gun and Glue Sticks: For creating secure and watertight seals between various plastic components, ensuring the watering system functions correctly.
Step-by-Step Guide: Building Your Self-Watering Vertical Garden
Follow these detailed instructions carefully to construct your efficient and space-saving vertical garden with an automatic watering system. Precision in each step will ensure the longevity and success of your garden.
Step 1: Prepare the Main Gallon Bottle Structure
Begin by taking your large water gallon bottle. Carefully cut off the entire bottom section of the bottle. If your gallon bottle comes with a faucet, remove it completely. Next, create a series of small, evenly spaced holes around the new bottom edge of the bottle – aim for about 6 holes. These will provide drainage and aeration for the lowest soil layer. Then, move to the top edge (the rim where the cap usually goes) and create 4 pairs of holes. These pairs of holes will be used to secure the wire mesh in the next step, so ensure they are aligned for stability.
Step 2: Install the Wire Mesh Core
Now, take your round wire mesh. Carefully insert it into the prepared gallon bottle. The mesh should fit snugly inside. Align the top edge of the wire mesh with the 4 pairs of holes you created on the top rim of the gallon bottle. Using zip ties, thread them through these holes and around the wire mesh, pulling them tight to secure the mesh firmly in place. This wire mesh forms the internal framework that will support your soil and define the planting areas, so ensure it is stable and centered.
Step 3: Prepare the Watering System Reservoir
Grab one of your smaller plastic bottles. This bottle will become a key component of your automatic watering reservoir. On the top part of this plastic bottle, create four small, evenly spaced holes. These holes will serve as entry points for the wicking cloth strips, allowing water to be drawn upwards to the soil efficiently.
Step 4: Integrate the Wicking Cloth Strips
Cut four strips of absorbent cloth, each approximately 1-2 inches wide and long enough to reach from the bottom of your prepared plastic bottle reservoir to well into the soil above. Insert each strip halfway through the four holes you made in the plastic bottle in the previous step. Ensure they are securely threaded, as these cloth strips are crucial for the capillary action that will deliver water to your plants.
Step 5: Assemble the Internal Watering Mechanism
Take your metal tube and create several small holes along its length, particularly towards one end. These holes will allow water to slowly disperse into the soil from the tube. Using a hot glue gun, securely glue the end of the metal tube (the one with the holes) into the mouth of the plastic bottle (the one with the cloth strips). This connection must be watertight. Next, carefully glue the bottom of this entire plastic bottle assembly (the one with the metal tube and cloth strips) inside the large gallon bottle, ensuring it is positioned centrally at the base. This forms the core of your self-watering system.
Step 6: Create the Watering Port and Cover
Get another plastic bottle. Cut off both the top (neck) and bottom sections of this bottle. Take the top part, which will now resemble a funnel, and glue it securely onto the exposed end of the metal tube protruding from the main structure. This will serve as your easy-fill watering port. Then, use the bottom part of the same plastic bottle to create a simple cover for this watering port, protecting it from debris and reducing evaporation.
Step 7: Line the Garden Tower
Carefully drape your heavy-duty trash bag inside the entire wire mesh structure, ensuring it covers the mesh completely. Smooth out any wrinkles and press it against the mesh walls. Fold the excess ends of the trash bag outward over the top edge of the wire mesh and gallon bottle, creating a clean, secure rim. This lining will hold your soil in place and prevent it from spilling out through the mesh openings, while also protecting the main structure.
Step 8: Fill, Plant, and Water Your Vertical Garden
Now, it’s time to bring your garden to life! Fill the lined structure with your chosen potting soil, ensuring it’s evenly distributed around the central watering system. Once filled, create several strategic holes in the sides of the trash bag lining – these will be your planting pockets. Carefully plant your chosen vegetable seedlings or seeds into these pockets. Finally, pour water into the central metal tube until the internal bottle reservoir is sufficiently filled. The wicking cloth strips will then automatically draw water from this reservoir up into the soil, providing consistent moisture to your plants. Monitor the water level and replenish as needed, and watch your vegetables thrive!
The Allure of Vertical Gardening: Maximizing Green Space
Vertical gardening has emerged as a revolutionary solution for urban dwellers and anyone with limited outdoor space. Its appeal extends far beyond mere space-saving, offering a multitude of benefits that traditional gardening often cannot match. By growing plants upwards, you transform previously unused walls, fences, or even corners into vibrant, productive green areas. This technique is perfect for small balconies, compact patios, and even indoor spaces, allowing you to cultivate a diverse range of vegetables, herbs, and flowers without needing extensive ground area. Imagine a lush wall of cascading strawberries or a fragrant tower of culinary herbs – all made possible by vertical design.
Beyond its ingenious space efficiency, vertical gardens add significant aesthetic value to any setting. They can act as living art installations, transforming drab walls into captivating displays of nature. The elevated position of plants in a vertical garden also makes them more accessible, reducing the need for bending and kneeling, which is a blessing for those with mobility challenges. Furthermore, raising plants off the ground can provide a natural barrier against certain ground-dwelling pests, contributing to healthier plant growth and potentially reducing the need for chemical pesticides. The increased air circulation around plants in a vertical setup can also help prevent fungal diseases, creating a more robust growing environment. It’s a holistic approach to gardening that addresses modern challenges with elegant, natural solutions.
Unlocking Convenience: The Automatic Watering System
Integrating an automatic watering system into your vertical garden is a game-changer, elevating convenience and plant health to new heights. The system described in this tutorial utilizes a simple yet effective wicking method, mimicking aspects of self-watering planters. This ensures that your plants receive a consistent and steady supply of moisture, eliminating the common problems of under-watering or over-watering that can plague manual irrigation.
For busy individuals or those who frequently travel, an automatic watering system offers invaluable peace of mind. You no longer have to worry about forgetting to water your plants or entrusting their care to others. The internal reservoir slowly releases water as needed, allowing your plants to draw moisture at their own pace, which promotes stronger root development and overall healthier growth. This targeted delivery of water also leads to significant water conservation compared to traditional watering methods, where much of the water can evaporate or run off before reaching the roots. By maintaining optimal soil moisture levels, your automatic watering vertical garden fosters a thriving environment where your vegetables can flourish with minimal daily intervention, leaving you more time to simply enjoy the fruits (and vegetables!) of your labor.
Choosing the Right Crops for Your Vertical Oasis
Selecting the appropriate vegetables for your vertical garden is key to its success. Not all plants are equally suited to this growing method, which typically involves shallower soil pockets and specific light conditions. Focus on plants that have compact growth habits, relatively shallow root systems, and a good tolerance for container growing. Leafy greens are an excellent choice for vertical gardens. Varieties like lettuce (loose-leaf and butterhead), spinach, kale, and Swiss chard thrive in these conditions, offering continuous harvests. Herbs such as basil, mint, chives, thyme, rosemary, and oregano are also ideal, providing a fragrant and flavorful addition to your culinary endeavors.
For those looking for fruiting vegetables, certain varieties are particularly well-suited. Strawberries are a classic vertical garden favorite, producing abundant, sweet berries that cascade beautifully. Dwarf varieties of cherry tomatoes and compact pepper plants can also do very well, especially if given adequate sunlight and support. You might also consider bush beans, peas, or even some smaller radishes. When making your selections, always consider the amount of sunlight your vertical garden will receive throughout the day. Most vegetables require at least 6 hours of direct sunlight to produce optimally, so choose sun-loving crops for a sunny spot, or opt for more shade-tolerant greens and herbs if your location is less illuminated. Remember to also account for the mature size of the plant to ensure it doesn’t overcrowd its neighbors or the structure itself.
Essential Tips for Thriving Vertical Gardens
Building your vertical garden is just the first step; maintaining its vitality requires ongoing care and attention. To ensure your vegetables thrive and provide a continuous harvest, keep these essential tips in mind:
- Optimal Sunlight: Position your vertical garden in a spot where it receives at least 6-8 hours of direct sunlight daily for most fruiting vegetables. Leafy greens and herbs can often tolerate slightly less, but more sun generally means better yields.
- Quality Potting Mix: Invest in a high-quality, lightweight potting mix specifically designed for containers. This provides excellent drainage, aeration, and essential nutrients. Avoid using dense garden soil, which can compact and hinder root growth.
- Consistent Nutrition: Since vertical gardens have limited soil volume, nutrients can deplete faster. Supplement your plants with a balanced liquid fertilizer every 2-4 weeks, especially for heavy feeders like tomatoes and leafy greens. You can often add a diluted liquid fertilizer directly into the automatic watering system’s reservoir.
- Pest and Disease Management: Regularly inspect your plants for signs of pests or diseases. Catching issues early can prevent them from spreading. Use organic pest control methods like neem oil, insecticidal soap, or simply hand-picking pests when necessary. Good air circulation in a vertical setup can naturally deter some issues.
- Regular Harvesting: Harvest leafy greens and herbs frequently to encourage new growth and prevent plants from going to seed too quickly. For fruiting vegetables, pick them as they ripen to stimulate further production.
- Monitor the Watering System: Even with an automatic system, it’s wise to check the water reservoir periodically. Learn how quickly your plants consume water to establish a refilling schedule. Ensure the wicking cloth remains effective and clear of debris.
- Seasonal Refresh: At the end of a growing season or after several cycles, consider refreshing the soil or rotating your crops. This helps replenish nutrients and prevents soil-borne diseases from building up.
Embracing Sustainability: Upcycling for a Greener Tomorrow
This DIY vertical garden project is more than just a clever way to grow vegetables; it’s a powerful statement about sustainability and resourcefulness. By transforming discarded plastic gallon bottles and other household scraps into a functional gardening system, you are actively participating in the upcycling movement. This practice significantly reduces waste, diverting plastic from landfills and giving these materials a new, purposeful life.
Choosing to upcycle not only benefits the environment but also makes gardening more accessible and affordable. You save money on expensive planters and materials, proving that a productive garden doesn’t require a hefty investment. Furthermore, growing your own food, even in a small vertical setup, reduces your carbon footprint by minimizing reliance on commercially grown produce that often travels long distances. It fosters a deeper connection to your food source and encourages a more eco-conscious lifestyle. This project beautifully demonstrates how simple, everyday items can be repurposed to create something truly valuable and contribute to a greener, more sustainable future for everyone.
Conclusion: Your Green Journey Starts Here
Embarking on the journey of creating your own DIY vertical garden with an automatic watering system is an incredibly rewarding experience. It’s a testament to the power of innovation and the joy of growing your own food, regardless of the space you have available. This project empowers you to transform small, underutilized areas into vibrant, productive vegetable gardens, offering a continuous supply of fresh, healthy produce right at your doorstep.
From the satisfaction of repurposing materials to the convenience of an automated watering system, every aspect of this vertical garden is designed to make gardening enjoyable and sustainable. You’ll not only reap the benefits of fresh herbs and vegetables but also contribute to a greener planet through upcycling. So, gather your materials, follow these detailed steps, and prepare to cultivate your very own vertical oasis. Your green thumb is waiting – let the planting begin!