
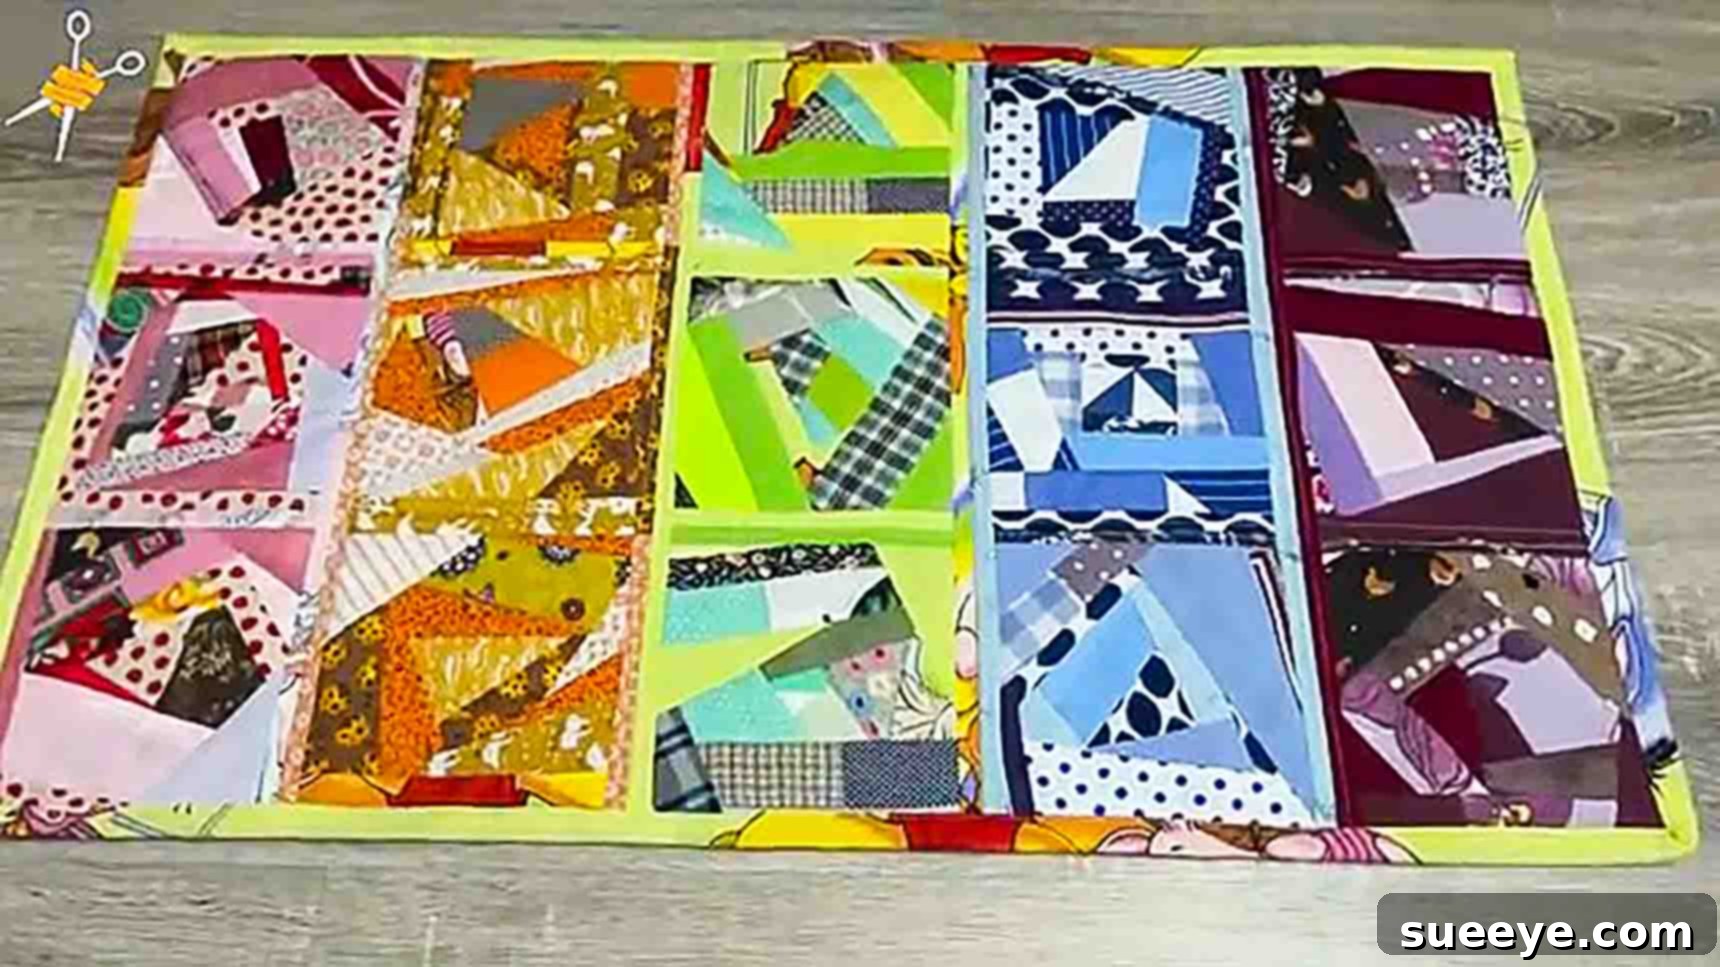
DIY Patchwork Carpet: Transform Fabric Scraps into a Beautiful Handcrafted Rug
As passionate quilters and avid sewists, we often accumulate a treasure trove of leftover fabrics – a vibrant collection of scraps, some tiny, some oddly shaped, all waiting for their next purpose. The thought of these precious bits contributing to waste is often disheartening. This common dilemma sparks a creative challenge: how can we transform these remnants into something beautiful and functional? If you, like many, are searching for an innovative way to breathe new life into your smallest fabric pieces, then you’ve stumbled upon the perfect solution. Imagine turning those irregular shapes and tiny off-cuts into a unique, durable, and eye-catching patchwork carpet.
We recently discovered an incredibly inspiring DIY patchwork carpet tutorial from Two Strands on Youtube, and it’s a game-changer for anyone committed to sustainable crafting. This method isn’t just about recycling; it’s about elevating your scraps into a gorgeous, personalized home accent that can serve as a thoughtful gift or a charming addition to your own living space. This project is surprisingly easy, wonderfully fuss-free, and promises immense satisfaction. Get ready to embark on a creative journey that will forever change how you view your fabric leftovers!
Why Make a Patchwork Carpet from Fabric Scraps?
Creating a patchwork carpet from fabric scraps offers numerous benefits beyond just waste reduction. It’s an opportunity for:
- Sustainability: Minimize textile waste by giving your smallest fabric pieces a new life.
- Cost-Effectiveness: Utilize materials you already own, saving money on new home decor items.
- Personalization: Design a unique piece that perfectly matches your decor or reflects your personal style.
- Creative Expression: Experiment with color, texture, and pattern in a free-form, improvisational manner.
- Gifting: A handmade rug makes an incredibly thoughtful and cherished gift for friends and family.
- Skill Building: Practice fundamental sewing and quilting techniques in a fun, forgiving project.
Materials You’ll Need for Your Scrappy Rug Project
Before you dive into the exciting world of patchwork, ensure you have all the necessary supplies on hand. Gathering your materials beforehand will make the process smooth and enjoyable.
- Leftover Fabrics (Scraps): These are the stars of your project! Gather a diverse collection of fabric scraps in various sizes, shapes, and colors. Cotton quilting fabrics work wonderfully, but you can also incorporate other woven fabrics like linen, light denim, or even old clothes cut into usable pieces.
- Fabric for Borders: Choose a solid-colored or subtly patterned fabric that complements your scraps. This fabric will frame your patchwork blocks and create a cohesive look. You’ll need enough to create several 1 ½-inch wide strips.
- Backing Fabric: A sturdy fabric like canvas, duck cloth, or a heavy-duty cotton will provide durability and structure to your rug. It should be slightly larger than your intended rug size.
- Batting: A medium-loft cotton or polyester batting will give your carpet softness, cushioning, and insulation. Choose a size slightly larger than your desired rug dimensions.
- Rotary Cutter: Essential for precise and efficient cutting of fabric strips and trimming.
- Self-Healing Cutting Mat: To protect your work surface and prolong the life of your rotary cutter blade.
- Quilting Ruler: A clear acrylic ruler with measurements will be invaluable for accurate cutting and trimming.
- Sewing Machine: A standard sewing machine capable of sewing through multiple layers of fabric.
- All-Purpose Sewing Thread: A strong, durable thread in a neutral color (like white, grey, or beige) that blends with most of your fabrics.
- Fabric Scissors: For general cutting and snipping threads.
- Pins or Fabric Clips: To hold layers of fabric together securely while sewing.
- Iron and Ironing Board: Crucial for pressing seams open and ensuring a flat, professional finish.
Step-by-Step Guide: Crafting Your Patchwork Carpet
This project is broken down into manageable steps, making it perfect for both beginners and experienced sewists. Follow these instructions carefully to create a beautiful and long-lasting patchwork rug.
Step 1: Preparing Your Fabric Scraps and Creating Patchwork Blocks
The first step involves preparing your fabric scraps and transforming them into individual patchwork blocks, which will form the foundation of your carpet.
- Gather and Sort Scraps: Begin by collecting a variety of fabric scraps. Press them flat to remove any wrinkles. You can choose to sort them by color palette for a cohesive look or mix them freely for a truly “scrappy” aesthetic.
- Prepare Your Batting Foundation: Cut your batting into squares or rectangles of your desired individual block size. For example, you might aim for 6-inch or 8-inch squares. These batting pieces will serve as the base for your patchwork.
- Sew Scraps onto Batting (Improvisational Piecing): This is where your creativity shines!
- Place your first scrap piece onto a batting square. It doesn’t need to cover the entire batting.
- Take a second scrap piece and align it right sides together with one edge of the first scrap.
- Stitch them together through all layers (scrap 1, scrap 2, and batting) using a ¼-inch seam allowance.
- Flip the second scrap open and press the seam flat.
- Continue adding scraps in this “sew-and-flip” method, covering the entire batting square. You can lay pieces horizontally, vertically, or diagonally, creating a unique and organic design. Don’t worry about perfect alignment; the charm of this project lies in its free-form nature.
- Trim Excess Fabrics: Once the entire batting square is covered with fabric scraps, use your rotary cutter and ruler to trim the block back to your original desired square/rectangle size, creating neat edges.
- Attach Border Strips: Measure and cut a solid-colored strip of fabric to 1 ½ inches wide. This strip will form a border around your patchwork block. Sew this strip to one side of each trimmed patchwork block, right sides together, using a ¼-inch seam allowance. Press the seam open or towards the border fabric.
- Repeat for Multiple Blocks: The original tutorial suggests making fifteen of these patchwork blocks. This number is a good starting point for a small to medium-sized rug. Adjust the quantity based on the desired final dimensions of your carpet.
Step 2: Assembling the Carpet and Finishing Touches
Now that you have your individual patchwork blocks, it’s time to bring them together to form the complete carpet.
- Assemble Blocks into Rows: Take three of your finished patchwork blocks and arrange them side-by-side to form a row. With right sides together, sew the blocks together using a ¼-inch seam allowance. After sewing each seam, press the seams open to reduce bulk and ensure your rows lay flat. Repeat this process until all your blocks are sewn into rows (e.g., if you made 15 blocks, you’ll have 5 rows of 3 blocks each).
- Create Connecting Bands: Cut more 1 ½-inch wide strips from your border fabric. These will serve as connecting bands between your rows. Cut these bands to the exact length of your assembled rows.
- Sew Rows Together with Bands:
- Place one connecting band right sides together with the bottom edge of your first patchwork row. Pin carefully, then stitch with a ¼-inch seam allowance. Press the seam.
- Take your second patchwork row and place it right sides together with the bottom edge of the newly attached connecting band. Pin and stitch, then press the seam.
- Continue adding connecting bands and patchwork rows in this manner until all your rows are joined, forming the main body of your carpet.
- Press the Top: Once all rows are assembled, give the entire patchwork top a thorough pressing. Ensure all seams are flat and smooth, and the fabric is free of wrinkles. This step is crucial for a professional finish.
- Layer the Quilt Sandwich:
- Lay your backing fabric on a clean, flat surface, wrong side up, smoothing out any wrinkles. Tape it down if necessary to keep it taut.
- Place your batting on top of the backing fabric, centering it.
- Finally, lay your completed patchwork top right side up on top of the batting, ensuring it is centered and smooth.
- Baste the Layers: Secure the three layers together using safety pins (pin basting) or basting spray. This prevents shifting during the quilting process. Space your pins every 4-6 inches across the entire surface.
- Quilt Your Carpet: This step adds durability and design. You can choose a simple quilting pattern:
- Stitch-in-the-Ditch: Quilt along the seams of your patchwork blocks and connecting bands. This highlights the piecing and is very straightforward.
- Straight Line Quilting: Quilt straight lines across the rug, either diagonally or parallel to the rows. Use a walking foot on your sewing machine for best results when quilting multiple layers.
- Free-Motion Quilting: If you’re more adventurous, try free-motion quilting for organic, flowing designs.
- Trim and Bind the Edges:
- After quilting, trim the excess batting and backing fabric, squaring up the edges of your carpet with your rotary cutter and ruler.
- Binding: For a durable and neat finish, you’ll need to bind the edges of your carpet. Cut binding strips (typically 2 ¼ or 2 ½ inches wide) from a coordinating fabric. Join them end-to-end to create a continuous strip long enough to go around the entire perimeter of your rug. Attach the binding to the front of the rug, then fold it over to the back and hand-stitch or machine-stitch it in place. This provides a clean, finished edge that will protect your rug from fraying and enhance its longevity.
And there you have it! Your beautiful, handmade patchwork carpet is now complete, ready to adorn your home or be gifted to someone special.
Tips for Success and Customization
To ensure your patchwork carpet is not only beautiful but also durable and uniquely yours, consider these additional tips:
- Fabric Selection: For a rug that will withstand foot traffic, opt for sturdy, tightly woven cotton fabrics. Avoid very thin or loosely woven materials for the patchwork pieces themselves, though they can be used as accents.
- Color Palette: While a scrappy rug is inherently colorful, you can create a more harmonious look by sticking to a general color palette (e.g., warm tones, cool tones, pastels, or contrasting brights).
- Thread Strength: Use a good quality polyester thread that is strong and durable for all construction and quilting stitches.
- Needle Choice: A sharp, heavy-duty needle (e.g., a denim or topstitching needle) might be beneficial, especially when quilting through multiple layers of fabric and batting.
- Non-Slip Backing: If your carpet will be placed on a smooth floor, consider adding a non-slip rug pad underneath or stitching a non-slip grip fabric to the back for safety.
- Size and Shape Variations: Don’t feel limited to the suggested size. You can make a small mat for a bathroom, a runner for a hallway, or a large area rug by simply adjusting the number of patchwork blocks and rows. You can also experiment with different shapes for your blocks.
- Maintenance: For best results, spot clean your patchwork carpet when possible. If a full wash is needed, use a gentle cycle with cold water and air dry flat to prevent shrinking or damage.
- Safety First: Always use your rotary cutter on a self-healing mat, away from your body, and retract the blade when not in use.
Embrace the Art of Upcycling with Your New Handcrafted Rug
Creating a DIY patchwork carpet is more than just a sewing project; it’s an act of sustainable creativity and a testament to your resourcefulness. Each fabric scrap tells a story, and together, they weave a new narrative in the form of a functional piece of art for your home. This project offers a fantastic way to clear out your overflowing scrap bins, reduce waste, and produce something truly meaningful.
Whether you’re looking to add a touch of handmade charm to your own living space, seeking the perfect personalized gift, or simply want to explore new ways to enjoy your sewing hobby, this patchwork carpet tutorial provides a clear path to success. The ease and adaptability of this project make it a delightful endeavor for sewists of all skill levels.
So, gather your colorful scraps, fire up your sewing machine, and get ready to transform forgotten fabric into a cherished heirloom. We encourage you to share your unique creations and inspire others in the crafting community. Happy sewing!