
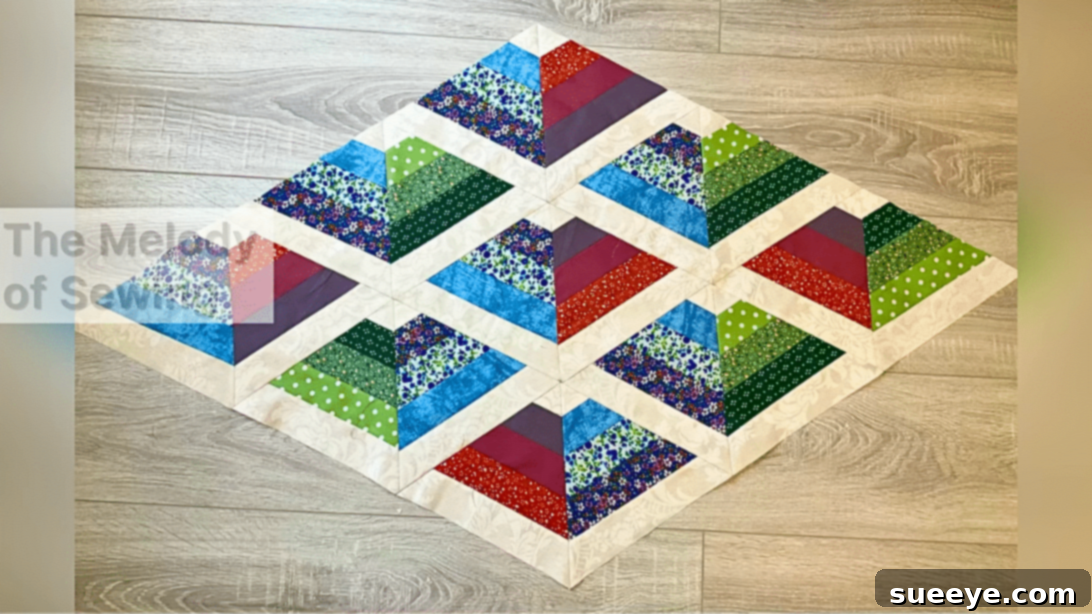
Mastering the Geometric Charm Quilt: Create a Stunning 3D Patchwork Design with Ease
Unleash your inner quilter with a project that combines simplicity with dazzling visual impact: the Geometric Charm Quilt. This ingenious triangle patchwork quilt project, brilliantly demonstrated by The Melody of Sewing on YouTube, is an absolute game-changer for both novice and experienced crafters. What makes it truly stand out is its captivating 3D pattern, achieved with surprising ease using only a few fabric strips. Imagine transforming a simple stack of fabrics into a vibrant, three-dimensional masterpiece that could adorn your dining table as a stylish topper or runner, or even become a unique wall hanging. The beauty of this design lies in its versatility; the triangle units can be arranged in countless ways, allowing you to personalize each creation and achieve a truly unique aesthetic every time.
Discover the Allure of the Geometric Charm Quilt
This quilting technique offers an accessible entry point into the world of patchwork while delivering professional-looking results. Whether you’re drawn to bold, contrasting colors or prefer a more subtle, harmonious palette, the choice of fabric prints and solids allows for endless creative expression. Pairing vibrant prints with a dark or light solid fabric creates a stunning visual pop, giving the illusion of depth and movement. It’s an ideal project for beginners eager to try quilting, as the straightforward steps mean you can comfortably complete this project, potentially even within a single crafting session. Dive into the details and watch the comprehensive video tutorial below to bring this beautiful geometric charm quilt to life.
RELATED: If you love quick and charming quilting projects, don’t miss our Beginner-Friendly Quilted Round Table Topper Tutorial for another delightful idea!
Essential Materials for Your 3D Geometric Quilt Project
Gathering your materials is the first exciting step toward creating your geometric charm quilt. This project requires only a few basic quilting supplies, making it perfect for using up fabric scraps or investing in a new favorite print. The choice of a contrasting background fabric (black or white) is crucial for highlighting the stunning 3D effect of the triangles. Prepare your workspace and ensure all your tools are at hand for a smooth and enjoyable crafting experience.
- Black or White Fabric: This will serve as your contrasting background strip, emphasizing the geometric pattern.
- Assorted Print Fabric: Choose a variety of prints that complement each other. These will form the colorful core of your design.
- Ruler: A clear quilting ruler (preferably with 60° markings) for precise measurements and accurate cuts.
- Marking Pen, Pencil, or Chalk: For marking cutting lines on your fabric.
- Scissors or Rotary Cutter and a Cutting Mat: A rotary cutter and mat are highly recommended for achieving straight, consistent fabric strips and precise angles.
- Needle and Thread: High-quality thread that matches or complements your fabrics for durable seams.
- Iron, for pressing: Essential for flattening seams and ensuring your quilt lies flat.
- Sewing Machine: A standard sewing machine will make quick work of stitching your fabric strips and units together.
Step-by-Step Guide: Crafting Your Geometric Charm Quilt
Now that you have all your materials ready, let’s embark on the creative journey of assembling your geometric charm quilt. Each step is designed to be straightforward, ensuring a rewarding experience even for those new to quilting. Pay close attention to precision in cutting and pressing, as these details contribute significantly to the professional finish of your quilt.
Step 1: Preparing Your Fabric Strips for the Foundation
The foundation of your geometric charm quilt begins with careful fabric preparation. Precision at this stage is paramount for the overall success and visual appeal of your finished piece. Begin by cutting all your chosen fabrics into strips measuring 2 inches wide by 20 inches long. For best results and crisp edges, use a rotary cutter and a self-healing mat. If you’re using scissors, take your time to ensure straight and even cuts. Next, organize your strips: select two strips of your contrasting black or white fabric and two strips of your assorted print fabrics. Arrange these vertically side-by-side, placing the two print strips in the middle and framing them with the black or white strips on each end. This specific arrangement forms the core unit from which all your stunning 3D triangles will emerge.
Step 2: Assembling Your Fabric Panels with Precision
With your strips prepared and arranged, it’s time to stitch them into cohesive panels. Using your sewing machine, carefully stitch the strips together, one at a time. Maintain a consistent seam allowance throughout – a standard ¼-inch seam allowance is typically used in quilting. An important technique to apply here is to overlap each successive strip by approximately ½ inch at the top before stitching. This slight offset creates the diagonal lines that will later form the points of your 3D triangles. After stitching each seam, take your panel to the ironing board. Ironing is not just about flattening; it’s about setting your stitches and ensuring your seams lie perfectly. Press all your seams towards one direction. This creates a smoother finish and reduces bulk when you assemble the final quilt, contributing to a professional and polished appearance.
Step 3: Unlocking the 3D Effect: Cutting and Arranging Triangle Units
This step is where the magic truly happens and your geometric pattern begins to take shape. With your fabric panel stitched and pressed, it’s time to cut out the individual triangle units. Using your quilting ruler and rotary cutter, cut the edges of your fabric panel at a precise 60° angle. Then, continue to cut individual triangles from the strip-pieced panel, maintaining this 60° angle for each cut. The exact width of your triangle base will depend on the desired size of your final quilt units. Repeat this process until you have a good number of triangle units. Once you have a collection of these unique triangles, the creative fun begins! Experiment with different arrangements by laying them out on a flat surface, as demonstrated in the video. You’ll quickly discover how shifting their orientation creates stunning optical illusions and a beautiful three-dimensional effect. Play with mirrored patterns, repeating motifs, or even a more randomized layout until you are completely content with your unique design. This exploration phase is crucial for personalizing your quilt.
Step 4: Finishing Your Geometric Quilt with Style
Once you’ve settled on your preferred pattern and arrangement, it’s time to bring your vision to life by stitching the individual triangle units together. Carefully pick up your arranged triangles, maintaining their order, and begin stitching them into rows, then stitching the rows together to form the quilt top. Take your time to align the points and seams for a crisp finish. After your quilt top is complete, the final steps involve adding batting and a backing fabric, then quilting all three layers together. You can choose simple straight-line quilting to complement the geometric pattern, or free-motion quilting for added texture. Finally, bind the edges of your quilt to give it a neat, durable finish. This can be done with a contrasting fabric strip or one that blends seamlessly. Congratulations, your beautiful, handcrafted geometric charm quilt is now complete and ready to be admired!
Pro Tips and Creative Variations for Your Geometric Quilt
Elevate your geometric charm quilt project with these helpful tips and ideas for customization:
- Fabric Choice is Key: The magic of the 3D effect largely depends on strong contrast. Opt for a vibrant assortment of prints against a solid black or white background. Consider complementary colors for a harmonious look or analogous colors for a more dynamic feel.
- Embrace Precision: While this project is beginner-friendly, precision in cutting and stitching will significantly impact the final outcome. Use a fresh rotary blade and a steady hand.
- Press, Press, Press: Never underestimate the power of a good iron. Pressing seams after each stitch helps keep your fabric flat and accurate, preventing bulk and ensuring sharp points when you assemble your triangles.
- Experiment with Layouts: Before stitching, spend time arranging your cut triangles on a design wall or floor. Rotate them, flip them, and experiment with different patterns. Take photos of various layouts to help you decide on your favorite.
- Scale It Up or Down: This pattern is incredibly versatile. Want a larger quilt? Simply increase the length of your initial fabric strips and the number of units you create. For smaller projects like coasters or mug rugs, reduce the width of your strips (e.g., 1.5 inches) and shorten the length.
- Vary Strip Widths: While the tutorial uses 2-inch strips, feel free to experiment with wider or narrower strips to alter the visual impact of your finished triangles. Wider strips will create chunkier triangles, while narrower strips will result in more delicate, intricate patterns.
- Add Borders: Once your quilt top is assembled, consider adding a solid or coordinating print border to frame your geometric design and increase the overall size of your project.
Beyond the Table Topper: Versatile Uses for Your Geometric Patchwork
While this geometric design makes a stunning table topper or runner, its versatility extends far beyond. Imagine this eye-catching 3D pattern adorning various items around your home or becoming a thoughtful handmade gift. Consider creating individual placemats for a coordinated dining set, or transforming the quilt units into striking cushion covers that add a modern touch to your living space. This pattern is also fantastic for creating decorative wall hangings, adding a pop of color and texture to any room. You could even incorporate smaller versions of the triangles into a tote bag or a zippered pouch for a unique accessory. The possibilities are truly endless, limited only by your imagination and creativity.
Embrace Your Creativity: The Rewarding Journey of Geometric Quilting
The Geometric Charm Quilt is more than just a sewing project; it’s an opportunity to create something truly beautiful and functional with your own hands. The satisfaction of seeing simple fabric strips transform into a complex-looking, yet surprisingly easy, 3D pattern is incredibly rewarding. Whether you’re making it for your home, as a gift for a loved one, or simply to hone your quilting skills, this project offers a perfect blend of challenge and accessibility. So, gather your fabrics, fire up your sewing machine, and prepare to be amazed by the stunning results you can achieve. We hope this expanded guide inspires you to embark on your own geometric quilting adventure!
*All image credit belongs to The Melody of Sewing via YouTube. Follow and subscribe to her channel for more incredible sewing tutorials and inspiration!