
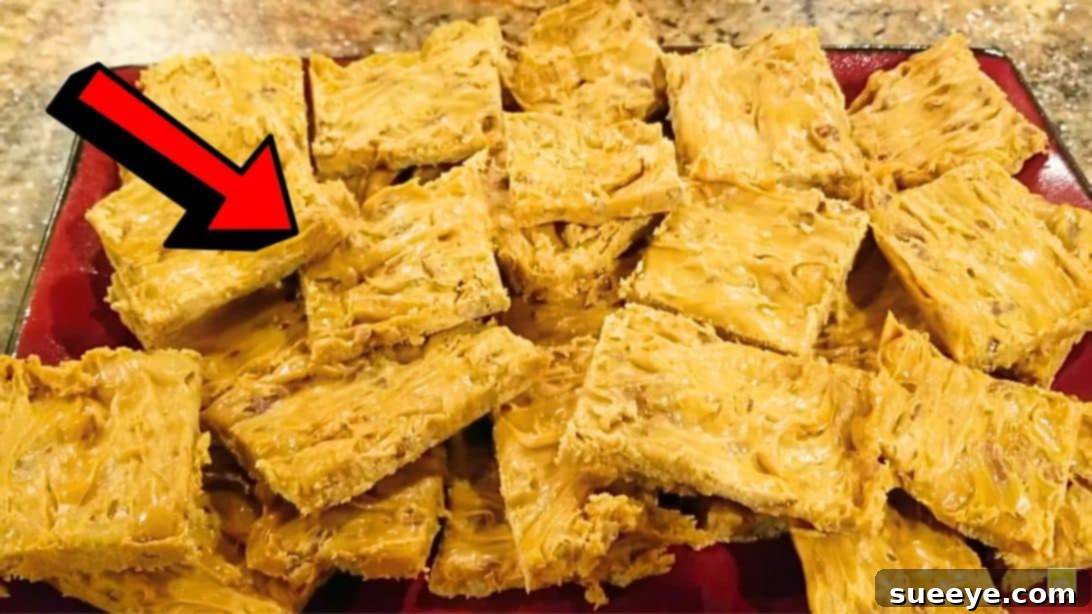
Delight in the rich, creamy goodness of this timeless treat: Old-Fashioned Pecan Candy. A beloved classic, this simple yet incredibly satisfying candy recipe has been cherished and passed down through generations, proving its enduring appeal. It’s the quintessential confection for any occasion – whether you’re hosting a festive party, gathering with loved ones, or searching for the perfect homemade gift that truly speaks from the heart. What makes this particular recipe a standout is its remarkable simplicity and ease of preparation. Requiring just five staple ingredients that are likely already in your kitchen, you can whip up a batch of this delicious candy with minimal fuss, making it an ideal go-to for both novice and experienced confectioners alike. Its smooth texture and sweet, comforting flavor evoke a sense of nostalgia, bringing back memories of simpler times and wholesome, homemade delights.
The beauty of this recipe lies not only in its taste but also in its versatility. You can easily scale it up to produce larger batches, making it perfect for sharing with a crowd during holiday seasons, community events, or large family celebrations. Imagine trays laden with these delectable candies, ready to be enjoyed by all. For those eager to master the art of making this traditional, melt-in-your-mouth candy, you’re in the right place. We’ll guide you through each step, ensuring your success in recreating this beloved treat. Before we dive into the detailed instructions, we highly recommend watching the insightful video tutorial by sho’nuff gonna keep it real witcha on YouTube. Their visual demonstration provides invaluable tips and tricks that complement this written guide, helping you achieve perfect results every time.
RELATED: Easy 7-Minute Microwave Praline Pecan Clusters Recipe
Essential Ingredients for Your Old-Fashioned Pecan Candy
Crafting this delightful pecan candy requires just a handful of common ingredients. The quality of each component plays a crucial role in the final texture and flavor, so choose wisely. Here’s what you’ll need:
- 1/3 stick of unsalted butter: Butter adds richness and helps create that smooth, luscious texture. Unsalted butter is preferred as it gives you control over the overall saltiness of the candy.
- 2 cans of evaporated milk: Evaporated milk, which is concentrated milk with about 60% of the water removed, contributes to the candy’s creamy consistency and deepens its flavor without adding extra liquid.
- 1 can of sweetened condensed milk: This ingredient is key for both sweetness and a thick, syrupy base. It adds an unparalleled richness and helps the candy set beautifully.
- 1½ cups of granulated sugar: The primary sweetening agent, granulated sugar is essential for achieving the classic candy structure and taste.
- ½ tbsp of pure vanilla extract: A touch of pure vanilla extract enhances all the other flavors, adding warmth and a hint of aromatic complexity. Do not skimp on pure vanilla; imitation extracts will not yield the same depth of flavor.
- Optional: 1 cup of chopped pecans: While the base recipe creates a wonderfully creamy candy, adding toasted pecans transforms it into the truly classic “pecan candy” with a delightful crunch and nutty flavor. Ensure they are fresh and fragrant for the best results.
Each of these ingredients, when combined with care and attention, contributes to the magical transformation into a candy that’s sure to impress. Gathering them beforehand makes the cooking process smooth and enjoyable.
Crafting Your Classic Old-Fashioned Pecan Candy: A Step-by-Step Guide
Making this old-fashioned pecan candy is a rewarding experience. Follow these detailed steps to ensure your candy turns out perfectly creamy and absolutely delicious.
Step 1: Prepare Your Cooking Vessel
Begin by selecting a heavy-bottomed pot. This is crucial because a heavy pot distributes heat more evenly, significantly reducing the risk of your candy scorching at the bottom. Scorching can ruin the flavor and texture of your candy. Add both cans of evaporated milk, the can of sweetened condensed milk, and the granulated sugar to the pot. Give them a good stir with a wooden spoon or spatula to combine the ingredients thoroughly before placing the pot on the stove. This initial mixing helps prevent the sugar from sticking and burning before the liquids heat up.
Step 2: Gentle Heating and Initial Boil
Place the pot on your stovetop over medium-low heat. The key here is patience. You want to bring the mixture to a boil gradually, not rapidly. Cooking it too fast will not only increase the chance of scorching but also prevent the sugar from dissolving properly, potentially leading to a grainy texture in your final candy. Stir continuously as the mixture heats up. This constant stirring is essential to prevent the sugar from crystallizing on the sides of the pot and to ensure even cooking. Keep a close eye on the mixture; once it starts to show signs of coming to a boil and begins to rise in the pot, proceed to the next step.
Step 3: Incorporate Butter and Vanilla
As soon as the milk mixture starts to rise and boil, carefully drop in the 1/3 stick of butter and add the ½ tablespoon of pure vanilla extract. Continue stirring them continuously. The butter will melt and integrate, adding richness, while the vanilla will infuse its aromatic flavor throughout the candy. Once these ingredients are fully combined and dissolved into the bubbling mixture, it’s a good idea to slightly reduce the heat to a low simmer. This helps maintain a gentle boil, preventing it from cooking too quickly and boiling over, which can be messy and dangerous.
Step 4: The Art of Constant Stirring and Thickening
Now comes the most important part of the candy-making process: cooking and stirring. You’ll need to continue stirring consistently for a total of 45 minutes to 1 hour, or until the mixture has thickened considerably and reached the desired consistency. This long, slow cooking process allows the sugars to caramelize slowly and the mixture to reduce, intensifying the flavor and creating that signature creamy texture. Do not stop stirring! Consistent stirring prevents the candy from sticking to the bottom of the pot and burning, which is the most common pitfall in candy making. As the candy cooks, you will notice it gradually thickening and turning a beautiful caramel color. It will coat the back of your spoon more heavily.
Step 5: Testing for Doneness (Soft Ball Stage)
To ensure your candy sets correctly, you’ll need to test for the “soft ball stage.” This typically occurs when the mixture reaches a temperature between 235°F and 240°F (118°C-116°C) on a candy thermometer. If you don’t have a thermometer, perform the cold water test: drop a small spoonful of the hot mixture into a cup of very cold water. Allow it to cool for a few seconds, then pick up the candy with your fingers. If it forms a soft, pliable ball that holds its shape but is still squishy, it’s ready. If it’s too soft and dissolves, continue cooking. If it’s too hard or brittle, it’s overcooked. Once it reaches the soft ball stage, immediately remove the pot from the heat.
Step 6: Incorporate Pecans (Optional) and Pour
If you’re making traditional pecan candy, now is the time to stir in your optional 1 cup of chopped pecans. Fold them into the hot candy mixture quickly and evenly. Prepare a baking dish (an 8×8 inch or 9×9 inch pan works well) by greasing it lightly with butter or lining it with parchment paper. Carefully pour the hot candy mixture into the prepared pan. Do not scrape the bottom or sides of the pot, as any crystallized sugar could make your candy grainy. Allow the candy to cool at room temperature for several hours, or until it has completely set. Resist the urge to refrigerate it immediately, as rapid cooling can also lead to graininess.
Step 7: Cut and Enjoy
Once the candy has fully set and cooled, gently lift it out of the pan using the parchment paper or a thin spatula. Place it on a cutting board and cut it into desired squares or rectangular pieces. You can make them as large or as small as you like. Your homemade, old-fashioned pecan candy is now ready to be served and savored! Enjoy the fruits of your labor, sharing this delightful treat with friends and family.
*Thanks to sho’nuff gonna keep it real witcha via YouTube for all the images used here. If you love this recipe idea, then you’ll surely love her other video tutorials too, so give her channel a visit and subscribe!
Tips for Perfect Pecan Candy Every Time:
- Use a Candy Thermometer: While the cold water test works, a candy thermometer offers precision, ensuring your candy reaches the exact soft ball stage for optimal texture.
- Don’t Rush the Boil: Patience is key. Low to medium-low heat prevents scorching and allows sugars to dissolve properly, preventing a grainy texture.
- Stir, Stir, Stir!: Consistent stirring from start to finish is non-negotiable. It prevents sticking, burning, and ensures even cooking.
- Grease Your Pan Well: Whether with butter or parchment paper, a well-prepared pan ensures your candy releases easily once set.
- Avoid Scraping the Pot: After pouring, resist the urge to scrape the last bits from the pot, as these often contain sugar crystals that can initiate crystallization in your smooth candy.
- Room Temperature Setting: Allow the candy to cool and set at room temperature naturally. Refrigerating it too quickly can make it grainy.
- Clean Tools: Ensure your pot and stirring utensils are perfectly clean before starting to prevent any stray sugar crystals from causing issues.
Delicious Variations to Try:
- Chocolate Swirl: After pouring the candy into the pan, drizzle melted chocolate over the top and swirl gently with a knife for a beautiful marble effect.
- Spiced Pecan Candy: Add a pinch of cinnamon, nutmeg, or a dash of pumpkin pie spice along with the vanilla for a warm, autumnal flavor profile.
- Nutty Alternatives: While pecans are classic, feel free to experiment with other toasted nuts like walnuts, almonds, or even a mix of your favorites.
- Salted Caramel Touch: Sprinkle a touch of flaky sea salt over the top of the candy just after pouring it into the pan for a delightful sweet and salty contrast.
Serving and Storage Suggestions:
- Serving: This pecan candy is perfect on its own, with a cup of coffee or tea, or as part of a dessert platter. It also makes a fantastic edible gift, elegantly packaged in decorative boxes or bags.
- Storage: Store your homemade pecan candy in an airtight container at room temperature. It will remain fresh and delicious for up to 2 weeks. If you live in a warm or humid climate, you may consider storing it in the refrigerator, but allow it to come to room temperature before serving for the best texture.
The Enduring Charm of Old-Fashioned Candies
There’s something inherently magical about old-fashioned candies. They transport us back to simpler times, to childhood memories, and to the comforting taste of homemade goodness. This pecan candy recipe embodies that charm perfectly. It’s not just about the taste, but the process – the meditative stirring, the anticipation as it thickens, and the satisfaction of creating something truly special with your own hands. In an age of mass-produced treats, crafting a batch of old-fashioned candy is an act of love and a connection to culinary heritage. It’s a reminder that the best things in life often require a little patience, a few simple ingredients, and a whole lot of heart.
The velvety texture and rich flavor of this homemade pecan candy are simply unmatched. Each bite offers a harmonious blend of sweet, creamy goodness with the subtle hint of vanilla, and the delightful crunch of pecans if you choose to add them. It’s a treat that appeals to all ages, from the youngest family members to the seasoned candy connoisseurs. Imagine serving this on a holiday platter, tucked into gift baskets, or simply enjoyed as an afternoon pick-me-up. It’s a versatile confection that promises to bring smiles and satisfy sweet cravings. The simplicity of its ingredients belies the depth of flavor it achieves, making it a testament to the power of traditional cooking methods.
Frequently Asked Questions About Pecan Candy
Even with simple recipes, questions can arise. Here are answers to some common inquiries about making this old-fashioned pecan candy:
- Why did my candy turn out grainy? Graininess usually occurs due to undissolved sugar crystals. Ensure you stir continuously, especially in the initial stages, and avoid scraping the sides of the pot once the candy starts thickening, as dislodged crystals can cause a chain reaction.
- Why didn’t my candy set? If your candy didn’t set, it likely didn’t reach the correct temperature (soft ball stage). Ensure you cook it long enough and test for doneness accurately. Humidity can also affect setting, so try to cook on a dry day.
- Can I use regular milk instead of evaporated and condensed milk? While you might achieve a sweet sauce, regular milk will not yield the same thick, creamy texture and rich flavor due to its higher water content and lack of concentration. The evaporated and condensed milk are crucial for this recipe’s success.
- How long does homemade pecan candy last? When stored in an airtight container at room temperature, it typically stays fresh for up to two weeks. If refrigerated, it can last longer, but bring it to room temperature before serving for the best texture.
- Can I make this recipe without adding pecans? Absolutely! If you prefer a smooth, creamy candy without nuts, simply omit the pecans. The base recipe is delicious on its own.
Mastering the Old-Fashioned 5-Star Pecan Candy Recipe
In conclusion, this old-fashioned pecan candy recipe is more than just a sweet treat; it’s a journey into the heart of traditional confectionery. With just five simple ingredients and a little bit of patience, you can create a truly memorable candy that tastes like it came straight from a gourmet kitchen, yet carries the warmth of homemade charm. Whether you’re making it for a special occasion, as a heartfelt gift, or simply to satisfy your own sweet tooth, this recipe promises delightful results. So, gather your ingredients, embrace the joy of cooking, and get ready to indulge in the rich, creamy, and utterly irresistible taste of your very own Old-Fashioned 5-Star Pecan Candy. Happy candy making!