
Irresistible 5-Ingredient No-Bake Chocolate Truffles: Your New Favorite Easy Dessert
Imagine serving a dessert that looks sophisticated, tastes incredibly rich, and yet requires no baking and only five simple ingredients. Sounds like a dream, right? Well, prepare to turn that dream into a delicious reality with this incredible 5-ingredient no-bake chocolate truffle recipe. These luscious, dome-like sweets are not just easy to make, but they’re also a guaranteed showstopper at any gathering, from casual family dinners to elegant parties. Get ready to impress your friends and delight your taste buds with minimal effort and maximum flavor!
For every chocolate lover out there, and for anyone seeking a quick yet decadent treat, this recipe is a true gem. The harmonious blend of rich cocoa and sweet condensed milk, combined with the delightful crunch of biscuits, creates an energy-boosting indulgence that’s hard to resist. The best part? There’s no need to switch on your oven, making it perfect for warm days or when you simply want a hassle-free dessert. Inspired by the brilliant creators at BakeBerry on YouTube, this recipe is a testament to how simple ingredients can create extraordinary results. Dive in and discover your new go-to chocolate dessert!
Why You’ll Fall in Love with This Easy Chocolate Truffle Recipe
There are countless reasons why this no-bake chocolate truffle dessert stands out as a must-try. Beyond its undeniable deliciousness, its simplicity and versatility make it a firm favorite for home cooks of all skill levels. Here’s why this recipe will quickly earn a permanent spot in your culinary repertoire:
- Effortless Preparation: Forget complicated steps and long baking times. This recipe is designed for ease, allowing you to whip up a gourmet-looking dessert in mere minutes of active preparation. It’s perfect for busy schedules or spontaneous cravings, proving that delicious doesn’t have to mean difficult.
- No Oven Required: Ideal for hot climates, small kitchens, or when you just don’t feel like baking, the “no-bake” aspect is a huge advantage. All you need is a mixing bowl and a refrigerator! This also makes it a fantastic recipe for younger chefs or those new to dessert making.
- Minimal Ingredients: With only five core ingredients, this dessert is incredibly budget-friendly and uses items you likely already have in your pantry. This cuts down on grocery shopping time and cost, making it an accessible treat anytime you desire.
- Crowd-Pleasing Flavor: The rich, deep chocolate flavor combined with a creamy, dense texture is universally loved. These truffles are designed to be a hit, ensuring compliments from everyone who tastes them. They strike the perfect balance between sweetness and cocoa intensity.
- Highly Customizable: While delicious on their own, these truffles are a fantastic canvas for various toppings and flavor enhancements. From different nuts to fresh fruits and spices, you can easily adapt them to suit any preference, dietary need, or special occasion.
- Perfect for Any Occasion: Whether it’s a casual snack, a special occasion dessert, a thoughtful homemade gift, or an elegant addition to a dessert platter, these truffles fit right in. Their appealing dome shape makes them look professionally made.
- Kid-Friendly Activity: The simple mixing and shaping steps make this an excellent recipe to involve children in the kitchen, fostering their love for cooking and creating sweet memories. It’s a fun and safe way for them to participate in dessert preparation.
This dessert isn’t just about satisfying a sweet tooth; it’s about enjoying the process and creating something wonderful with ease. It’s a perfect example of how simple ingredients can come together to produce an extraordinarily satisfying and visually appealing treat. Let’s gather our ingredients and begin this delightful culinary journey!
Ingredients: The Quintessential Five for Your Delicious Truffles
The magic of this simple no-bake dessert lies in its minimal yet impactful ingredient list. Each component plays a crucial role in creating the perfect texture, sweetness, and rich chocolate flavor that defines these truffles. Here’s what you’ll need, along with a little insight into each, ensuring you understand the purpose behind every item:
- 10 oz (approx. 280-300g) of Sweetened Condensed Milk: This is the backbone of our truffles, providing both the primary sweetness and the sticky binding agent that holds everything together without cooking. It also contributes significantly to the smooth, creamy, and decadent texture that makes these truffles so irresistible.
- 2 tablespoons of Unsweetened Cocoa Powder: The source of our deep, decadent chocolate flavor. Using good quality unsweetened cocoa powder can significantly enhance the final taste, offering a rich and authentic chocolate experience. Dutch-processed cocoa powder tends to give a darker color and milder flavor, while natural cocoa powder is more acidic and intense – either works well here.
- 1.8 oz (approx. 50g) of Butter: Butter adds crucial richness, helps with the binding process, and contributes to the melt-in-your-mouth quality of the truffles. It also provides a smoother consistency to the mixture. Unsalted butter is usually preferred in desserts, allowing you to control the salt content in the overall recipe.
- 10.6 oz (approx. 300g) of Crushed Biscuit Crackers (e.g., Digestive biscuits, Graham crackers, Marie biscuits): These provide the necessary bulk and a delightful texture to the truffles. They absorb the liquid ingredients and give the truffles their distinctive body and a satisfying chew. The specific type of plain, buttery biscuit can subtly alter the flavor profile; ensure they are crushed to a consistent crumb size.
- Hazelnuts (Optional for Garnish): While optional, hazelnuts add a fantastic nutty crunch and aroma, complementing the chocolate beautifully. They elevate the visual appeal and add another layer of sophisticated flavor. They are perfect for giving your truffles a gourmet touch.
Ingredient Customization & Flavor Alternatives:
Don’t limit yourself to just hazelnuts! This recipe is incredibly versatile for customization, allowing you to tailor the truffles to your personal taste or the occasion:
- Other Nuts: Almonds, walnuts, pistachios, or pecans can be used instead of or in addition to hazelnuts. Lightly toasting them before crushing or using them as whole garnishes can enhance their nutty flavor.
- Fresh Berries or Fruits: For a refreshing twist, consider garnishing with fresh raspberries, sliced strawberries, or blueberries. The tartness of berries beautifully cuts through the richness of the chocolate, creating a delightful contrast. You can even combine them with nuts for a textural and flavor contrast.
- Coconut Flakes: Toasted or untoasted shredded coconut flakes offer a tropical twist and appealing texture, adding another dimension of flavor and visual interest.
- Chocolate Shavings or Sprinkles: For an extra dose of chocolate or a festive, colorful look, finely shaved chocolate (dark, milk, or white) or decorative sprinkles are excellent choices.
- Powdered Sugar or Cacao Nibs: Beyond cocoa powder, a light dusting of powdered sugar can give an elegant look, while a sprinkling of bitter cacao nibs can add a sophisticated textural contrast and intensify the chocolate flavor.
- Flavor Extracts: A few drops of vanilla extract, peppermint extract, orange extract, or even a hint of rum or coffee liqueur can transform the flavor profile of your truffle base mixture.
Feel free to get creative and tailor these truffles to your personal preferences or the theme of your event. The beauty of this recipe lies in its adaptability!
Essential Equipment for Your Smooth No-Bake Truffle Journey
One of the beauties of this easy no-bake dessert is the minimal equipment required. You won’t need any fancy gadgets, special molds, or an oven, just a few basic kitchen tools that most households already possess. This simplicity makes the recipe even more appealing and accessible to everyone:
- Large Mixing Bowl: Essential for combining all the ingredients effectively. Choose one large enough to allow for thorough mixing without spills, ensuring all components are well incorporated.
- Whisk or Sturdy Spatula: Initially used for combining the condensed milk and cocoa powder until smooth, and later for folding in the softened butter and crushed biscuits. A durable wooden spoon can also work effectively.
- Ice Cream Scoop (Optional but Highly Recommended): This tool is incredibly useful for portioning out the truffle mixture uniformly, giving them that appealing, consistent dome shape, and keeping your hands cleaner during the shaping process. A standard tablespoon measure can be used if an ice cream scoop isn’t available, but it might require more manual shaping.
- Plate or Tray (lined with parchment paper): For arranging the scooped truffles before refrigeration. Lining with parchment paper is crucial to prevent the truffles from sticking and to make them easier to remove once set. Ensure it’s flat and can fit comfortably into your refrigerator.
- Sifter or Fine-Mesh Sieve (Optional): For an even and elegant dusting of cocoa powder on top of the finished truffles. If you don’t have a sifter, a regular fine-mesh sieve works just as well to create that professional-looking finish.
- Plastic Wrap or Additional Parchment Paper: To cover the plate of truffles during refrigeration. This prevents them from drying out, absorbing other refrigerator odors, and helps them set uniformly.
- Food Processor or Zip-Top Bag with Rolling Pin: For crushing the biscuit crackers quickly and efficiently into fine crumbs.
Having these simple tools ready will make the preparation process smooth, efficient, and enjoyable, leading you swiftly to your delectable finished product without any last-minute searching for equipment.
Step-by-Step Guide to Crafting Your Perfect 5-Ingredient Truffles
Follow these detailed instructions carefully to ensure your homemade no-bake chocolate truffles turn out perfectly every time. Precision in mixing and chilling is key to achieving the ideal texture, richness, and overall delightful flavor profile.
Step 1: Preparing the Rich Chocolate Base Mixture
Begin by taking a large, clean mixing bowl, ensuring it’s spacious enough for all your ingredients. Carefully pour the entire 10 oz of sweetened condensed milk into the bowl. Next, add the 2 tablespoons of unsweetened cocoa powder directly on top of the condensed milk. Using a sturdy whisk or a strong spatula, start whisking these two ingredients together with steady, even strokes. Continue whisking until the cocoa powder is fully and smoothly incorporated into the condensed milk. The mixture should transform into a thick, uniformly chocolate-colored paste with a wonderfully gooey, almost fudge-like texture. It’s crucial to ensure there are no dry pockets or streaks of cocoa powder remaining to achieve a consistent flavor.
Once you have a perfectly consistent chocolate base, it’s time to introduce the butter. Add the 1.8 oz of softened butter to the chocolate-condensed milk mixture. If your butter isn’t already at room temperature and soft, you can gently warm it in the microwave for a few seconds until it’s pliable but not fully melted. Mix the butter slowly into the chocolate paste using your whisk or spatula. Continue stirring until the butter is completely blended in, creating an even richer, glossier, and more luxurious chocolate mixture. This step adds creaminess and further aids in binding the subsequent ingredients, contributing to the truffle’s indulgent mouthfeel.
Finally, it’s time to incorporate the essential texture component: the crushed biscuit crackers. If your biscuits aren’t already crushed, place them in a zip-top bag and crush them thoroughly using a rolling pin, or pulse them briefly in a food processor until they resemble coarse, even crumbs. Add these crushed biscuits directly into your chocolate mixture. Using a spatula or, if you prefer, your clean hands (which can be very effective for this step!), combine everything thoroughly. Fold and press the mixture until the biscuit crumbs are fully incorporated and evenly distributed throughout the sticky chocolate base. The resulting mixture should be firm enough to scoop and hold its shape, yet still pliable and slightly sticky. This forms the delightful, chewy body of your truffles.
Step 2: Shaping, Chilling, and Exquisite Garnishing
Now for the fun and creative part: shaping your truffles! Using an ice cream scoop (a small one, roughly 1-1.5 tablespoons in capacity, works best for truffle-sized portions), scoop uniform amounts of the chocolate biscuit mixture onto a plate or tray that you’ve lined with parchment paper. This lining is essential as it will prevent the truffles from sticking and make them incredibly easy to remove once they are set. If you don’t have a scoop, you can roll small, even balls by hand, though a scoop typically helps achieve a neater, more consistent dome-like shape. After scooping, gently flatten the very top of each portion just a little bit with the back of a spoon or your finger, creating that classic, slightly domed, truffle-like appearance.
Once all your truffles are shaped and neatly arranged on the lined plate, cover the plate loosely but securely with plastic wrap or another sheet of parchment paper. This protective layer is important to prevent the truffles from drying out or absorbing any unwanted odors from the refrigerator. Store them in the refrigerator for a minimum of 30 minutes to an hour, or until they are firm, solid, and cold to the touch. This crucial chilling time allows the truffles to set properly, making them much easier to handle and enhancing their dense, satisfying texture.
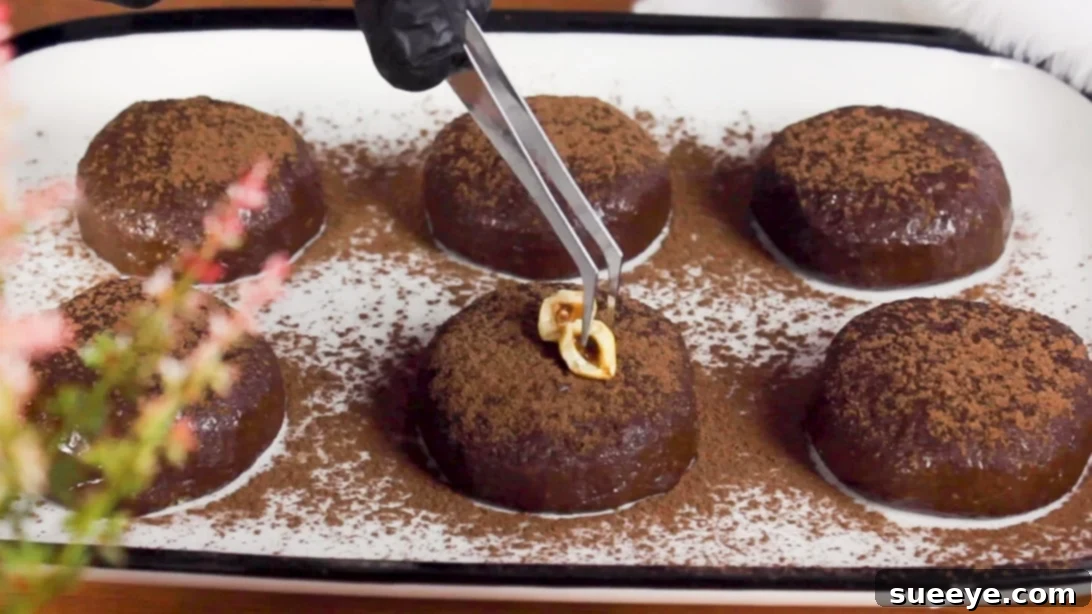
When the truffles are thoroughly chilled and firm, it’s time for the final, elegant touches. Carefully remove them from the refrigerator. Take a sifter or a fine-mesh sieve and generously sift a light, even dusting of cocoa powder on top of each truffle. This not only significantly enhances their visual appeal, giving them a professional, polished look, but also adds an extra layer of sophisticated chocolatey bitterness that beautifully balances the sweetness of the condensed milk. For an elegant finish, gently place a whole hazelnut (or your chosen garnish) on top of each truffle. To ensure the nuts stick better and appear beautifully glossy, you can lightly grease them with a tiny dab of honey (applied with a small brush or toothpick) before placing them. The honey acts as a natural adhesive and adds a subtle sweetness and sheen.
Beyond hazelnuts and cocoa powder, feel free to unleash your creativity with your garnishes! You can add different fresh berries like vibrant raspberries or juicy blueberries, finely chopped pistachios for a color pop, a delicate sprinkle of flaky sea salt for a sophisticated sweet-and-salty contrast, or even a delicate drizzle of melted white chocolate for a striking visual effect. The possibilities are endless to make your 5-ingredient truffles even more special, unique, and visually stunning, truly making them your own signature treat.
Tips for Perfecting Your No-Bake Truffles Every Time
While this easy 5-ingredient recipe is incredibly straightforward, a few expert tips and tricks can elevate your homemade chocolate truffles from great to absolutely exceptional. Pay attention to these details for a truly unforgettable dessert experience that will have everyone asking for your secret recipe.
- Biscuit Choice Matters: While the recipe suggests plain biscuit crackers like Digestives or Graham crackers, feel free to experiment. Rich Tea biscuits, arrowroot biscuits, or even vanilla wafers are excellent alternatives due to their mild flavor and good absorption properties. For a slightly different twist, you could try using shortbread biscuits for a buttery crumb, or even chocolate-flavored biscuits for an extra chocolate punch. Ensure they are finely crushed for a smooth truffle texture, or leave them slightly coarser for more bite and rustic appeal.
- Enhance the Chocolate Flavor: To deepen and intensify the chocolate experience, consider adding a pinch of instant espresso powder or fine coffee granules (about 1/2 teaspoon) to the cocoa powder and condensed milk mixture. Coffee is a natural enhancer for chocolate, bringing out its richness without imparting a strong coffee flavor. A dash of pure vanilla extract (1 teaspoon) can also round out the flavors beautifully, adding warmth and complexity.
- Achieving the Right Consistency: The mixture should be sticky but firm enough to scoop, roll, and hold its shape without being overly wet or crumbly. If your mixture feels too dry and crumbly, it likely needs more liquid. Gradually add a tiny bit more condensed milk (a tablespoon at a time) until it reaches the desired pliable consistency. Conversely, if it’s too sticky or soft, it needs more dry ingredients; add a few more crushed biscuit crumbs until it’s manageable. Humidity can sometimes affect the mixture, so trust your instincts and adjust as needed.
- Chilling is Crucial: Do not rush the refrigeration step. A minimum of 30-60 minutes is absolutely essential for the truffles to set properly and firm up. If they are not firm enough, they will be difficult to handle, shape further, and garnish neatly. For the best results and a truly firm, sliceable truffle, consider chilling them for at least 2 hours, or even overnight if time allows.
- Creative Toppings and Coatings: Beyond the suggested hazelnuts and cocoa powder, explore a world of other coatings. You can roll the truffles in shredded coconut (toasted or untoasted), finely chopped various nuts (almonds, pistachios, pecans), colorful sprinkles for a festive look, powdered sugar for a snowy appearance, or even melted chocolate (dark, milk, or white) for a more luxurious, hard shell finish. For a simple yet elegant touch, dust with a mix of cocoa powder and confectioners’ sugar.
- Storage for Freshness: Store your finished truffles in an airtight container in the refrigerator. Properly stored, they will remain fresh and absolutely delicious for up to 5-7 days. For optimal taste and texture, bring them to cool room temperature for 10-15 minutes before serving, allowing the chocolate to soften slightly and its flavors to fully develop.
- Gift-Worthy Treats: These homemade truffles make wonderful, thoughtful gifts! Arrange them neatly in a decorative box, separating layers with parchment paper to prevent sticking, tie with a festive ribbon, and you have a beautiful, delicious, and personalized present for friends, family, or colleagues.
With these comprehensive tips in mind, you’re well on your way to creating stunning and delicious no-bake chocolate truffles that will undoubtedly become a frequently requested and cherished treat in your household!
Frequently Asked Questions About Your No-Bake Chocolate Truffles
Have some questions before you start making these delightful 5-ingredient truffles, or perhaps while you’re in the midst of creating them? Here are answers to some common queries that will help you master this recipe with confidence and ensure perfect results every time.
Q1: Can I use different types of biscuits or cookies?
Absolutely! While plain biscuit crackers like Digestives, Graham crackers, or Marie biscuits are recommended for their neutral flavor and ideal texture, you can certainly experiment. Rich Tea biscuits, shortbread, or even vanilla wafers would work well. If using flavored cookies (like chocolate or ginger snaps), be aware they will subtly alter the final taste profile of your truffles, often deliciously. Just ensure they are crushed to a fine, consistent crumb for the best texture in your truffles.
Q2: How long do these no-bake truffles last, and how should I store them?
When stored in an airtight container in the refrigerator, these chocolate truffles will stay wonderfully fresh and delicious for about 5 to 7 days. It’s important to keep them in an airtight container to prevent them from drying out or absorbing any strong odors from other foods in your fridge. For optimal taste and texture, it’s generally best to consume them within the first few days, but they remain perfectly good for up to a week.
Q3: Can I freeze these chocolate truffles for longer storage?
Yes, you can! These truffles freeze beautifully, making them excellent for meal prep or larger batches. Arrange the firm, chilled truffles in a single layer on a parchment-lined tray and freeze until solid (this usually takes about 2-3 hours). Once thoroughly frozen, transfer them to a freezer-safe airtight container or a heavy-duty freezer bag. They can be stored in the freezer for up to 1-2 months without a significant loss in quality. To thaw, simply place them in the refrigerator for a few hours, or at room temperature for about 15-30 minutes before serving.
Q4: What if my truffle mixture is too sticky or too dry to work with?
This is a common issue and easily fixable! If your mixture is too sticky and difficult to scoop or shape, it likely needs more dry ingredients. Gradually add a tablespoon or two of extra finely crushed biscuits, mixing well after each addition, until it reaches a manageable consistency that can be easily formed. If, conversely, the mixture is too dry and crumbly and doesn’t hold together when pressed, it needs more liquid. Add a very small amount (half a teaspoon to a teaspoon at a time) of additional sweetened condensed milk or even a tiny splash of regular milk, mixing thoroughly until it becomes pliable and holds its shape effectively.
Q5: Can I adapt this recipe to make these truffles vegan?
Yes, absolutely! While the original recipe uses dairy products, it can be quite successfully adapted for a vegan diet with straightforward substitutions. You would need to use a plant-based sweetened condensed milk (which is readily available, often made from coconut or oat milk), a good quality vegan butter (margarine), and ensuring that your chosen biscuit crackers are certified vegan (many plain varieties are). The result will be a delightfully rich and delicious vegan no-bake chocolate truffle!
Q6: Are there any other flavor variations I can incorporate into the truffles?
Definitely! The base mixture of this recipe is a wonderfully versatile canvas for endless flavor creativity. You can mix in a teaspoon of fresh orange zest for a vibrant chocolate-orange truffle, a tiny pinch of chili powder or cayenne pepper for a subtle spicy kick, a few drops of peppermint extract for a refreshing mint-chocolate treat, or even a tablespoon of smooth peanut butter or almond butter for a nutty, rich twist. For adult palates, consider a dash of rum, Kahlúa, or Grand Marnier. Experiment with different essences or liqueurs to create truly unique flavor profiles that cater to your taste.
Q7: What is the best way to serve these delicious truffles?
These truffles are best served slightly chilled or at cool room temperature. This allows their flavors to fully develop and their texture to be perfectly tender yet firm. They pair wonderfully with a hot cup of freshly brewed coffee, a soothing cup of tea, a glass of cold milk, or as a sophisticated after-dinner treat with a digestif. Arrange them beautifully on a dessert platter for guests, or simply enjoy them as a personal indulgence whenever a craving for something sweet and chocolatey strikes. Their rich flavor means even a small portion goes a long way!