
Irresistible Mini Chocolate Tarts: Your Ultimate Homemade Recipe Guide
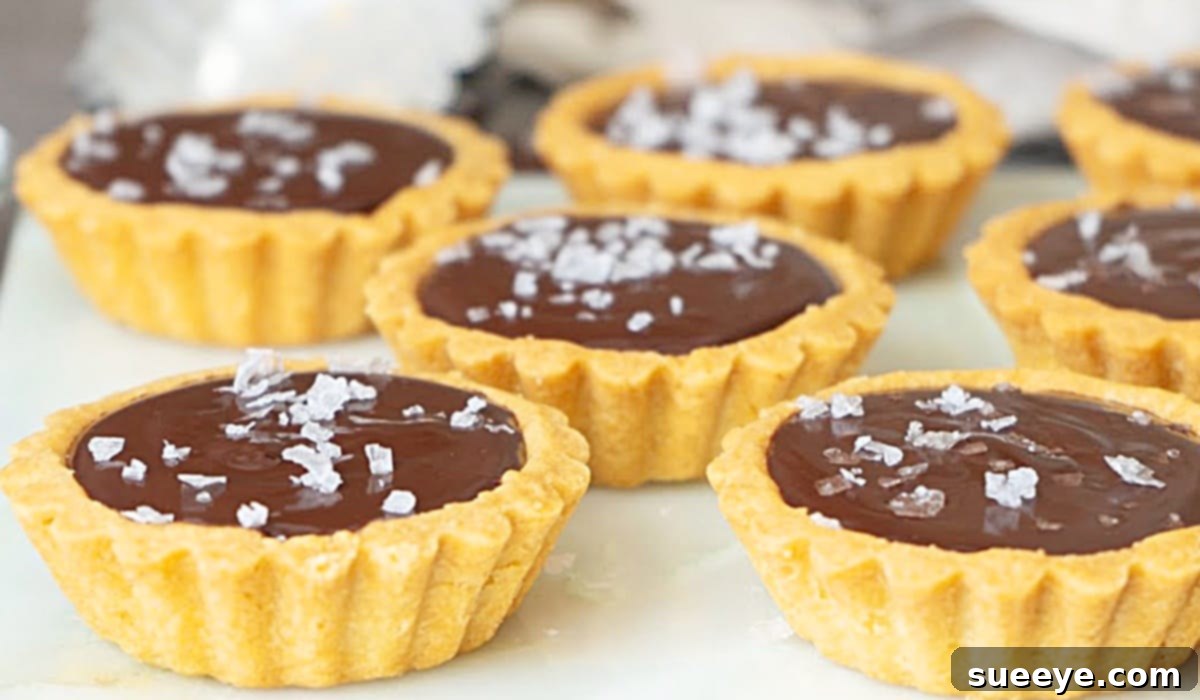
There’s a special kind of magic that happens when you combine rich, decadent chocolate with a delicate, buttery crust. For any true chocolate aficionado, the allure of a perfectly crafted chocolate pie or tart is undeniable. While store-bought options can satisfy a craving, nothing quite compares to the fresh, vibrant taste and fulfilling experience of a homemade treat. That’s precisely why, upon discovering the sensational homemade chocolate mini tarts recipe by El Mundo Eats on YouTube, I knew instantly it was a culinary adventure I had to embark on. And let me tell you, these miniature masterpieces live up to every expectation and more.
These aren’t just any mini tarts; they are miniature wonders, bursting with an intense chocolate flavor and boasting a lusciously creamy center that melts in your mouth. Their exquisite taste makes them utterly irresistible, and their elegant appearance ensures they’re absolutely gorgeous – perfect for impressing guests, delighting family, or even gifting to friends who appreciate a gourmet touch. The beauty of this recipe lies in its simplicity, utilizing readily available cookie ingredients alongside an abundance of quality chocolate, making it an ideal project for both novice bakers and seasoned pros. And for those seeking a truly elevated flavor profile, the sprinkle of coarse sea salt on top is a game-changer. If you haven’t experienced the delightful harmony of sweet chocolate paired with a hint of savory sea salt, prepare for a revelation that will transform your dessert perspective.
Why Homemade Mini Chocolate Tarts Are a Must-Try
Beyond the sheer joy of biting into one of these delightful treats, making mini chocolate tarts at home offers numerous benefits:
- Unmatched Freshness: Control over ingredients means a fresher, more vibrant taste free from artificial additives and preservatives found in many store-bought options.
- Customization at Your Fingertips: You have the freedom to adjust the sweetness level, choose your favorite type of chocolate (dark, milk, or semi-sweet), and even add unique toppings to suit your palate and occasion.
- Impressive & Thoughtful Gifts: Handmade gifts carry a special sentiment. These tarts are not only beautiful and delicious but also convey care and effort, making them perfect for birthdays, holidays, or simply as a token of appreciation.
- Perfect Portion Control & Convenience: Mini tarts are ideally sized for individual servings, making them perfect for parties, potlucks, or simply enjoying a single treat without the commitment of slicing into a large pie.
- A Therapeutic Baking Experience: There’s a calming satisfaction that comes from creating something delicious from scratch, watching simple ingredients transform into a culinary delight.
Essential Ingredients for Your Delectable Mini Chocolate Tarts
Crafting these delectable mini chocolate tarts starts with gathering quality ingredients. While the list might seem straightforward, understanding the role of each component is key to achieving that perfect texture and flavor balance. This recipe is designed to be accessible, utilizing common pantry staples that transform into something truly extraordinary with a little care.
For The Delicate Tart Shells:
- 1/3 cup (75g) Unsalted Butter: Using unsalted butter gives you precise control over the overall saltiness of the dough. Ensure it’s softened to room temperature for easier creaming with the sugar, which helps incorporate air and creates a tender, crumbly crust.
- 2 tablespoons (25g) Granulated Sugar: Sugar not only adds a touch of sweetness to the crust but also contributes to its tenderness and aids in achieving that desirable golden-brown color during baking.
- 1 teaspoon Vanilla Extract: A splash of good quality pure vanilla extract significantly enhances the overall flavor profile of the crust, adding a warm, aromatic note that beautifully complements the rich chocolate filling.
- 1 cup (125g) All-Purpose Flour: This forms the primary structure of your tart shells. Measuring flour correctly (ideally by weight for accuracy, or by spooning it into a measuring cup and leveling it off) is crucial to avoid a dense or tough crust.
For The Rich Chocolate Ganache Filling:
- 4 ounces (113g) Semi-Sweet Chocolate: This is the heart and soul of your tart! Opt for high-quality semi-sweet chocolate bars (chopped) or good-quality chocolate chips. Chocolate with a cocoa content between 50-60% is typically ideal for a balanced sweetness and deep chocolate flavor, ensuring a silky-smooth ganache.
- 1/2 cup (120ml) Heavy Cream: Also widely known as heavy whipping cream, this ingredient is absolutely essential for creating a smooth, incredibly rich, and velvety creamy ganache. Its high fat content (at least 36%) is what provides the luxurious texture and allows the ganache to set perfectly.
The Exquisite Finishing Touch:
- Coarse Sea Salt: A delicate sprinkle of flaky coarse sea salt on top is a non-negotiable step for an elevated culinary experience. The striking contrast between the intensely sweet, creamy chocolate and the subtle crunch and briny burst of the salt is absolutely divine, serving to deepen and enhance the chocolate’s inherent flavors. Fleur de sel, with its delicate crystals, is an excellent choice if available.
Essential Kitchen Tools You’ll Need
Having the right tools at hand can significantly streamline the baking process and make your experience smoother and more enjoyable:
- Muffin Tin or Mini Tart Pan: A standard 12-cup muffin tin or a dedicated mini tart pan is essential for shaping your individual tart shells uniformly.
- Mixing Bowls: You’ll need at least two – one for preparing the tart dough and another for crafting the chocolate ganache.
- Electric Mixer (Handheld or Stand) or Sturdy Whisk: Useful for creaming the butter and sugar for the dough, and for whisking the ganache until it’s smooth and glossy.
- Measuring Cups and Spoons: For precise and accurate measurement of all your ingredients, ensuring consistency in your baking.
- Rolling Pin: Necessary for rolling out the tart dough to the correct thickness before cutting.
- Round Cookie Cutter (2.5-3 inches): To cut out uniform circles of dough that will perfectly fit into your muffin tin cavities.
- Small Saucepan or Microwave-Safe Bowl: For gently heating the heavy cream and melting the chocolate for the ganache.
- Spatula and Spoon: For mixing, scraping bowls, and transferring ingredients efficiently.
- Wire Rack: Crucial for allowing the baked tart shells to cool completely and evenly, preventing them from becoming soggy.
Step-by-Step Directions: Crafting Your Perfect Mini Chocolate Tarts
Follow these detailed, easy-to-understand instructions to create stunning and utterly delicious mini chocolate tarts right in your own kitchen. This comprehensive guide covers everything from preparing the delicate, buttery shells to achieving that velvety smooth, rich chocolate ganache.
Part 1: Preparing and Baking the Flaky Tart Shells
The foundation of a truly great tart is a well-made crust. This recipe utilizes a simple, buttery dough that bakes up beautifully crisp and golden.
- Cream Butter and Sugar: In a medium mixing bowl, combine the softened unsalted butter and granulated sugar. Using an electric mixer (or a sturdy whisk and some elbow grease), beat them together on medium speed until the mixture is light, fluffy, and noticeably pale in color. This process incorporates air, which contributes significantly to a tender and flaky crust.
- Add Vanilla: Stir in the vanilla extract until it is just combined into the butter mixture, ensuring an even distribution of its aromatic flavor.
- Incorporate Flour: Gradually add the all-purpose flour to the butter mixture, mixing on low speed (or by hand with a spatula) until a crumbly dough begins to form. Be diligent not to overmix at this stage, as excessive mixing can overdevelop the gluten, resulting in a tough and chewy crust. Mix only until the flour is fully incorporated and the dough just barely comes together.
- Chill the Dough: Gather the dough into a cohesive ball, then gently flatten it into a disk shape. Wrap this disk tightly in plastic wrap and refrigerate for at least 30 minutes. Chilling is a critical step as it allows the butter to firm up, making the dough much easier to handle and preventing it from shrinking excessively during the baking process. It also helps to deepen the flavors.
- Preheat Oven & Prepare Pan: While the dough is chilling, preheat your oven to a precise 350°F (175°C). Lightly grease a mini muffin tin or a mini tart pan (a standard 12-cup capacity is common) to prevent sticking.
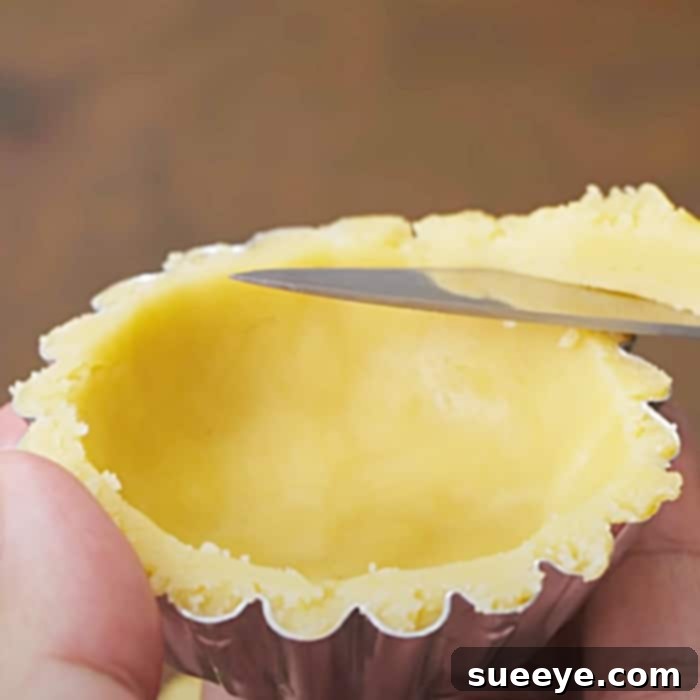
- Form the Tart Shells: On a lightly floured surface, roll out the chilled dough evenly to an approximate thickness of 1/8-inch. Use a round cookie cutter (ideally between 2.5 to 3 inches in diameter, depending on the size of your muffin tin cavities) to cut out uniform dough circles. Carefully press each dough circle into the prepared muffin tin cavities, molding it gently to fit the bottom and sides without tearing. Ensure there are no large air bubbles trapped underneath. Prick the bottom of each shell several times with a fork; this essential step helps to prevent the crust from puffing up excessively during baking (a technique often referred to as “blind baking”).
- Bake the Shells: Place the prepared muffin tin with the tart shells into the preheated oven. Bake for approximately 15-20 minutes, or until the shells are lightly golden brown around the edges and appear fully set and firm. Baking the shells first ensures a beautifully crisp crust that will not become soggy once filled with the ganache.
- Cool Completely: Carefully remove the baked tart shells from the oven and allow them to cool in the muffin tin for a few minutes to firm up. Then, gently transfer them to a wire rack to cool down completely to room temperature. It is absolutely essential that the shells are entirely cool before adding the chocolate filling.
Part 2: Crafting the Silky Chocolate Ganache Filling
The ganache, though surprisingly simple to make, delivers an incredibly luxurious, rich, and professional result that will elevate your tarts.
- Prepare Chocolate: If you are using a chocolate bar, finely chop your semi-sweet chocolate into small, uniform pieces. If using chocolate chips, ensure they are ready. Place all the chopped chocolate (or chips) in a clean, heatproof bowl.
- Heat Heavy Cream: In a small saucepan, pour the heavy cream and heat it over medium heat. Watch it carefully and heat until it just begins to simmer around the edges, showing small bubbles. Do not allow it to come to a full, rolling boil. Alternatively, you can heat the cream in a microwave-safe bowl in short 30-second intervals, stirring after each, until it is hot but not boiling.
- Combine Cream and Chocolate: Immediately pour the hot heavy cream directly over the prepared chocolate in the heatproof bowl. Let it sit undisturbed for about 5 minutes. This crucial resting period allows the residual heat from the cream to gently melt the chocolate, preparing it for emulsification.
- Whisk Until Smooth: After the 5 minutes, begin whisking the mixture gently but consistently, starting from the center of the bowl and gradually moving outwards. Continue whisking until the chocolate is fully melted and the mixture is completely smooth, beautifully glossy, and uniform in color, thus forming a perfect ganache. If you encounter any stubborn, unmelted chocolate pieces, you can briefly place the bowl over a saucepan of simmering water (creating a makeshift double boiler) and whisk until completely smooth, taking care not to let any water or steam come into contact with the chocolate.
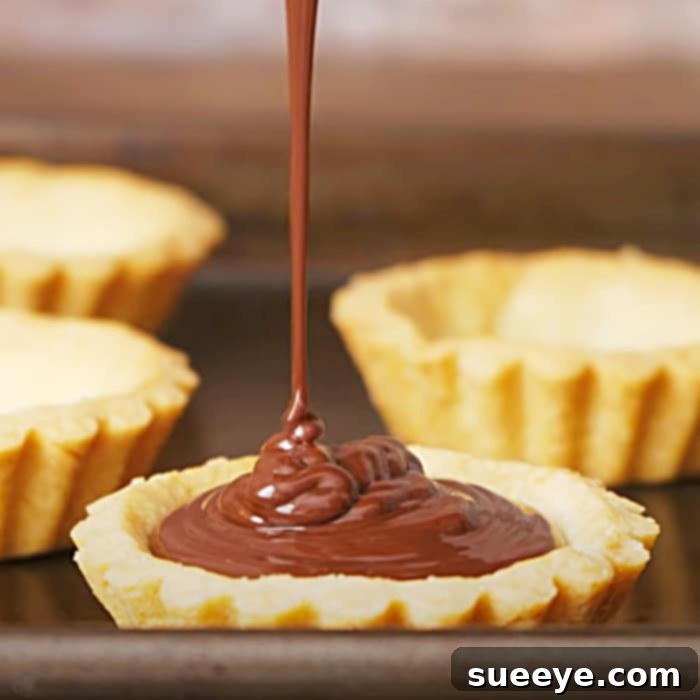
- Cool the Ganache: Allow the prepared ganache to cool slightly at room temperature for approximately 10-15 minutes, or until it has thickened to a pourable consistency that holds its shape slightly. It should not be too hot when poured into the shells, as this can make the crust soggy.
Part 3: Assembling and Finishing Your Masterpieces
The final steps bring all the delicious components together for an exquisite dessert that’s ready to impress.
- Fill the Tart Shells: Once your baked tart shells are completely cool and the chocolate ganache has cooled to its ideal pourable consistency, carefully spoon or pour the rich chocolate ganache into each baked tart shell. Fill them almost to the brim, leaving just a tiny bit of space at the top.
- Chill to Set: Gently transfer the filled mini tarts to the refrigerator and chill them for at least 1-2 hours, or until the chocolate ganache is completely set, firm, and cool to the touch. This chilling step is absolutely crucial for the tarts to hold their shape beautifully and develop that perfect, melt-in-your-mouth texture.
- Garnish with Sea Salt: Just before you are ready to serve, artfully sprinkle a small, delicate pinch of coarse sea salt over the top of each individual mini chocolate tart. This not only adds a beautiful visual appeal but, more importantly, introduces a delightful flavor contrast that truly elevates and brightens the entire dessert experience.
Expert Tips for Mini Chocolate Tart Success
Achieving bakery-quality mini chocolate tarts is easier than you might think with a few expert tips and careful execution:
- Avoid Overworking the Dough: The key to a tender crust is minimal handling. Overmixing develops gluten, leading to a tough, chewy texture. Mix just until the ingredients are combined and no dry flour remains.
- Always Chill Your Dough: This step is absolutely non-negotiable for a flaky, tender crust that holds its shape beautifully and prevents excessive shrinking during baking. Don’t skip it!
- Quality Chocolate Matters: Since chocolate is the undisputed star of these tarts, invest in a good quality semi-sweet chocolate. Better chocolate equals better flavor and a silkier ganache.
- Prevent Soggy Crusts: Ensure your tart shells are fully baked and, more importantly, completely cooled before you add the ganache. Also, allow the ganache itself to cool slightly to a pourable but not piping-hot temperature before filling.
- Patience with Ganache: Don’t rush the melting and whisking process. Gentle heat and steady, consistent whisking are key to creating a perfectly smooth, glossy, and emulsified ganache.
- Even Baking: If you know your oven has hot spots, rotate the muffin tin halfway through baking the shells to ensure an even golden-brown color and consistent crispness.
- Proper Storage: Store any finished mini chocolate tarts in an airtight container in the refrigerator for up to 3-4 days. For the best flavor and texture, allow them to come to room temperature for about 15-20 minutes before serving.
Creative Variations & Customizations for Your Tarts
While these mini chocolate tarts are deliciously perfect on their own, they also serve as a fantastic canvas for your culinary creativity. Feel free to experiment with these variations:
- Explore Chocolate Types: Experiment with different types of chocolate! Use dark chocolate (60-70% cocoa) for a more intense, sophisticated flavor, or switch to milk chocolate for a sweeter, creamier profile that children often adore.
- Flavor Infusions: Elevate your ganache by infusing the heavy cream before heating. Steep a split vanilla bean, a strip of orange peel, a few coffee beans, or a sprig of fresh mint in the cream. Strain the cream before pouring it over the chocolate.
- Nutty Crunch: Add a delightful textural contrast by garnishing your tarts with a sprinkle of finely chopped toasted almonds, pecans, hazelnuts, or even pistachios.
- Fruity Freshness: Introduce a burst of freshness and color by topping the set ganache with fresh raspberries, delicate sliced strawberries, a few vibrant blueberries, or even tart pomegranate seeds just before serving.
- Caramel Drizzle: For an extra layer of indulgence, add a light drizzle of homemade or high-quality store-bought caramel sauce over the set chocolate ganache. A sprinkle of sea salt on top of the caramel would be divine!
- A Hint of Spice: For the adventurous palate, a tiny pinch of cayenne pepper or a touch of chili powder added to the ganache can create an unexpected and delightfully warm, subtle spicy kick.
Frequently Asked Questions (FAQs)
- Can I make these mini chocolate tarts ahead of time?
- Absolutely! This recipe is excellent for meal prepping or preparing for events. The tart shells can be baked a day or two in advance and stored in an airtight container at room temperature. The ganache can also be made ahead, stored in the refrigerator, and then gently reheated or brought to room temperature before filling. Once assembled, the tarts can be stored in the refrigerator for up to 3-4 days.
- What’s the best way to store leftover tarts?
- For optimal freshness and to maintain their delicate texture, store any leftover mini chocolate tarts in an airtight container in the refrigerator. To enjoy them at their best, allow them to sit at room temperature for approximately 15-20 minutes before serving to soften the ganache slightly.
- Can I freeze these chocolate tarts?
- Yes, you can! You have a couple of options: you can freeze the baked but unfilled tart shells for up to a month in an airtight container. Once filled and completely set, the assembled tarts can also be frozen for up to 2-3 weeks. When ready to enjoy, simply thaw them overnight in the refrigerator before serving.
- Is there a suitable substitute for heavy cream in the ganache?
- For a true, rich, and creamy ganache that sets beautifully, heavy cream (with its high fat content) is essential. Substitutes like half-and-half or milk will not yield the same luxurious texture and may prevent the ganache from setting correctly, resulting in a runny filling.
- Why did my ganache seize or become grainy?
- Ganache seizing or becoming grainy can occur for a few reasons: if the chocolate gets too hot too quickly (e.g., in a microwave without stirring), if even a tiny drop of water gets into the chocolate, or if the cream wasn’t hot enough to melt the chocolate properly. Ensure you melt chocolate gently and whisk consistently. If it seizes, sometimes adding a tablespoon of hot cream or milk and whisking vigorously can help rescue it, but it’s not always guaranteed to restore the perfect texture.
Conclusion: Your New Favorite Chocolate Indulgence Awaits!
These homemade mini chocolate tarts are more than just a dessert; they are a delightful experience waiting to be savored. From the crisp, buttery crust that crumbles perfectly with every bite, to the silky, intensely rich chocolate ganache, all harmonized by that perfect, surprising sprinkle of coarse sea salt, every single bite is a journey of exquisite flavors and textures. Whether you’re baking for a special occasion, searching for the perfect edible gift to show you care, or simply treating yourself and loved ones to something truly extraordinary, this recipe promises to deliver pure chocolate bliss. So roll up your sleeves, gather your premium ingredients, and prepare to create a batch of mini chocolate tarts that will undoubtedly become a cherished favorite in your culinary repertoire. Happy baking, and enjoy every sweet, salty, and utterly irresistible moment!