
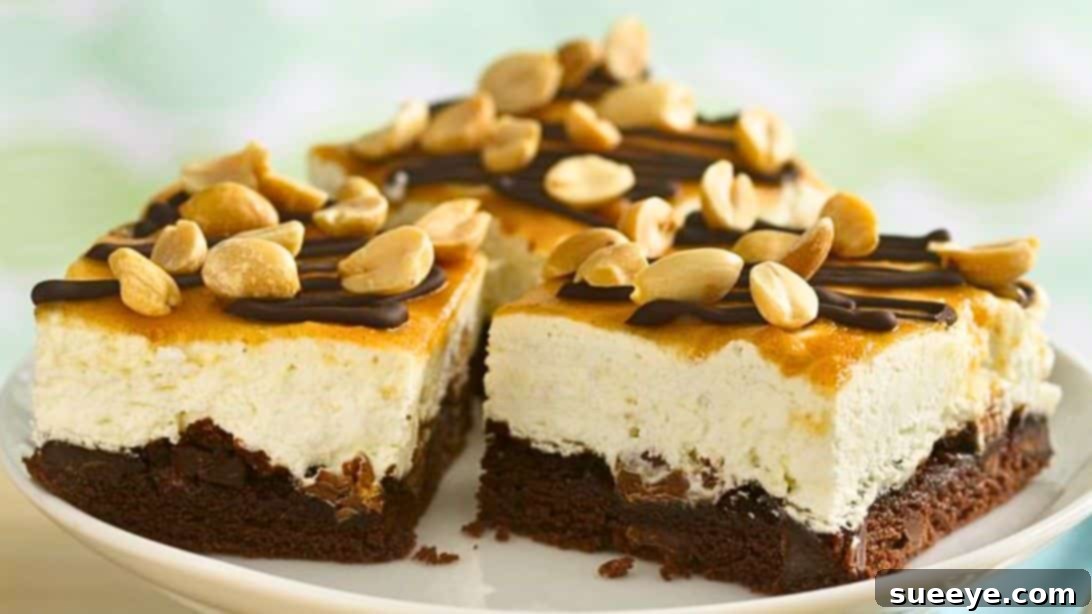
Irresistible Chocolate Peanut Butter Dream Bars: Your Ultimate Guide to a Decadent Dessert
Prepare to embark on a culinary journey that promises layers of pure bliss with every bite. These Chocolate Peanut Butter Dream Bars are more than just a dessert; they are a symphony of flavors and textures designed to captivate your senses. Featuring a rich, chewy chocolate cookie base, a luscious, creamy peanut butter filling generously studded with chopped Reese’s Peanut Butter Cups, and crowned with a delightful chocolate and peanut drizzle, this recipe is a true showstopper. Inspired by classic American dessert traditions, much like those championed by culinary icons such as Betty Crocker, these dream bars offer an accessible path to creating an extraordinary homemade treat. Whether you’re a seasoned baker or just starting, this guide ensures a smooth and enjoyable process, culminating in a dessert that will undoubtedly earn rave reviews from everyone who tries it. Get ready to amaze your family and friends with this incredibly satisfying and easy-to-make confection.
Why These Chocolate Peanut Butter Dream Bars Are a Must-Try
What makes these Chocolate Peanut Butter Dream Bars an absolute essential for your recipe collection? It’s the impeccable balance of contrasts that creates an unforgettable experience. Imagine the delightful crunch of a rich chocolate cookie giving way to an incredibly smooth and airy peanut butter cream cheese filling, made even more irresistible with chunks of your favorite miniature peanut butter cups. Then, a final layer of sweet peanut butter drizzle, melted chocolate, and crunchy peanuts ties everything together in a harmonious blend. This dessert is not only a feast for the taste buds but also incredibly versatile. It’s perfect for elevating any special occasion, from casual family gatherings and potlucks to elegant dinner parties. Kids and adults alike will find it impossible to resist the tempting combination of chocolate and peanut butter, making it a guaranteed crowd-pleaser that will disappear quickly from any dessert table.
Gather Your Ingredients: What You’ll Need
Creating these magnificent dream bars begins with gathering the right ingredients. We’ve carefully selected components that ensure a harmonious blend of flavors and textures, making each layer a pure delight. While the recipe is straightforward, using quality ingredients will undoubtedly enhance the final outcome, transforming simple steps into a truly gourmet experience.
For the Rich and Chewy Cookie Base
This foundation provides the perfect contrast to the creamy filling.
- 1 (17.5-ounce) pouch of Betty Crocker double chocolate chunk cookie mix: Opting for a mix simplifies the process significantly without compromising on flavor or texture. It ensures a consistently delicious and chewy base.
- ¼ cup vegetable oil: This adds moisture and helps create a tender crumb for the cookie base.
- 2 tbsp cold strong brewed coffee or water: While water works, cold strong brewed coffee is highly recommended. It subtly deepens and intensifies the chocolate flavor of the cookie without making it taste like coffee.
- 1 large egg: A binding agent that contributes to the structure and richness of the cookie.
For the Velvety Peanut Butter Cream Cheese Filling
The heart of our dream bars – a light yet incredibly flavorful filling.
- 1 (8-ounce) package of cream cheese, softened: Ensuring your cream cheese is at room temperature is crucial for achieving a smooth, lump-free filling. It blends much easier and results in a superior texture.
- ¼ cup granulated sugar: Sweetens the cream cheese, balancing its tanginess and enhancing the peanut butter flavor.
- 1 (8-ounce) container of frozen whipped topping, thawed: This ingredient is key to the filling’s light, airy, and fluffy texture. Make sure it’s completely thawed but still cold.
- 1 (9-ounce) bag of Reese’s peanut butter cups miniatures, chopped: These iconic candies are a game-changer, adding bursts of intense peanut butter and chocolate flavor, along with a pleasant chewiness to the filling. Chop them into small, manageable pieces.
For the Decadent Chocolate Peanut Topping
The crowning glory that adds a beautiful finish and an extra layer of flavor.
- ¼ cup creamy peanut butter: Forms the base of our luscious drizzle, adding another dimension of peanut butter flavor.
- ¼ cup milk: Thins the peanut butter slightly, making it easier to drizzle and creating a smoother consistency.
- 2 tbsp granulated sugar: Sweetens the peanut butter drizzle, complementing the other layers.
- 3 ounces or ½ cup bittersweet baking chocolate, melted: Provides a rich, deep chocolate flavor without being overly sweet. Bittersweet chocolate offers a perfect contrast to the sweet layers below.
- 1 cup unsalted dry-roasted peanuts, roughly chopped: Adds a fantastic textural crunch and a nutty aroma, elevating the overall experience.
Step-by-Step Directions: Crafting Your Dream Bars
Follow these detailed instructions to bring your Chocolate Peanut Butter Dream Bars to life. Each step is designed to be clear and easy to follow, ensuring a successful and delicious outcome. Take your time, enjoy the process, and soon you’ll be indulging in these heavenly layered treats.
Step 1: Preparing the Perfect Cookie Foundation
Begin by preheating your oven to 350°F (175°C). This ensures the oven is at the correct temperature for even baking. In a large mixing bowl, combine the contents of the Betty Crocker double chocolate chunk cookie mix pouch, vegetable oil, cold strong brewed coffee (or water), and the egg. Use a sturdy spoon or spatula to stir all the ingredients together thoroughly. Continue mixing until everything is well combined and a soft, uniform dough forms. Avoid overmixing, as this can lead to a tougher cookie base. Once your dough is ready, transfer it to the bottom of a 9×13-inch baking dish. Press the dough out evenly across the bottom of the dish, ensuring it forms a compact and consistent layer. You can use your hands, a spatula, or the bottom of a glass to achieve an even spread. Place the baking dish into your preheated oven and bake for approximately 12 to 15 minutes, or just until the edges are set and the center appears cooked but still soft. The exact baking time may vary slightly depending on your oven, so keep an eye on it. Once baked, remove the dish from the oven and set it aside on a wire rack to cool down. It’s crucial to let the cookie base cool completely, which typically takes about 30 minutes to an hour, before proceeding to the next step. A completely cooled base prevents the filling from melting or becoming too soft.
Step 2: Whipping Up the Silky Peanut Butter Filling
While your cookie base cools, you can begin preparing the irresistible peanut butter filling. In a separate large mixing bowl, add the softened cream cheese and the granulated sugar. Using an electric hand mixer, beat these two ingredients together over medium speed until the mixture is completely smooth and creamy, with no lumps of cream cheese remaining. This usually takes about 2-3 minutes. Achieving a smooth base is key to a luscious filling. Next, gently fold in the thawed whipped topping. Use a rubber spatula to carefully incorporate the whipped topping, preserving its airy texture. Follow this by adding the chopped miniature Reese’s peanut butter cups. Again, fold them in gently until they are evenly distributed throughout the cream cheese mixture. Be careful not to overmix, as vigorous stirring can deflate the whipped topping, leading to a denser filling. The goal is a light, fluffy, and decadent mixture that’s bursting with peanut butter and chocolate flavor.
Step 3: Assembling the Layers of Bliss
Once your cookie base is completely cool and your filling is prepared, it’s time to bring these layers together. Carefully spoon the peanut butter cream cheese filling over the cooled chocolate cookie base in the baking dish. Using an offset spatula or the back of a spoon, gently spread the filling out evenly from edge to edge, ensuring a smooth and consistent layer. Take your time to create a uniform surface, as this will contribute to the beautiful presentation of your finished dream bars. Set the dish aside while you prepare the final, irresistible topping.
Step 4: Creating the Irresistible Chocolate Peanut Topping
Now, let’s make the perfect topping that seals the deal. In a small, microwave-safe bowl, combine the creamy peanut butter, milk, and the remaining 2 tablespoons of granulated sugar. Whisk these ingredients together until they are smooth and well combined. Place the bowl in the microwave and heat on a high setting for approximately 30 to 60 seconds. It’s crucial to pause and stir the mixture at 30-second intervals to prevent scorching and ensure even melting. You want the mixture to be warm and pourable, not boiling. Once the peanut butter drizzle is ready, evenly drizzle it all over the top of the peanut butter cream cheese filling. For the chocolate drizzle, melt the bittersweet baking chocolate. You can do this in a microwave-safe bowl in 30-second bursts, stirring in between, or over a double boiler. Once melted and smooth, drizzle the chocolate generously over the peanut butter layer. Finally, sprinkle the chopped unsalted dry-roasted peanuts evenly over the chocolate and peanut butter drizzles. The combination of these toppings creates a visually appealing and texturally exciting finish.
Step 5: Chilling for Perfection and Serving
The final crucial step for these dream bars is proper chilling. Once all the layers are assembled and topped, carefully transfer the baking dish to the refrigerator. Allow the bars to chill for at least 1 hour, or preferably longer, until the filling and topping are completely set. This chilling time is essential not only for the layers to firm up but also for the flavors to meld beautifully, creating a more cohesive and enjoyable dessert. Once thoroughly chilled, remove the dish from the refrigerator. For clean cuts, you may want to run a sharp knife under hot water and wipe it dry between each cut. Slice the bars into your desired size and shape. These dream bars are best served chilled. You can serve them immediately after cutting, or if you’ve made them in advance, keep them refrigerated until serving time. Enjoy every delicious, multi-layered bite!
Pro Tips for Flawless Chocolate Peanut Butter Dream Bars
Achieving perfection with these dream bars is easy, especially with a few expert tips:
- Room Temperature Cream Cheese: Always ensure your cream cheese is completely softened before beating. This prevents lumps and ensures a smooth, creamy filling.
- Don’t Overmix the Cookie Dough: Overmixing can develop the gluten too much, leading to a tough cookie base. Mix just until combined.
- Cool the Base Completely: Patience is key here! A warm cookie base will melt the filling, leading to a messy and less appealing dessert.
- Chop Peanut Butter Cups Evenly: Uniformly chopped Reese’s ensures that every bite gets a piece of that delicious candy, and it makes the filling easier to spread.
- Warm Knife for Clean Cuts: For perfectly neat slices, dip your knife in hot water and wipe it dry before each cut. This helps the knife glide through the sticky layers.
- Thorough Chilling is Essential: Do not skimp on the chilling time. It allows the filling to set properly, making the bars easier to cut and improving their overall texture and stability.
- Use Quality Ingredients: While a cookie mix makes it easy, don’t hesitate to use good quality chocolate for melting and fresh peanuts for the topping to truly elevate the flavor profile.
Creative Variations to Make Them Your Own
While the classic Chocolate Peanut Butter Dream Bar recipe is outstanding, don’t hesitate to get creative and personalize them:
- Different Cookie Bases: Experiment with other Betty Crocker cookie mixes, such as chocolate chip or sugar cookie, for a different flavor profile. You could also use a crushed Oreo or graham cracker crust for a truly no-bake base if you prefer.
- Additions to the Base: Incorporate mini chocolate chips, sprinkles, or even finely chopped nuts into the cookie dough before baking for added texture.
- Filling Fun: Instead of Reese’s cups, try adding other chopped candy bars like Snickers, Butterfingers, or even just mini chocolate chips to the filling. You could also swirl in a bit of caramel sauce for an extra layer of decadence.
- Topping Twists: Drizzle with white chocolate or caramel instead of or in addition to the bittersweet chocolate. A sprinkle of sea salt flakes over the chocolate drizzle can also beautifully enhance the flavors.
- Nut-Free Option: For those with nut allergies, substitute the peanut butter with a seed butter (like sunflower seed butter) and omit the peanuts, or use a combination of pretzel pieces and melted chocolate for the topping for a salty-sweet crunch.
- Spice It Up: A pinch of cinnamon or a tiny dash of cayenne pepper in the chocolate drizzle can add an unexpected and delightful kick.
Serving Suggestions and Storage Guidelines
Perfect for Every Occasion
These Chocolate Peanut Butter Dream Bars are incredibly versatile and suitable for a multitude of occasions. They are an absolute hit at parties, potlucks, and family gatherings, effortlessly becoming the centerpiece of any dessert table. Serve them after a hearty meal as a satisfying sweet finish, or offer them as a delightful snack during an afternoon break. Their elegant layered appearance makes them ideal for holiday celebrations, birthday parties, or even as a thoughtful gift. Pair them with a scoop of vanilla ice cream, a dollop of whipped cream, or a glass of cold milk for an even more indulgent experience. No matter the event, these dream bars are sure to impress and satisfy every sweet tooth.
Keeping Your Dream Bars Fresh
To maintain their optimal taste and texture, store any leftover Chocolate Peanut Butter Dream Bars in an airtight container in the refrigerator. They will remain fresh and delicious for up to 3-5 days. While they are best enjoyed chilled, you can let them sit at room temperature for a few minutes before serving to slightly soften the layers. For longer storage, these bars freeze beautifully. Place them in a single layer in an airtight freezer-safe container, separating layers with parchment paper if stacking. They can be frozen for up to 1-2 months. When ready to enjoy, simply thaw them in the refrigerator overnight or at room temperature for a shorter period until softened. This makes them an excellent make-ahead dessert option, perfect for planning ahead for future events or simply having a delicious treat on hand whenever a craving strikes.
Final Thoughts: Indulge in Your Homemade Masterpiece!
You’ve now mastered the art of creating truly irresistible Chocolate Peanut Butter Dream Bars. This recipe, with its harmonious blend of a rich chocolate base, a luscious peanut butter filling, and a crunchy, chocolatey topping, promises a dessert experience like no other. It’s a testament to how simple ingredients, when combined with a little love and guidance, can transform into a spectacular treat that brings joy to all who taste it. We encourage you to try this recipe and discover the pure delight of these homemade dream bars. They are not just a dessert; they are an invitation to create sweet memories and indulge in moments of pure culinary happiness. Happy baking, and enjoy every blissful bite!
*All image credit belongs to Betty Crocker via YouTube. Follow and subscribe to her channel for more!