
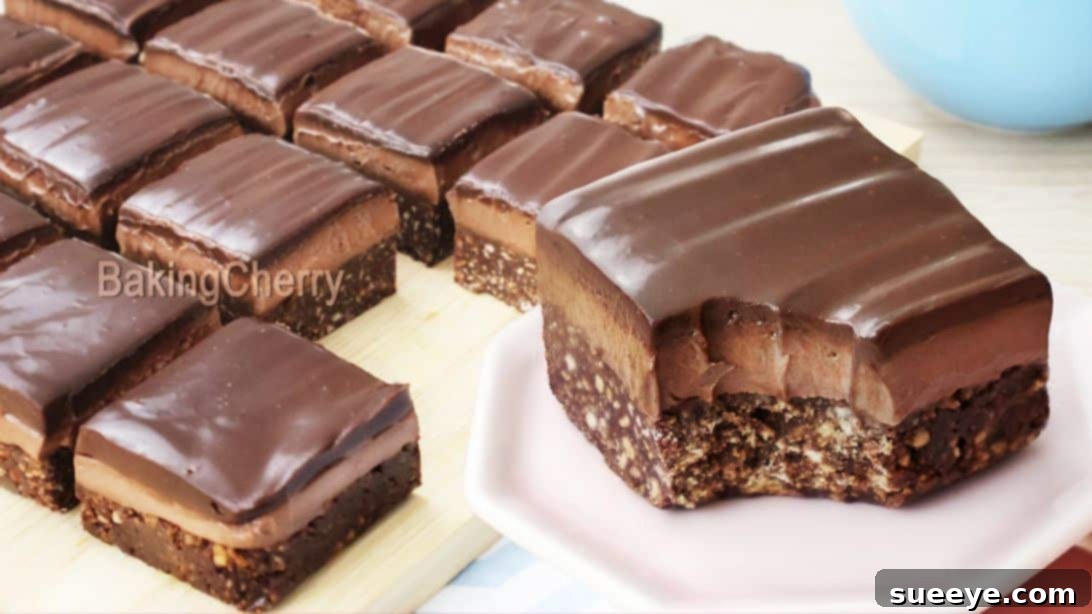
Prepare to delight your taste buds with these extraordinary no-bake chocolate cheesecake biscuit bars. Crafted by the talented folks at Baking Cherry, this recipe stands out as one of the most delicious and satisfying dessert bars you’ll encounter. Forget about heating up your kitchen; these decadent treats come together effortlessly, making them an ideal choice for any time of year, especially when you crave something sweet without the fuss of an oven. Each bar is a symphony of textures and flavors, meticulously layered to create a truly unforgettable experience.
The magic begins with a robust and flavorful foundation: a rich biscuit base. This irresistible layer is expertly fashioned from a blend of finely crushed biscuit crumbs, melted chocolate, luxurious heavy cream, unsweetened cocoa powder, and softened butter. It’s the perfect crunchy, chocolaty counterpoint to the layers that follow. Next, you’ll discover the star of the show: a wonderfully creamy chocolate cheesecake filling. This indulgent middle layer combines smooth cream cheese, rich butter, powdered sugar, additional cocoa powder for intensified chocolate flavor, and a hint of vanilla extract to round out its exquisite taste. Finally, crowning these delightful bars is a silky-smooth spread of glossy chocolate ganache, adding an elegant finish and a final burst of pure chocolate bliss.
RELATED: Looking for other simple cheesecake ideas? Try this 3-Ingredient Greek Yogurt Cheesecake Recipe for a lighter, equally delicious option!
While the idea of crafting a three-layered dessert might seem daunting at first glance, rest assured, making these no-bake bars is far simpler than you might imagine. It does require a bit of patience due to the multiple layers and chilling times, but every moment invested is absolutely worth it. The moment these dessert bars touch your palate, you’ll understand why they are so incredibly irresistible. The harmonious combination of distinct textures—from the firm, crumbly base to the lusciously smooth cheesecake and the soft, melt-in-your-mouth ganache—paired with their rich, profound chocolate flavors, creates an amazing culinary masterpiece. They are the perfect sweet indulgence to enjoy after a savory meal, a delightful treat for gatherings, or simply a well-deserved reward for yourself.
If you’re a fan of no-bake desserts, you’ll love exploring more easy recipes. Here’s another quick and satisfying option: No-Bake Chocolate Clusters Recipe.
Why Choose No-Bake Chocolate Cheesecake Biscuit Bars?
No-bake desserts are a revelation, offering a fantastic solution for those who love homemade treats but prefer to skip the oven, especially during warmer months. These chocolate cheesecake biscuit bars perfectly embody the charm of no-bake recipes. They are incredibly versatile, require minimal equipment, and are remarkably forgiving for beginner bakers. The convenience factor cannot be overstated: no need to preheat, no worries about uneven baking, and no hot kitchen. Just simple mixing, layering, and chilling. Furthermore, the rich and indulgent profile of chocolate combined with creamy cheesecake is a universally loved pairing, making these bars an instant crowd-pleaser for parties, potlucks, or quiet evenings at home. Their elegant appearance belies their ease of preparation, ensuring you always impress with minimal effort.
Essential Ingredients for Decadent Chocolate Cheesecake Biscuit Bars
Crafting these sensational bars begins with selecting quality ingredients. The beauty of this recipe lies in its simplicity, relying on common pantry staples and fresh dairy items to build layers of exquisite flavor.
For the Robust Biscuit Base:
- 2 2/3 cups of biscuit crumbs: Digestive biscuits, graham crackers, or any plain sweet biscuit work wonderfully. Ensure they are finely crushed for a cohesive base.
- 2/3 cup of semi-sweet or milk chocolate: High-quality chocolate chips or finely chopped bar chocolate will yield the best flavor. This melts into the base, adding richness and helping bind the crumbs.
- 2 tablespoons of unsweetened cocoa powder: Enhances the chocolate flavor of the base without adding extra sweetness, providing a delightful depth.
- 1/3 cup of heavy cream (slightly warm): Helps to moisten the crumbs and combine all the ingredients, creating a pliable dough-like consistency.
- 1/4 cup of unsalted butter (room temperature): Essential for binding the biscuit crumbs together, giving the base its firm yet tender texture. Room temperature butter ensures it blends smoothly.
For the Luscious Cheesecake Filling:
- 1 cup of cream cheese (room temperature): Full-fat cream cheese is recommended for the creamiest, richest texture. Bringing it to room temperature is crucial for a smooth, lump-free filling.
- 1/4 cup of unsalted butter (room temperature): Adds to the richness and stability of the cheesecake layer. Like cream cheese, room temperature butter whips up beautifully.
- 1/2 cup of powdered sugar: Also known as confectioners’ sugar, this fine sugar dissolves easily, ensuring a silky-smooth cheesecake texture without grittiness.
- 3 tablespoons of unsweetened cocoa powder: Infuses the cheesecake layer with a deep, delightful chocolate flavor. Sifting it prevents clumps.
- 1/2 teaspoon of vanilla extract: A touch of pure vanilla extract enhances the overall flavor profile, complementing the chocolate and cream cheese beautifully.
For the Velvety Chocolate Ganache Topping:
- 1/2 cup of semi-sweet chocolate: Again, choose a good quality chocolate for the best ganache. This will be the dominant flavor of your topping.
- 1/4 cup of heavy cream: The key ingredient for creating a smooth, pourable, and ultimately luscious ganache. The ratio of cream to chocolate is crucial for the desired consistency.
How to Make Irresistible Chocolate Cheesecake Biscuit Bars: A Step-by-Step Guide
Creating these no-bake marvels is a straightforward process, broken down into manageable steps. Precision in preparation and patience during chilling are your keys to success.
Step 1: Crafting the Delectable Biscuit Base
Begin by preparing your semi-sweet chocolate. Place the chocolate chips or finely chopped chocolate into a microwave-safe bowl. Microwave in short, 30-second intervals, stirring thoroughly after each interval. This gentle melting process prevents the chocolate from scorching and ensures a smooth, even consistency. Continue until the chocolate is fully melted and beautifully glossy.
Step 2: Combining the Base Ingredients
In a separate, generously sized mixing bowl, combine the finely crushed biscuit crumbs with the unsweetened cocoa powder. Mix these dry ingredients until they are thoroughly combined, ensuring an even distribution of cocoa powder throughout the crumbs. Next, carefully pour in the slightly warm heavy cream and the freshly melted chocolate. Finally, add the room-temperature unsalted butter. Using a sturdy spoon or your hands (if clean), mix everything together until a thick, uniform dough-like mixture forms. It should be moist enough to hold its shape when pressed.
Step 3: Forming the Base in Your Pan
Prepare a 7-inch square baking pan by lining it completely with parchment paper. Leave a generous overhang of parchment paper on all sides; this will serve as convenient “handles” later, making it incredibly easy to lift the finished bars out of the pan. Transfer the biscuit mixture into the lined pan. Using the back of a spoon, a flat-bottomed glass, or your fingers, firmly and evenly press the mixture into the bottom of the pan. Ensure it’s compact and level across the entire base. This creates a sturdy foundation for your cheesecake.
Step 4: Preparing the Velvety Cheesecake Filling
Now, it’s time to create the star layer. In a large mixing bowl, combine the room-temperature cream cheese and the room-temperature unsalted butter. These ingredients must be at room temperature to ensure a silky-smooth, lump-free filling. Using a fine-mesh sieve, sift the powdered sugar and unsweetened cocoa powder directly over the bowl. This crucial step prevents any lumps of sugar or cocoa from forming in your cheesecake. Stir the ingredients gently with a spatula to initially combine them, then switch to an electric mixer. Beat the mixture at medium speed until it becomes incredibly creamy, light, and perfectly smooth. Finally, add the vanilla extract and whisk briefly again to incorporate it fully. Avoid over-mixing once the vanilla is in.
Step 5: Layering and Initial Chilling
Carefully and evenly spread the prepared creamy chocolate cheesecake mixture over the compacted biscuit base in your baking pan. Use an offset spatula or the back of a spoon to create a smooth, level surface. Once the filling is spread, place the pan into the refrigerator for approximately one hour. This initial chilling period allows the cheesecake layer to set slightly, making it firm enough to support the ganache topping without blending.
Step 6: Crafting the Luxurious Chocolate Ganache Topping
While the cheesecake is chilling, prepare the final, exquisite layer: the chocolate ganache. In a microwave-safe bowl, combine the semi-sweet chocolate and the heavy cream. Return to the microwave and heat in short, 30-second intervals. After each interval, stir the mixture with a spatula. The heat from the cream will melt the chocolate, and continued stirring will create a beautifully smooth, glossy, and homogeneous ganache. Continue until all the chocolate is fully melted and the ganache is perfectly emulsified and lump-free.
Step 7: The Grand Finale and Final Chill
Once the ganache is smooth and the cheesecake layer has firmed up slightly from its hour in the fridge, retrieve the pan. Carefully pour the warm, silky ganache evenly over the set cheesecake filling. You can gently tilt the pan to ensure it spreads to the edges, creating a flawless top layer. Now comes the most important part: patience! Return the pan to the refrigerator and chill for a minimum of 4 hours. For the best results and easiest cutting, chilling overnight is highly recommended. This extended chilling time allows all three layers to firm up completely, making for clean cuts and perfect individual bars. When ready to serve, use the parchment paper overhangs to gently lift the entire slab of cheesecake bars out of the pan. Place it on a cutting board, then use a sharp knife (wiping it clean between cuts for perfect edges) to cut into desired squares or rectangles. Serve immediately and prepare for compliments!
Expert Tips for No-Bake Chocolate Cheesecake Bar Success
Achieving perfection with these no-bake bars is easy with a few insider tips:
- Room Temperature Ingredients are Key: For the cheesecake filling, ensure your cream cheese and butter are softened to room temperature. This is non-negotiable for a truly smooth, lump-free, and creamy consistency. Cold ingredients will result in a clumpy, difficult-to-mix filling.
- Finely Crushed Biscuits: Use a food processor for the quickest and most consistent biscuit crumbs. If crushing by hand, place biscuits in a Ziploc bag and use a rolling pin, ensuring they are very fine to create a solid base.
- Don’t Rush the Melting: When melting chocolate for both the base and ganache, use short microwave intervals and stir diligently. Chocolate can seize or burn if overheated.
- Press the Base Firmly: A well-compacted biscuit base is essential. Press it down with significant force to ensure it doesn’t crumble when cut.
- Sift Dry Ingredients: Always sift powdered sugar and cocoa powder directly into your cream cheese mixture. This prevents annoying lumps and ensures a velvety smooth filling.
- Chill, Chill, Chill: The chilling times are crucial. Do not shorten them! Proper chilling allows all layers to set completely, making the bars easy to cut and handle, and enhancing their texture. Overnight chilling is always best for optimal results.
- Clean Cuts: For neat slices, use a long, sharp knife. Heat the knife under hot water and wipe it dry between each cut. This creates clean, professional-looking edges.
- Experiment with Chocolate: While semi-sweet is recommended, feel free to adjust to your preference. Dark chocolate will yield a more intense, less sweet bar, while milk chocolate will make it sweeter and milder.
Creative Variations and Serving Suggestions
While this recipe is perfect as is, you can always get creative! Consider these ideas to customize your no-bake chocolate cheesecake biscuit bars:
- Nutty Base: Add 1/4 cup of finely chopped toasted nuts (like pecans or walnuts) to the biscuit base mixture for extra crunch and flavor.
- Mint Chocolate: Add 1/4 teaspoon of peppermint extract to the cheesecake filling for a refreshing mint-chocolate twist.
- Espresso Kick: Dissolve 1 teaspoon of instant espresso powder in 1 tablespoon of hot water and add it to the cheesecake filling or ganache for a mocha flavor.
- White Chocolate Swirl: Instead of a full chocolate ganache, melt white chocolate and drizzle it over the set chocolate ganache for a beautiful contrasting swirl.
- Fruity Topping: While it’s a chocolate bar, a few fresh raspberries or strawberries placed on top before the ganache sets could add a lovely pop of color and tartness.
- Decorative Touches: Sprinkle with chocolate shavings, cocoa powder, a dusting of powdered sugar, or even edible glitter just before serving for an extra elegant touch.
- Serve with Ice Cream: A scoop of vanilla bean ice cream or a dollop of whipped cream makes these bars even more indulgent.
Storing Your No-Bake Delight
These no-bake chocolate cheesecake biscuit bars are best stored in an airtight container in the refrigerator for up to 5-7 days. While they are safe to eat after this, their freshness and optimal texture are best enjoyed within the first few days. You can also freeze individual bars for longer storage (up to 1-2 months). Wrap them tightly in plastic wrap and then aluminum foil before freezing. Thaw them in the refrigerator overnight before serving.
No-Bake Chocolate Cheesecake Biscuit Bars: Your New Go-To Dessert
In conclusion, these no-bake chocolate cheesecake biscuit bars offer a truly decadent and surprisingly easy dessert experience. From their delightful biscuit crunch base to the creamy, rich chocolate cheesecake filling and the final luxurious ganache topping, every bite is a celebration of flavor and texture. Perfect for any gathering, a special occasion, or simply as a comforting treat, this recipe proves that you don’t need an oven to create something truly spectacular. Embrace the simplicity and joy of no-bake baking, and prepare to be amazed by the deliciousness you can create with minimal effort. Give this recipe a try; you won’t regret bringing these utterly irresistible chocolate cheesecake bars into your life!