
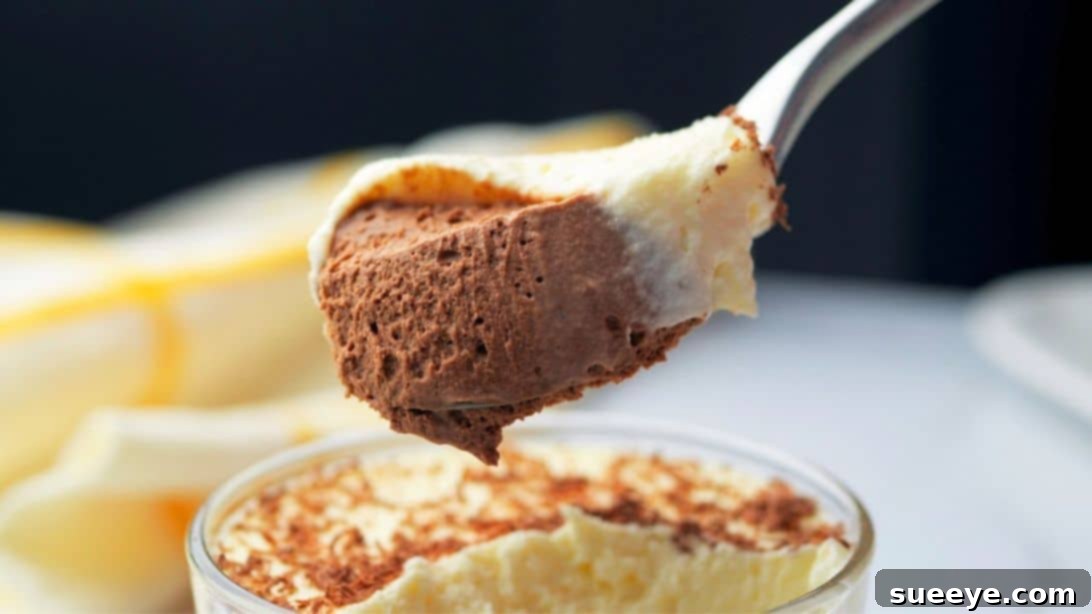
Are you searching for a dessert that’s both incredibly decadent and surprisingly simple to prepare? Look no further! This spectacular 3-ingredient double chocolate mousse recipe is a game-changer for anyone with a sweet tooth. Gone are the days of believing that exquisite chocolate mousse is only for professional chefs. Thanks to this straightforward method, you can whip up a rich, velvety, and perfectly consistent double chocolate mousse right in your own kitchen in just about 20 minutes of active prep time. Imagine indulging in layers of smooth dark and delicate white chocolate mousse, a delightful treat that looks impressive but requires minimal effort. If you consider yourself a true chocolate enthusiast, preparing this dessert isn’t just an option; it’s an absolute must-try experience!
This recipe, inspired by the culinary simplicity demonstrated by Spice Bangla, redefines easy dessert making. It’s designed to satisfy your deepest chocolate cravings without the complexity often associated with gourmet sweets. The resulting mousse is not only luscious and creamy but also boasts that coveted airy yet substantial texture that defines a truly great mousse. Prepare to amaze your family and friends with a dessert that tastes like it came from a high-end patisserie, all while secretly knowing it took you mere minutes to create. This double chocolate delight is perfect for any occasion, from a casual family dinner to a more formal gathering or a special celebration.
Why This 3-Ingredient Double Chocolate Mousse Is a Must-Try
What makes this particular double chocolate mousse recipe stand out from the crowd? Its incredible simplicity, the use of minimal ingredients, and the speed at which you can achieve a truly luxurious dessert. Many people shy away from making mousse at home, intimidated by the perceived difficulty of achieving the right texture and consistency. This recipe dismantles those preconceptions, proving that elegance doesn’t have to mean complexity. With just three core ingredients – quality dark chocolate, luscious white chocolate, and rich whipping cream – you’ll create a dessert that offers a sophisticated flavor profile and an inviting texture that rivals any dessert parlor.
This recipe is perfect for those spontaneous sweet cravings, last-minute gatherings, or when you simply want to treat yourself to something extraordinary without spending hours in the kitchen. The “double chocolate” aspect is where this recipe truly shines. Instead of a single uniform flavor, you get two distinct yet harmonious chocolate experiences: the intense, slightly bitter notes of dark chocolate perfectly complementing the sweet, delicate creaminess of white chocolate. This dual-flavor approach adds an extra layer of gourmet appeal, making each spoonful a delightful journey through contrasting tastes and textures. Whether you’re serving it for an intimate dinner, a birthday celebration, or a special holiday, this homemade double chocolate mousse is guaranteed to be a crowd-pleaser and a conversation starter, leaving everyone asking for the recipe.
Essential Ingredients for Your Decadent Mousse
The magic of this recipe lies in its incredibly short ingredient list. However, because there are so few components, the quality of each ingredient significantly impacts the final taste and texture of your double chocolate mousse. Investing in good quality products will elevate your dessert from good to absolutely sublime. Here’s exactly what you’ll need to create your sumptuous treat:
- 3.5 oz (100g) Dark Chocolate (or Semi-Sweet): For the best results, choose a high-quality dark chocolate with a cocoa content of around 60-70%. This provides a rich, deep chocolate flavor without being overly bitter. If you prefer a slightly sweeter dark chocolate profile, semi-sweet chocolate can be used as a delicious alternative. Finely chopping your chocolate ensures even melting.
- 3.5 oz (100g) White Chocolate: Select a premium white chocolate that contains real cocoa butter. This is crucial for achieving a smooth, creamy melt and a genuinely delicious flavor. Avoid white confectionery coatings, which often contain vegetable fats instead of cocoa butter and may not melt or taste as well. Like the dark chocolate, ensure it’s finely chopped.
- 16.9 oz (500ml) Heavy Whipping Cream: This is the backbone of your mousse, providing its signature light and airy texture. It’s imperative that your whipping cream has a fat content of at least 35% (often labeled as heavy cream or heavy whipping cream) to ensure it can be whipped to stable, firm peaks. For optimal whipping, always keep your cream thoroughly chilled until you are ready to use it.
That’s it! Just three simple ingredients stand between you and a truly remarkable, homemade chocolate dessert. The simplicity allows the quality and inherent deliciousness of each component to truly shine, resulting in a pure and intense chocolate experience that feels luxurious.
Step-by-Step Guide to Crafting Double Chocolate Mousse
Follow these detailed, easy-to-understand steps to effortlessly create your impressive double chocolate mousse. Precision and a little patience are your best friends here, especially when dealing with melting chocolate and whipping cream to their perfect consistency. Each step is designed to guide you to success, ensuring a delightful dessert every time.
Step 1: Prepare Your Chocolates with Precision
Begin by carefully slicing or finely chopping both your white and dark chocolates into small, uniform pieces. This might seem like a minor detail, but it’s a crucial step as smaller pieces will melt more quickly and evenly when hot cream is added, preventing any scorching or uneven textures that can occur with larger chunks. Place the finely chopped dark chocolate into one heatproof bowl and the finely chopped white chocolate into a separate, equally heatproof bowl. Ensure your bowls are dry and clean. Set them aside, ready for the next stage.
Step 2: Infuse the Cream for a Silky Melt
Measure out 6.8 oz (approximately 200ml) of your heavy whipping cream and pour it into a small saucepan. Place the saucepan over medium heat, gently heating the cream until it just comes to a simmer. You’ll observe small, delicate bubbles forming around the edges of the pan, but it’s vital not to let it come to a rolling boil, as boiling the cream can alter its texture and potentially scorch it, impacting the final flavor. Once simmering, remove the cream from the heat immediately. Divide the hot cream equally between the two bowls of chopped chocolate – pouring half over the dark chocolate and the other half over the white chocolate. Let the mixtures sit undisturbed for about 5 minutes. This ‘resting’ period allows the residual heat from the cream to gently and evenly melt the chocolate. After 5 minutes, use a spatula or whisk to gently stir each bowl of chocolate vigorously until both the dark and white chocolates are completely melted and beautifully smooth, with no lumps remaining. The mixtures should resemble a glossy ganache.
Step 3: Cool the Chocolate Bases to Perfection
Once both the dark and white chocolate mixtures are perfectly melted and smooth, allow them to cool down sufficiently. This step is critical. It’s important that these mixtures are cool enough to the touch, but not completely solidified, before you attempt to incorporate them into the delicate whipped cream. Let them sit at room temperature for approximately 5 to 10 minutes, stirring occasionally. They should feel cool or lukewarm, not hot. Cooling prevents them from melting and deflating the delicate airiness of the whipped cream in the next step, which could lead to a dense mousse rather than a light and airy one.
Step 4: Prepare the Whipped Cream Foundation
While your chocolate mixtures are cooling gracefully, pour the remaining heavy whipping cream (the larger portion, approximately 300ml or 10.1 oz) into a large, preferably chilled mixing bowl. Using an electric mixer (or a robust balloon whisk if you’re up for a workout), beat the cream on medium-high speed until soft peaks form. Soft peaks are characterized by holding their shape when the whisk is lifted, but their tips will curl over slightly. Be extremely careful not to over-whip the cream at this initial stage, as you will be mixing it further when you fold in the chocolate, and over-whipped cream can become grainy. Once soft peaks are achieved, gently transfer exactly half of this whipped cream into a separate, clean bowl. You now have two distinct bowls of perfectly whipped, soft-peaked cream, one designated for each chocolate flavor.
Step 5: Master the Art of Folding the Chocolates
Now, it’s time to transform your smooth chocolate bases into airy, delightful mousse! Take the first bowl containing half of the soft-peaked whipped cream. Gradually add the cooled, melted white chocolate mixture in portions – perhaps in three additions. Using a spatula, gently fold the white chocolate into the whipped cream. Employ an upward scooping motion, carefully turning the bowl as you go, until all the white chocolate is fully incorporated and the mixture reaches firm peaks. This gentle folding technique is absolutely essential to maintain the airiness and volume of the mousse. Repeat this exact process with the remaining whipped cream in the second bowl and the cooled, melted dark chocolate mixture. Continue folding until the dark chocolate is evenly mixed and the mousse forms firm, stable peaks. You should now have two distinct bowls of delicious, airy mousse – one intensely dark, one delicately white.
Step 6: Assemble and Chill Your Mousse for Optimal Texture
With both the white and dark chocolate mousses beautifully prepared, it’s time for the final, artistic assembly. You have a few delightful options for presentation. For an elegant and visually appealing layered look, carefully spoon alternating layers of the white chocolate mousse and dark chocolate mousse into individual serving dishes. Martini glasses, elegant espresso cups, small decorative bowls, or charming glass jars all work wonderfully. Alternatively, for a more professional and precise finish, you can transfer each mousse into separate piping bags (you can use a plain round nozzle or a star tip for extra flair, or simply snip off the corner of the bag). Then, carefully pipe them into your chosen serving dishes, creating beautiful swirls or distinct, clean layers. This method often results in a cleaner, more refined appearance. Once assembled, you can serve them immediately for a softer, slightly more fluid creamy texture, or, for the perfect firm mousse consistency that holds its shape beautifully, refrigerate them for a minimum of 3 to 4 hours before serving. Chilling allows the flavors to deepen and the mousse to set properly, enhancing its rich flavor and delightful, airy texture. Garnish with your favorite toppings and enjoy!
Tips for the Perfect Double Chocolate Mousse
Achieving a truly exceptional double chocolate mousse isn’t difficult, but a few key tips can make all the difference, ensuring your dessert is light, airy, and full of flavor every time:
- Prioritize Quality Ingredients: As this recipe uses only three ingredients, the quality of each is paramount. Invest in good quality dark and white chocolate, and make sure your heavy whipping cream has a high-fat content (35% or more). Better ingredients mean better flavor and texture.
- Avoid Overheating the Cream: When heating the cream to melt the chocolate, bring it just to a gentle simmer. A rolling boil can scorch the cream, altering its taste and potentially affecting its ability to emulsify smoothly with the chocolate.
- Chop Chocolate Finely and Evenly: Small, uniform pieces of chocolate will melt more consistently and quickly when hot cream is poured over them. This prevents scorching and ensures a silky-smooth chocolate base without any stubborn lumps.
- Crucial Cooling of Chocolate Mixtures: This is a critical step! Ensure your melted chocolate mixtures are cooled to lukewarm or room temperature before you fold them into the whipped cream. If they are too warm, they will melt the delicate air bubbles in the whipped cream, resulting in a runny, dense mousse instead of a light and airy one.
- Don’t Over-Whip the Cream (Initially): When preparing the whipped cream in Step 4, whip it only to soft peaks. You will be incorporating it further with the chocolate, and if you start with cream that is already stiff or over-whipped, it can become grainy or separate when mixed.
- Master the Gentle Folding Technique: When combining the chocolate mixtures with the whipped cream, use a light, gentle folding motion with a spatula. This technique is designed to carefully incorporate the heavier chocolate mixture into the lighter whipped cream without deflating the precious air pockets that give mousse its signature texture.
- Allow Adequate Chill Time: While the mousse is delicious immediately, chilling it for at least 3-4 hours (or ideally overnight) allows the flavors to meld and deepen, and the mousse to set properly. This results in a much richer, firmer, and more satisfying dessert experience.
Creative Variations and Serving Suggestions
While the classic 3-ingredient double chocolate mousse is heavenly on its own, don’t hesitate to experiment with variations and toppings to customize it to your personal taste or the specific occasion. These ideas can elevate your mousse to an even more impressive dessert!
Flavor Enhancements:
- Coffee Infusion: For a delightful mocha twist, add a teaspoon of instant espresso powder or a tablespoon of strong brewed coffee to the hot cream before pouring it over the dark chocolate.
- Minty Freshness: A few drops of food-grade peppermint extract can transform your dark chocolate mousse into a refreshing mint chocolate delight, perfect for after-dinner indulgence.
- Citrus Zest: Grate a bit of fresh orange or tangerine zest into either the dark or white chocolate mixture for a bright, aromatic, and invigorating twist that cuts through the richness.
- Liqueur Boost: For an adult-friendly version, consider adding a tablespoon of your favorite liqueur to the cooled chocolate mixtures. Kahlua or espresso liqueur for coffee notes, Grand Marnier for orange, or Baileys Irish Cream for a creamy, boozy kick work wonderfully.
Toppings and Garnishes:
- Classic Chocolate Adornments: Decorate your finished mousse with chocolate sprinkles, elegant chocolate shavings, or a light dusting of high-quality unsweetened cocoa powder for an authentic touch.
- Fresh Berry Brilliance: The natural tartness and vibrant color of fresh raspberries, strawberries, or blueberries provide a lovely contrast to the sweet, rich mousse. A few berries on top instantly elevate the presentation.
- Extra Whipped Cream: A small dollop of plain, unsweetened whipped cream on top of each serving, perhaps with a sprig of fresh mint or a single berry, adds an extra touch of elegance and lightness.
- Crunchy Nuts: Toasted chopped almonds, hazelnuts, or pistachios can add a delightful textural contrast and nutty flavor.
- Sauce Drizzles: Drizzle with a homemade caramel sauce, a raspberry coulis, or even a contrasting chocolate sauce for an additional layer of flavor and visual appeal.
Serving Ideas:
- Individual Elegant Portions: As described in the recipe, martini glasses, small elegant espresso cups, charming glass jars, or classic dessert bowls are perfect for individual servings, making each guest feel special.
- Mousse Tart: For a more substantial dessert, use the prepared mousse as a luscious filling for a pre-baked pie crust or a sweet chocolate tart shell.
- Grand Trifle Layers: Create a show-stopping dessert by layering the mousses with crumbled cookies (like Oreos or shortbread), pieces of sponge cake, and fresh berries in a large trifle bowl.
- Mini Shooter Glasses: For parties or tasting menus, serve the mousse in tiny shot glasses for a delightful, bite-sized treat that allows guests to sample multiple flavors.
Storage Instructions
While this delightful double chocolate mousse is undeniably at its peak when enjoyed fresh, it can certainly be prepared in advance and stored. Once your mousse is assembled in its serving dishes and properly chilled, cover each dish loosely with plastic wrap. This is important to prevent the mousse from absorbing any unwanted odors from the refrigerator and to protect its delicate surface. Stored correctly in the refrigerator, the mousse will maintain its freshness, texture, and delicious flavor for up to 3-4 days. For optimal enjoyment, we highly recommend consuming it within this timeframe. It is generally not advisable to freeze chocolate mousse, as the delicate airy texture can be compromised and may become icy or separate upon thawing, diminishing its luxurious quality.
Conclusion: Your New Go-To Chocolate Dessert
There you have it – a remarkably easy, undeniably delicious, and visually stunning 3-ingredient double chocolate mousse recipe that promises to be a staple in your dessert repertoire. This recipe eloquently proves that you don’t need a pantry full of exotic ingredients or hours of complicated steps to create something truly extraordinary. Whether you’re celebrating a special occasion, looking for a quick yet impressive weeknight treat, or simply want to indulge your chocolate cravings with minimal effort, this double chocolate mousse delivers on all fronts. Its rich, harmonious flavors, combined with a silky-smooth and airy texture, and its beautiful layered presentation, make it an unforgettable dessert that will surely impress. So go ahead, gather your three simple ingredients, and prepare to embark on a delightful culinary journey that culminates in pure chocolate bliss. Your taste buds will undoubtedly thank you for this delightful and easy indulgence!
Related Dessert Recipes to Satisfy Your Sweet Tooth
If you loved making this easy chocolate mousse and are eager to explore more fantastic dessert ideas that are both simple and satisfying, check out these other tempting recipes. They’re perfect for expanding your home baking skills and discovering new favorites:
- Easy 10-Minute Coffee Chocolate Dessert Recipe
- Rich Chocolate Sorbet Recipe
- No-Bake Milk Chocolate Cheesecake Dessert
- 6-Ingredient White Chocolate Truffles