
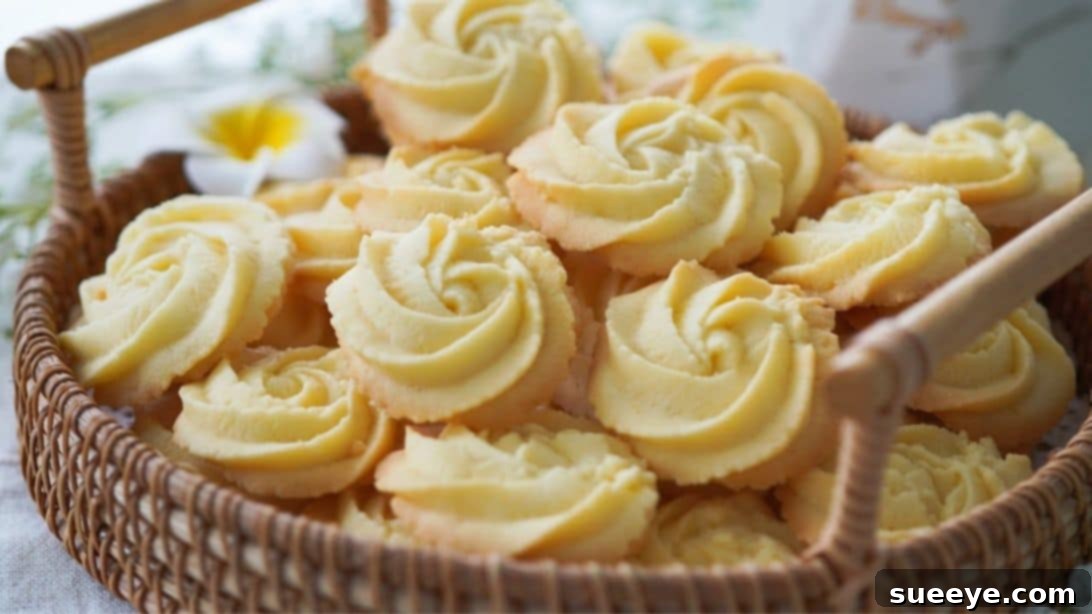
There are some flavors that instantly transport us back to cherished childhood memories. For many, including myself, the iconic taste and delightful crunch of Danish butter cookies hold a special place in our hearts. I remember the beautiful tin cans, often adorned with charming European scenes, that promised a treasure trove of perfectly baked, buttery delights. The joy of opening one of these tins and discovering a variety of intricately piped cookies was unmatched. It’s this deep-seated nostalgia and love for classic baking that fills me with excitement whenever I encounter a truly exceptional recipe for these beloved treats.
That’s why I was absolutely thrilled to discover this incredible recipe by Little Duck’s Kitchen on YouTube. After trying countless recipes in pursuit of that authentic, melt-in-your-mouth perfection, I can confidently say that these are, without a doubt, the best Danish butter cookies I have ever tasted! They strike the perfect balance: wonderfully crunchy, yet delicate, with an incredibly rich and authentic buttery flavor that is simply irresistible. This recipe captures the essence of those classic tin-can cookies, elevating them to a whole new level of homemade deliciousness. Whether you’re rekindling old memories or creating new ones, this recipe promises a delightful baking experience and a truly superior butter cookie. For a visual guide and additional tips, I highly recommend watching the full video!
The Timeless Appeal of Danish Butter Cookies
Danish butter cookies are more than just a sweet treat; they are a culinary institution, celebrated worldwide for their distinctive flavor, crisp texture, and elegant shapes. Originating from Denmark, these cookies have become synonymous with hospitality, often served during holidays, special occasions, or simply as a comforting accompaniment to coffee or tea. Their global popularity can be attributed to their simple yet sophisticated profile: a harmonious blend of high-quality butter, sugar, and flour, meticulously crafted to achieve a sublime crispness that snaps with every bite, followed by a smooth, buttery melt.
What sets Danish butter cookies apart is their authentic, unadulterated butter flavor. Unlike some cookies that rely on a multitude of extracts or complex spice blends, the star here is the butter itself. This emphasis on a core, premium ingredient ensures a pure, rich taste that appeals to nearly everyone. Furthermore, the traditional assortment of shapes – from delicate swirls and rings to pretzel-like forms – adds to their charm and visual appeal, making them not just delicious but also a beautiful addition to any dessert platter. Their enduring legacy is a testament to the power of simple, well-executed baking, proving that sometimes, the most basic ingredients can create the most profound culinary experiences.
Crafting the Perfect Danish Butter Cookie: Key Elements
Achieving the ideal Danish butter cookie requires attention to a few crucial details. It’s not just about mixing ingredients; it’s about understanding how each component contributes to the cookie’s signature characteristics. Let’s delve into what makes these cookies truly special and how to replicate that perfection in your own kitchen.
The Butter: Heart of the Cookie
The quality and type of butter are paramount. Using high-quality salted butter, as specified in this recipe, provides a depth of flavor that unsalted butter might lack without added salt. The salt enhances the sweetness and richness, creating a more balanced taste profile. Ensure your butter is at room temperature – soft enough to cream easily but not melted or greasy. This temperature is crucial for incorporating air, which is vital for the cookies’ light and crisp texture.
The Flour: For Structure and Tenderness
Cake flour is specified for a reason. It has a lower protein content than all-purpose flour, which results in a more tender crumb. This is key to preventing the cookies from becoming tough or overly dense. When combined with cornflour (or cornstarch), which is pure starch, it further reduces gluten development, contributing to that distinctive delicate crispness and melt-in-your-mouth quality that defines Danish butter cookies.
The Sweetener: Icing Sugar’s Role
Icing sugar (also known as powdered sugar or confectioners’ sugar) is preferred over granulated sugar for a smoother, finer texture in the dough. Its fine particles dissolve more readily into the butter, resulting in a more uniform and tender cookie, free from any grainy feel. It also contributes to the beautiful, pale color of the baked cookies.
The Vanilla: Aromatic Enhancement
Vanilla essence, or even better, pure vanilla extract, adds a warm, inviting aroma and subtly enhances the other flavors without overpowering the star — the butter. While a small amount, it plays a significant role in rounding out the cookie’s overall taste.
Milk Powder: The Secret to Depth
The addition of milk powder might seem unusual, but it’s a brilliant touch. Milk powder adds an extra layer of richness and a slight caramel note, intensifying the buttery flavor and contributing to a beautiful golden-brown color during baking. It also helps with the crispness by absorbing some moisture, leading to a more stable, crunchy cookie.
Ingredients:
To embark on this delightful baking journey, gather the following high-quality ingredients. Precision in measurements is key for the best results.
- 8.8 oz (approximately 250g) of high-quality salted butter, softened to room temperature
- 1 large egg, at room temperature
- 1 cup (approximately 120g) of icing sugar (confectioners’ sugar), sifted
- 1/2 teaspoon of pure vanilla essence or extract
- 2 1/8 cups (approximately 260g) of cake flour, sifted
- 1/2 cup plus 4 teaspoons (approximately 70g) of cornflour (cornstarch), sifted
- 2.5 tablespoons (approximately 20g) of milk powder
Essential Equipment for Baking Perfection:
Having the right tools can make all the difference in ensuring a smooth and successful baking process for your Danish butter cookies. Here’s a list of what you’ll need:
- Large mixing bowls
- Hand mixer or stand mixer with paddle attachment
- Rubber spatula or silicone spatula
- Fine-mesh sieve
- Piping bag with a 1M star nozzle tip (or other preferred decorative tips)
- Baking trays/sheets
- Parchment paper or silicone baking mats
- Small brush for buttering (optional, if using parchment)
- Measuring cups and spoons
- Kitchen scale (highly recommended for precise ingredient measurements)
Step-by-Step Guide: Crafting Your Own Authentic Danish Butter Cookies
Follow these detailed instructions to create Danish butter cookies that are truly remarkable. Pay close attention to the nuances of each step for optimal texture and flavor.
Step 1: Prepare Your Wet Ingredients
Begin by cutting your 8.8 oz of salted butter into smaller cubes. Place these butter pieces into a large mixing bowl and allow them to come to a complete room temperature. This is crucial for proper creaming. In a separate small bowl, crack 1 large egg. Whisk it thoroughly until the yolk and white are fully combined and slightly frothy. Set the beaten egg aside.
Step 2: Creaming the Butter and Sugar
Once the butter is perfectly softened (it should yield easily to gentle pressure without being greasy), use a rubber spatula to press and flatten it slightly in the bowl. Add the 1 cup of sifted icing sugar to the butter. Using a hand mixer (or a stand mixer with a paddle attachment), begin mixing at a low speed to incorporate the sugar without creating a cloud of dust. Gradually increase the speed to medium and beat the mixture until it becomes pale yellow, light, and wonderfully fluffy. This creaming process typically takes 3-5 minutes and is vital for incorporating air, which contributes to the cookies’ light texture.
Step 3: Incorporating Egg and Vanilla
With the mixer still running at medium speed, gradually add the beaten egg to the butter-sugar mixture, a little at a time. This slow addition helps prevent the mixture from curdling. Continue mixing until the egg is fully incorporated. Next, add the 1/2 teaspoon of vanilla essence. Mix again briefly, just until the vanilla is evenly distributed throughout the mixture.
Step 4: Sifting and Folding in Dry Ingredients
This step ensures a smooth, lump-free dough. Position a fine-mesh sieve over your butter mixture. Measure and sift in 2 1/8 cups of cake flour, 1/2 cup and 4 teaspoons of cornflour (cornstarch), and 2.5 tablespoons of milk powder directly into the bowl. Sifting removes any lumps and aerates the dry ingredients, making them easier to incorporate evenly.
Step 5: Gentle Mixing to Form the Dough
Once all the dry ingredients are sieved into the bowl, switch from the mixer to a silicone spatula or a wooden spoon. Gently fold the dry ingredients into the butter mixture. Be careful not to overmix; mix just until no streaks of flour remain and the dough comes together. Overmixing develops gluten, which can lead to tough cookies. The dough should be soft, pliable, and smooth.
Step 6: Prepare for Piping
Transfer the cookie dough into a piping bag fitted with a 1M open star nozzle tip. This tip is ideal for creating the classic Danish butter cookie shapes like rosettes, shells, and S-shapes. If you don’t have a 1M tip, any open star tip will work, or even a round tip for simple drops.
Step 7: Preheat and Prepare Baking Trays
Preheat your oven to 350 degrees Fahrenheit (175 degrees Celsius). Line your baking trays with parchment paper or silicone baking mats. Alternatively, if not using parchment, lightly brush your baking tray with a thin layer of melted butter (as suggested in the original recipe) to prevent sticking, although parchment paper is generally recommended for consistent non-stick results.
Step 8: Pipe and Chill for Perfect Shapes
Holding the piping bag upright and close to the baking tray, squeeze gently and steadily in a circular motion to create your desired cookie shapes. Leave ample space between each cookie, as they will spread slightly during baking. Once all cookies are piped onto the trays, place the trays in the fridge and let them chill for approximately 10-15 minutes. This chilling step is crucial! It helps the butter in the dough solidify, preventing the cookies from spreading too much in the oven and ensuring their beautiful piped shapes remain clear and defined after baking.
Step 9: The Two-Stage Baking Process
Transfer the chilled cookie trays to the preheated oven. Bake at 350 degrees Fahrenheit (175 degrees Celsius) for the first 5 minutes. After 5 minutes, carefully take the tray out of the oven, rotate it 180 degrees (this promotes even baking), and reduce the oven temperature to 320 degrees Fahrenheit (160 degrees Celsius). Place the tray back in the oven and continue baking for another 8-12 minutes, or until the edges of the cookies are beautifully golden brown and the centers are set. The exact baking time may vary depending on your oven and cookie size, so keep a close eye on them.
Step 10: Cooling and Enjoying
Once baked to perfection, remove the trays from the oven. Let the cookies cool on the baking sheet for a few minutes to firm up before carefully transferring them to a wire rack to cool completely. Allowing them to cool completely is essential for them to achieve their ultimate crispness. Once cooled, these Danish butter cookies are ready to be served and enjoyed!
Tips for Danish Butter Cookie Success
To ensure your homemade Danish butter cookies turn out perfectly every time, keep these expert tips in mind:
- Ingredient Temperature is Key: Ensure both butter and egg are at proper room temperature. This allows for a smooth, homogenous mixture and prevents curdling.
- Sift Dry Ingredients: Don’t skip sifting the flours and milk powder. This removes lumps and aerates the mixture, contributing to a lighter cookie texture.
- Do Not Overmix: Once you add the dry ingredients, mix just until combined. Overmixing develops gluten, which can make your cookies tough instead of tender and crisp.
- Proper Creaming: The initial creaming of butter and sugar is crucial. Beat until the mixture is truly light and fluffy to incorporate enough air for that characteristic melt-in-your-mouth texture.
- Master the Piping: If you’re new to piping, practice on a piece of parchment paper first. Consistent pressure and steady hand movements create uniform, attractive cookies.
- The Chill Factor: Chilling the piped cookies before baking is non-negotiable. It prevents excessive spreading and helps the cookies retain their intricate shapes, ensuring crisp edges.
- Know Your Oven: Ovens can vary significantly. Use an oven thermometer to ensure your oven is at the correct temperature. Adjust baking times slightly if needed. The two-stage baking temperature helps achieve a crispy exterior and a tender interior.
- Cool Completely: Always let your cookies cool completely on a wire rack. They will crisp up further as they cool, developing their signature snap.
- Storage: Store cooled cookies in an airtight container at room temperature for up to two weeks to maintain their freshness and crispness.
Delightful Variations to Explore
While the classic Danish butter cookie is perfect on its own, there’s always room for a little creativity. Here are a few ideas to customize your batch:
- Chocolate Dipped: Once fully cooled, dip half of each cookie into melted dark, milk, or white chocolate. Sprinkle with sea salt or chopped nuts for an extra touch.
- Citrus Zest: Add 1-2 teaspoons of finely grated lemon or orange zest to the butter and sugar mixture for a bright, aromatic twist.
- Nutty Crunch: Before baking, sprinkle finely chopped almonds, pecans, or walnuts over some of the piped cookies for added texture and flavor.
- Jam Thumbs: Pipe small mounds of dough, make an indentation in the center before chilling, and fill with a dollop of your favorite fruit jam (raspberry or apricot works wonderfully) before baking.
- Cardamom Spice: For a more traditional Scandinavian flavor, add 1/2 teaspoon of ground cardamom along with the dry ingredients.
- Espresso Kick: Dissolve 1 teaspoon of instant espresso powder in 1 tablespoon of hot water, let it cool, and add it with the vanilla essence for a subtle coffee flavor.
Frequently Asked Questions about Danish Butter Cookies
Q: What is the difference between cornflour and cornstarch?
A: In many parts of the world, particularly in the UK and Commonwealth countries, “cornflour” refers to what is known as “cornstarch” in the United States and Canada. Both are essentially the same finely powdered starch derived from corn, used as a thickening agent and to create a tender, crispy texture in baked goods like these cookies.
Q: Can I use unsalted butter instead of salted butter?
A: Yes, you can. If you use unsalted butter, I recommend adding about 1/4 to 1/2 teaspoon of fine salt to the dry ingredients to compensate. The salted butter specified in the recipe helps balance the sweetness and enhances the overall flavor profile.
Q: Why did my cookies spread too much and lose their shape?
A: This is usually due to butter that was too soft or warm, or insufficient chilling time before baking. Ensure your butter is softened but still cool enough to hold its shape, and do not skip the 10-15 minute chilling step in the refrigerator. Overmixing the dough can also contribute to spreading.
Q: Can I make the dough ahead of time?
A: Yes! You can prepare the dough and keep it in the refrigerator, tightly wrapped, for up to 2-3 days. When ready to bake, let it sit at room temperature for 15-20 minutes to soften slightly before piping, as it will be quite firm when cold.
Q: How long do Danish butter cookies stay fresh?
A: When stored in an airtight container at room temperature, these cookies will remain fresh and delightfully crisp for up to two weeks. Avoid refrigerating them, as this can affect their texture.
Q: Can I freeze baked Danish butter cookies?
A: Yes, baked cookies can be frozen. Once completely cooled, arrange them in a single layer in an airtight freezer-safe container, separated by parchment paper. They can be frozen for up to 2-3 months. Thaw at room temperature before serving.
Q: My cookies are not as crunchy as I expected. What went wrong?
A: Several factors can affect crispness. Ensure you’re using cake flour and cornflour as specified, as they contribute to tenderness and crispness. Avoid overmixing the dough. Also, make sure your oven temperature is accurate and that the cookies are baked until golden brown at the edges; underbaking can result in a softer cookie. Finally, allowing them to cool completely on a wire rack is crucial for them to crisp up.
Indulge in the Best Danish Butter Cookies!
Embarking on the journey to bake your own Danish butter cookies is a rewarding experience that brings a taste of tradition and pure delight into your home. This recipe, inspired by the mastery of Little Duck’s Kitchen, promises a batch of cookies that are truly superior in every aspect – from their irresistible crunch to their profound buttery flavor. They are the perfect accompaniment to your morning coffee, an elegant addition to any tea party, or a thoughtful homemade gift that speaks volumes. So, gather your ingredients, follow these steps with care, and prepare to be enchanted by the magic of these classic treats. Happy baking, and enjoy every blissful bite!