
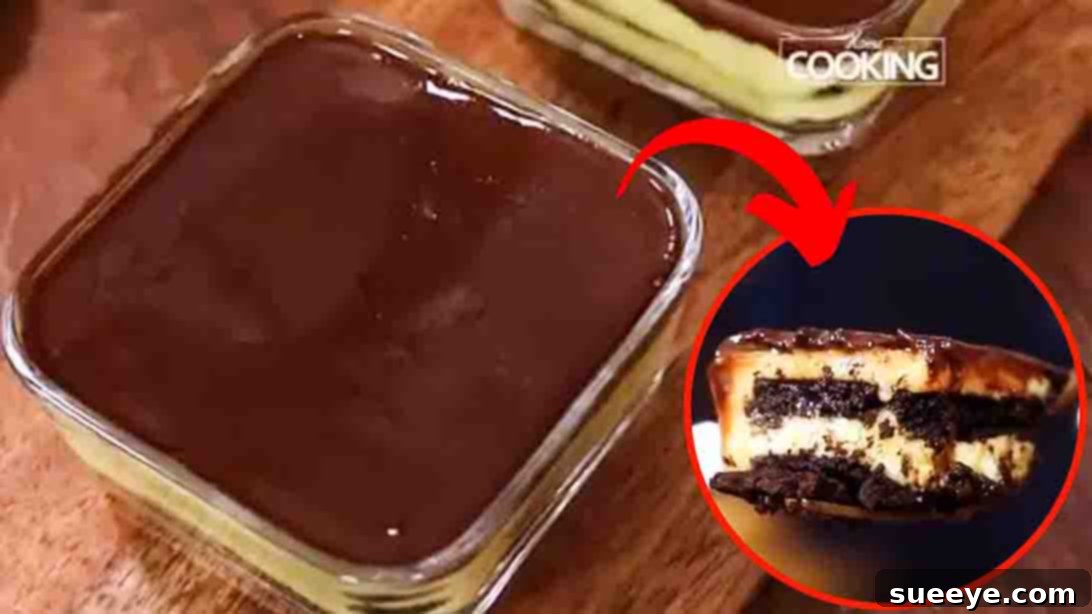
Irresistible Chocolate Custard Biscuit Pudding: Your Ultimate No-Bake Delight
The sublime pairing of rich chocolate and velvety custard creates a dessert experience that is simply impossible to resist. Imagine a treat that melts in your mouth, delights your senses, and leaves everyone craving more. This incredible Custard Biscuit Pudding, inspired by the fantastic recipe from HomeCookingShow on YouTube, is precisely that! It’s not just a dessert; it’s a showstopper that promises ease of preparation and unforgettable flavor. Perfect for those bustling family gatherings, impromptu celebrations, or simply a delightful indulgence on a quiet evening, this no-bake wonder allows you to prepare ahead of time, ensuring you spend more moments enjoying your company rather than being confined to the kitchen. Get ready to impress your loved ones with this mouthwatering creation that truly defines simple elegance. Watch the full step-by-step video for visual guidance and master this delightful recipe!
Why This Chocolate Custard Biscuit Pudding Is a Must-Try
There are countless reasons why this Custard Biscuit Pudding is destined to become a staple in your dessert repertoire. Its simplicity is truly a game-changer; being a no-bake recipe means you avoid the hassle of ovens and complex baking techniques. This makes it an ideal choice for beginner cooks or anyone looking for a stress-free dessert solution. Furthermore, the ability to prepare it in advance is a tremendous advantage, especially when planning for parties, potlucks, or busy holidays. Whip it up the night before, let it chill, and serve it perfectly set and ready to enjoy, freeing up your time on the day of your event.
Beyond its convenience, the pudding offers a sensory delight. The combination of crisp dark chocolate biscuits softening into layers of creamy, sweet custard, all crowned with a decadent chocolate glaze, creates a symphony of textures and flavors. Each bite delivers a comforting blend of rich cocoa and smooth, vanilla-infused sweetness. It’s a dessert that appeals to all ages, bringing smiles with every spoonful. Say goodbye to complicated desserts and hello to your new favorite make-ahead marvel – a treat that looks impressive but is incredibly simple to create!
Essential Ingredients for Your Luscious Custard Biscuit Pudding
Crafting this delightful pudding requires a few common ingredients that, when combined, create something truly extraordinary. Opting for fresh, good-quality components will always enhance the final taste and texture of your dessert.
- 5 cups of milk, divided: This forms the foundational base for our rich, creamy custard. Using full-fat milk is recommended as it yields a more luxurious and decadent custard, though you can use lower-fat options if preferred.
- 3 tbsp custard powder: This key ingredient helps achieve that classic custard consistency and distinct flavor with minimal fuss. It acts as a thickening agent and ensures a consistently smooth, lump-free custard without the need for tempering eggs.
- 1 tbsp all-purpose flour: A small addition of all-purpose flour works in conjunction with the custard powder to stabilize the custard, contributing to its velvety texture and helping it set beautifully.
- 1 cup sugar: Sweetens the custard to perfection. The specified amount strikes a balance, but you have the flexibility to adjust it slightly according to your personal preference for sweetness. Keep in mind the chocolate biscuits and glaze also contribute sweetness.
- 1 tsp vanilla essence: A splash of vanilla essence is crucial. It elevates the overall flavor profile of the custard, adding a warm, aromatic depth that beautifully complements the chocolate elements in the pudding.
- 2 tbsp butter: Incorporating butter into the finished custard is a game-changer. It melts seamlessly into the warm custard, lending it an incredibly smooth, almost silky texture and a beautiful, glossy finish that makes it even more appealing.
- Dark chocolate biscuits: These form the structural layers of our pudding. Their deep, slightly bitter chocolate flavor provides an excellent contrast to the sweet custard. As they absorb the custard’s moisture during chilling, they transform into a soft, cake-like layer. Popular choices include digestive biscuits, rich tea biscuits, or any other chocolate cookie you prefer, ensuring they are not too thin.
For the Decadent Chocolate Glaze:
The glaze is the crowning glory of this pudding, adding an extra layer of chocolatey goodness and a polished, professional finish.
- 1 cup dark chocolate chips, melted: Choose good quality dark chocolate chips for an intense, rich chocolate flavor that isn’t overly sweet. The better the chocolate, the better the glaze.
- 2 tbsp butter: When mixed with the melted chocolate, butter helps create a wonderfully smooth, glossy, and pourable glaze. It also ensures the glaze sets to a soft, sliceable consistency rather than becoming brittle.
Step-by-Step Directions to Your Perfect Pudding
Step 1: Crafting the Velvety Smooth Custard Base
The foundation of this exquisite pudding is its rich, smooth, and creamy custard. Achieving the perfect consistency is simpler than you might think, provided you pay a little attention to detail. Begin by taking a medium-sized mixing bowl. Into this bowl, pour 1/2 cup of milk, which is part of your total milk quantity. Next, add 3 tablespoons of custard powder and 1 tablespoon of all-purpose flour. Using a whisk, thoroughly combine these ingredients until you achieve a perfectly smooth, lump-free paste. This initial mixing is a critical step; it ensures that both the custard powder and flour are fully dissolved and hydrated before they encounter heat, thus preventing any undesirable clumps from forming in your final custard. Once the paste is uniform and smooth, set it aside.
Now, take a sturdy saucepan and place it over medium-low heat on your stovetop. Pour in the remaining 4 1/2 cups of milk. As the milk begins to warm, gradually add your prepared custard paste to the saucepan. It is absolutely essential to start whisking immediately and continuously as you incorporate the paste. This constant motion is your best defense against lumps and ensures a uniformly smooth custard from the outset. Once the custard paste is fully integrated into the warming milk, add 1 cup of sugar and 1 teaspoon of vanilla essence to the saucepan. Continue whisking diligently, making sure that all the sugar dissolves completely into the milk mixture. You’ll notice the delightful aroma of vanilla beginning to waft through your kitchen, signaling the deliciousness to come.
Once the sugar has completely dissolved, increase the heat to medium-high. At this juncture, it becomes even more crucial to continue whisking the custard constantly and vigorously. This sustained whisking not only prevents the custard from sticking to the bottom of the pan and burning but also promotes even thickening without lumps. You will observe the custard gradually transforming, becoming thicker, richer, and more luxurious. This process typically takes approximately ten minutes, but always prioritize the desired consistency over strict timing; the custard should be thick enough to generously coat the back of a spoon. As soon as your custard reaches this ideal, creamy thickness, promptly remove it from the heat. Finally, stir in 2 tablespoons of butter. The butter will melt effortlessly into the warm custard, imparting an incredibly smooth texture and a beautiful, inviting glossy sheen. Whisk for another couple of minutes to ensure the butter is fully incorporated and the custard is uniformly silky. Your luscious custard base is now perfectly prepared and ready for the next exciting step: assembly!
Step 2: Layering and Chilling Your Delectable Pudding to Perfection
With your perfectly prepared custard cooling slightly, it’s time for the exciting and artistic part: assembling your magnificent pudding! Select a rectangular or square serving container, dish, or pan that will beautifully showcase your layered creation. Start by carefully arranging two layers of dark chocolate biscuits across the bottom of your chosen container. Ensure they fit snugly, covering the entire base as much as possible. If necessary, you can gently break some biscuits to fill any awkward gaps, creating a solid and even foundation. These biscuits are crucial; they will absorb the creamy custard, transforming into a moist, cake-like texture once thoroughly chilled.
Once your biscuit base is securely set, spoon a generous amount of the warm (but not piping hot) custard mixture over the biscuits. Use a spatula or the back of a spoon to spread the custard evenly, making sure every biscuit is thoroughly coated. This initial layer of custard is vital for the biscuits to begin softening and for the flavors to meld together seamlessly. Next, add another uniform layer of dark chocolate biscuits directly on top of the custard. Follow this with another delightful layer of custard mixture, again spreading it out smoothly and evenly to cover all the biscuits. You can repeat these biscuit and custard layers as desired, depending on the depth of your container and the number of servings you wish to create. For a classic pudding, two layers of biscuits and custard usually suffice, but feel free to add more for a taller, more dramatic presentation.
To finish your masterpiece, prepare the glorious chocolate glaze that will crown your pudding. In a separate heatproof bowl, combine 1 cup of melted dark chocolate chips with 2 tablespoons of butter. Stir this mixture gently until it is perfectly smooth, glossy, and uniform in consistency. This simple yet effective glaze adds an irresistible final touch, providing an extra burst of rich chocolate flavor and a stunning visual appeal. Carefully pour this luscious glaze over the very top layer of your custard and biscuits, spreading it gently with a spatula to create a beautiful, even coating. The slight warmth of the glaze will help it settle beautifully onto the custard, ensuring a cohesive and appealing finish.
Finally, and perhaps the most crucial step for achieving the perfect texture and flavor development, is the chilling process. Place your fully assembled pudding into the refrigerator. Allow it to set for a minimum of five hours, or ideally, leave it overnight. This extended chilling time is absolutely essential for several reasons: it allows the biscuits to soften completely, absorbing moisture from the custard; it enables the custard to firm up to its ideal, sliceable consistency; and most importantly, it gives all the wonderful flavors ample time to fully develop, meld, and marry together. Patience is key here – resisting the urge to dig in too soon will be richly rewarded with a truly spectacular, perfectly set dessert. Once thoroughly chilled and firm, your Chocolate Custard Biscuit Pudding is ready to be sliced and served, promising a slice of heaven with every single bite.
Tips for a Flawless Chocolate Custard Biscuit Pudding Every Time
To ensure your Custard Biscuit Pudding turns out perfectly, keep these expert tips in mind:
- Lump-Free Custard is Key: The golden rule for smooth custard is to always mix the custard powder and flour with a small amount of cold milk first to create a smooth, thick paste. Add this paste gradually to the warming milk while whisking continuously. Maintain constant whisking while cooking the custard to prevent lumps from forming at the bottom of the pan.
- Patience with Thickening: Do not rush the custard cooking process. Cook it over medium heat, whisking until it thickens properly. It should be thick enough to generously coat the back of a spoon and hold its shape slightly when dropped.
- Biscuit Choice Matters: While dark chocolate biscuits are highly recommended for their complementary flavor, feel free to experiment with other plain or chocolate-flavored biscuits. Ensure they are not excessively thin, as they need enough structure to soften without disintegrating completely.
- Even Spreading: For uniform softening of biscuits and a beautiful presentation, ensure each layer of custard is spread evenly and thoroughly over the biscuits. This guarantees that every part of the biscuit layer comes into contact with the moisture.
- Chill Time is Non-Negotiable: The minimum 5 hours of chilling, or ideally overnight, is absolutely crucial. This extended period allows the biscuits to fully soften and absorb moisture, and the custard to firm up to its ideal, creamy consistency. Rushing this step will result in a less satisfying pudding.
- Quality Chocolate for Glaze: Invest in good quality dark chocolate chips for the glaze. This will result in a richer, more luxurious, and flavorful topping that truly enhances the overall dessert.
- Serving Temperature: This pudding is best served chilled directly from the refrigerator. Its cool, creamy texture is most refreshing and enjoyable when thoroughly cold.
Delicious Variations to Personalize Your Pudding
While the classic Chocolate Custard Biscuit Pudding is divine on its own, don’t hesitate to get creative and personalize it to suit your taste or occasion!
- Different Biscuit Flavors: Experiment beyond dark chocolate! Try plain digestive biscuits for a subtle base, graham crackers for a slight crunch, or even vanilla wafers for a lighter flavor profile. Coffee-flavored biscuits would add a sophisticated, tiramisu-like twist.
- Fruity Layers: Introduce a burst of freshness and color by adding a thin layer of sliced fresh bananas, strawberries, or raspberries between the custard and biscuit layers. Ensure fruits are thinly sliced to integrate well.
- Nutty Crunch: For an added textural contrast and rich flavor, sprinkle chopped toasted nuts like almonds, walnuts, or pecans between layers or on top of the chocolate glaze.
- Coffee Infusion: For coffee lovers, dissolve a teaspoon of instant coffee powder in a small amount of warm milk and brush it lightly over the biscuits before adding custard. This will infuse your pudding with a delightful mocha essence.
- Coconut Delight: Sprinkle shredded coconut flakes (toasted or untoasted) between layers or use them as a decorative topping for a subtle tropical flavor and texture.
- Citrus Zest: Add a teaspoon of finely grated orange zest or lemon zest to the custard while it’s cooking for a refreshing citrus note that cuts through the richness. You can also grate some over the chocolate glaze.
- White Chocolate Glaze: For a different look and taste, substitute dark chocolate chips with white chocolate chips for the glaze. You can even drizzle both dark and white chocolate for an elegant marble effect.
- Caramel Swirl: Drizzle a layer of caramel sauce over the custard before adding the next biscuit layer for an extra layer of sweetness and complexity.
Storing Your Chocolate Custard Biscuit Pudding
One of the many appealing features of this pudding is its make-ahead convenience and excellent storage capabilities. Whether you’ve prepared it in advance for a special event or have a few delicious slices leftover, proper storage is simple and ensures its freshness and quality:
- Refrigeration: Always store the pudding in an airtight container in the refrigerator. This is crucial not only to keep it fresh but also to prevent it from absorbing any unwanted odors from other foods in your fridge.
- Shelf Life: When stored correctly in an airtight container, this pudding will remain fresh and absolutely delicious for 3 to 4 days in the refrigerator. You might even find that the biscuits continue to soften slightly over time, which many enthusiasts find even more appealing, enhancing the cake-like texture.
- Freezing: It is generally not recommended to freeze this pudding. The delicate balance of textures in the custard and biscuits can be compromised during the freezing and thawing process. Custard can become watery or grainy, and the biscuits might turn too mushy or crumbly. For the best experience, it’s always best enjoyed fresh from the refrigerator within its recommended shelf life.
Frequently Asked Questions (FAQs) About Custard Biscuit Pudding
- Can I use homemade custard instead of custard powder?
- Absolutely! If you prefer to make custard from scratch using eggs and milk, feel free to substitute. Just ensure your homemade custard reaches a thick, creamy consistency similar to the one achieved with custard powder before you proceed with the layering steps. The goal is a custard that sets well.
- What if I don’t have dark chocolate biscuits?
- No problem at all! You can easily substitute dark chocolate biscuits with plain digestive biscuits, shortbread, or even graham crackers. For a touch of chocolate flavor, you could briefly dip plain biscuits in milk infused with a little cocoa powder before layering, or simply enjoy the delightful contrast of plain biscuits with the rich chocolate glaze.
- How do I prevent lumps in the custard?
- The most effective way to prevent lumps is to create a smooth paste with cold milk, custard powder, and flour first. Then, add this paste gradually to the warming milk while whisking continuously. Maintain constant, vigorous whisking as the custard heats and thickens on the stove.
- Can I make this pudding vegan?
- Yes, with a few thoughtful substitutions, you can definitely make a delicious vegan version! Use plant-based milk (such as almond, soy, or oat milk), ensure your custard powder is vegan (check ingredients carefully), use vegan butter, and verify that your dark chocolate biscuits and chocolate chips are dairy-free. The core principle of the recipe remains the same.
- My custard isn’t thickening. What should I do?
- First, ensure you’re cooking it over at least medium heat and whisking consistently. Sometimes, very old custard powder might lose some of its thickening potency. If it’s still not thickening after 10-15 minutes of simmering and whisking, you can mix a small amount of cornstarch (about 1 teaspoon) with a tablespoon of cold milk to create a slurry, then add it to the simmering custard while whisking vigorously. It should thicken more quickly after this addition.
- Can I reduce the sugar content?
- Yes, you can certainly adjust the sweetness to your preference. If you prefer a less sweet dessert, you can slightly reduce the sugar in the custard (perhaps by 1/4 cup initially) and taste as you go. Keep in mind that the dark chocolate biscuits and the chocolate glaze will also contribute to the overall sweetness.
There you have it – a truly magnificent Chocolate Custard Biscuit Pudding recipe that promises to be a hit at any gathering or a delightful treat for yourself. Its ease of preparation, combined with its rich, comforting flavors and elegant presentation, makes it an unparalleled choice for anyone seeking a standout dessert. Dive into the world of no-bake wonders and savor every luscious spoonful of this irresistible creation. Happy dessert making!