
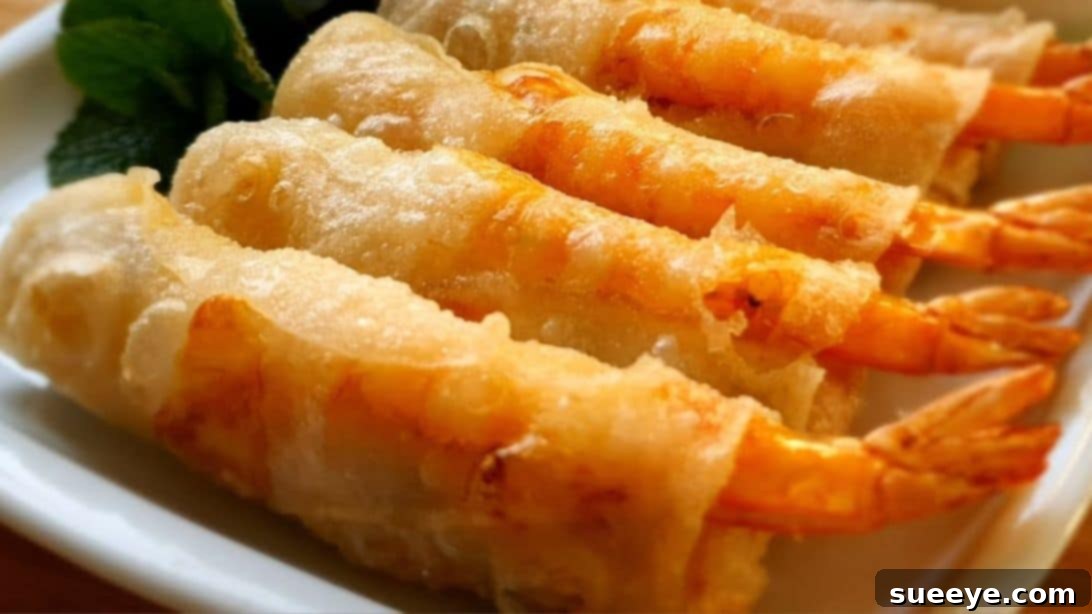
Crispy Fried Shrimp Spring Rolls: Your Guide to an Irresistible Homemade Delicacy
There’s nothing quite like the delightful crunch of a perfectly fried spring roll, especially when it’s packed with a succulent, savory filling. This incredible recipe for fried shrimp spring rolls, inspired by the culinary experts at 365 Recipe Cooking, promises an unbelievably delicious experience. Each bite delivers a symphony of textures and flavors, thanks to the harmonious blend of finely chopped shrimp, tender mushrooms, crisp carrots, aromatic onions, and delicate vermicelli noodles, all encased in a super crispy rice paper wrapper.
Whether you’re looking for an impressive appetizer to wow your guests, a satisfying snack, or a delightful addition to your dinner spread, these homemade fried shrimp spring rolls are sure to become a staple in your kitchen. Forget about bland, store-bought versions; this recipe guides you through every step to achieve restaurant-quality results right in your own home. Get ready to elevate your culinary skills and savor the irresistible taste of these golden-brown, flavorful parcels!
Essential Ingredients for Your Crispy Shrimp Spring Rolls
Crafting the perfect spring roll begins with selecting fresh, high-quality ingredients. This recipe balances savory, sweet, and umami notes to create a truly unforgettable filling. Pay attention to the details in preparation for each component to ensure maximum flavor and texture.
- 25 sheets of Rice Paper (8.7 inches in diameter): Opt for good quality rice paper that becomes pliable when wet but doesn’t tear easily. The 8.7-inch size is ideal for rolls that are neither too small nor too large.
- 1.1 lb (approximately 500g) of Deveined Prawns: Fresh prawns are key to a flavorful filling. Ensure they are deveined for best taste and texture. We’ll be using a portion of these for chopping and another for adding whole into the rolls.
- 0.9 oz (approximately 25g) of Dried Mushrooms: Wood ear mushrooms or dried shiitake mushrooms are excellent choices. They add a wonderful earthy flavor and chewy texture to the filling. Remember to rehydrate them fully.
- 1.7 oz (approximately 50g) of Mung Bean Vermicelli: These thin, clear noodles absorb flavors beautifully and add a delicate texture to the filling. They are a staple in many Asian spring roll recipes.
- 1.7 oz (approximately 50g) of Onion (finely diced): Finely diced onion provides a foundational aromatic base, adding sweetness and depth once cooked.
- 3.5 oz (approximately 100g) of Carrot (finely diced): Carrots add a touch of sweetness, vibrant color, and a subtle crunch to the filling. Fine dicing ensures even distribution and quick cooking.
- Scallions (sliced): Fresh scallions (green onions) contribute a mild, oniony flavor and a pop of green, enhancing both taste and appearance.
- 2 cloves of Garlic (chopped): Garlic is essential for an aromatic and savory base, infusing the filling with its distinct flavor.
- 1 teaspoon of Soy Sauce: A touch of soy sauce provides a salty, umami kick, deepening the overall flavor profile of the filling.
- 1 teaspoon of Chicken Broth Powder (divided): This secret ingredient amplifies the savory notes. We’ll use it in both the marinade and the main filling.
- 1 teaspoon of Sugar: Balances the savory elements and enhances the natural sweetness of the shrimp and vegetables.
- 1 teaspoon of Oyster Sauce: A rich, savory sauce that adds a complex umami flavor and a beautiful sheen to the filling.
- Chives (optional, for garnish or subtle flavor): Fresh chives can add a delicate oniony note and a touch of freshness.
- Coriander Leaves (optional, for garnish or subtle flavor): Fresh coriander (cilantro) offers a vibrant, aromatic counterpoint to the rich filling, perfect for garnish.
- 1 large Egg: Acts as a crucial binder, holding the filling ingredients together and ensuring your spring rolls maintain their shape during frying.
Kitchen Essentials:
To make the preparation process smooth and enjoyable, ensure you have the following kitchen tools readily available:
- Large mixing bowls for soaking and combining ingredients.
- A sharp chef’s knife and a sturdy cutting board for precise dicing and chopping.
- A deep pot or wok for deep-frying.
- A kitchen thermometer to accurately monitor oil temperature.
- Tongs or a slotted spoon for handling the spring rolls during frying.
- A wire rack set over paper towels for draining excess oil from the fried rolls.
Step-by-Step Instructions for Perfect Fried Shrimp Spring Rolls
Follow these detailed steps carefully to create beautifully crispy and flavorful shrimp spring rolls that will impress everyone.
Step 1: Prepare the Dried Ingredients
Begin by rehydrating your dried ingredients. Place the mung bean vermicelli in a medium-sized bowl and cover it completely with warm water. Allow it to soak for about 15 minutes, or until the noodles are soft and pliable. In a separate bowl, do the same with the dried mushrooms, ensuring they are fully submerged. Soaking is crucial for both to soften them, making them easier to chop and allowing them to absorb flavors effectively in the filling.
Step 2: Clean and Prepare the Shrimp
Thoroughly wash the 1.1 lb of prawns in a bowl of cold water mixed with 1 teaspoon of salt. This helps to clean the shrimp and remove any impurities. Once cleaned, pat them dry. Now, separate the shrimp: for approximately 0.65 lb (about 300g) of shrimp, carefully remove both the tail and the shell. These will be finely chopped for the main filling. For the remaining shrimp, remove only the shell, keeping the tail intact. These tail-on shrimp will be added whole into the spring rolls for an impressive presentation and added texture.
Step 3: Marinate and Chop the Shrimp
Divide the prepared shrimp onto two separate plates. Take the shrimp with tails still attached; sprinkle them with 1/2 teaspoon of chicken broth powder and mix gently to coat evenly. Set these aside to marinate while you prepare the other ingredients. This simple marinade adds a foundational layer of savory flavor to the whole shrimp. For the shrimp that had their tails and shells completely removed, finely chop them. A fine mince is preferred, as it ensures the shrimp integrates seamlessly into the spring roll filling, distributing its delicious flavor throughout.
Step 4: Combine the Spring Roll Filling
In a large mixing bowl, bring together all the dry filling ingredients. Add the finely chopped shrimp, the finely diced carrot, the finely diced onion, the sliced scallions, and the chopped garlic. Next, drain the rehydrated mushrooms thoroughly and finely chop them before adding them to the bowl. Finally, drain the softened mung bean vermicelli, snip them into shorter, manageable lengths (about 2-3 inches) with kitchen shears, and add them to the mixture. This combination creates a vibrant and aromatic base for your spring rolls.
Step 5: Prepare the Flavorful Sauce
In a small separate bowl, whisk together the components for your seasoning sauce. Combine the remaining 1/2 teaspoon of chicken broth powder, 1 teaspoon of sugar, 1 teaspoon of soy sauce, and 1 teaspoon of oyster sauce. Mix well until the sugar and broth powder are fully dissolved. This sauce is designed to deliver a balanced profile of savory, sweet, and umami, which is crucial for the overall taste of your spring rolls.
Step 6: Mix the Filling and Egg
Pour the prepared sauce directly over the shrimp and vegetable mixture in the large bowl. Crack one large egg into the bowl as well. Using your hands (wearing food-safe gloves is recommended) or a sturdy spoon, mix all the ingredients thoroughly until everything is well combined and the egg acts as a binder, evenly coating all the components. Ensure the filling is homogenous, so every spring roll gets a burst of all the delicious flavors.
Step 7: Master the Art of Rolling Spring Rolls
This step requires a bit of practice but is incredibly satisfying once mastered. Prepare your workspace by having a bowl of warm (not hot) water nearby and a clean, slightly damp surface (like a clean cutting board or a kitchen towel) to prevent the rice paper from sticking. Quickly pass one sheet of rice paper through the warm water, just enough to moisten it and make it pliable – typically only 5-10 seconds. Avoid over-soaking, as it will become too fragile. Lay the softened rice paper flat on your work surface.
Scoop about a tablespoon (or slightly more, depending on your desired roll size) of the filling mixture and place it horizontally near the bottom edge of the rice paper, leaving a small border. Begin to roll the bottom edge up tightly over the filling. Once you’ve made one full turn, fold in the left and right sides of the rice paper towards the center, creating an envelope shape. Now, place one of the marinated, whole tail-on shrimp on top of the folded sides, ensuring its tail points outwards from where you’re rolling. Continue rolling the spring roll upwards, keeping it as tight as possible without tearing the rice paper. Repeat this process for all the remaining rice paper sheets and filling, ensuring uniform size and tightness for even cooking. Place finished rolls on a separate tray, making sure they don’t touch each other to prevent sticking.
Step 8: Deep Fry to Golden Perfection
Heat a sufficient amount of oil in a deep pot or wok over medium-high heat. The oil should be deep enough to fully submerge the spring rolls. Use a kitchen thermometer to ensure the oil reaches an optimal temperature of 356°F (180°C). Maintaining the correct oil temperature is crucial for achieving crispy spring rolls without them becoming greasy or burning. Carefully lower a few spring rolls into the hot oil, ensuring not to overcrowd the pot, which can lower the oil temperature and result in soggy rolls. Fry in batches, turning occasionally, for about 5 to 10 minutes, or until the spring rolls are beautifully golden brown and crispy on all sides. Once cooked, remove them from the oil using tongs or a slotted spoon and place them on a wire rack lined with paper towels to drain any excess oil. This step helps maintain their crispiness.
Fried Shrimp Spring Rolls Recipe: Serving Suggestions
Once your crispy fried shrimp spring rolls are golden and irresistible, it’s time to serve them! These delectable rolls are fantastic on their own, but pairing them with the right dipping sauce can elevate the experience even further. Classic choices include a sweet chili sauce, a traditional Vietnamese nuoc cham (fish sauce dipping sauce), or a simple soy-ginger dipping sauce. For an added touch of freshness, serve them alongside a crisp lettuce salad, fresh mint, and coriander leaves, allowing guests to create their own lettuce wraps. They make a perfect appetizer for any gathering, a delightful party snack, or even a light meal when accompanied by a refreshing side salad.
Storage and Reheating Tips
While these spring rolls are best enjoyed fresh out of the fryer, you can certainly prepare them in advance or store leftovers. Uncooked spring rolls can be covered and refrigerated for up to 24 hours. For longer storage, freeze them raw on a baking sheet until solid, then transfer them to an airtight container or freezer bag for up to 2-3 months. Fry them directly from frozen, adding a few extra minutes to the cooking time.
Cooked spring rolls can be stored in an airtight container in the refrigerator for 2-3 days. To reheat and restore their crispiness, avoid the microwave. Instead, bake them in a preheated oven at 350°F (175°C) for 10-15 minutes, or use an air fryer at 325°F (160°C) for 5-8 minutes, until heated through and crispy.
Tips for Spring Roll Success
- Don’t Over-soak Rice Paper: A quick dip is all it takes. Over-soaked rice paper becomes gummy and difficult to handle.
- Don’t Overfill: Too much filling will make rolling difficult and can cause the rolls to burst during frying.
- Keep Rolls Tight: A tightly rolled spring roll maintains its shape and prevents the filling from escaping.
- Maintain Oil Temperature: Use a thermometer! Too-low oil temperature results in greasy rolls, while too-high temperature burns the exterior before the inside is cooked.
- Fry in Batches: Overcrowding the fryer lowers the oil temperature and leads to uneven cooking.
- Prep Ahead: Have all your ingredients chopped and measured before you start mixing and rolling. This makes the process much smoother.
Variations to Explore
While the shrimp filling is undeniably delicious, feel free to experiment with other ingredients to customize your spring rolls:
- Protein Swaps: Replace shrimp with finely ground pork, minced chicken, or even crumbled firm tofu for a vegetarian option.
- Vegetable Additions: Add finely shredded cabbage, bean sprouts, or water chestnuts for extra crunch and texture.
- Spice It Up: Incorporate a pinch of red pepper flakes or a dash of sriracha into the filling for a spicy kick.
- Herbaceous Twist: Fresh mint or perilla leaves can be added to the filling for a more aromatic profile.
Unleash Your Inner Chef with Homemade Spring Rolls!
There you have it – a comprehensive guide to creating the most tantalizing crispy fried shrimp spring rolls right in your own kitchen. This recipe, inspired by the culinary insights of 365 Recipe Cooking, provides all the details you need to achieve golden, crunchy, and utterly delicious results every time. The blend of fresh shrimp, vibrant vegetables, and aromatic seasonings, all wrapped in a delicate, crispy shell, makes these rolls an absolute crowd-pleaser.
So, gather your ingredients, follow these instructions, and get ready to impress your family and friends with an appetizer that truly shines. The satisfaction of biting into a homemade spring roll that’s perfectly crispy on the outside and bursting with savory flavor on the inside is unparalleled. Don’t hesitate to try this recipe; it’s a culinary adventure that promises delightful rewards!