
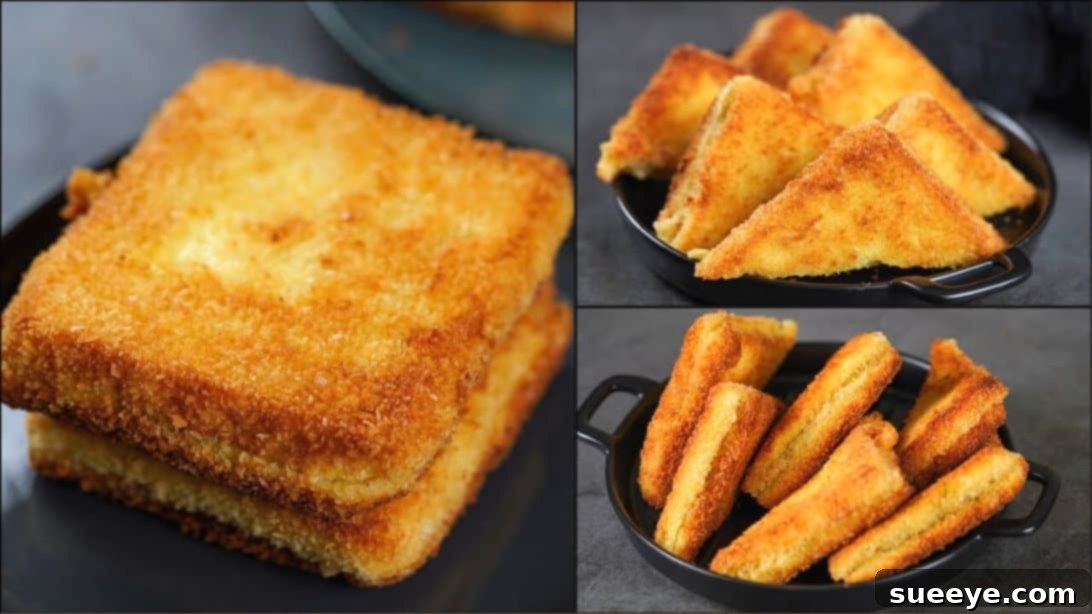
There’s nothing quite like a delicious, homemade snack to kickstart your day or provide the perfect pick-me-up. If you’re searching for an incredibly simple yet supremely satisfying recipe, look no further than this quick and crunchy bread potato snack. It’s a delightful creation by the talented chefs at N’Oven – Cake & Cookies, perfect for transforming humble ingredients into something truly special. Imagine a crispy exterior giving way to a soft, flavorful potato filling – a culinary experience that’s surprisingly easy to achieve.
This recipe is a game-changer, especially for those busy mornings or relaxed weekend brunches. Got some leftover mashed potatoes from dinner? Excellent! This snack is the ideal way to repurpose them into a fresh and exciting dish, minimizing waste and maximizing flavor. Simple, easy-to-follow recipes like this are invaluable additions to any home cook’s repertoire, providing comfort and joy without demanding hours in the kitchen. Whether you’re a seasoned chef or a kitchen novice, you’ll find this potato bread snack both approachable and incredibly rewarding. Get ready to impress your family and friends with this irresistible treat!
Why You’ll Love These Crispy Potato Snacks
These crunchy bread potato snacks are more than just a recipe; they’re a revelation for anyone seeking convenience, flavor, and versatility. Here’s why they’re destined to become a staple in your home:
- Effortlessly Quick: From prep to plate, this recipe comes together surprisingly fast, making it ideal for those moments when hunger strikes without warning.
- Perfect for Leftovers: A brilliant solution for utilizing leftover mashed potatoes, transforming them into a completely new and exciting dish. Say goodbye to food waste!
- Irresistibly Crunchy: The breadcrumb coating ensures a golden-brown, satisfyingly crispy exterior that contrasts beautifully with the tender potato filling.
- Family-Friendly: A crowd-pleaser for all ages! Kids and adults alike will adore these savory delights, making them perfect for breakfast, brunch, or an afternoon snack.
- Customizable: While delicious as is, this recipe serves as a fantastic base for customization. Add your favorite spices, herbs, or even cheese to tailor it to your taste.
- Budget-Friendly: Made with readily available and inexpensive ingredients, this snack is kind to your wallet without compromising on taste.
Prepare to fall in love with a snack that delivers on taste, texture, and convenience every single time.
Essential Ingredients for Your Crispy Creation
Gathering your ingredients is the first step towards culinary success. This recipe calls for a handful of simple items, most of which you likely already have in your pantry. The magic truly happens when these basic components come together to create something extraordinary.
- 3 medium-boiled potatoes: The star of the show! For best results, use starchy potatoes like Russets or Yukon Golds, as they mash up beautifully and provide a creamy base. Ensure they are fully cooked but not waterlogged.
- 1/2 teaspoon of white pepper powder: Offers a subtle heat and aromatic depth without overpowering the other flavors. If you prefer a bolder kick, black pepper can be used as an alternative.
- 1/2 teaspoon of chili flakes: Adds a pleasant warmth and visual appeal. Adjust the quantity to suit your preferred spice level. For a milder flavor, reduce or omit.
- 1/2 teaspoon of salt: Essential for seasoning the potatoes and bringing out all the flavors. Always taste and adjust to your preference.
- 2 tablespoons of green onion (chopped): Provides a fresh, pungent bite and a vibrant pop of color. Finely chop for even distribution.
- 1 teaspoon of Chat Masala: This Indian spice blend is key to the unique flavor profile, offering a tangy, savory, and slightly spicy complexity. If unavailable, a mix of cumin powder, coriander powder, and a pinch of amchur (dry mango powder) can offer a similar essence.
- Bread slices: Any standard white or whole wheat sandwich bread will work. Fresher bread is often easier to work with.
- 2 eggs: Act as a binding agent for the breadcrumb coating, ensuring a beautiful golden crispness when fried.
- Breadcrumbs: The secret to that irresistible crunch! Panko breadcrumbs are excellent for extra crispiness, but regular breadcrumbs will also yield fantastic results.
With these ingredients at the ready, you’re well on your way to crafting a truly memorable snack.
Step-by-Step Guide to Perfect Bread Potato Snacks
Follow these detailed instructions carefully to ensure your bread potato snacks turn out perfectly golden, crispy, and utterly delicious. Each step is designed to guide you through the process with ease, ensuring a successful culinary adventure.
Step 1: Prepare the Potatoes
Begin by taking your medium-boiled potatoes. Gently remove their skins; they should peel off easily if the potatoes are cooked correctly. Once peeled, slice them into manageable chunks and place them into a sturdy mixing bowl. Now, using a fork, a potato masher, or even the back of a large spoon, thoroughly mash the potatoes until they are smooth and free of any large lumps. A well-mashed potato base is crucial for an even texture in your snack.
Step 2: Season the Mashed Potatoes
To your mashed potatoes, it’s time to infuse some incredible flavor. Add 1/2 teaspoon of white pepper powder, 1/2 teaspoon of chili flakes for a gentle kick, 1/2 teaspoon of salt to enhance all the flavors, 2 tablespoons of freshly chopped green onion for freshness and a mild oniony note, and 1 teaspoon of Chat Masala for its signature tangy and savory profile. Mix all these ingredients thoroughly using a spoon or your hands, ensuring the spices and herbs are evenly distributed throughout the potato mixture. The goal is a homogenous, fragrant potato filling.
Step 3: Trim the Bread Slices
Lay out your bread slices. Using a sharp knife or kitchen shears, carefully cut off all the crusts from each slice of bread. While this step is optional, it helps create a neater, more uniform sandwich and ensures a softer texture once fried. Plus, it makes the final product more appealing, especially for picky eaters.
Step 4: Assemble the Potato Sandwiches
Take one of your crust-trimmed bread slices. Spread a generous, even layer of the seasoned potato mixture across its entire surface, ensuring it reaches almost to the edges. Then, gently place another slice of bread on top, pressing down lightly to create a compact potato sandwich. Be careful not to press too hard, as this might squeeze out the filling. Repeat this process for all your bread slices.
Step 5: Prepare the Egg Wash
In a shallow bowl, crack open two eggs. Use a fork or a small whisk to beat them thoroughly until the yolks and whites are completely combined and a uniform yellow color. This will create your egg wash, which acts as the crucial adhesive for the breadcrumbs, giving your snacks their beautiful golden crust.
Step 6: Dip in Egg Mixture
Carefully pick up one of your potato-filled bread sandwiches. Dip it into the beaten egg mixture, ensuring all sides of the sandwich are completely covered and soaked. Allow any excess egg to drip back into the bowl for a few seconds; you want a good coating, but not so much that it’s dripping excessively.
Step 7: Coat with Breadcrumbs
Pour a generous amount of breadcrumbs onto a clean, flat plate. Gently place the egg-dipped sandwich onto the breadcrumbs. Carefully turn and press the sandwich lightly into the breadcrumbs until all sides are thoroughly coated. Ensure there are no bare spots, as the breadcrumbs are what will provide that coveted crunch when fried. A thick, even coating is key.
Step 8: Repeat for Remaining Snacks
Continue this assembly line process: spread potato mixture on bread (Step 4), dip in egg (Step 6), and coat in breadcrumbs (Step 7) for all the remaining bread slices. Place the prepared potato sandwiches on a clean tray or plate, ready for frying. This repetitive step ensures consistency across all your snacks.
Step 9: Fry Until Golden and Crispy
Heat a generous amount of oil in a large frying pan or skillet over medium heat. You want enough oil to at least partially submerge the sandwiches, allowing for even frying. Test the oil by dropping a tiny breadcrumb in; if it sizzles immediately, the oil is ready. Carefully place the bread potato snacks into the hot oil, making sure not to overcrowd the pan. Fry them for about 2-3 minutes per side, or until they achieve a beautiful golden-brown color and a wonderfully crispy texture on all sides. Turn them gently with tongs to ensure even cooking.
Step 10: Drain, Slice, and Serve
Once your bread potato snacks are perfectly golden and crispy, carefully remove them from the pan using tongs or a slotted spoon. Transfer them to a plate lined with paper towels; this will help absorb any excess oil, ensuring your snacks remain delightfully crisp. Allow them to cool for just a minute or two, then, for a beautiful presentation and easier handling, slice each bread potato snack in half diagonally. Serve immediately with your favorite dipping sauce, such as ketchup, green chutney, or a spicy mayo. Enjoy every crunchy, flavorful bite!
Tips for Success and Delicious Variations
Making these bread potato snacks is straightforward, but a few expert tips can elevate your results from good to absolutely fantastic. Plus, don’t hesitate to get creative with variations!
Achieving the Perfect Crisp:
- Oil Temperature is Key: Ensure your oil is heated to the right temperature (around 350-375°F or 175-190°C) before frying. If it’s too cold, the snacks will absorb too much oil and become greasy. If it’s too hot, they’ll burn on the outside before the filling is heated through.
- Don’t Overcrowd the Pan: Fry in batches if necessary. Overcrowding lowers the oil temperature, leading to less crispy results. Give each snack enough space to fry evenly.
- Panko Breadcrumbs: For an extra-level crunch, swap regular breadcrumbs for Japanese Panko breadcrumbs. Their flakier texture results in a lighter, crispier coating.
Mashed Potato Consistency:
- Not Too Wet: Ensure your mashed potato mixture isn’t too wet. If it is, it can make the bread soggy and harder to handle. If your mashed potatoes are a bit loose, add a tablespoon of breadcrumbs or a little flour to firm them up.
- Smooth and Even: Mash the potatoes thoroughly to avoid lumps. A smooth filling spreads more easily and provides a consistent texture in every bite.
Customization Ideas:
- Add Cheese: Mix in a handful of grated cheddar, mozzarella, or a spicy pepper jack cheese into the potato filling for a melty, cheesy surprise.
- Fresh Herbs: Incorporate finely chopped fresh cilantro, parsley, or mint into the potato mixture for an aromatic boost.
- Spice it Up: For those who love heat, add a pinch of cayenne pepper, a dash of red chili powder, or finely chopped green chilies to the potato filling.
- Vegetable Boost: Finely grated carrots, peas, or corn can be mixed into the potato for added nutrition and texture.
- Garlic & Ginger: A teaspoon of finely minced garlic and ginger paste can add a wonderful depth of flavor to the potato mixture.
Serving Suggestions and Storage Tips
Serving Suggestions:
These versatile bread potato snacks are delicious on their own, but they truly shine when paired with complementary dips and accompaniments:
- Classic Ketchup: A timeless pairing that always works.
- Green Chutney: A tangy, spicy, and fresh Indian mint-coriander chutney offers an explosion of flavor.
- Spicy Mayo: Mix mayonnaise with a dash of sriracha or your favorite hot sauce for a creamy, spicy dip.
- Yogurt Dip: A cool, refreshing dip made with yogurt, grated cucumber, and a pinch of salt and pepper can balance the fried crispiness.
- As a Side: Serve alongside a light salad or a bowl of soup for a more substantial meal.
- Brunch Star: Perfect as part of a larger breakfast or brunch spread, complementing eggs and other savory dishes.
Storage and Reheating Advice:
While these snacks are best enjoyed fresh and hot, you can store and reheat them:
- Storage: Allow any leftover snacks to cool completely. Store them in an airtight container in the refrigerator for up to 2-3 days.
- Reheating: To restore their crispiness, avoid the microwave. Reheat them in a toaster oven, a conventional oven (at 350°F / 175°C) for 10-15 minutes, or in an air fryer (at 375°F / 190°C) for 5-7 minutes, until heated through and crispy again.
Final Thoughts and Inspiration
This quick and crunchy bread potato snack recipe is a testament to how simple ingredients can create extraordinary flavors and textures. It’s a delightful solution for leftovers, a weekend brunch hero, and a testament to the joy of homemade food. The combination of the fluffy potato filling, vibrant spices, and the satisfying crunch of the breadcrumb coating makes it an instant classic in any home. We encourage you to try this recipe and experience the deliciousness for yourself.
For more incredible recipes and sweet treats, be sure to visit and subscribe to N’Oven – Cake & Cookies on Youtube. They consistently share tons of yummy dishes and desserts that will surely inspire your next culinary adventure. Happy cooking, and enjoy every golden, crispy bite!