
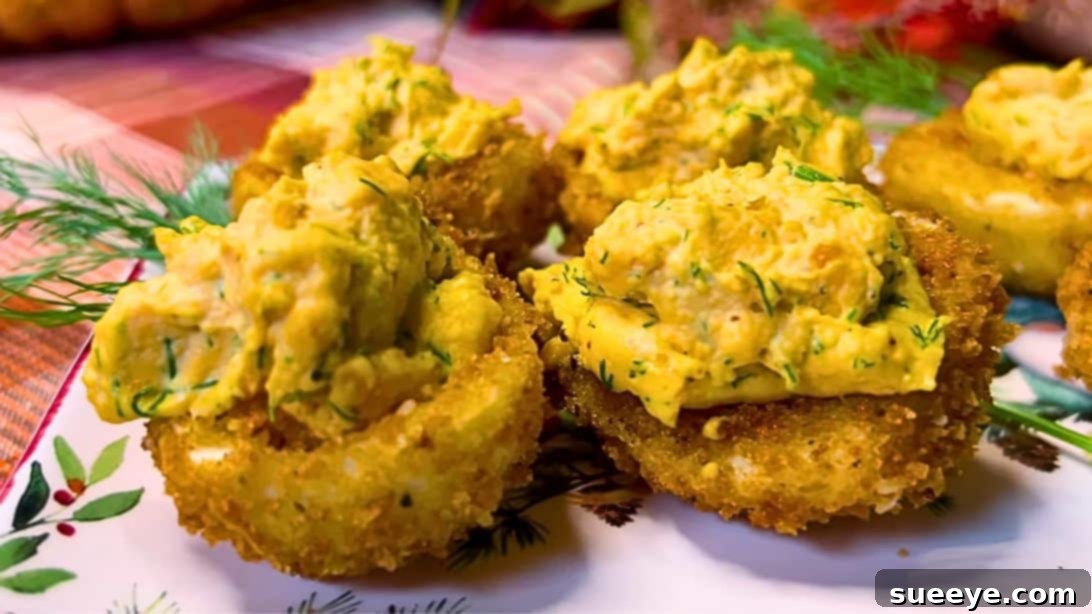
The Ultimate Crispy Fried Deviled Eggs: A Gourmet Twist on a Classic Appetizer
Deviled eggs are a timeless classic, gracing tables at holiday gatherings, family barbecues, and special occasions alike. Their simple elegance and irresistible creamy texture make them a universal crowd-pleaser. But what if we told you there’s a way to elevate this beloved appetizer to an entirely new level of deliciousness? Enter the world of Crispy Fried Deviled Eggs – a revolutionary take that introduces an unexpected, delightful crunch to every bite.
This isn’t just another deviled egg recipe; it’s a culinary experience. By lightly frying the egg white halves, we create a golden, crispy shell that perfectly contrasts with the silky-smooth, flavorful yolk filling. The result is a symphony of textures and tastes that will leave your guests intrigued and coming back for more. This recipe is designed to be straightforward, allowing you to whip up this impressive dish even at the last minute, transforming an ordinary appetizer into an extraordinary culinary highlight.
RELATED: Explore Another Twist: Easy Avocado Deviled Eggs Recipe
Why Fried Deviled Eggs Will Be Your New Favorite Appetizer
The concept of frying deviled eggs might sound unconventional, but the benefits are undeniable. Traditional deviled eggs, while delicious, primarily offer a soft, creamy mouthfeel. By introducing a delicate frying step, we unlock a whole new dimension:
- Unforgettable Texture: The crispy exterior provides a satisfying crunch that beautifully complements the rich, velvety egg yolk filling. It’s a textural interplay that sets this dish apart from any deviled egg you’ve had before.
- Enhanced Flavor Profile: Frying adds a subtle depth and nutty undertone to the egg whites, enriching the overall flavor experience. The delicate seasoning on the breading further amplifies this, creating a more complex and satisfying taste.
- Gourmet Appeal: This unique preparation method instantly elevates deviled eggs from a simple snack to a sophisticated appetizer, perfect for impressing guests at dinner parties, holiday feasts, or any special gathering.
- Conversation Starter: Prepare for compliments and curious questions! These fried deviled eggs are not only delicious but also visually appealing and a definite talking point at any event.
This recipe provides a detailed guide to creating these sensational deviled eggs, ensuring perfect results every time. We’ll walk you through each step, from preparing the perfect hard-boiled eggs to achieving that irresistible golden crunch. For a visual demonstration, don’t miss the video tutorial by DarlenesTable on YouTube, linked for your convenience.
A Brief History of Deviled Eggs: From Ancient Rome to Modern Tables
The concept of stuffing eggs dates back to ancient Rome, where recipes featured hard-boiled eggs mashed with various spices and sauces. However, the modern deviled egg as we know it began to take shape in 13th-century Andalusia, where mashed egg yolks were mixed with herbs and spices before being returned to the whites. The term “deviled” itself didn’t appear in culinary texts until the 18th century, referring to spicy or highly seasoned dishes. It wasn’t until the late 19th and early 20th centuries that deviled eggs became a staple in American cuisine, particularly popular for picnics, potlucks, and holiday gatherings.
This recipe for crispy fried deviled eggs continues this rich tradition of innovation, taking a beloved classic and infusing it with a modern, exciting twist. It’s a testament to the enduring versatility and appeal of the humble egg.
Essential Ingredients for Crispy Fried Deviled Eggs
Crafting these extraordinary deviled eggs requires a careful selection of ingredients that balance richness, tang, and crunch. Here’s what you’ll need to gather:
- 6 large hard-boiled eggs, peeled and perfectly cooked
- 3 tbsp of creamy mayonnaise
- 2 tbsp of freshly chopped dill, plus extra for a vibrant garnish
- 1 tsp of bright apple cider vinegar
- 1 tsp of whole-grain Dijon mustard for a subtle kick
- ¾ tsp of fine salt, divided for filling and breading
- ⅛ tsp of freshly ground black pepper, divided for robust flavor
- 3 dashes of your favorite hot sauce for a hint of warmth
- 1 cup of all-purpose flour for the initial dredge
- 2 large eggs, beaten for the egg wash
- 1½ cups of Panko breadcrumbs for ultimate crispiness
- ¼ cup of freshly grated Parmesan cheese, adding savory depth to the coating
- A pinch of ground cayenne pepper for a touch of heat in the breading
- Vegetable oil, or another neutral oil, sufficient for deep frying
- Paprika, for an optional pop of color and flavor as garnish
How to Make Crispy Fried Deviled Eggs: A Step-by-Step Guide
Follow these detailed instructions to create your memorable crispy fried deviled eggs:
Step 1: Preparing the Creamy Yolk Filling
Begin by carefully peeling your hard-boiled eggs. Once peeled, slice each egg lengthwise, creating two symmetrical halves. Gently scoop out the bright yellow yolks and transfer them into a medium-sized mixing bowl. To the yolks, add the mayonnaise, freshly chopped dill, apple cider vinegar, Dijon mustard, ½ teaspoon of the salt, a pinch of the ground pepper, and the hot sauce. Using a fork, thoroughly mash and mix all the ingredients until the mixture is perfectly smooth and uniformly combined. Taste and adjust seasoning if needed – a little more salt, pepper, or hot sauce can make a difference. Once satisfied, spoon the creamy yolk mixture into a piping bag fitted with your preferred tip (a star tip works wonderfully for presentation) and set it aside. This allows the flavors to meld while you prepare the egg whites.
Step 2: Setting Up Your Frying Station
Place a Dutch oven or a sturdy, heavy-bottomed pot on your stove. Pour in enough vegetable oil to reach a depth of approximately 1½ inches. Begin heating the oil over medium-high heat until it registers a temperature between 350°F (175°C) and 360°F (180°C) on a deep-fry thermometer. Maintaining this temperature is crucial for crispy, non-greasy results. While the oil heats, set up your breading station: place the all-purpose flour in one shallow bowl, beat the two remaining eggs vigorously in a second shallow bowl to create an egg wash, and pour the Panko breadcrumbs into a third shallow bowl. This organized setup will make the coating process smooth and efficient.
Step 3: Breading the Egg White Halves
Now, enhance your Panko breadcrumbs! In the bowl containing the breadcrumbs, stir in the freshly grated Parmesan cheese, the remaining ¼ teaspoon of salt, a final pinch of ground pepper, and the ground cayenne pepper. Mix well to ensure the spices and cheese are evenly distributed. Take one egg white half and gently dredge it completely in the seasoned flour, tapping off any excess flour. Next, immerse the floured egg white into the beaten egg wash, allowing any excess to drip back into the bowl. Finally, thoroughly coat the egg white in the seasoned Panko breadcrumb mixture, pressing lightly to ensure the breadcrumbs adhere well. Place the coated egg white on a clean plate and repeat this breading process for all the remaining egg white halves, creating a beautiful, uniform coating on each.
Step 4: Frying and Finishing Touches
Carefully transfer the breaded egg white halves, a few at a time, into the hot oil. Avoid overcrowding the pot, as this can lower the oil temperature and result in greasy eggs. Fry the egg whites for about 1-2 minutes, or until they turn a beautiful crispy golden brown on all sides. Using a slotted spoon or spider, carefully remove the fried egg whites from the oil and transfer them to a plate lined with paper towels to drain off any excess oil. Continue this process until all the egg whites are perfectly fried. Once the fried egg whites have cooled slightly to a comfortable handling temperature, retrieve your piping bag. Neatly pipe the prepared egg yolk mixture back into each crispy egg white cavity. Garnish generously with fresh dill and a sprinkle of paprika for an appealing finish. Serve immediately and savor every delightful bite!
Tips for Achieving the Perfect Crispy Fried Deviled Eggs
While the recipe is straightforward, a few expert tips can ensure your fried deviled eggs are nothing short of spectacular:
- Perfect Hard-Boiled Eggs: The foundation of any great deviled egg is a perfectly cooked hard-boiled egg. Avoid overcooking, which can lead to a greenish ring around the yolk. A good method is to bring eggs to a rolling boil, then remove from heat, cover, and let sit for 10-12 minutes before transferring to an ice bath to stop cooking and make peeling easier. Older eggs tend to peel more easily than very fresh ones.
- Silky Smooth Yolk Filling: For the creamiest filling, ensure the yolks are thoroughly mashed with no lumps. A potato ricer or fine-mesh sieve can be used for ultimate smoothness, or simply use a fork and mash vigorously. Taste and adjust seasonings until it’s just right – a touch more mustard or vinegar can brighten the flavor.
- The Breading Process is Key: Ensure each egg white half is fully coated at each stage (flour, egg wash, breadcrumbs). The flour provides a dry surface for the egg wash to adhere, and the egg wash helps the breadcrumbs stick. Press the breadcrumbs gently onto the egg white to create a thick, even coating. This ensures maximum crispiness.
- Mind the Oil Temperature: This is critical for success. Oil that isn’t hot enough will result in greasy, soggy egg whites, while oil that’s too hot will burn the breading before the egg white can crisp up. Use a thermometer and maintain the suggested temperature range of 350-360°F (175-180°C).
- Don’t Overcrowd the Pot: Fry in small batches to maintain the oil temperature and allow for even browning. Overcrowding cools the oil rapidly and leads to less crispy results.
- Drain Properly: Always transfer fried items to a wire rack set over paper towels, or directly onto several layers of paper towels, to absorb excess oil. This helps them stay crispy.
- Serve Fresh: While the yolk filling can be made ahead, the fried egg whites are best enjoyed shortly after frying to maintain their optimal crispness.
Delicious Variations and Customizations
This recipe is a fantastic starting point, but feel free to experiment and make it your own! Here are some ideas for variations:
- Spicy Kick: Increase the hot sauce in the yolk filling or add a pinch of smoked paprika for a deeper, spicier flavor. You could even finely chop a jalapeño or serrano pepper and mix it in.
- Smoky Bacon Twist: Crumble crispy bacon bits into the yolk mixture for a smoky, savory dimension. A sprinkle on top as a garnish is also fantastic.
- Herbaceous Delight: Experiment with different fresh herbs. Chives, parsley, or tarragon can offer distinct flavor profiles to the yolk filling or as a garnish.
- Cheesy Indulgence: Aside from Parmesan in the breading, a little cream cheese or goat cheese can be whipped into the yolk for extra creaminess and tang.
- Different Breading: While Panko offers superior crispiness, you could try crushed crackers (like Ritz) or even finely crushed cornflakes for a different texture.
- Exotic Flavors: For a unique twist, consider adding a dash of curry powder to the yolks, or a touch of sesame oil and sriracha for an Asian-inspired deviled egg.
What to Serve with Crispy Fried Deviled Eggs
These elevated deviled eggs are incredibly versatile and pair well with a variety of dishes. They shine as a standalone appetizer at any gathering, from casual backyard BBQs to elegant cocktail parties. They make a fantastic addition to holiday spreads, such as Easter brunch, Thanksgiving appetizers, or Christmas dinner. They also complement charcuterie boards, picnic baskets, or even a simple weekend lunch. Their rich flavor and satisfying texture mean they hold their own among other flavorful finger foods.
Storage and Make-Ahead Tips
While best enjoyed fresh to maximize their crispiness, certain components of these deviled eggs can be prepared in advance. You can make the yolk filling up to 24 hours ahead of time and store it in the piping bag (or an airtight container) in the refrigerator. The hard-boiled eggs can also be cooked and peeled a day or two in advance. For the fried egg whites, it’s highly recommended to bread and fry them just before serving to ensure they are at their crispiest. If you do have leftovers, store the filled deviled eggs in an airtight container in the refrigerator for up to 1-2 days. The fried exterior may soften slightly, but the flavor will still be delicious.
Easy-to-Make Crispy Fried Deviled Eggs: A Culinary Triumph
This recipe for Crispy Fried Deviled Eggs is truly a game-changer. It takes a beloved classic and transforms it into an exciting, texture-rich appetizer that is sure to become a new favorite. The combination of the smooth, tangy yolk filling and the golden, crunchy exterior creates an unforgettable culinary experience that’s both comforting and gourmet. Whether you’re hosting a grand holiday feast or simply looking to impress with a unique party snack, these deviled eggs are guaranteed to be a hit. Gather your ingredients, follow these steps, and prepare to delight your taste buds and those of your guests with this fantastic recipe. Enjoy the process, and most importantly, savor every delicious bite!
*All image credit belongs to DarlenesTable via YouTube. Follow and subscribe to her channel for more amazing recipes and cooking tutorials!