
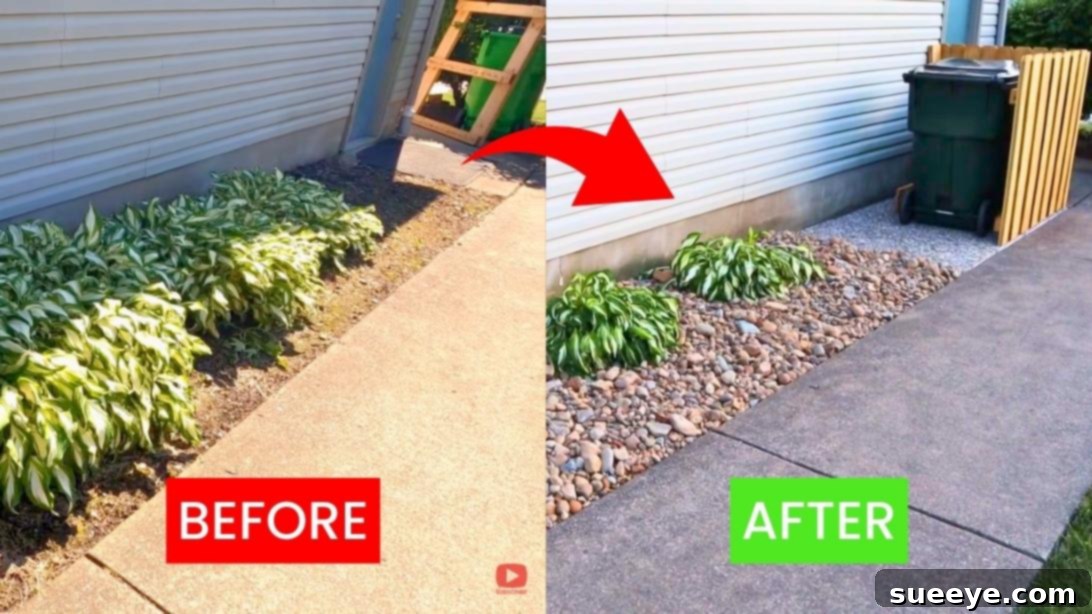
Are you dreaming of an effortless garden makeover or searching for a clever way to conceal unsightly outdoor elements like trash cans? Look no further! This comprehensive DIY rock landscaping guide offers a simple yet impactful solution to elevate your home’s exterior. Inspired by the practical and creative insights from That Tech Teacher, this project is designed for everyone, regardless of your DIY experience. It’s incredibly easy to execute and promises a beautiful, low-maintenance result that will significantly improve your space.
Rock landscaping isn’t just about aesthetics; it’s a smart choice for sustainability and functionality. By incorporating natural stones, you can reduce water usage, suppress weeds, and create durable, visually appealing features that stand the test of time. Whether you’re aiming for a serene rock garden, a decorative border, or a discreet enclosure for your bins, this tutorial covers all the essential steps to bring your vision to life. Get ready to transform your garden into a more organized, attractive, and enjoyable area!
Transform Your Outdoor Space: Easy DIY Rock Landscaping
Essential Materials for Your Rock Landscaping Project
Before you embark on your landscaping journey, gathering the right tools and materials is paramount. A well-prepared workspace ensures a smooth and efficient process. Here’s a detailed list of what you’ll need for both the general landscaping and the specialized trash can enclosure.
General Rock Landscaping Materials:
- Weed Control Solution: This can be a granular weed preventer, a liquid herbicide, or a high-quality weed barrier fabric. Its purpose is to inhibit weed growth under your rocks, ensuring your new landscape remains pristine and low-maintenance.
- Shovel: Essential for digging, moving soil, and spreading gravel. A sturdy, ergonomic shovel will make the work much easier.
- Mini Cobble (1-inch to 4-inch stones): These small to medium-sized stones are perfect for creating a visually appealing and stable ground cover. Consider various colors and textures to match your home’s aesthetic. You might also consider decorative river rocks or crushed granite depending on your desired look and budget.
- Gardening Gloves: Protect your hands from blisters, cuts, and dirt. A good pair of gloves is indispensable for any landscaping project.
- Wheelbarrow: Invaluable for transporting dirt, gravel, and other materials across your yard, saving you time and effort.
- Rake: A strong landscape rake will help level soil and spread gravel evenly.
- Measuring Tape: For accurate measurements of your area and material depth.
- Level (Optional but Recommended): To ensure proper grading and even surfaces, especially crucial for the trash can enclosure.
Additional Materials for the Trash Can Enclosure:
- Play Sand: This fine, clean sand provides a perfectly level and compactable base for your pavers, preventing shifting over time.
- Leveling Ruler (or a 2×4 piece of lumber): A straight edge is vital for scraping and leveling the play sand evenly, ensuring a stable foundation for your pavers.
- Pavers (24-inches wide or suitable size): Choose durable, weather-resistant pavers that can withstand the weight of trash cans and offer a clean, finished look. Concrete or natural stone pavers are excellent choices.
- Fence: Select a fence that is robust enough to contain your trash cans while providing adequate concealment without being excessively high, allowing for easy access and airflow. Materials can range from wood panels to vinyl or even decorative metal.
Step-by-Step Instructions: Transforming Your Outdoor Space
This section guides you through the process of creating your rock landscape, starting with site preparation and moving through the meticulous placement of materials. Follow these steps carefully to ensure a durable and beautiful outcome.
Part 1: General Rock Landscaping
Step 1: Clearing and Preparing Your Site
The foundation of any successful landscaping project begins with thorough site preparation. If your chosen area is currently overgrown with plants, the first crucial step is to carefully remove them. Dig down deep enough to extract the entire root system, not just the visible foliage. This ensures that the plants, especially weeds, do not regrow through your new rock bed. For plants you wish to keep, prepare them for temporary relocation or replanting by keeping their root balls moist. Properly dispose of any unwanted plant material, ensuring a clean slate for your project.
Step 2: Excavation, Grading, and Layout Planning
Once the area is clear, remove any remaining loose dirt. Then, excavate the soil to a depth of approximately one inch, creating a shallow basin for your rock bed. Crucially, establish a gentle slope away from your house or any permanent structures. This slight gradient, perhaps a quarter-inch drop per foot, is essential for effective water drainage, preventing puddles and moisture issues near your foundation. Before spreading any weed control or rocks, use stakes or spray paint to mark the precise locations where you intend to replant your chosen plants. Consider the mature size of each plant to ensure adequate spacing, allowing them room to grow and thrive without overcrowding.
Step 3: Implementing Weed Control Measures
Effective weed suppression is key to maintaining a low-maintenance rock landscape. If you opt against a physical weed barrier fabric, a high-quality granular or liquid weed control product is your next best choice. Carefully sprinkle or spray the chosen product evenly across the entire excavated soil surface, following the manufacturer’s instructions diligently. Many effective products can prevent weed growth for up to six months, offering a long period of peace. If using weed barrier fabric, lay it down, securing it with landscape staples, and cut X-shapes where plants will be inserted.
Step 4: Spreading the Gravel or Mini Cobble
Now comes the satisfying part: spreading your chosen gravel or mini cobble. Using your shovel and a rake, distribute the stones evenly across the prepared area. Aim for a consistent thickness of approximately three to three and a half inches. This depth is critical; it provides excellent weed suppression, ensures good drainage, and creates a visually robust and stable rock bed. Take your time to spread the rocks smoothly, using the rake to achieve a uniform appearance and to fill in any sparse spots.
Step 5: Final Touches and Hydration
With the rocks in place and plants replanted, it’s time for the finishing touches. Thoroughly water any replanted plants to help them establish in their new home. Then, gently wash the newly spread rocks with a hose. This action serves a dual purpose: it cleans away any lingering dirt or dust that accumulated during transport and spreading, revealing the true color and texture of the stones, and it also helps settle the rocks into their bed, creating a more stable surface.
Part 2: Constructing the Trash Can Enclosure
A dedicated area for your trash cans can drastically improve the tidiness and appeal of your outdoor space. This segment details how to create a sturdy and discreet enclosure.
Step 1: Excavation and Precise Soil Leveling
Once you’ve excavated the designated area for your trash can enclosure, the next critical step is to achieve a perfectly level soil base. Use a rake to smooth out the area, then employ a hand tamper or even your feet to compact the soil firmly. A level surface is paramount for the stability of your pavers, ensuring they don’t shift or create an uneven platform over time. Take your time with this step, as a solid foundation is key to the longevity of your enclosure.
Step 2: Creating a Stable Play Sand Base
Fill the excavated and leveled area with play sand, spreading it evenly to a depth of about one to two inches. Play sand creates a flexible yet firm bed that allows for fine adjustments when placing pavers. Use a long, flat piece of lumber (like a 2×4) as a leveling ruler, dragging it across the sand to scrape away excess and fill in low spots. You can also lightly mist the sand with water and compact it further for an even more stable base.
Step 3: Carefully Placing the Pavers
Once your sand base is perfectly leveled and compacted, carefully begin to place your pavers. Start from one corner and work your way across, ensuring each paver is firmly seated and level with its neighbors. Use a rubber mallet to gently tap the pavers into place, settling them into the sand. Continuously check for levelness using a spirit level, making minor adjustments to the sand underneath as needed. This meticulous placement will ensure a smooth, stable, and professional-looking platform for your trash cans.
Step 4: Installing the Fence
With the paver base complete, it’s time to install your chosen fence. Securely position the fence panels around the paver area, ensuring they are plumb and stable. Depending on the fence type, this might involve digging post holes, attaching panels to existing structures, or simply setting up freestanding panels. The fence should be just high enough to effectively conceal your trash cans from view while still allowing easy access for waste disposal and collection. Once the fence is securely in place, your new, tidy trash can enclosure is ready for use!
Benefits of DIY Rock Landscaping
Choosing rock landscaping for your garden offers a multitude of advantages beyond just aesthetic appeal. It’s a smart, sustainable, and often more cost-effective choice for modern homeowners.
- Low Maintenance: One of the biggest draws of rock landscaping is the drastically reduced need for ongoing maintenance. Unlike grass lawns or extensive flower beds, rock gardens require minimal weeding, no mowing, and significantly less watering once established.
- Water Conservation: Rocks and gravel do not require irrigation, making them an excellent choice for xeriscaping and reducing your overall water usage. This is particularly beneficial in drought-prone areas or for environmentally conscious homeowners.
- Improved Aesthetics and Curb Appeal: Rock landscaping adds a sophisticated, clean, and modern look to any property. It provides textural contrast, highlights plants, and can create stunning visual interest, ultimately enhancing your home’s curb appeal and potentially increasing its value.
- Effective Weed Suppression: When combined with a proper weed barrier or pre-emergent herbicide, a layer of gravel or cobble acts as a powerful deterrent against weed growth, keeping your garden looking tidy with minimal effort.
- Versatility in Design: Rocks come in various shapes, sizes, and colors, offering endless design possibilities. They can be used for pathways, borders, accents, dry creek beds, or as the main ground cover, adapting to any garden style from rustic to contemporary.
- Durability and Longevity: Unlike organic materials that decompose, rocks are incredibly durable and can withstand various weather conditions without degrading. Your rock landscape will maintain its integrity and appearance for many years with little to no replacement needed.
- Erosion Control: On sloped areas, rocks and gravel can effectively slow down water runoff, preventing soil erosion and protecting your garden beds from damage during heavy rains.
Expert Tips for a Successful Rock Landscaping Project
To ensure your DIY rock landscaping project is a resounding success, consider these expert tips that will help you achieve professional results and avoid common pitfalls.
- Plan Your Design Carefully: Before you even pick up a shovel, take the time to sketch out your design. Consider the size and shape of the area, the placement of any existing or new plants, and how the rock features will integrate with your overall yard. A clear plan saves time and prevents costly mistakes.
- Choose the Right Rocks: Different types of rocks offer varying aesthetics and functionalities. Mini cobble is versatile, but consider decomposed granite for paths, river rocks for natural accents, or larger boulders for dramatic focal points. Always buy a small sample first to see how it looks in your space.
- Prioritize Drainage: Proper drainage is paramount. Ensure your graded soil slopes away from your home or other structures to prevent water accumulation. If you have heavy clay soil, consider incorporating a layer of coarse sand or gravel underneath the weed barrier for improved sub-surface drainage.
- Invest in Quality Weed Control: Don’t skimp on weed control. A good quality weed barrier fabric or a long-lasting granular weed preventer is crucial for truly low-maintenance results. Cheap alternatives may degrade quickly or be ineffective, leading to more work later on.
- Consider Edging: To give your rock bed a clean, defined look and prevent rocks from migrating into surrounding lawn or garden areas, install a durable landscape edging. Options include plastic, metal, brick, or natural stone borders.
- Select Drought-Tolerant Plants: Complement your rock landscape with plants that thrive in similar, drier conditions. Succulents, ornamental grasses, lavender, and certain shrubs are excellent choices that enhance the beauty without requiring excessive water.
- Safety First: Always wear appropriate personal protective equipment, including sturdy gloves, safety glasses, and closed-toe shoes. When lifting heavy materials, use proper lifting techniques to avoid injury.
- Budgeting Your Project: Get quotes for materials from several suppliers. Remember that rock and gravel are often sold by the cubic yard or ton, and delivery fees can add up. Factor in the cost of tools and any rental equipment.
- Ongoing Maintenance: While low-maintenance, rock landscapes aren’t entirely maintenance-free. Periodically blow away leaves and debris, top up gravel if it settles, and spot-treat any stubborn weeds that manage to sprout. A light rinse with a hose can keep the rocks looking fresh.
DIY Rock Landscaping Idea: Your Path to a Beautiful Home
Embarking on a DIY rock landscaping project is a rewarding endeavor that can profoundly enhance the functionality and beauty of your outdoor living space. From creating a serene, low-maintenance garden to ingeniously concealing your trash cans, the possibilities are vast and achievable for any homeowner.
By following these detailed instructions and incorporating our expert tips, you’ll not only achieve a professional-looking result but also gain the satisfaction of transforming your environment with your own hands. This project is more than just moving rocks; it’s about crafting a more sustainable, attractive, and enjoyable outdoor area that reflects your personal style and meets your practical needs. So, gather your materials, put on your gloves, and get ready to create a lasting improvement to your home. Share your results and inspire others to embrace the beauty and practicality of rock landscaping!