
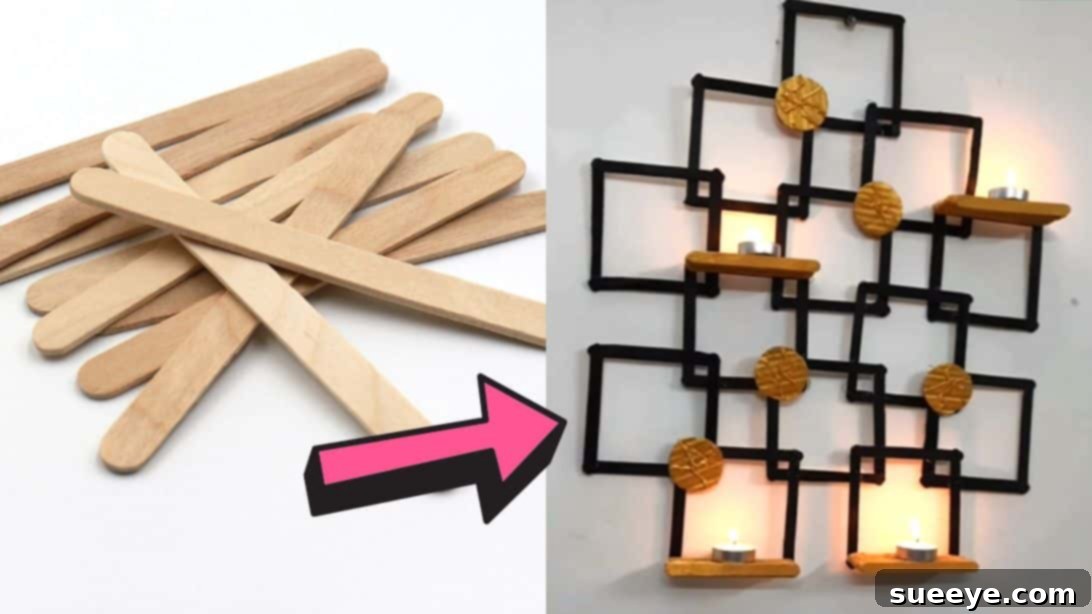
There’s nothing quite like the joy of transforming simple materials into beautiful creations, especially when shared with loved ones. Weekends are my favorite for diving into engaging DIY craft projects, and there’s a special charm in crafting alongside family. Recently, we embarked on a delightful project inspired by Anirya’s Craft & More on Youtube: a gorgeous DIY Popsicle Sticks Wall Decor. This elegant piece is designed to adorn any plain wall in your home, adding a touch of handmade sophistication and warmth. It’s an incredibly fun and rewarding activity, perfect for engaging kids while nurturing their creativity. Just remember to keep a watchful eye on them, especially when handling hot glue, and take charge of the gluing steps yourself to ensure safety. Dive into this guide to discover how you can create your own stunning popsicle stick wall art with ease.
Gather Your Materials: What You’ll Need for This Popsicle Stick Craft
One of the best aspects of this DIY wall decor project is that it utilizes readily available and inexpensive materials. Before you begin, gather everything listed below to ensure a smooth and enjoyable crafting experience. Having all your supplies organized will make the process much more efficient and fun.
- Ice Cream Sticks or Popsicle Sticks: These are the stars of our project! You’ll need a generous supply, as they form the foundational structure and decorative elements. Look for standard-sized sticks, which are easy to work with and widely available at craft stores, supermarkets, or online. The exact quantity will depend on the final size and complexity of your design, but it’s always wise to have a few extra on hand.
- Hot Glue Gun and Glue Sticks: Hot glue is essential for quick and strong bonds, making assembly fast and secure. If crafting with children, an adult should always handle the hot glue gun to prevent burns. Alternatively, a strong craft adhesive like wood glue or super glue can be used, but it will require longer drying times for each step.
- Black and Gold Acrylic Paint: These colors create a striking, elegant contrast for your wall decor. Black provides a sophisticated base, while gold adds a luxurious and shimmering accent. You can opt for matte or glossy finishes based on your preference. Acrylic paints are versatile, quick-drying, and easy to clean up with water.
- Paint Brushes: You’ll need a couple of brushes – one for the black paint and another for the gold. A medium-sized flat brush works well for covering larger surfaces (like the squares), and a smaller, finer brush might be useful for detailed work or touch-ups on the abstract cardboard designs.
- Cardboard: A piece of sturdy cardboard, such as from an old shipping box or cereal box, will be used to create small decorative round shapes. This adds another layer of texture and visual interest to your finished piece.
- Scissors: A good pair of sharp scissors is needed for cutting the cardboard circles precisely. If children are involved, ensure they use child-safe scissors, or handle this step yourself.
- LED Candles: These battery-operated candles provide a safe and ambient glow without the fire hazard of real flames. They are crucial for completing the look of this wall decor, adding a cozy and inviting atmosphere. Choose flicker-flame LEDs for a more realistic candle effect. The number of candles you’ll need will correspond to the number of candle stands you create, typically around 4-6 for a balanced display.
Step-by-Step Guide: Crafting Your DIY Popsicle Stick Wall Decor
Ready to transform a handful of popsicle sticks into a beautiful piece of art? Follow these detailed instructions carefully. Remember, patience and precision are key to achieving a polished and professional-looking finished product. Before you start, lay down some old newspapers or a craft mat to protect your work surface from paint and glue.
Step 1: Constructing the Popsicle Stick Squares
Begin by forming the fundamental building blocks of your wall decor: the squares. Take four individual popsicle sticks for each square. Apply a thin line of hot glue along the ends of two sticks and join them to form an ‘L’ shape. Repeat this with two more sticks. Then, connect these two ‘L’ shapes to complete a perfect square. Ensure the corners are neatly aligned and the glue holds firmly. For this specific design, you will need to create a total of thirteen (13) identical squares. Work carefully to make each square as uniform as possible, as this consistency will greatly enhance the final aesthetic of your wall art.
Step 2: Painting the Foundation Squares Black
Once all thirteen squares are assembled and the glue has completely dried, it’s time to add the base color. Prepare your workspace by covering it with old paper or newspaper to protect against paint spills. Using your black acrylic paint and a paint brush, carefully coat all sides of each popsicle stick square. Aim for even, thin coats to avoid drips and ensure thorough coverage. Depending on the paint’s opacity, you might need to apply two coats for a rich, solid black finish. Allow each coat to dry completely before applying the next, and ensure they are thoroughly dry before proceeding to the next step. This dark base will provide a striking contrast for the gold accents to come.
Step 3: Crafting the Elegant Candle Stands
Next, we will create the stands that will hold your LED candles, adding depth and functionality to your wall decor. For each stand, you will need approximately 14 popsicle sticks. Begin by applying a generous dab of hot glue to the center of one popsicle stick. Carefully stack a second stick directly on top, ensuring perfect alignment. Continue this process, stacking and gluing each subsequent stick precisely in the center, building a sturdy column. This creates a raised platform for your LED candles. The number 14 is a suggestion; you can adjust this to make your stands taller or shorter, depending on your desired aesthetic. Make sure to create enough stands for all the LED candles you plan to use, securing each stack firmly and allowing the glue to set completely before handling.
Step 4: Illuminating the Candle Stands with Gold Paint
With your candle stands fully assembled and dried, it’s time to add a touch of glamour. Using your gold acrylic paint and a clean brush, carefully paint all visible sides of each candle stand. The gold paint will beautifully catch the light and create a luxurious feel, contrasting elegantly with the black squares. Apply the paint smoothly and evenly, ensuring no black spots are visible. You might need two coats for a truly vibrant gold finish. Allow the paint to dry thoroughly before proceeding to the next step. This golden shimmer will make your LED candles truly stand out.
Step 5: Crafting Unique Golden Cardboard Accents
To add intricate details and break the geometric monotony, we’ll create some abstract golden cardboard designs. Take your piece of cardboard and, using scissors, carefully cut out small round shapes. These circles don’t have to be perfectly uniform; slight variations will add to their handmade charm. Once you have your cardboard circles, use hot glue to create abstract patterns or textures on their surface. You can make swirls, dots, lines, or any free-form design you like. The raised glue will create a unique dimensional effect when painted. Allow the glue to dry completely and harden. Then, paint these cardboard shapes with gold acrylic paint, ensuring the raised glue designs are also covered, highlighting their texture. Make approximately 5 to 6 similar golden circles to strategically place on your wall decor as embellishments.
Step 6: Assembling the Main Wall Decor Structure
Now comes the exciting part of bringing your wall decor to life by assembling the black squares. This step requires a keen eye for balance and symmetry. Take one of the painted black squares as your central anchoring point. To begin forming the larger pattern, glue two more squares to its bottom corners, ensuring they are slightly offset from the exact corner to create a visually interesting, layered effect rather than a flat connection. These two squares will serve as foundational elements for the lower part of your design. Next, build upwards and outwards: on the ‘third row’ above your initial central square, you might glue three squares side-by-side, creating a wider section. Follow this with a row of just two squares, then another row of three, and finally two more. This specific sequence (2, 3, 2) allows for a cascading or tiered effect, creating dynamic visual movement. Experiment with the arrangement to achieve a shape that is appealing to you, ensuring all squares are securely attached to each other, forming a cohesive and stable structure. This layered arrangement utilizes all your black squares to form a captivating pattern.
Step 7: Adding the Golden Embellishments
With the main black structure complete, it’s time to integrate the golden elements that will make your decor shine. Carefully position and glue the gold-painted candle holders onto the black squares. A common and visually balanced arrangement involves placing two candle holders symmetrically on the bottom-most squares of your design, serving as anchors. Then, place the remaining candle holders on the left and right sides of your main structure, perhaps on squares within the “third row” or near the center, to balance the overall composition. Once the candle holders are securely in place, glue the gold round cardboard shapes onto the middle parts of your design, filling in any gaps and adding decorative flourishes. Distribute them strategically to create visual harmony and enhance the overall luxurious feel. Ensure all pieces are firmly attached with hot glue.
Step 8: The Grand Finale: Placing the LED Candles
The final step brings your DIY wall art to life! Once all the glue has dried and every element is securely in place, carefully position your LED candles on top of their designated golden stands. Arrange them to achieve the best visual impact. The soft, flickering glow of the LED candles will beautifully illuminate your crafted piece, casting intriguing shadows and creating a warm, inviting ambiance in any room. Take a step back and admire your beautiful, handmade popsicle stick masterpiece.
Showcasing Your DIY Popsicle Sticks Wall Decor: Tips & Variations
Congratulations! You’ve successfully created a stunning and unique piece of handmade wall decor. Now, let’s talk about how to best display and personalize your creation, ensuring it perfectly complements your home interior.
Displaying Your Masterpiece
This elegant popsicle stick craft is versatile enough to enhance various spaces. Consider hanging it in your living room as a focal point, above a mantelpiece, or in a hallway to add warmth and character. It would also look fantastic in a bedroom, creating a serene and inviting atmosphere. When choosing a spot, consider where the LED candles will have the most impact – perhaps in an area that gets natural light during the day but can be admired with its gentle glow in the evening. Use strong picture-hanging hooks or command strips, depending on the weight of your finished piece, to securely mount it on the wall.
Creative Variations and Personalization
The beauty of DIY projects lies in their potential for personalization. Don’t be afraid to experiment and make this popsicle stick art truly your own:
- Color Palette: While black and gold offer a classic, luxurious look, you could easily adapt the color scheme to match your existing home decor. Imagine soft pastels for a nursery, vibrant primary colors for a playroom, or rustic browns and greens for a farmhouse style.
- Different Shapes: Instead of squares, try creating hexagons, triangles, or even free-form shapes with your popsicle sticks for a more abstract design.
- Additional Embellishments: Feel free to add other decorative elements. Small mirrors, glitter, beads, rhinestones, dried flowers, or even small painted rocks could be incorporated to add texture and sparkle.
- Scented Options: If you’re using real candles (with extreme caution and constant supervision, keeping fire safety in mind), choose scented ones to add an aromatic dimension to your decor. However, LED candles are always the safest option.
- Size and Scale: You can easily scale this project up or down. Make a smaller version for a cozy nook or create a grander, multi-paneled piece for a large wall.
Why Choose Popsicle Stick Crafts?
Popsicle stick crafts, like this exquisite wall decor, offer numerous benefits beyond just creating beautiful objects:
- Affordability: Popsicle sticks are incredibly inexpensive, making them an accessible crafting material for everyone. This project allows you to create high-impact decor without breaking the bank.
- Eco-Friendly Upcycling: It’s a fantastic way to upcycle simple wooden sticks into something new and functional, promoting sustainable crafting practices.
- Family Bonding: Crafting together is a wonderful way to spend quality time, fostering communication, teamwork, and shared memories.
- Skill Development: For children, it helps develop fine motor skills, hand-eye coordination, patience, and the ability to follow instructions. For adults, it’s a great way to unwind and engage in a mindful activity.
- Boosts Creativity: The project encourages imaginative thinking and problem-solving, especially when customizing the design or troubleshooting during assembly.
- Sense of Accomplishment: There’s immense satisfaction in looking at a finished piece and knowing you created it with your own hands.
This DIY popsicle stick wall decor project is more than just a craft; it’s an opportunity to create something beautiful, share a meaningful experience with family, and add a personal touch to your living space. It demonstrates that elegant home decor doesn’t always require significant expense or professional skills, but rather a little imagination and a willingness to get creative. So, gather your materials, clear your schedule for a fun crafting session, and get ready to transform simple popsicle sticks into a stunning focal point for your home. We hope you enjoy making this as much as we did!