
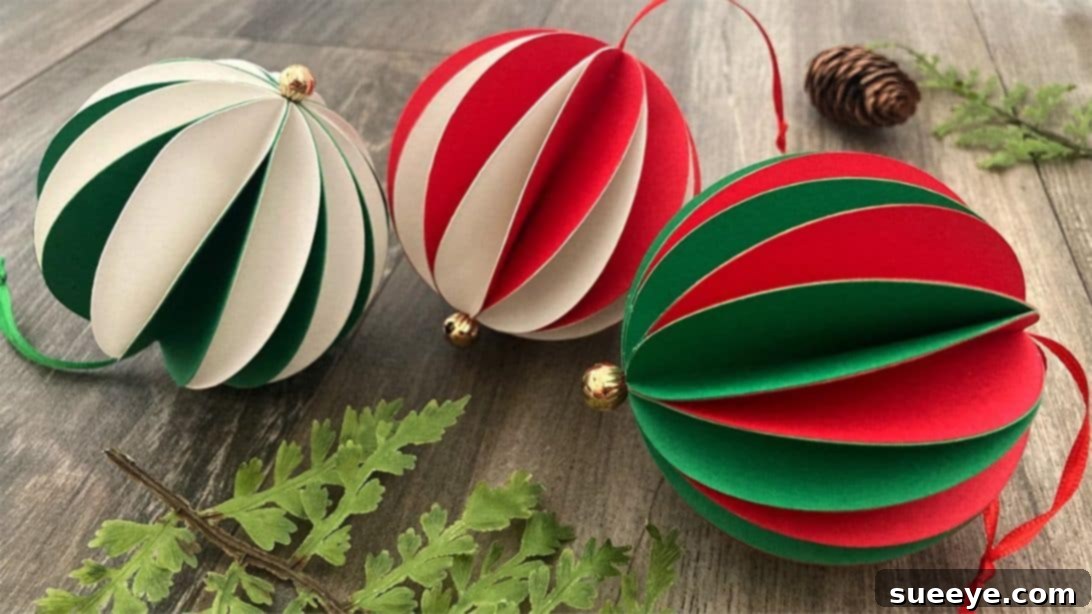
DIY Paper Honeycomb Ball Ornaments: Craft Stunning Christmas Decor on a Budget
As the festive season approaches, the magic of Christmas lights up our homes, but often, the cost of elaborate decorations can cast a shadow on our holiday cheer. If you’re looking to infuse your home with personalized charm without breaking the bank, embarking on a Do-It-Yourself (DIY) project is the perfect solution. Imagine adorning your Christmas tree with unique, handcrafted ornaments that not only reflect your style but also carry the warmth of your own efforts. This year, instead of settling for generic store-bought baubles, discover the joy and affordability of creating your own paper honeycomb ball ornaments.
These exquisite ornaments, inspired by the creative minds at Gift Wrapping Love, are surprisingly simple to make and offer a significant cost saving compared to purchasing a dozen traditional Christmas balls. They are not just decorations; they are expressions of creativity, little pieces of art that add a personal touch to your festive setup. Whether you’re a seasoned crafter or new to the world of DIY, this project is designed to be accessible, enjoyable, and incredibly rewarding.
Why Choose DIY Paper Honeycomb Ornaments for Your Holiday Decor?
The appeal of paper honeycomb ornaments extends far beyond their budget-friendly nature. They offer a unique aesthetic that blends vintage charm with modern simplicity, creating a captivating visual texture on your Christmas tree or around your home. The geometric beauty of the honeycomb design, coupled with your choice of colors, allows for endless customization possibilities. You can match them to your existing decor, create a vibrant contrast, or even craft a monochromatic display for a sophisticated look.
Moreover, this project is an ideal activity for family and friends. Gathering loved ones to craft these beautiful decorations transforms a simple task into a cherished holiday memory. Each person can personalize their own ornament, adding unique touches that make the final display a mosaic of individual creativity. It’s an opportunity to bond, share stories, and create tangible mementos of togetherness during the most wonderful time of the year. From selecting cardstock colors to carefully gluing each fold, every step is a chance to connect and contribute to the festive spirit.
RELATED CHRISTMAS CRAFT: If you love transforming simple items into stunning decor, you might also enjoy discovering how to create an amazing Christmas garland by sliding wire through ball ornaments. It’s another brilliant way to elevate your holiday decorations with a personal touch!
Essential Materials for Your Paper Honeycomb Ball Ornaments
Crafting these stunning two-toned paper honeycomb ball ornaments requires a few basic and readily available materials. The beauty of this project lies in its simplicity and the ability to customize every element, from the paper’s color to the embellishments. Here’s what you’ll need to gather to bring your festive vision to life:
- Medium-Weight Christmas Card Stock (8.5″ x 11″): For a classic holiday look, consider festive colors like green, red, and white. The medium weight is crucial as it provides enough rigidity for the honeycomb structure to hold its shape while still being pliable enough for folding and cutting. Lighter paper might tear easily, while heavier cardstock could be difficult to fold precisely.
- 1/8″ Red Ribbon: This will be used for creating the elegant hanging loop for your ornament. Choose a satin or grosgrain ribbon for a refined finish.
- 1/8″ Green Ribbon: Provides an alternative or complementary hanging option, allowing for varied aesthetics.
- 30 Pieces of Bell Beads: Small bell beads add a delicate sparkle and a subtle jingle to your ornaments, enhancing their festive appeal. You can experiment with different types of beads like pearl beads, wooden beads, or even small charms.
- Sharp Scissors: Precision is key when cutting circles and trimming edges. A good pair of craft scissors will ensure clean cuts and a professional finish.
- Bone Folder: While optional, a bone folder is highly recommended for achieving crisp, sharp folds in your cardstock. This tool helps create defined creases, making the honeycomb structure more pronounced and stable.
- Hot Glue Gun and Glue Sticks: A hot glue gun provides a quick-drying and strong bond, essential for assembling the multiple layers of your ornament efficiently. Ensure you have plenty of glue sticks on hand.
- Large and Mini Clothespins: These are indispensable for holding glued sections together while they dry, ensuring that the paper adheres properly and maintains its shape without slipping.
Before you begin, ensure your workspace is clean and organized. Having all your materials within reach will make the crafting process smooth and enjoyable, allowing you to focus on the creative aspects of making your beautiful ornaments.
How to Craft Your DIY Paper Honeycomb Ball Ornaments: A Step-by-Step Guide
Now that you have all your materials ready, let’s dive into the exciting process of creating these charming paper honeycomb ball ornaments. Follow these steps carefully to ensure a beautiful and sturdy finished product.
Step 1: Preparing Your Paper Circles with Precision
Begin by cutting a 3-inch diameter circle from your chosen cardstock. This circle will serve as your template. Once cut, fold this template circle precisely in half. Next, take your main sheets of cardstock (e.g., green and red). Fold each sheet in half lengthwise, then open it and fold the edges inward towards the newly created center crease. This technique helps you establish consistent guidelines for your circle placement. Place the straight, folded edge of your 3-inch half-circle template along one of the folded edges of your cardstock and carefully trace its curved outline. Repeat this tracing process all the way down the folded cardstock, ensuring each traced curve is evenly spaced. Flip the cardstock over and repeat on the other side. This method ensures uniformity across all your pieces. Once traced, meticulously cut out each half-circle piece. For a standard two-toned ornament, you will need a total of 20 pieces: 10 in your first color (e.g., red) and 10 in your second color (e.g., green). Consistency in cutting is crucial for the final symmetrical look of your honeycomb ball.
Step 2: Assembling the Honeycomb Layers
Take one of your red half-circles and apply a thin, even layer of hot glue along one of its straight, folded sides. Immediately place a folded green half-circle on top, aligning its straight edge perfectly with the glued edge of the red piece. Press gently but firmly to ensure good adhesion. Continue this process, alternating colors (red, green, red, green), until all 20 pieces are glued together in a stack. The goal is to create a multi-layered accordion structure. As you glue, carefully wipe away any excess glue that might seep out along the straight edges. This prevents pieces from sticking where they shouldn’t and ensures a clean finish, allowing the honeycomb to expand freely later.
Step 3: Ensuring Clean Edges and Free Movement
Once all 20 pieces are glued together, carefully separate the flaps of the layered stack. This is a critical step to ensure that none of the inner layers have accidentally stuck together during the gluing process. Take your time to gently pull each folded flap apart, making sure they can move independently. If you find any excess glue, gently wipe it away or carefully trim it with your scissors. This step guarantees that your honeycomb ornament will open smoothly and evenly, achieving that signature rounded look.
Step 4: Strategic Gluing for the Honeycomb Effect
This step is where the magic of the honeycomb structure truly comes to life. With your layered stack still folded, you will apply glue strategically to hold the alternating flaps together. Near the top edge of the stack, apply a small dot or thin line of hot glue to one flap. Then, near the bottom edge of the *next* flap, apply glue. Continue alternating the glue placement – top, then bottom, then top, then bottom – for each successive flap. It’s absolutely vital to keep the glue away from the outer edges and the central fold of each flap. The glue should only connect the internal layers, allowing the edges to pop out when the ornament is opened. Once all the glue is applied, firmly hold the entire stack together with clothespins on both ends. This pressure is essential for the glue to set properly. Let it sit for a good couple of minutes to allow the glue to dry completely and create a strong bond.
Step 5: Forming the Perfect Ball Shape
Once the glue from Step 4 has completely dried, carefully remove the clothespins. Now, gently fan out your layered paper structure. You will see the honeycomb effect begin to form. To complete the ball, bring the two end pieces of your layered stack together. Apply a thin line of hot glue along the entire straight edge of one end piece, then carefully press the straight edge of the other end piece against it, ensuring a seamless connection. This final glue joint will close the circle, transforming your flat stack into a beautiful three-dimensional ball. Use a small clothespin to hold this final seam in place while the glue sets and dries. This ensures a tight, secure closure and a perfectly spherical ornament.
Step 6: Adding the Hanging Ribbon and Bell Bead
Now it’s time to add the finishing touches that allow your ornament to hang elegantly. Take your chosen ribbon (e.g., red ribbon) and thread a bell bead onto it. Hold the two ends of the ribbon together and drape it over your newly formed paper honeycomb ball ornament to determine the desired hanging length. Cut off any excess ribbon, making sure to leave enough for a secure knot. Next, apply a small dot of hot glue to the very center of the top (or inside) of your paper ornament. Carefully insert the ends of the ribbon into this glue, positioning the bell bead at the bottom center of the ornament. Gently press the ribbon ends into the glue to secure them. Finally, tie the two ends of the ribbon together at the top, forming a sturdy loop for hanging. You can add another dab of glue to the knot to ensure it doesn’t unravel. Your beautiful, custom-made paper honeycomb ball ornament is now complete and ready to adorn your tree or gifted to a loved one!
Customizing Your DIY Paper Honeycomb Ball Ornaments
The true beauty of DIY lies in the freedom to personalize every aspect. Don’t limit yourself to just red and green cardstock! Explore a spectrum of colors to match various themes – pastels for a whimsical touch, metallics for glamour, or even printed cardstock for unique patterns. You can also experiment with different embellishments. Instead of bell beads, consider small tassels, glitter glue applied to the edges, sequins, or even tiny painted details. For a larger statement piece, simply scale up the size of your initial circle template and adjust the number of paper layers accordingly. These ornaments aren’t just for Christmas trees; hang them from garlands, use them as unique gift toppers, or create a stunning mobile for a festive corner.
Embrace the Spirit of Handmade Holiday Decor
Creating these paper honeycomb ball ornaments is more than just a craft project; it’s an opportunity to infuse your home with warmth, personality, and the true spirit of the holidays. Each ornament you make carries a story, a memory of creation, and a unique charm that mass-produced decorations simply can’t replicate. So gather your materials, invite your loved ones, and embark on this delightful DIY adventure. You’ll not only save money but also create cherished decorations that will be admired for many Christmases to come. Happy crafting!