
Unlock Your Creative Potential: The Revolutionary DIY Stenciling Technique You Need to Try!
As an avid DIY enthusiast, I’ve delved into countless craft projects, and stenciling has always held a special place in my heart. The ability to transform plain surfaces into works of art with intricate patterns is incredibly satisfying. However, I recently stumbled upon a stenciling technique that completely redefined my understanding of this craft, proving that creativity truly knows no bounds!
In a world brimming with pre-made stencils, it’s refreshing to discover methods that encourage resourcefulness and personal expression. This particular approach blew me away with its ingenuity, demonstrating how easily we can leverage everyday items to craft unique and professional-looking designs. Forget the limitations of store-bought stencils; this brilliant idea empowers you to become the designer, bringing your specific vision to life without breaking the bank.
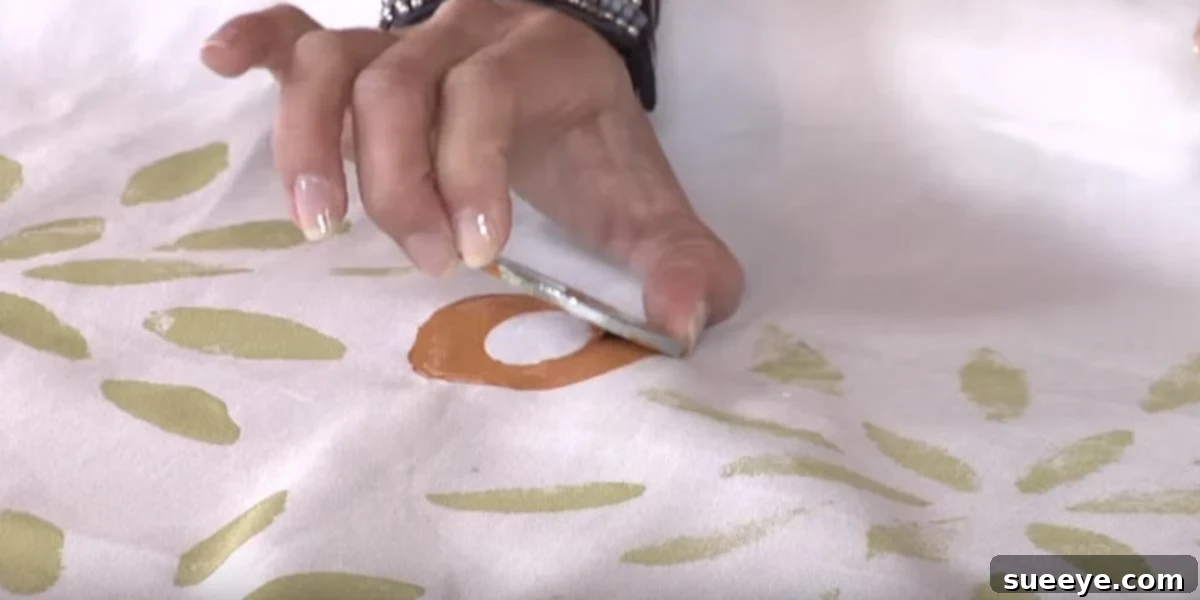
My initial skepticism quickly transformed into pure delight after trying this method myself. I’ve worked with traditional plastic stencils many times, experiencing the usual challenges of alignment, paint bleed, and finding just the right pattern. To my absolute amazement, this alternative technique proved to be significantly easier and yielded superior results. My bedroom drapes, which I adorned with a custom design using this method, turned out absolutely beautiful. The crisp lines and vibrant patterns have completely elevated the room’s aesthetic, making it feel more bespoke and luxurious. I am beyond thrilled with the outcome and immensely grateful to have discovered this game-changing tip!
The Magic Behind This Innovative DIY Stenciling Technique
What makes this stenciling method so revolutionary? It boils down to a few key advantages that truly set it apart from conventional approaches. This isn’t just about saving money; it’s about unlocking a level of creative freedom and application ease that plastic stencils often struggle to provide.
Beyond the Pre-Made: Cost-Effectiveness and Unique Designs
One of the most compelling aspects of this technique is its incredible affordability and the limitless design possibilities it offers. Instead of purchasing specific stencils, which can quickly add up, this method encourages you to use materials you likely already have around your home or can acquire for mere pennies. This commitment to resourcefulness not only makes DIY decorating accessible to everyone but also significantly reduces waste.
- Budget-Friendly: Eliminate the need to buy expensive, specialized stencils. Many variations of this technique rely on common household items, making it incredibly cost-effective.
- Unleash Your Creativity: You are no longer confined to the patterns available in craft stores. Imagine any design, sketch it, and bring it to life! This allows for truly personalized decor that reflects your unique style and vision.
- Eco-Conscious Crafting: By repurposing materials, you contribute to a more sustainable crafting practice, reducing the demand for new plastic products.
Unexpected Ease: Surpassing Traditional Stenciling Methods
Perhaps the most surprising benefit is how much easier and more forgiving this technique can be, especially for beginners. Traditional plastic stencils, while effective, can sometimes be rigid, difficult to hold perfectly in place, and prone to paint seeping underneath, leading to blurry edges. This innovative method often employs materials that offer better adhesion and flexibility, leading to cleaner, more professional results with less effort.
- Reduced Paint Bleed: Many variations of this clever technique involve creating a stencil that adheres more closely to the surface, significantly minimizing the dreaded paint bleed and ensuring sharper lines.
- Flexibility for Various Surfaces: The adaptable nature of homemade stencils makes them ideal for a wider range of surfaces, from flat walls to textured fabrics and curved furniture, where rigid stencils might falter.
- Beginner-Friendly: The simplicity and effectiveness of this approach make it incredibly welcoming for those new to stenciling, building confidence with impressive results right from the start.
Unlocking Your Inner Designer: A Step-by-Step Guide to Creative Stenciling
While the original content alludes to a video tutorial, I will outline the general principles of a “clever” and “easier” DIY stencil technique that typically involves creating your own adhesive stencil. This comprehensive guide will equip you with the knowledge to replicate the stunning results I achieved.
Gathering Your Creative Toolkit: Essential Materials
Success in any DIY project starts with the right tools. For this innovative stenciling method, you’ll find that most of what you need is either already in your home or easily accessible at a local craft store or even a dollar store.
- Stencil Material: Think thin, flexible, and adhesive. Common choices include self-adhesive contact paper, freezer paper (especially good for fabric), or even painter’s tape for geometric designs. The key is a material that can be cut precisely and adheres well without damaging the surface.
- Cutting Tools: A craft knife (X-Acto knife) with a sharp blade is essential for intricate designs. A cutting mat will protect your work surface. Scissors are useful for larger, simpler cuts.
- Your Design: Printed patterns, freehand sketches, or even natural elements like leaves for inspiration.
- Paints: Fabric paint for textiles, acrylic paint for walls and furniture, or specialized stencil paint. Choose colors appropriate for your project and surface.
- Applicators: Stencil brushes, foam pouncers, or even small sponges work perfectly. The goal is to apply paint in thin, even layers.
- Masking Tape or Painter’s Tape: For securing areas, masking off borders, or holding non-adhesive stencil material in place.
- Protective Gear: Gloves, drop cloths, and old newspapers to keep your workspace clean.
Crafting Your Custom Design: From Inspiration to Stencil
This is where your personalized touch truly shines! The ability to create your own stencil design means your decor will be one-of-a-kind.
- Find Your Inspiration: Browse online, flip through magazines, or simply look around for patterns that catch your eye. Geometric shapes, floral motifs, abstract designs, or even monograms are popular choices.
- Sketch or Print Your Design: Draw your pattern directly onto the back of your stencil material, or print it out and carefully trace it onto the material. Ensure your lines are clear and precise. Remember, the areas you cut out will be where the paint goes.
- Carefully Cut Out Your Stencil: Place your stencil material onto a cutting mat. Using a sharp craft knife, meticulously cut out the areas that will form your pattern. Take your time, especially with intricate details. A steady hand is crucial here. For larger designs, you might cut the stencil into manageable sections.
- Prepare Your Surface: Ensure the surface you plan to stencil is clean, dry, and smooth. For fabric, wash and iron it first. For walls or furniture, wipe them down to remove dust and debris.
The Application Process: Making Your Vision Reality
Now for the exciting part – bringing your design to life! Proper application is key to achieving those coveted sharp, professional edges.
- Position Your Stencil: Carefully peel the backing off your adhesive stencil material (if using contact paper or similar) and firmly press it onto your desired surface. Smooth out any air bubbles. If using freezer paper, iron it shiny-side-down onto fabric for a temporary bond. For non-adhesive stencils, use painter’s tape to secure it firmly in place, ensuring no gaps.
- Load Your Brush/Pouncer: Dip your stencil brush or foam pouncer into the paint, then offload most of the excess paint onto a paper towel. This is perhaps the most critical step to prevent paint bleed. You want your applicator to be “dry to the touch.”
- Apply Paint Using a Dabbing Motion: Gently dab or swirl the paint onto the stencil openings. Use light pressure and build up thin layers of paint rather than applying a thick coat all at once. This prevents paint from seeping under the stencil edges.
- Remove the Stencil: Once you’ve achieved your desired color saturation (and before the paint dries completely if using an adhesive stencil), carefully peel off the stencil. Pull it away slowly and evenly to reveal your crisp design. For fabric, let the paint dry completely before removing freezer paper.
- Clean Up: Immediately clean your stencil material and brushes with water (for water-based paints) so they can be reused. Allow your stenciled project to dry thoroughly according to paint instructions. For fabric paints, follow curing instructions (often involving heat-setting) to ensure durability.
Transforming Every Corner of Your Home
The beauty of this custom stenciling technique lies in its versatility. Once you master the basics, a world of decorative possibilities opens up, allowing you to infuse personalized style into every nook and cranny of your home.
Fabric Fantasies: Drapes, Pillows, and Upholstery
My own success with drapes is just the beginning! Fabric stenciling is a fantastic way to update textiles. Imagine custom throw pillows, a personalized duvet cover, or even revitalizing an old armchair with a unique pattern. Fabric paints are designed to remain flexible and washable once cured, making them perfect for items that see regular use.
Wall Wonders: Accent Walls and Artistic Murals
An accent wall created with a custom stencil can dramatically change the feel of a room. Whether you prefer a subtle damask pattern, a bold geometric design, or a whimsical nature scene, stenciling offers a cost-effective alternative to wallpaper and allows for far greater customization. You can even combine multiple stencils to create a full, repeating mural.
Furniture Facelifts: Tables, Dressers, and Cabinets
Give old furniture new life with a stenciled design. A plain dresser can become a focal point with a patterned top or drawer fronts. Coffee tables, bedside tables, and even kitchen cabinets can benefit from a touch of stenciled artistry, transforming bland pieces into cherished heirlooms.
Personalized Accessories: Bags, T-shirts, and Gifts
Beyond home decor, this technique is perfect for creating personalized gifts and accessories. Design your own tote bags, jazz up plain t-shirts, or make unique placemats. Handmade stenciled items make thoughtful and memorable presents for friends and family.
Mastering the Art: Tips for Stenciling Success
While this clever technique simplifies many aspects of stenciling, a few expert tips can further enhance your results and ensure a flawless finish every time.
- Less is More with Paint: Always offload excess paint from your brush or pouncer. A common mistake is using too much paint, which is the primary cause of bleeding under the stencil. Build up color with thin, even layers.
- Secure Your Stencil: Whether it’s adhesive material, freezer paper, or tape, ensure your stencil is firmly adhered or taped down to prevent shifting and paint seepage.
- Practice Makes Perfect: If you’re tackling a large or intricate project, consider doing a test run on a scrap piece of the same material first. This allows you to perfect your technique and test paint colors.
- Dab, Don’t Brush: Use a dabbing or swirling motion with your stencil brush or pouncer. Avoid traditional brushing strokes, as these can push paint under the stencil edges.
- Angles Matter: For fabric, if you’re using a method where the stencil is slightly lifted (like with some non-adhesive techniques), hold the brush perpendicular to the surface and dab straight down.
- Clean Your Stencil: If working on a large project with a repeating pattern, clean your stencil periodically to prevent paint buildup, which can cause blurry edges.
- Patience is a Virtue: Allow each layer of paint to dry slightly before applying the next, and always let the final design dry completely before handling or removing the stencil for certain methods.
Why Embrace DIY Decor?
Beyond the immediate satisfaction of creating something beautiful, diving into DIY decor projects like this incredible stenciling technique offers numerous profound benefits that extend far beyond aesthetics.
Personal Touch and Unique Style
In a world of mass-produced goods, custom DIY decor allows you to infuse your personality and unique style into your living space. Your home becomes a true reflection of who you are, telling a story that off-the-shelf items simply cannot.
Budget-Friendly Transformations
Home renovations and decor updates can be incredibly expensive. DIY stenciling provides a powerful tool for transforming spaces on a shoestring budget, proving that stunning design doesn’t require a hefty investment. Repurposing and customizing saves money and sparks innovation.
The Joy of Creation and Self-Expression
There’s an unparalleled sense of accomplishment that comes from creating something with your own hands. DIY projects foster creativity, reduce stress, and provide a healthy outlet for self-expression. The pride you feel every time you look at your stenciled drapes or accent wall is truly priceless.
Final Thoughts and Inspiration
This clever stenciling technique has truly opened my eyes to the incredible potential of DIY home decor. It’s a testament to the fact that innovation often comes from simplifying processes and utilizing what’s readily available. My experience stenciling my drapes was not just a successful project; it was a joyous journey of discovery and creativity.
If you’re looking for a way to add a personalized, stylish, and budget-friendly touch to your home, I wholeheartedly encourage you to explore this method. Dive into a comprehensive step-by-step tutorial (like the one I initially discovered!) to see exactly how this magic happens. Don’t keep this amazing discovery to yourself – make sure to SHARE this brilliant idea with your friends and fellow DIY enthusiasts on Facebook and other social media platforms! Let’s inspire a wave of custom, creative home transformations together!