
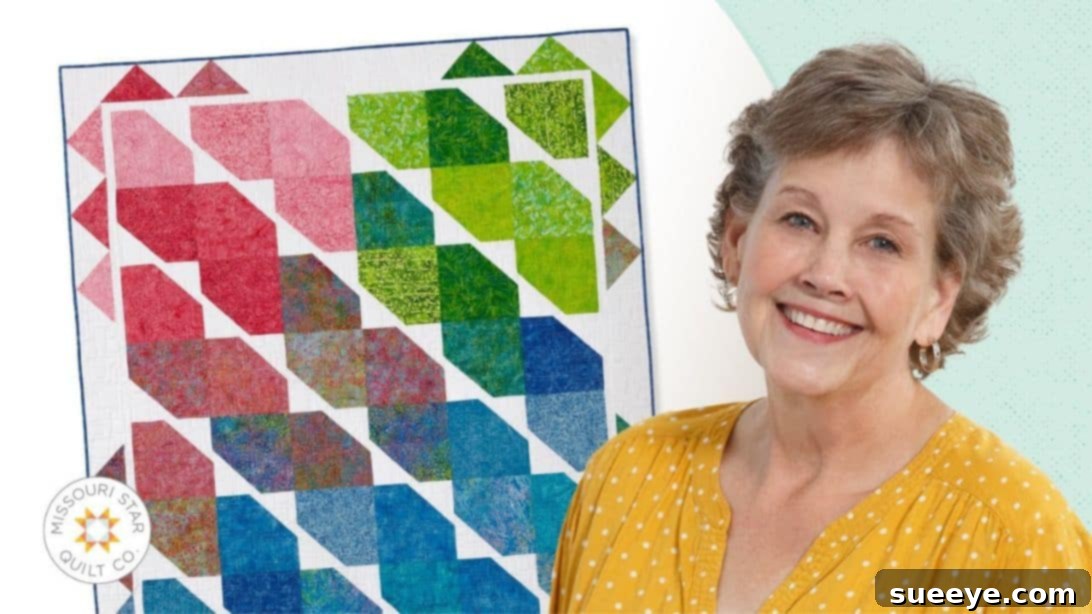
Mastering the Trailing Squares Quilt: A Beginner-Friendly Tutorial for Stunning Results
Embark on a rewarding quilting journey with the beautiful and surprisingly simple Trailing Squares Quilt pattern! If you’re new to the world of quilting, this project is tailor-made for you. Its straightforward steps and striking visual appeal make it an ideal starting point for beginners, promising a quick and satisfying finish. The “trailing squares” effect creates a dynamic sense of movement across your quilt top, giving it a sophisticated look that belies its simple construction. Imagine snuggling under your very own handcrafted masterpiece, a testament to your newfound skills and creativity.
This comprehensive guide will walk you through every step, from preparing your fabrics to assembling the final quilt top. You’ll learn essential quilting techniques, understand the importance of precise measurements, and discover how easy it is to create a stunning quilt that you’ll be proud to display or gift. To further enhance your learning experience, we highly recommend watching the detailed video tutorial by Missouri Star Quilt Company, linked below. Their clear visual instructions complement this written guide perfectly, ensuring you grasp every nuance of this delightful project.
Materials and Essential Tools
Before diving into the fun of cutting and sewing, gather all your materials and tools. Having everything organized will make your quilting process smoother and more enjoyable. The beauty of the Trailing Squares Quilt often comes from a curated fabric collection, so choose colors and patterns that inspire you!
Required Materials:
- 1 pack of 10″ squares (Pre-cut Fabric): Often called “layer cakes,” these packs contain 42 pre-cut 10-inch by 10-inch squares, making fabric selection and initial cutting incredibly convenient. Choose a pack with a variety of prints or solids that complement each other for a dynamic quilt.
- 1 3/4 yards for Background Fabric: This fabric will form the diagonal “trailing” element and is crucial for creating contrast. A solid or tone-on-tone fabric often works best to highlight the main 10-inch squares. Ensure it’s a good quality quilting cotton.
- 4 3/4 yards for Backing Fabric: The backing fabric is the underside of your quilt. You can choose a single wide-back fabric or piece together several coordinating fabrics. Consider a soft flannel or minky for extra coziness, or stick with quilting cotton for durability.
- 3/4 yard for Binding Fabric: The binding provides a clean, finished edge for your quilt and helps frame the design. You can choose a fabric that matches your background, contrasts sharply with it, or ties into one of the colors from your 10-inch squares.
- Quilt Batting (not listed but essential): Approximately 55″ x 70″ for a lap-sized quilt. This is the soft inner layer that gives your quilt warmth and dimension.
- Coordinating Thread: High-quality polyester or cotton thread that matches or blends with your fabrics.
Essential Quilting Tools:
- Rotary Cutter: A sharp rotary cutter (45mm or 60mm) is indispensable for quick and accurate fabric cutting.
- Self-Healing Cutting Mat: Protect your work surface and keep your rotary blade sharp with a good-sized mat.
- Quilting Rulers: A large rectangular ruler (e.g., 6″x24″) and a smaller square ruler (e.g., 6″x6″ or 10″x10″) will be invaluable for precise measurements and squaring up blocks.
- Sewing Machine: A reliable machine with a 1/4-inch quilting foot (optional, but highly recommended) is key.
- Iron and Ironing Board: Essential for pressing seams to ensure flat, accurate blocks.
- Fabric Marking Pen or Pencil: A heat-erasable pen or tailor’s chalk for drawing lines on your fabric.
- Fabric Scissors: For snipping threads and other small cuts.
- Straight Pins or Fabric Clips: To hold fabric pieces together securely before sewing.
Detailed Instructions for Your Trailing Squares Quilt
Precision is important in quilting, especially for beginners. Take your time with each step, and remember that consistent 1/4-inch seam allowances are key to blocks fitting together perfectly. Don’t rush, and enjoy the process of watching your quilt come to life!
Step 1: Preparing Your Background Fabric and Marking
Begin by preparing your background fabric. From your 1 3/4 yards of background fabric, carefully cut 6-inch wide strips. Use your rotary cutter and a long ruler to ensure these strips are perfectly straight and consistent. Once your strips are cut, sub-cut them into 6-inch by 6-inch squares. You will need one 6-inch background square for each 10-inch feature square, plus extra for potential mistakes and border units, so aim for at least 42-45 squares.
Now, take each of your 6-inch background squares and prepare them for sewing. Using your fabric marking pen or pencil and a ruler, draw a diagonal line from one corner of the square to the opposite corner. This will be your primary guide. Next, move your ruler half an inch to the right of this first line and draw a second parallel line. Repeat this process for all your 6-inch background squares. These two parallel lines, 1/2 inch apart, will serve as your sewing guides in the next step, creating the distinctive “trailing” effect.
Step 2: Crafting the Corner Units (Building the Diagonal Effect)
This step is where the magic of the “trailing squares” truly begins. Take one of your marked 6-inch background squares and place it right sides together on one corner of a 10-inch feature square. Ensure that the corner of the 6-inch square aligns perfectly with the corner of the 10-inch square. Pay close attention to the lines you’ve drawn: the critical detail is to ensure that the second drawn line (the one further from the edge you just aligned) is positioned on the “outside” part or towards the center of the 10-inch square. This alignment is crucial for the diagonal to “trail” correctly.
Carefully sew precisely along both of the drawn lines on the 6-inch background square. Maintain a consistent stitch length. Once both lines are sewn, take your rotary cutter and cut the fabric directly between the two sewn lines. This will separate the corner unit into two distinct pieces. One piece will be the main 10-inch square with a new diagonal background fabric corner. The other piece will be a smaller unit, a half-square triangle (HST) formed from the excess background fabric and a small piece of the original 10-inch square.
Next, carefully press the seams. For the larger unit (the 10-inch square with the new background corner), press the background fabric open and away from the center of the 10-inch square, ensuring the seam allowance lies flat under the background triangle. This creates a crisp, clean diagonal. For the smaller unit (the HST), press the seam open or towards the darker fabric. Then, take this smaller unit and meticulously trim it down to a 5-inch by 5-inch square, making sure your diagonal line runs perfectly from corner to corner. These 5-inch HSTs are vital for your outer border. Repeat this entire process 41 more times until you have a total of 42 main block units and 42 corresponding 5-inch HST units.
Step 3: Assembling the Outer Border Units
Now that you have your 42 main quilt blocks and 42 of the 5-inch HST units, it’s time to prepare the border components. The 5-inch HSTs you created in Step 2 will be used to construct a decorative and cohesive outer border for your quilt.
Take your 5-inch half-square triangle (HST) units. You will sew these into pairs to create larger square units, which will form sections of your border. For instance, joining two HSTs can create a square with a diagonal seam, which can then be oriented to create specific patterns within the border. For the top and bottom borders, you will need two of these combined “bigger triangles” (or paired HSTs) on each side to create corner units or specific border block designs. For the side borders, you’ll utilize three of these paired HST units on each side. The exact arrangement will be clearer from the video tutorial, allowing you to replicate the intended design precisely.
You’ll also need to cut specific filler strips from your background fabric to complement these border units. The space between the constructed “triangle” units on the sides of the quilt will measure approximately 5 inches by 15 inches. For the top and bottom borders, the corresponding filler strips will be 5 inches by 23 1/2 inches. Carefully cut these strips from your remaining background fabric, ensuring accurate dimensions for a seamless border assembly. Lay out your border pieces around your quilt center to visualize how they will fit before sewing them together.
Step 4: Constructing the Quilt Top and Adding Borders
This is the exciting stage where your individual blocks come together to form the complete quilt top. You will be assembling your quilt in rows, with each row consisting of six of your main 10-inch blocks (the ones with the trailing background fabric). The key to the “trailing squares” effect lies in the alternating orientation of these blocks.
For your first row, arrange six blocks side by side. Ensure that the small background triangle of the first block is positioned at the top right corner. For the second block in the row, the small background triangle should be at the bottom left corner. Continue this alternating pattern for the remaining four blocks in the first row. Once satisfied with the arrangement, sew these six blocks together, creating a complete row. Press your seams consistently, either all to one side or open, to minimize bulk.
For the next row, you will alternate the pattern again. If the first block of your previous row started with the triangle at the top right, the first block of this new row should start with the triangle at the bottom left. Continue this alternating pattern for all subsequent rows. This creates the continuous, dynamic “trailing” motion across your entire quilt top. Once all your rows are assembled, carefully sew them together, aligning your seams precisely. Pinning extensively will help prevent shifting.
With your quilt center assembled, it’s time to add the borders. First, cut 1 1/2-inch wide strips from your background fabric to create the inner border. Measure the length of your quilt top’s sides and top/bottom edges, then cut your inner border strips to match, adding a little extra length for trimming. Sew these strips to your quilt center, usually attaching the side borders first, then the top and bottom. This inner border provides a subtle frame and helps the outer border stand out.
Finally, attach the outer border you prepared in Step 3. Assemble your pieced outer border units (the 5-inch HST pairs and filler strips) into longer border sections. Measure and attach these to your quilt top, starting with the side borders and then the top and bottom. Take your time, pinning thoroughly, to ensure your quilt top remains flat and square. Once all borders are sewn, give your finished quilt top a final press.
Finishing Your Quilt: Sandwich, Quilting, and Binding
Congratulations on completing your quilt top! The journey isn’t quite over yet. To transform your beautiful top into a functional and durable quilt, you’ll need to complete three more essential steps: creating the quilt sandwich, quilting, and adding the binding.
Creating the Quilt Sandwich:
A quilt is made of three layers: the top, the batting, and the backing. To create the “quilt sandwich,” lay your backing fabric wrong side up on a clean, flat surface, smoothing out all wrinkles. Tape it down to your floor or table to keep it taut. Next, center your batting over the backing, ensuring it’s smooth and flat. Finally, place your finished quilt top right side up on top of the batting, centering it as well. Your batting and backing should extend a few inches beyond the quilt top on all sides.
Secure these layers together using basting pins, safety pins designed for quilting, or basting spray. Start from the center and work your way outwards, placing pins approximately every 4-6 inches. This prevents the layers from shifting during the quilting process.
Quilting Your Trailing Squares Quilt:
Quilting is the process of stitching through all three layers of the quilt sandwich to hold them together and add texture. For a beginner-friendly project like the Trailing Squares Quilt, simple straight-line quilting is often effective and beautiful. You can quilt “in the ditch” (along the seams), stitch parallel lines across the diagonals of your trailing squares, or create a grid pattern.
If you’re using a domestic sewing machine, use a walking foot to help feed all three layers evenly. Start quilting from the center of your quilt and work your way outwards to avoid puckering. Take breaks and gently roll your quilt to manage its bulk under the machine. Alternatively, you can hand quilt for a softer, more traditional look, or even send your quilt top to a long-arm quilter for professional results.
Adding the Binding:
The binding is the final border that encases the raw edges of your quilt, providing durability and a polished finish. From your 3/4 yard of binding fabric, cut 2 1/2-inch wide strips. Sew these strips together end-to-end using a diagonal seam to create one long continuous strip. Press the seams open and then press the entire strip in half lengthwise, wrong sides together.
Attach the raw edge of your folded binding strip to the raw edge of your quilt top, aligning all edges and starting on one side, leaving a tail of about 6-8 inches. Sew with a 1/4-inch seam allowance. Miter the corners as you go, and when you return to your starting point, join the ends of the binding strip neatly. Finally, fold the binding over to the back of the quilt and hand-stitch or machine-stitch it in place. This step will complete your beautiful Trailing Squares Quilt, ready for enjoyment!
Creative Variations to Personalize Your Quilt
While the Trailing Squares Quilt is stunning in its classic form, there are many ways to infuse your personal style into this versatile pattern:
- Color Play: Experiment with different background fabric colors. A dark background will make light feature squares pop, while a light background can soften the overall look. Consider using a scrappy background with various low-volume prints for added texture.
- Fabric Choices: Instead of a uniform 10-inch square pack, try using fussy-cut squares to highlight specific motifs, or mix in some solids with your prints for visual breathing room.
- Size Adaptations: This pattern is easily scalable. Use smaller pre-cut squares (e.g., 5-inch charm squares) for a doll quilt or wall hanging, adjusting your background square size and overall dimensions accordingly. For a larger bed quilt, simply make more blocks and rows.
- Border Innovations: Get creative with your outer border. Instead of the pieced HSTs, you could use a solid wide border, add a flange for extra detail, or incorporate different block designs if you’re feeling adventurous.
Your First Masterpiece: A Joyful Quilting Experience
Congratulations! You’ve not only learned how to make a beautiful Trailing Squares Quilt, but you’ve also honed valuable quilting skills that will serve you well in future projects. This pattern truly is one of the most approachable for beginners, offering a quick win and immense satisfaction. The clean lines and dynamic movement of the “trailing squares” create a sophisticated aesthetic, proving that simple techniques can yield extraordinary results. Don’t hesitate to share your finished quilt with friends and family, and perhaps inspire others to pick up a needle and thread. Every stitch tells a story, and your Trailing Squares Quilt is a testament to your creativity and perseverance. Happy quilting!