
Crafting Festive Memories: A Guide to Christmas Scrappy Quilting with the Timeless Wedding Ring Block
There’s an undeniable magic in creating something with your own hands, especially when the holiday season approaches. While quilting brings me immense joy throughout the year, the festive spirit of Christmas truly ignites a special spark, inspiring me to infuse every stitch with warmth and cheer. Nothing quite captures the essence of a bright and homey holiday season like decorative accessories crafted from patchwork remnants, fashioned into incredible seasonal flair. This year, my heart was set on a project that would not only celebrate the holidays but also make good use of my cherished collection of Christmas fabric remnants gathered over the years. The “scrappy style” was the perfect approach, allowing even the smallest pieces of fabric to contribute to a beautiful, cohesive design. It’s a wonderful way to honor past holiday memories while creating new ones.
I often find myself irresistibly drawn to fabric sales, acquiring delightful fat quarters and bundles without a specific project in mind—just the promise of future creations. I had recently acquired some charming Christmas fabrics and fantastic fat quarters from a sale at JoAnn’s Fabrics, and while I knew they were destined for something special, the exact project remained a mystery. Eager for inspiration, I turned to YouTube, searching for a brilliant Christmas quilting idea to adorn my holiday living area. It didn’t take long before I stumbled upon the breathtaking Wedding Ring Quilt Block Pattern, and I instantly knew this was it! Its classic elegance and potential for a scrappy interpretation made it an irresistible choice.
Embracing the Charm of Scrappy Christmas Quilting
Scrappy quilting offers a unique blend of sustainability, creativity, and sentimental value. For Christmas quilting, it’s particularly appealing as it allows you to utilize those treasured fabric scraps and holiday fabric remnants from previous projects or gift-wrapping endeavors. Each piece, no matter how small, contributes to a rich tapestry of color and pattern, telling its own story. This method not only helps reduce waste but also results in a truly one-of-a-kind piece that carries a history within its stitches. Imagine a quilt made from bits of fabric that once adorned a special holiday dress, a festive tablecloth, or even a child’s Christmas pajamas – it’s a beautiful way to create a tangible heirloom filled with memories.
The beauty of a patchwork Christmas item lies in its imperfection and uniqueness. Unlike store-bought decorations, a handmade quilt or accent piece speaks volumes about the care and effort invested. The vibrant medley of colors and patterns inherent in scrappy quilting lends itself perfectly to the joyful chaos and abundant spirit of the holidays. Whether you’re making a full quilt, a festive table runner, or a set of charming placemats, using a variety of Christmas-themed fabric scraps guarantees a dynamic and visually interesting result that will brighten any room.
The Iconic Wedding Ring Quilt Block: A Symbol of Enduring Craftsmanship
The Wedding Ring Quilt Block is a beloved classic in the quilting world, cherished for its elegant curves and intricate appearance. Despite its sophisticated look, the process of creating this block can be surprisingly accessible, even for those new to curved piecing. Historically, the double wedding ring pattern symbolized love, commitment, and eternity, making it a popular choice for wedding gifts and commemorative quilts. Adapting this timeless design for holiday quilt patterns lends a sense of tradition and enduring charm to your DIY Christmas decor.
What makes the Wedding Ring block particularly exciting for a scrappy Christmas quilt is its inherent versatility. Each “ring” segment can be pieced from multiple scraps, creating a kaleidoscope of color within each curve. When assembled, these blocks can be arranged in countless configurations, offering a fantastic opportunity for creative expression. The design allows for a striking interplay between the pieced rings and the solid background pieces, creating visual depth and interest. It’s a design that truly stands the test of time, and when rendered in festive fabrics, it transforms into a stunning celebration of the season.
Gathering Your Essentials: Tools for Your Christmas Quilting Journey
Before diving into the creative process, gathering the right tools is essential for a smooth and enjoyable quilting experience. For this quilting for beginners friendly project, you’ll need a few standard quilting supplies:
- Sewing Machine: A reliable machine with a quarter-inch foot is ideal for precise seams.
- Good Quality Thread: A neutral color like white or light grey often works best for piecing.
- Rotary Cutter, Mat, and Rulers: These are indispensable for accurate and efficient fabric cutting. A 2.5-inch or 6-inch by 24-inch ruler is very versatile.
- Fabric Scissors: Sharp scissors, like Olfa Scissors, are great for trimming threads and paper.
- Disappearing Fabric Marker: Essential for tracing your template onto fabric without leaving permanent marks.
- Pins: To secure fabric pieces before sewing.
- Iron and Ironing Board/Pressing Mat: Crucial for pressing seams open or to one side, ensuring flat, accurate blocks.
- Your Fabric Scraps: A joyful assortment of Christmas fabric scraps, including those precious fat quarters you’ve collected.
Investing in quality tools, particularly for cutting and pressing, will significantly impact the accuracy and overall finish of your quilt blocks. These essentials make the creative process much more enjoyable and lead to more satisfying results.
Step-by-Step: Crafting Your Scrappy Wedding Ring Quilt Block
Embarking on the Wedding Ring Quilt Block journey is a rewarding experience. Here’s how to create these beautiful components for your festive quilt ideas:
Preparing Your Fabrics and Template
The first step involves preparing your materials. Begin by sorting your Christmas-themed fabric scraps, ensuring they are all pressed flat and free of wrinkles. This is crucial for accurate cutting and sewing. Next, you’ll need the foundational template for the Wedding Ring block. I started by downloading my basic ring pattern from this incredibly helpful resource: https://mypatchwork.files.wordpress.com/2017/12/scrappy-wedding-ring-template.pdf. Once downloaded, print it out carefully, making sure your printer settings are at 100% scale to ensure the template’s dimensions are accurate. Then, precisely cut out the paper template pieces.
Precision Cutting: Bringing Your Scraps to Life
With your template ready, it’s time to cut your fabric. Lay your fabric pieces right side up. Place the paper template on your fabric and trace around it using your disappearing fabric marker. This marker is fantastic as its lines vanish after a short time or with a spritz of water, leaving no trace. For superior accuracy, especially with curves, I prefer using my new Olfa Scissors for the initial cuts, then fine-tuning with a rotary cutter for straight edges where applicable. Remember, precision in cutting is paramount for successful curved piecing, especially when working with small fabric remnants.
Mastering the Curved Seams
Now comes the exciting part: sewing! Using a technique often referred to as paper piecing or foundation paper piecing (implied by “sewing onto the paper”), you’ll begin attaching your scrappy Christmas pieces directly onto the paper template. This method helps stabilize the fabric and ensures precise curves. Align your first fabric piece over the designated area on the paper, then place the next fabric piece right sides together, aligning the edges. Pin carefully along the curve. Slow and steady stitching is key here. Sew with a consistent 1/4-inch seam allowance along the marked line, allowing the paper to guide your stitch. This careful approach prevents distortion and ensures your curves are smooth.
Trimming and Revealing Your Block Segments
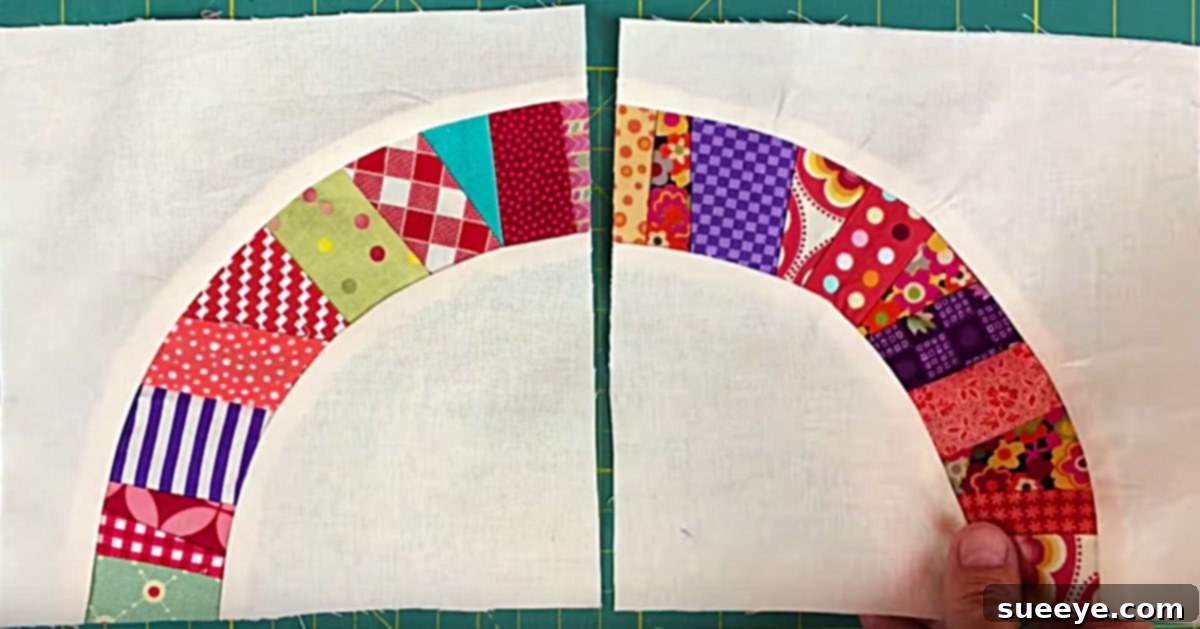
After sewing each segment, carefully trim the excess fabric, leaving a consistent seam allowance. Then, gently tear away the excess paper from around your sewn fabric pieces. The beauty of foundation paper piecing is that once the paper is removed, you’re left with perfectly formed, curved units. Press these units flat, setting the seams. You might choose to press seams open or to one side, depending on what helps your block lie flattest and reduces bulk. Consistent pressing makes a huge difference in the final look of your quilt block.
Assembling the Wedding Ring Block
Once you have all your curved segments pieced and pressed, the next step is to join them together to form the complete Wedding Ring block. This usually involves joining the curved segments into larger arcs, and then attaching the “plain parts” – the background fabric pieces that fill in the corners and center of the block. These plain parts are crucial for giving the ring its distinct shape and providing visual rest. Take your time aligning the seams and pin liberally to ensure everything matches up perfectly. Sew with a consistent 1/4-inch seam, and again, press your completed block thoroughly to remove any puckering and make it lie flat. Repeat this process for each block you intend to make.
Exploring Block Arrangements and Quilt Designs
The true magic of the Wedding Ring block unfolds when you begin to arrange multiple blocks. The tutorial I followed beautifully illustrates the many gorgeous variations for arranging these blocks. By simply rotating blocks or combining them in different sequences, you can create entirely new patterns and optical illusions. This stage is where your creativity truly shines. Experiment with different layouts on your design wall or floor. You might opt for a traditional interlocking rings pattern, or perhaps a more modern, abstract arrangement. This versatility makes the Wedding Ring block perfect for a range of DIY Christmas decor projects, from wall hangings to cozy throws, each with its own unique patchwork Christmas design.
Beyond the Block: Finishing Your Christmas Quilt Project
While mastering the block is a significant achievement, remember that a quilt project involves a few more steps to reach completion. Once all your Wedding Ring blocks are sewn and assembled into a quilt top, you’ll need to create the quilt sandwich. This involves layering the quilt top, a layer of batting (for warmth and dimension), and a backing fabric. Secure these layers together with basting spray or pins. Then comes the quilting itself – stitching through all three layers. You can choose from simple straight-line quilting, elaborate free-motion designs, or even hand quilting for a traditional touch. Finally, a beautifully sewn binding will finish the edges of your quilt, giving it a professional and durable finish. Each of these steps is an opportunity to add your personal flair and complete your handmade Christmas gifts or decor item.
Choosing Your Christmas Color Palette and Fabrics
The beauty of a scrappy quilt lies in its eclectic mix, but thoughtful fabric selection can elevate it from a random assortment to a harmonious masterpiece. When selecting Christmas fabrics, consider whether you prefer a traditional palette of rich reds, deep greens, and shimmering golds, or a more contemporary look with icy blues, silvers, and crisp whites. Don’t be afraid to mix classic holiday prints with subtle blenders or even a few novelty fabrics that tell a specific Christmas story. The goal is to create visual interest while maintaining an overall festive feel. Integrating your old Christmas fabric with new purchases can create a wonderful sense of continuity and memory in your finished piece, making your festive quilt truly unique.
The Enduring Joy of Handmade Holiday Gifts and Decor
There’s an unparalleled satisfaction in decorating your home with items you’ve created yourself, and even more so in gifting something handmade. A patchwork Christmas item, whether it’s a cozy throw or a charming wall hanging, carries a piece of your heart and soul. These creations often become cherished family heirlooms, passed down through generations, each stitch whispering tales of holidays past. The process itself offers a tranquil escape from the holiday rush, allowing you to slow down, be mindful, and immerse yourself in a creative pursuit. The joy of giving a handmade Christmas gift that took hours of love and dedication to create is truly one of the greatest pleasures of the season.
Tips for Aspiring Christmas Quilters
If you’re new to quilting or curved piecing, remember that every master was once a beginner. Start with a small project, perhaps just a single block or a small table mat, to build confidence. Don’t be afraid to make mistakes; they are part of the learning process. Invest in a good quilting book or find reliable online quilt block tutorials to guide you. Most importantly, enjoy the process! Quilting is a journey, not just a destination. Embrace the creative flow, experiment with different quilt patterns, and celebrate each finished stitch. The quilting community is incredibly supportive, so don’t hesitate to seek advice or share your progress.
Conclusion: Stitching Love into Every Christmas Memory
The Wedding Ring quilt block is so classic and versatile that you truly cannot go wrong making this design, especially when infused with the vibrant energy of Christmas scrappy quilting. It’s more than just a quilt; it’s a labor of love, a collection of memories, and a beautiful addition to your holiday decor that will be cherished for years to come. Whether you’re a seasoned quilter or just beginning your journey, this project offers a wonderful opportunity to create something truly special and personal for the festive season. Embrace your fabric stash, let your creativity lead the way, and stitch a little bit of magic into your Christmas memories this year.