
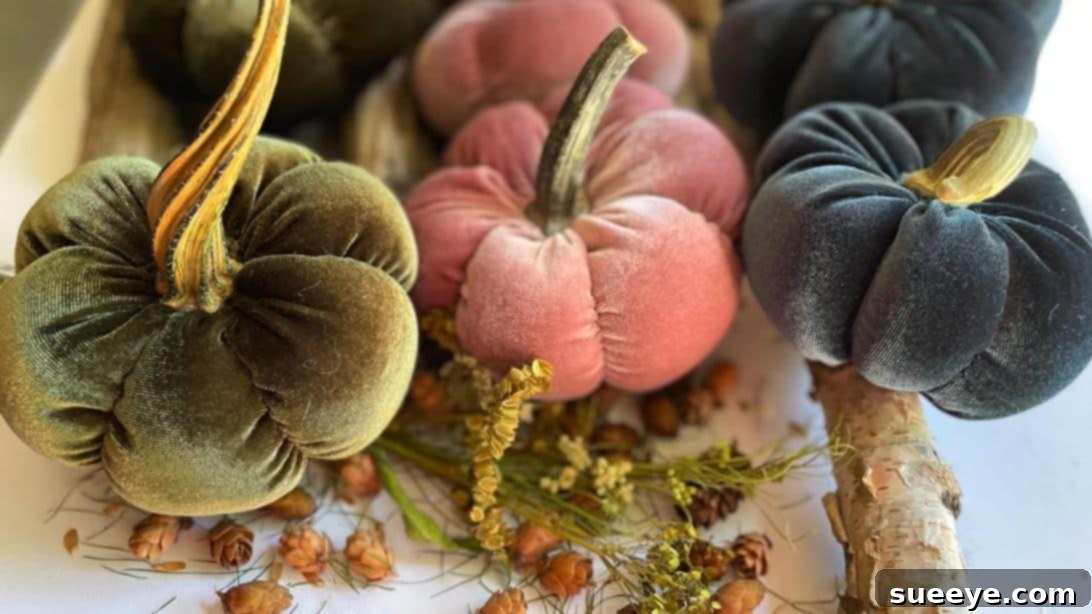
As the leaves begin to change and a crisp breeze fills the air, the desire to infuse our homes with the warmth and beauty of autumn becomes undeniable. While traditional orange and white pumpkins have their charm, imagine elevating your seasonal display with something truly magical and elegant. Enter the world of **DIY velvet pumpkins** – a sophisticated alternative that brings a touch of luxury to any fall setting.
These exquisite handmade velvet pumpkins, inspired by wonderful creators like A Well Purposed Woman on YouTube, are far more captivating than their plain counterparts. Their soft texture and rich hues instantly transform any space, making them the perfect centerpiece or accent for your autumn decor. Beyond their aesthetic appeal, crafting your own velvet pumpkins offers a delightful creative outlet, allowing you to personalize your decorations to perfectly match your unique style.
If you’ve ventured into making fabric pumpkins before, you’ll find this project remarkably straightforward, as the fundamental sewing techniques are quite similar. However, the choice of velvet fabric immediately grants these pumpkins an undeniably upscale appearance. And what truly sets these creations apart? The thoughtful addition of real, dried pumpkin stems. These authentic touches provide a rustic charm that beautifully contrasts with the plush velvet, creating a truly unique and artisanal decoration that will be admired by all.
Why Choose DIY Velvet Pumpkins for Your Fall Decor?
Beyond their undeniable beauty, there are numerous compelling reasons to embark on this DIY journey:
- Unmatched Elegance: Velvet fabric inherently exudes sophistication and luxury. When shaped into pumpkins, it creates a visual and tactile experience that elevates your decor far beyond standard craft store finds.
- Customization at Your Fingertips: Unlike mass-produced decorations, making your own allows for complete creative freedom. Choose from an endless palette of velvet colors – from deep jewel tones and traditional autumn shades to soft pastels and contemporary neutrals – to perfectly complement your home’s aesthetic. You can also experiment with different sizes and even textures of velvet.
- Cost-Effective Luxury: High-end velvet pumpkins can be quite expensive in boutiques. By crafting them yourself, you can achieve a designer look for a fraction of the cost, making elegant decor accessible.
- Personal Touch: There’s immense satisfaction in decorating your home with items you’ve created. Each pumpkin will carry a piece of your effort and creativity, making your fall display truly unique and personal.
- Sustainable and Reusable: Once made, these durable velvet pumpkins can be stored and brought out year after year, reducing waste and becoming cherished parts of your seasonal traditions. They are a fantastic eco-friendly alternative to perishable fresh pumpkins.
- Fun and Rewarding Project: Whether you’re a seasoned crafter or new to sewing, this project is enjoyable and yields beautiful results, boosting your crafting confidence.
Selecting the Perfect Materials for Your Velvet Pumpkins
The success of your DIY velvet pumpkins lies in the quality and choice of your materials. Here’s a detailed look at what you’ll need and some tips for selection:
Essential DIY Velvet Pumpkin Materials
- Velvet Fabric (in different colors): This is the star of the show. Consider various types of velvet such as stretch velvet for ease of sewing, crushed velvet for added texture, or even upholstery velvet for a more structured, substantial feel. Choose colors that resonate with your fall vision – think deep maroons, forest greens, burnt oranges, rich browns, sophisticated grays, or even unexpected blues and purples.
- Embroidery Thread: Opt for a strong, durable embroidery thread that matches or subtly contrasts with your fabric. This thread will be crucial for creating the pumpkin’s sections and cinching, so strength is key.
- Sewing Machine and Thread: While hand-sewing is possible, a sewing machine will make quick work of the main seam. Choose a good quality polyester all-purpose sewing thread that matches your velvet.
- Hot Glue Gun and Glue Sticks: Essential for securely attaching the pumpkin stems. Make sure your glue gun is clean and ready.
- Sharp Scissors: For precise fabric cutting. A rotary cutter and mat can also be very helpful for straight lines.
- Pumpkin Stem: The secret ingredient for that authentic touch! Real dried pumpkin stems are ideal. If you don’t have access to fresh pumpkins, check craft stores or online for dried or realistic artificial stems. You can also use twigs for a more rustic look.
- Rice, Pebbles, or Sand: A small amount of one of these will provide weight at the base of your pumpkin, ensuring it sits firmly and doesn’t topple over easily.
- Polyfill (Polyester Fiberfill): This is for stuffing your pumpkins to give them their plump, soft shape. Ensure you have enough to create firm, shapely pumpkins without making them lumpy.
Sourcing and Preparing Real Pumpkin Stems
The use of real pumpkin stems truly elevates these velvet creations. Here’s how to acquire and prepare them:
- Harvesting: When you’re carving pumpkins for Halloween or cooking with gourds, carefully cut the stems off. Try to get a good length, perhaps 1-2 inches, and ensure they are clean.
- Drying:
- Oven Method: This is a quick way to dry stems. Preheat your oven to its lowest setting (around 170-200°F or 75-95°C). Place the stems on a baking sheet lined with parchment paper. Bake for several hours, checking periodically, until they are completely dry, hard, and light. Be careful not to burn them.
- Air Drying: Simply place the stems in a dry, well-ventilated area for several weeks. This method takes longer but is equally effective.
- Storage: Once dried, store them in a dry place until ready to use.
Alternative Stems: If real stems are hard to come by, don’t fret! Craft stores offer a variety of faux pumpkin stems made from resin or plastic that look incredibly realistic. You can also use sturdy twigs collected from your yard for a more natural, woodland aesthetic.
RELATED: DIY Dollar Tree Mop Pumpkins
Here’s another project for you: Easy DIY Dollar Tree Pumpkin Light
How to Make Elegant Velvet Pumpkins with Sections: A Step-by-Step Guide
This detailed tutorial will guide you through creating stunning velvet pumpkins, complete with the charming sections that give them their classic shape. Take your time with each step for the best results!
Step 1: Preparing and Cutting Your Fabric
Begin by carefully cutting your velvet fabric. For a medium-sized pumpkin, a dimension of **16 inches by 9 inches** (approximately 40 cm by 23 cm) works well. This size allows for a substantial pumpkin while still being manageable. Use sharp scissors or a rotary cutter to ensure clean, straight edges. Precision in this step will make sewing much easier later on. Remember, you can adjust these dimensions to create larger or smaller pumpkins – just maintain a roughly 2:1 ratio for length to height (or width).
Step 2: Forming the Fabric Tube
Take your cut fabric piece and fold it in half, ensuring the **right sides of the fabric are together**. This means the plush, visible side of the velvet should be on the inside. Align the raw edges perfectly. Using your sewing machine, sew a straight seam along this open edge, creating a tube. A standard 1/2-inch (1.25 cm) seam allowance is usually sufficient. Remember to backstitch at the beginning and end of your seam to secure the stitches. Once sewn, carefully trim any excess fabric close to the seam to reduce bulk, particularly if your velvet is thick.
Step 3: Cinched Bottom Edge (The Pumpkin’s Base)
Now, it’s time to create the bottom of your pumpkin. Thread your needle with an 18-inch (45 cm) length of **matching embroidery thread**, tying a secure knot at the end. Hand-stitch a running stitch or gathering stitch along one of the raw edges of your fabric tube. Work your way from one end to the other, making consistent stitches. Once you’ve stitched across the entire edge, **pull the thread tightly** to cinch up the opening, gathering the fabric into a tight bundle. To reinforce this closure, thread the needle back and forth through the center of the gathered fabric several times, pulling firmly. Tie off the thread with three to four strong knots to ensure the bottom is completely sealed and secure. Trim any excess thread.
Step 4: Adding Weight and Stuffing the Pumpkin
Turn your fabric tube **right side out**, revealing the beautiful velvet exterior. First, add a small amount of weight to the bottom. This can be about 1/4 to 1/2 cup of **sand, small pebbles, or rice**. This weighted base is crucial for preventing your finished pumpkin from toppling over and gives it a satisfying, stable feel. Next, begin to stuff the fabric tube with **polyfill**. Start by pushing polyfill into the bottom corners, then gradually fill the pumpkin, ensuring an even distribution. Aim for a firm, plump shape without making it so tight that the fabric is stretched or lumpy. Take your time to mold and shape the polyfill as you go, achieving your desired pumpkin form.
Step 5: Closing the Top Edge
With the pumpkin fully stuffed, it’s time to close the top. Just as you did with the bottom, perform a basting stitch (a long running stitch) all the way around the top raw edge of the fabric. Once the stitch is complete, gently pull the thread to gather the fabric and close the opening. Before pulling it completely tight, ensure the polyfill is neatly tucked in. To secure it firmly, thread the needle in and out of the center of the gathered fabric three to four times, pulling tightly with each pass. Finish by making three to four strong knots to secure the closure. Carefully trim any excess thread and fabric from the top, ensuring a neat base for your stem.
Step 6: Creating the Characteristic Pumpkin Sections
This step gives your velvet pumpkin its iconic segmented look. Cut a generous length of **embroidery thread, approximately 30 to 36 inches** (75-90 cm). Thread your needle. Starting from the bottom center of the pumpkin (where you initially cinched the fabric), push the needle all the way through the pumpkin to the top center. Pull the thread through, leaving a tail at the bottom that you can tie off later. Now, gently but firmly pull the thread to create an indentation. Carefully rotate the pumpkin and repeat this process 5 more times, creating a total of **6 evenly spaced sections** around the pumpkin. Each time, thread from the bottom center to the top center, pulling tightly to define the segment. Once all sections are created, ensure they are even and well-defined. Secure the thread at the bottom center with three to four strong knots, reinforcing the indentations. Trim excess thread.
Step 7: Attaching the Real Pumpkin Stem
The final touch! Heat up your hot glue gun. Apply a generous amount of hot glue to the bottom of your dried pumpkin stem. Carefully position the stem onto the top center of your velvet pumpkin, pressing down gently but firmly. Hold it in place for a minute or two until the glue sets completely. Ensure the stem is centered and stands upright. If needed, you can add a little more glue around the base of the stem for extra security. And just like that, your exquisite DIY velvet pumpkin is complete!
Tips for Success and Customization
- Practice Makes Perfect: If you’re new to sewing, consider doing a quick practice run on a scrap piece of fabric to get comfortable with the gathering and sectioning techniques.
- Vary Sizes: Don’t stick to just one size! Create a collection of velvet pumpkins in different dimensions for a more dynamic and visually interesting display. Smaller pumpkins look adorable clustered together, while larger ones make a statement.
- Experiment with Fabric: While velvet is key for this elegant look, don’t hesitate to experiment with other luxurious fabrics like corduroy, tweed, or even faux fur for different textures and seasonal looks.
- Embellish for Extra Flair: Once your pumpkins are complete, you can add further embellishments. Consider tying a rustic twine bow around the stem, adding small artificial leaves, beads, or even a personalized tag.
- Scented Pumpkins: For an extra sensory experience, add a few drops of essential oils (like cinnamon, clove, or pumpkin spice) onto a cotton ball and tuck it into the polyfill before closing the top.
- Care and Storage: To keep your velvet pumpkins looking pristine year after year, gently spot clean any marks. When storing them, place them in a box with tissue paper to protect the velvet from dust and crushing.
Displaying Your Elegant Velvet Pumpkins
Once your collection of beautiful velvet pumpkins is complete, it’s time to showcase them!
- Centerpieces: Arrange a variety of sizes and colors on your dining table or coffee table as a stunning fall centerpiece. Add some natural elements like acorns, pinecones, or real autumn leaves.
- Mantelpiece Magic: Line your fireplace mantel with velvet pumpkins, perhaps interspersed with candles, garlands, or fairy lights for a warm glow.
- Entryway Welcome: Place a few velvet pumpkins on a console table or shelf in your entryway to greet guests with seasonal charm.
- Shelf Styling: Tuck smaller pumpkins onto bookshelves or open shelving units to add subtle autumnal accents throughout your home.
- Gift Ideas: Handmade velvet pumpkins make thoughtful and unique hostess gifts, housewarming presents, or favors for fall events.
Embrace the Beauty of Handmade Fall Decor
Creating your own **DIY velvet pumpkins with real stems** is more than just a craft project; it’s an opportunity to infuse your home with unparalleled elegance and personal charm this autumn. These luxurious, soft pumpkins offer a refreshing alternative to traditional decor, bringing a sophisticated touch to any space.
With this comprehensive guide, you have all the tools and knowledge to craft a stunning collection that will not only impress your guests but also fill your home with the cozy, inviting spirit of the season. So gather your beautiful velvet fabric, prepare those rustic stems, and start sewing your way to the most elegant fall decor you’ve ever had. Happy crafting, and enjoy the beauty of your handmade creations!