
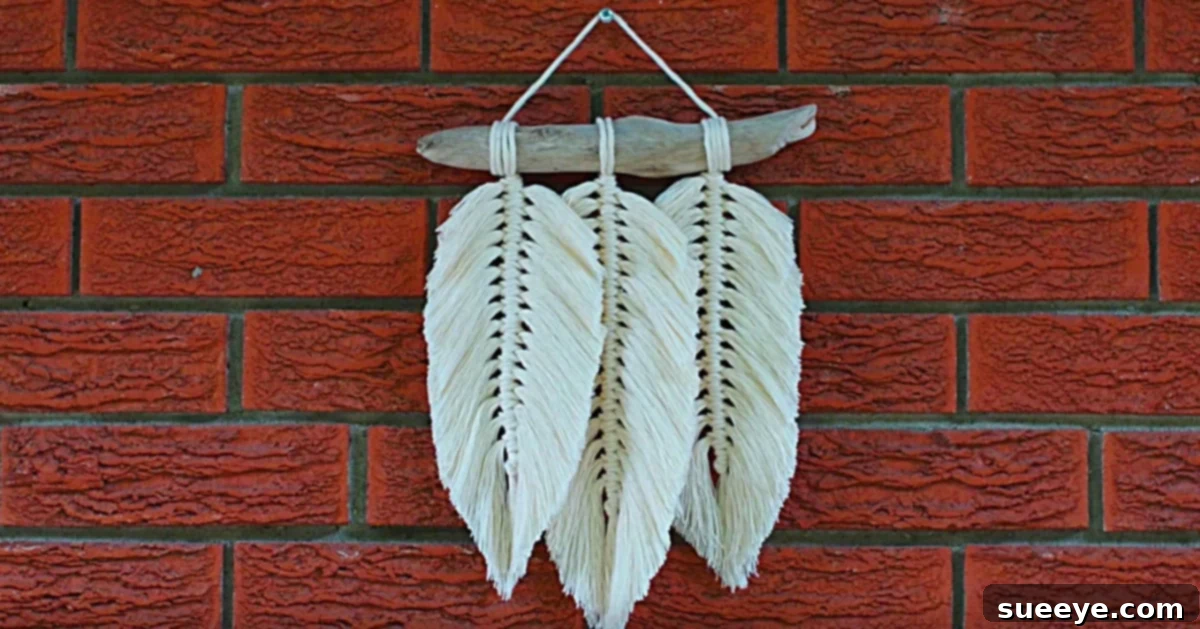
DIY Macrame Feather Wall Hanging: Craft Your Own Bohemian Masterpiece
Macrame, the ancient art of knot-tying, has enjoyed a remarkable resurgence, transitioning from a beloved 1970s classic to a sophisticated element in modern home decor. From breathtaking hanging plant holders to intricate wall tapestries, macrame pieces bring an unparalleled texture and organic beauty to any space. If you’ve been captivated by the elegant, bohemian aesthetics showcased in design magazines like Architectural Digest but felt intimidated by complex knotting techniques, you’re in the right place. This guide is dedicated to a project that perfectly balances artistic appeal with beginner-friendliness: the macrame feather wall hanging.
I recently embarked on a quest to create a macrame wall hanging that was not only beautiful but also achievable within a short timeframe. My search led me to an inspiring online tutorial for a macrame feather wall hanging, and I was immediately drawn to its simplicity and charming design. The feather motif resonated perfectly with my existing collection of Native American-inspired dream catchers, promising to blend seamlessly into my home’s natural aesthetic. What made this project even more appealing was its clear, step-by-step instructions and a remarkably basic materials list, making it an ideal choice for anyone new to the art of macrame.
Sourcing the necessary supplies was part of the fun. I found everything I needed at a popular craft store, and to my delight, I discovered the power of stacking coupons, making the entire endeavor incredibly affordable. This project proves that creating stunning, personalized home decor doesn’t have to break the bank or require years of crafting experience. It’s about embracing simple techniques and letting your creativity take flight. Join me as we delve into crafting a beautiful macrame feather wall hanging that will undoubtedly become a cherished piece in your home.
Why Choose a Macrame Feather Wall Hanging?
The allure of macrame feather wall hangings lies in their unique blend of simplicity and decorative impact. Unlike larger, more complex macrame pieces, feathers are relatively quick to create, making them highly satisfying for beginners. They offer a host of benefits:
- Beginner-Friendly: The primary techniques involve basic knots and brushing, making it accessible even for those with no prior macrame experience.
- Bohemian Chic: Feathers naturally evoke a free-spirited, earthy vibe that complements various decor styles, from boho and rustic to minimalist and Scandinavian.
- Customization Potential: Easily adapt the size, color, and number of feathers to suit your personal taste and space.
- Natural Elements: Incorporating materials like cotton string and driftwood brings a grounding, organic feel into your home.
- Quick Gratification: You can complete one or several feathers in a single crafting session, providing a quick sense of accomplishment.
Whether you’re looking to add a subtle accent to a small nook or create a striking focal point above a mantelpiece, macrame feathers offer a versatile and charming solution. Their delicate texture and flowing lines create visual interest, adding warmth and personality to any room.
Gathering Your Essential Supplies for Macrame Feather Creation
One of the most appealing aspects of this project is the simplicity of its material list. You won’t need an extensive array of specialized tools or costly fibers. Here’s a breakdown of the key items, along with tips for selecting the best options:
Materials:
- 3mm Single Strand Twisted Cotton String: This is the star of our project. Single-strand twisted cotton is ideal because it frays beautifully, creating that soft, feathery texture we desire. The 3mm thickness offers a good balance between ease of knotting and sufficient volume for the feathers.
- Why it works: Its twisted construction allows it to be easily unraveled and brushed out, resulting in a fluffy, uniform fringe. It’s also soft to the touch and comes in a wide array of natural and dyed colors.
- Alternatives: While 3mm is recommended, you could experiment with 2mm for a finer feather or 4mm for a more robust one. Avoid braided cords, as they do not unravel easily. Natural fibers like jute or hemp can also be used, but their texture might be coarser and harder to brush out smoothly.
- Shopping Tip: Consider purchasing a larger spool if you plan to make multiple feathers or other macrame projects in the future.
- A piece of Driftwood (roughly about ten inches long): This natural element provides the perfect organic base for your wall hanging. Its unique shapes and textures add character.
- Why it works: Driftwood brings an authentic, rustic, and bohemian aesthetic. Each piece is unique, adding a personalized touch to your artwork.
- Alternatives: If driftwood isn’t readily available, a smooth wooden dowel rod, a sturdy tree branch (cleaned and dried), or even a copper pipe can serve as excellent substitutes. For a polished look, you could sand and stain a dowel rod.
- Size Consideration: A 10-inch piece is suitable for a small to medium-sized hanging with several feathers. Adjust the length based on how many feathers you intend to create and their desired spacing.
- A Pet Brush (Wahl Brand from Walmart works well): This might seem unconventional for a craft project, but a fine-toothed pet brush is indispensable for achieving the fluffy feather effect.
- Why it works: The closely spaced, sturdy bristles of a pet brush are perfect for detangling and separating the individual strands of cotton string, transforming them into a soft fringe.
- Selection Tip: Look for a brush designed for long-haired pets, as these often have the ideal bristle density. A slicker brush or a fine-toothed comb can also work, but a good quality pet brush will give the best results.
- Scissors (Loops and thread scissors from Michael’s work well): Sharp scissors are crucial for clean cuts and precise shaping.
- Why it works: Sharp fabric or craft scissors will ensure clean edges when cutting your string lengths and allow for precise trimming to shape your feathers perfectly. Dull scissors can fray the ends and make the cutting process frustrating.
- Recommendation: Invest in a good pair of craft scissors that you reserve specifically for fabric and string to keep them sharp.
Step-by-Step Guide to Crafting Your Macrame Feather Wall Hanging
Creating your macrame feather wall hanging is an incredibly rewarding process. The tutorial simplifies the steps beautifully, allowing you to focus on the joy of creation. Let’s break down each stage in detail.
Preparation is Key: Setting Up Your Workspace
Before you begin knotting, it’s helpful to prepare your workspace. Find a clean, well-lit area where you can comfortably sit or stand. You might want a surface where you can lay out your string or even a hook from which to hang your driftwood as you work, especially for attaching the initial cords. Gather all your materials so they are within easy reach.
Cutting Your String Lengths: This is a crucial first step. The tutorial suggests cutting your string lengths, and for good reason. For each feather, you’ll need one “main” cord to serve as the spine and numerous shorter cords for the “fluff.” A good starting point for a feather on a 10-inch driftwood piece would be:
- Main Cords: Cut several pieces (e.g., 5-7 pieces if you want to make 5-7 feathers) that are roughly 20-24 inches long. These will be folded in half to create the hanging loop and the central spine of each feather.
- Cross Cords (Fluff): For each feather, you will need approximately 20-30 pieces of string, each about 8-10 inches long. The exact number will depend on how dense you want your feathers to be. It’s always better to cut a few extra! Consistency in length here is important for uniform feathers.
Crafting the Macrame Base and First Feather
The journey begins by attaching your main cords to the driftwood and establishing the spine of each feather. This foundational step is straightforward and sets the stage for your beautiful creation.
To start, take one of your long main cords and fold it in half. Drape the folded loop over your driftwood. Then, thread the two loose ends of the string through the loop. Pull tightly to secure it with a Lark’s Head knot. Repeat this process for each main cord, spacing them evenly across your driftwood. These will be the foundational “spines” of your feathers. The key here is to ensure consistent tension and spacing to create a balanced look across your driftwood. Once all your main cords are attached, you’ll begin building the feather’s structure.
Adding the Feather Fluff: Building Volume and Texture
This is where your feather truly begins to take shape, as you add the “fluff” that gives it volume and character. The process involves tying the shorter cross pieces onto the main cords.
For each feather, take one of your shorter cross cords and fold it in half. Place the folded loop under the two vertical main cords. Then, take another folded cross cord and place its loop over the main cords, threading its ends through the loop of the first cross cord. This forms a simple square knot variation or a double half hitch knot (depending on the specific tutorial, but the principle is similar: securing horizontal cords to vertical ones). Alternate the direction of the knot for an even look. Continue tying these cross cords, working your way down the main cord. The more cords you add, the fuller and denser your feather will be. Push the knots closely together to minimize gaps and ensure maximum fluffiness later on. Aim to create a symmetrical shape as you go, envisioning the final feather outline.
Brushing Out and Shaping Your Feathers: The Magical Transformation
Now comes the most satisfying part: transforming the knotted cords into soft, flowing feathers. This step uses your pet brush to unravel the twisted cotton string.
Lay a feather flat on a clean surface. Starting from the bottom tip of the feather, gently begin to brush out the individual strands of each cross cord with your pet brush. Work slowly and patiently, moving from the bottom upwards and outwards towards the sides. You’ll see the twisted cotton strands separate and fluff up, creating a beautiful, soft fringe. Continue brushing until all the cords are completely unraveled and fluffy. Once brushed, use your sharp scissors to carefully trim and shape each feather. You can opt for a classic teardrop shape, a more pointed look, or even a rounded, softer edge. Don’t be afraid to experiment with the shaping; you can always trim a little more if needed. For consistency, you might consider creating a paper template for your desired feather shape to guide your trimming.
Finishing Touches and Hanging Your Artwork
Once all your feathers are knotted, brushed, and shaped, it’s time for the final details that elevate your piece.
- Attaching a Hanging Loop: If your driftwood doesn’t already have one, attach a simple loop of cotton string to both ends of the driftwood for easy hanging. A basic overhand knot or a double knot will secure it.
- Optional Stiffening: For feathers that need to maintain a very precise shape or resist tangling, you can lightly spray them with a fabric stiffener or a diluted mixture of white glue and water (50/50). Hairspray can also offer a temporary hold. Apply sparingly and allow to dry completely.
- Arrangement: Take a step back and admire your creation. Arrange the feathers on the driftwood as desired, ensuring they hang evenly and create a harmonious display.
Tips for Personalizing Your Macrame Feather Wall Hanging
One of the joys of DIY projects is the ability to infuse them with your unique style. Here are some ideas to personalize your macrame feather wall hanging:
- Color Palette: While natural cream is classic, don’t shy away from experimenting with colored cotton strings. Create an ombre effect by using strings of varying shades, or make a vibrant piece with a rainbow of feathers.
- Size and Number: Vary the size and length of your feathers to create a dynamic composition. Combine tiny accent feathers with larger, more prominent ones. The number of feathers is also up to you – a single large feather can be a statement, while a cluster creates a fuller display.
- Embellishments: Consider adding small wooden beads, painted details, or even tiny bells to the main cords for extra texture and charm. Incorporate dried flowers or small pieces of polished stone for a truly natural look.
- Different Knotting Styles: Once comfortable with the basic technique, explore variations in how you tie the cross cords. Different knots can create subtle textural differences in the feather’s body.
- Driftwood Alternatives: If using a wooden dowel, consider painting it in a complementary color, wrapping it with thin macrame cord, or staining it to match your decor.
Caring for Your Macrame Artwork
To keep your macrame feather wall hanging looking its best for years to come, a little care goes a long way:
- Dusting: Gently dust your feathers with a soft brush or a lint roller. For deeper cleaning, you can very gently shake them outdoors.
- Preventing Tangling: If the feathers become a little messy, you can gently comb them back into shape with your pet brush. Avoid placing them in high-traffic areas where they might be frequently bumped.
- Sunlight Exposure: While natural light is lovely, prolonged direct sunlight can cause natural fibers to fade over time. Position your artwork where it receives indirect light if possible.
This project is more than just a craft; it’s an opportunity to connect with a beautiful art form and create something truly meaningful for your home. The satisfaction of seeing your raw materials transform into an elegant piece of decor is immensely rewarding. I truly hope you enjoy creating your macrame feather wall hanging as much as I did, and that it brings a touch of handmade charm and bohemian serenity to your living space. Happy knotting!