
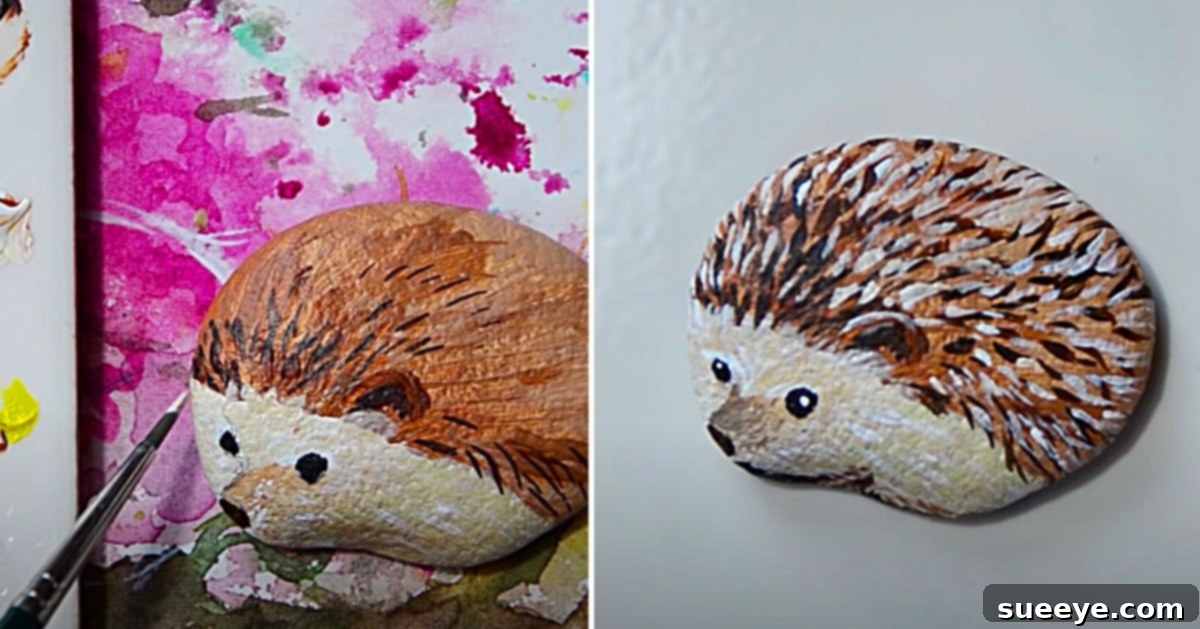
How to Paint Adorable Hedgehog Rocks: An Easy DIY Art Project for All Ages
There’s something truly enchanting about hedgehogs. Their charming features and shy demeanor make them delightful creatures, and lately, I’ve found myself inspired to capture their essence through art. The idea of “immortalizing” these adorable little mammals led me down a creative path, ultimately landing on rock painting – a wonderfully accessible and enjoyable art form. I stumbled upon an incredible hedgehog painting tutorial by Annamoon Fine Art on YouTube, and immediately knew it was the perfect project. Not only is it visually appealing, but it also promised to be a fantastic, engaging activity for the entire family.
Rock painting holds a special place in my heart. I often find joy in creating hand-painted mandala rocks, which are surprisingly simple to make, requiring just a pencil and a few Q-tips. The meditative process and satisfying results make them incredibly fun. This hedgehog concept, however, resonated with me on a deeper level. It instantly brought back cherished memories of my husband’s family country house in England, nestled in the picturesque open fields of East Anglia. Those fields were bustling with so many cute hedgehogs, and my husband and I spent countless hours trekking through the English countryside, delighted by every sighting of these charming critters.
What truly captivated me about the Annamoon Fine Art tutorial was how strikingly similar the hedgehog image was to the actual hedgehogs we encountered in England. It felt as if I already knew the little face peering from the screen, igniting an eager excitement to bring these familiar creatures to life on stone. This project isn’t just about painting; it’s about reconnecting with nature, cherishing memories, and creating something beautiful and tangible that can brighten any space or be shared as a thoughtful gift. Join me as we explore how to transform ordinary rocks into miniature works of art featuring our beloved prickly friends.
Why Embrace Hedgehog Rock Painting?
Hedgehog rock painting is more than just a craft; it’s a delightful blend of creativity, mindfulness, and connection to nature. This art form offers numerous benefits, making it an ideal activity for individuals and families alike. Engaging in rock painting can be incredibly relaxing, allowing you to unwind and focus on the present moment, much like meditation. It provides a wonderful outlet for self-expression, where you can experiment with colors, textures, and designs to create a unique piece of art.
Beyond personal enjoyment, these charming hedgehog rocks make fantastic gifts. Imagine surprising a loved one with a hand-painted hedgehog, a personalized token of affection that brings a smile. They can also serve as unique garden decorations, bringing a whimsical touch to your outdoor space, or delightful indoor accents on shelves and windowsills. Furthermore, rock painting encourages an appreciation for natural elements, transforming simple stones found in your environment into cherished works of art. It’s a low-cost, high-reward hobby that fosters creativity, patience, and a sense of accomplishment.
Materials You’ll Need:
Gathering the right materials is the first step to a successful rock painting adventure. While the list is simple, choosing quality supplies can make a significant difference in the final outcome and durability of your hedgehog rock art. Here’s a detailed look at what you’ll need:
- Craft Paint: Acrylic craft paints are ideal for rock painting. They are water-based, easy to clean up, and come in a vast array of colors. Look for paints labeled “multi-surface” or “outdoor” if you plan to display your rocks outside, as these tend to be more durable and weather-resistant. You’ll typically need shades of brown, black, white, and a touch of pink or blush for the hedgehog’s nose and cheeks. Don’t hesitate to mix colors to achieve the perfect earthy tones.
- A Rock (Smooth, like a River Rock): The foundation of your artwork! Selecting the right rock is crucial. Look for smooth, flat, or slightly rounded rocks, similar to river rocks. Their even surface makes it much easier to draw and paint without encountering bumps or uneven textures. Rinse your chosen rock thoroughly with soap and water, then allow it to dry completely before you begin painting. This ensures better paint adhesion.
- Paintbrushes: A variety of brush sizes will be beneficial. You’ll need a fine-tipped brush for intricate details like eyes, nose, and quills, a medium-sized brush for applying base colors, and possibly a slightly larger flat brush for broader areas. A small round brush is often perfect for outlining and filling in smaller shapes. Synthetic brushes are durable and work well with acrylic paints.
- A Pallet (to put your paint on): Any non-porous surface can serve as a palette. This could be a plastic plate, a ceramic tile, a piece of wax paper, or even a dedicated artist’s palette. Having a palette helps you organize your colors, mix new shades, and prevents wasting paint directly from the bottles.
- Optional but Recommended:
- Pencil (HB or 2B): For sketching your hedgehog’s outline before painting. It allows for easy corrections.
- Sealant/Varnish (Clear, Gloss or Matte): A crucial step for protecting your finished artwork, especially if it will be placed outdoors. Look for an outdoor-grade, waterproof sealant in a spray can or brush-on formula.
- Q-tips or Toothpicks: Great for tiny dots (like eye highlights) or for gently nudging paint into small areas.
- Water Container and Paper Towels: Essential for cleaning brushes between colors and blotting excess water.
Step-by-Step Guide to Painting Your Hedgehog Rock:
This awesome hedgehog painting tutorial by Annamoon Fine Art on YouTube provides an excellent visual guide, breaking down the process into quick and easy steps. However, let’s walk through the details to ensure your hedgehog creation is as charming as possible!
Step 1: Preparing Your Rock and Sketching the Hedgehog’s Face
Begin by ensuring your chosen rock is clean and completely dry. Using your pencil, gently sketch the basic outline of your hedgehog. Start with a simple oval shape for the body, then draw a smaller, pointed oval for the face, extending slightly from one end of the body. Focus on creating a cute, friendly expression. Draw two small circles for the eyes and a tiny inverted triangle or heart shape for the nose at the tip of the snout. Don’t worry about perfection; the pencil lines are just a guide and can be adjusted or painted over. This initial sketch sets the foundation for your adorable critter.
Step 2: Applying the Base Colors
Once your sketch is complete, it’s time to bring your hedgehog to life with paint! Start by applying a base color to the body of the hedgehog. A medium brown or a light tan is usually a good choice. Use a medium-sized brush to carefully fill in the main body area, avoiding the face and ear sections. Allow this layer to dry completely. For the face, choose a lighter cream or very light brown, carefully painting within the facial outline. Two thin coats are often better than one thick coat, ensuring smooth, even coverage and preventing streaks. Let each layer dry thoroughly before moving on.
Step 3: Defining Facial Features and Body Details
Now comes the fun part: adding the intricate details that give your hedgehog personality. With a fine-tipped brush and black paint, carefully outline the eyes and fill them in. Add a tiny white dot in each eye for a reflective highlight – this instantly makes the hedgehog look more alive and sparkling. Paint the nose black, making it slightly glossy if desired. You can add a delicate pink or reddish blush to the cheeks with a dry brush for a touch of warmth. For the hedgehog’s spiky texture, use a darker brown or even black paint and your fine brush. Create short, overlapping strokes radiating outwards from the body, mimicking the appearance of quills. Vary the length and direction slightly to give a natural, textured look. This step really transforms your basic outline into a recognizable hedgehog.
Step 4: Adding Shadows, Highlights, and Finishing Touches
To give your hedgehog more depth, consider adding subtle shadows and highlights. A slightly darker brown can be used to create shadows along the underside of the hedgehog’s body or beneath its face, while a lighter tan or white can be dry-brushed lightly over the quills to make them pop. You might also add a little green moss or tiny white flowers around the base of the hedgehog to create a miniature scene. Ensure all paint layers are completely dry before proceeding to the final step.
Step 5: Sealing Your Hedgehog Rock
This is a critical step, especially if your hedgehog will live outdoors. Once all the paint is completely dry (allow at least 24 hours for curing), apply a clear sealant or varnish. A spray sealant is often the easiest to apply evenly. Follow the product instructions for application and drying times. Typically, multiple thin coats are better than one thick coat, providing maximum protection against UV rays, moisture, and general wear and tear. This final layer will protect your artwork, ensuring your adorable hedgehog rock remains vibrant and beautiful for years to come.
Tips for Beginners and Enthusiasts:
- Practice Makes Perfect: Don’t be afraid to practice your hedgehog sketch on paper before committing to the rock. This builds confidence and refines your design.
- Work in Thin Layers: Applying paint in thin, even layers prevents clumping and allows for smoother blending.
- Patience is Key: Allow each layer of paint to dry completely before applying the next. Rushing can lead to smudges and mixing of colors.
- Embrace Imperfection: Hand-painted items have a unique charm. Don’t stress over tiny imperfections; they add character to your creation.
- Experiment with Colors: While traditional hedgehogs are brown, feel free to get creative with your color palette. Imagine a purple or blue hedgehog for a whimsical touch!
- Personalize Your Hedgehog: Add tiny accessories like a ladybug on its back, a small flower behind its ear, or even a tiny mushroom beside it to make your hedgehog truly unique.
Sharing Your Creations
Once your hedgehog rocks are complete and sealed, the joy doesn’t have to end! These charming pieces are perfect for hiding in local parks or gardens for others to find, participating in the growing trend of “kindness rocks.” You can write a friendly message or your social media handle on the back. They also make thoughtful, handmade gifts for friends, family, or teachers. Display them in your own home or garden, and let them serve as a constant reminder of the simple pleasures of nature and creativity. Don’t forget to share your finished hedgehog rocks on social media – inspire others and connect with fellow rock painting enthusiasts!
I love rock painting, and this hedgehog project has quickly become a real favorite of mine. The satisfaction of transforming a simple stone into such a delightful creature is immense. It’s a testament to how accessible and rewarding art can be, reminding us to slow down, connect with nature, and unleash our inner artist. I encourage you to pick up a rock, some paints, and embark on your own hedgehog painting journey. You might just discover a new passion!