
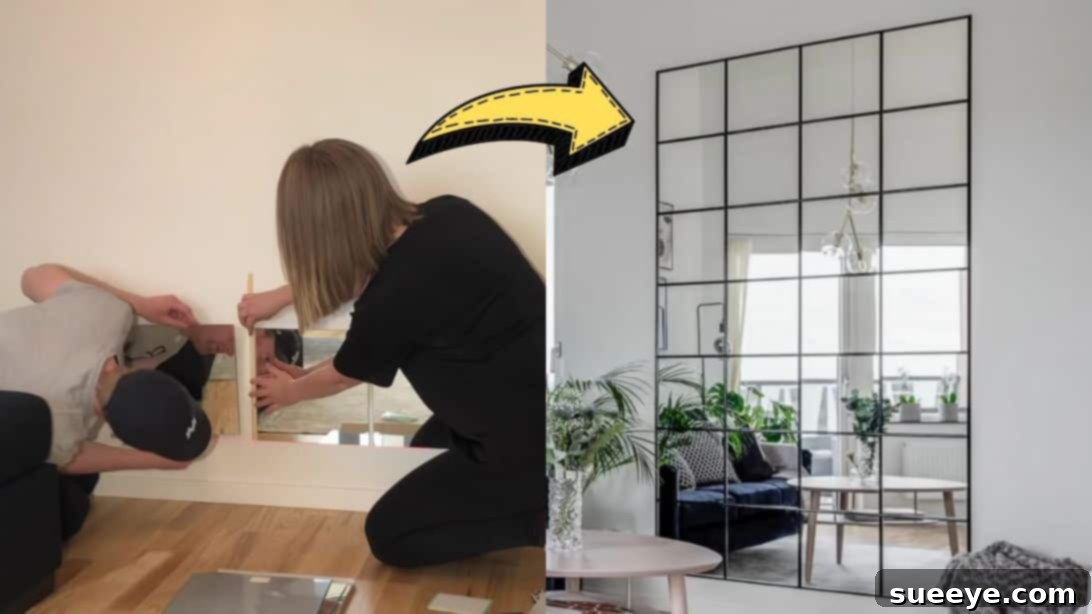
Transform Your Living Room: DIY IKEA Mirror Wall Hack Under $85
Are you dreaming of a brighter, more spacious living area but find yourself limited by budget or a smaller room size? The secret to achieving an open, airy feel often lies in the clever use of mirrors. However, investing in a single, large statement mirror can be surprisingly expensive, and finding one that perfectly fits your wall can be a challenge. What if you could create an impressive, custom-look mirror wall that not only elevates your home decor but also comes in at an unbelievably low cost? This innovative DIY IKEA mirror wall hack is your answer!
Say goodbye to cramped spaces and hello to an expansive, aesthetically pleasing environment. With just a few affordable square mirror stickers from IKEA, along with some common household materials, you can craft a stunning feature wall that looks like a high-end installation. The best part? This entire project can be completed for under $85, making it an incredibly budget-friendly way to refresh your home. Get ready to impress your guests and enjoy a transformed living space!
Why Choose This DIY IKEA Mirror Wall Hack?
This particular DIY project stands out for several compelling reasons. Firstly, it offers an incredible aesthetic upgrade without breaking the bank. Traditional large mirrors can cost hundreds, if not thousands, of dollars. By utilizing IKEA’s affordable LOTS mirror tiles and a few simple moldings, you achieve a similar grand effect for a fraction of the price. This makes it an ideal solution for anyone looking to enhance their home decor on a tight budget.
Secondly, the visual impact is profound. Mirrors are renowned for their ability to reflect light, making any room appear larger, brighter, and more inviting. This hack effectively doubles the perceived size of your living room, creating a sense of depth and openness that can dramatically improve the overall ambiance. It’s perfect for smaller apartments or rooms that lack natural light, instantly making them feel less enclosed.
Furthermore, this DIY project is surprisingly accessible. You don’t need extensive woodworking experience or specialized tools. The steps are straightforward, and the materials are readily available. It’s a rewarding project that allows you to personalize your living space and add a unique touch that store-bought items simply can’t replicate. Whether you’re a seasoned DIY enthusiast or a complete beginner, you’ll find this project both achievable and satisfying. Let LivingDIY on YouTube guide you through each step, ensuring a smooth and successful transformation.
Essential Materials for Your IKEA Mirror Wall Project
Gathering all your materials before you begin is crucial for a seamless DIY experience. Here’s a detailed list of what you’ll need, along with some tips for selection and usage:
- 7 Packages of IKEA LOTS Mirrors: These are the star of our show. Each package typically contains four square mirror tiles, measuring approximately 11×11 inches (30×30 cm). The exact number of packages you’ll need may vary depending on the size of your wall and the desired coverage. It’s always better to have an extra package or two on hand to account for any mishaps or if you decide to expand your design. Their self-adhesive backing makes installation simple, though additional adhesive can be used for extra security.
- ¼ Inch Round Moldings: These moldings will create the elegant grid effect that transforms individual mirror tiles into a cohesive, large mirror wall. The ¼ inch thickness provides a subtle yet defined frame. You’ll need enough length to cover all horizontal and vertical seams between your mirrors, plus the outer frame. Measure your wall and plan your mirror layout beforehand to accurately calculate the total molding length required. You can typically find these in long strips at hardware stores.
- Miter Saw: A miter saw is essential for cutting your moldings at precise angles, especially for creating clean, professional-looking corners for your frame. While a manual miter box and saw can work for smaller projects, an electric miter saw offers greater speed and accuracy. Always prioritize safety when using power tools; wear protective eyewear and follow the manufacturer’s instructions.
- Sealant Glue (Strong Adhesive): You’ll need a strong construction adhesive or sealant glue specifically designed for bonding wood to walls. This will be used to securely attach your moldings to the wall. Look for a quick-drying formula that offers strong initial grab to prevent the moldings from slipping during installation. Make sure it’s suitable for your wall type.
- Spray Paint (Color of Your Choice): This is where you can truly customize your mirror wall. Choose a spray paint color that complements your existing decor. Matte black offers a sophisticated, modern look, while metallic gold can add a touch of glamour. Ensure you choose a paint suitable for wood and that provides good coverage.
- Level Bar: Absolutely critical for ensuring your mirrors and moldings are perfectly straight and even. An uneven mirror wall can detract significantly from the overall aesthetic. A standard 2-foot or 4-foot level will be sufficient.
- Marker or Pencil: For marking your wall and moldings, guiding your cuts and placements. A fine-tip marker or a sharp pencil will provide clear, precise lines.
Additional Helpful Tools:
- Measuring Tape: For accurate measurements of your wall and molding lengths.
- Cleaning Supplies: Microfiber cloth and glass cleaner for wiping down mirrors before and after installation.
- Painter’s Tape: Can be useful for temporarily holding moldings in place while glue dries or for masking off areas during painting.
- Safety Glasses and Gloves: Always recommended when using power tools or working with adhesives and spray paint.
Getting Started: Planning Your Mirror Wall Layout
Before you even unbox your mirrors, careful planning is paramount. This initial stage ensures your mirror wall looks intentional and fits perfectly within your space. Start by deciding on the exact location for your mirror wall. Consider areas that could benefit from more light, an illusion of space, or simply a striking focal point.
Next, measure the dimensions of the wall space you intend to cover. This will help you determine how many mirror tiles you’ll need and how to arrange them. Unpack one or two mirror tiles and temporarily place them on the floor or tape them to the wall to visualize your layout. Experiment with different configurations: a perfect square grid, a rectangular arrangement, or even a more staggered pattern. Remember to account for the thickness of your moldings between each mirror tile. A common practice is to use a small piece of the actual molding to gauge the exact spacing required, ensuring a consistent gap throughout your design.
Once you have a rough idea of your layout, use your marker or pencil to lightly sketch the desired perimeter and internal grid lines on the wall. This will serve as a valuable guide during installation. Use your level bar frequently during this planning stage to ensure your initial markings are perfectly straight, as any slight misalignment here will be magnified once the mirrors and moldings are installed. Taking the time to plan thoroughly will save you headaches and ensure a professional-looking finish.
Step-by-Step Guide: Crafting Your IKEA Mirror Wall
With your materials gathered and your layout planned, it’s time to bring your vision to life!
Step 1: Strategizing Mirror Placement & Preparing Moldings
Begin by carefully unboxing all your IKEA LOTS mirrors. Lay them out on a clean, flat surface to inspect them for any imperfections. Starting from the bottom of your designated wall area, begin placing your first row of mirrors. The self-adhesive backing makes this relatively simple, but precision is key. Before sticking each mirror, use your level bar to ensure it’s perfectly horizontal. Once the first mirror is in place, use a small piece of your ¼-inch round molding as a spacer to determine the gap before placing the next mirror in the row. This ensures uniform spacing throughout your entire mirror grid.
As you work your way across the first row and then upwards, constantly re-check the alignment with your level bar. Even slight deviations can become very noticeable across a larger mirror wall. It’s often helpful to have a second person assist you, one holding the level while the other positions the mirror. Once your mirrors are securely placed, turn your attention to the moldings.
Take all your round moldings and prepare them for painting. Find a well-ventilated area, preferably outdoors or in a garage with open windows. Lay the moldings on a drop cloth or old newspaper. Begin by spraying one side of each molding with your chosen spray paint. Apply thin, even coats to avoid drips and ensure smooth coverage. Allow this side to dry completely according to the paint manufacturer’s instructions, then flip the moldings over and spray the other side. For the front-facing side of the moldings, apply at least two coats, allowing ample drying time between each coat for a durable and flawless finish. Ensure they are completely dry to the touch before proceeding to the next step, as wet paint can easily transfer onto your mirrors or walls.
Step 2: Precision Measurement and Molding Installation
Now that your mirrors are installed and your moldings are painted and dry, it’s time to create the elegant grid frame. This step requires meticulous measurement and careful application.
Start with the horizontal spaces between each row of mirrors. Using your measuring tape, carefully measure the exact length of each horizontal gap. It’s crucial to measure each gap individually, as slight variations might occur across your wall. Once you have a measurement, transfer it to a piece of molding, marking both the molding and the corresponding section on the wall with your marker or pencil. These marks will serve as your guides. Using your miter saw, carefully cut each molding piece to the precise length you just measured. For the outer frame pieces, measure the full length of the entire mirror grid’s outer perimeter and cut those pieces as well, ensuring you create neat 45-degree mitered corners for a seamless join.
Apply a continuous bead of sealant glue to the back of each cut horizontal molding piece. Be generous enough to ensure good adhesion, but not so much that it squeezes out excessively when pressed. Carefully align the molding with the marks you made on the wall, placing it squarely in the gap between the mirror rows. Press firmly along the entire length of the molding to ensure good contact with the wall. Use your level bar one final time to confirm the molding is perfectly straight before the glue sets. Wipe away any excess glue that might seep out immediately with a damp cloth.
Allow the horizontal moldings to set for a short period as you prepare the vertical pieces. The drying time for the glue can vary, so consult the product instructions. While the horizontal pieces are setting, repeat the entire measurement and cutting process for the vertical spaces between each mirror column. Again, measure each vertical gap individually for accuracy. Once cut, apply glue to the back of each vertical molding piece and carefully position them into their respective gaps, ensuring they are perfectly plumb (straight up and down) using your level bar. Press firmly and clean up any excess glue.
Finally, complete your mirror wall by installing the outer frame moldings. These pieces frame the entire mirror grid, giving it a finished, built-in look. Apply glue to the back of these pre-cut, mitered pieces and carefully position them around the perimeter of your mirror wall, ensuring the corners meet perfectly. Hold them in place for a few moments to allow the initial bond to form. Once all moldings are installed, allow the glue to cure completely, which might take several hours or even overnight, depending on the product. During this time, avoid touching or bumping the moldings.
Pro Tips for a Flawless Finish and Long-Lasting Design
To ensure your DIY IKEA mirror wall not only looks fantastic but also stands the test of time, consider these professional tips:
- Surface Preparation is Key: Before sticking any mirrors or moldings, ensure your wall surface is clean, dry, and smooth. Remove any dust, grease, or peeling paint. A well-prepared surface guarantees better adhesion.
- Double-Check Measurements: “Measure twice, cut once” is a golden rule in DIY. Even small errors in measurement can lead to noticeable gaps or misalignments in your mirror grid.
- Patience is a Virtue: Don’t rush the process, especially when allowing glue and paint to dry. Inadequate drying time can lead to smudges, weak bonds, or uneven finishes.
- Use a Good Quality Glue: Investing in a reliable sealant glue will pay off in the long run, ensuring your moldings stay firmly in place.
- Clean as You Go: Wipe away any excess glue immediately with a damp cloth or sponge before it dries and becomes difficult to remove.
- Mirror Cleaning: Once the project is complete and all adhesives are fully cured, give your mirror wall a thorough cleaning with glass cleaner and a microfiber cloth for a streak-free shine.
- Customization Ideas: Don’t limit yourself to square mirrors or black moldings. Consider painting your moldings a bold color, a metallic shade, or even a pastel to match your decor. You could also explore different mirror tile shapes if available, though square is easiest for this grid design.
- Safety First: Always wear safety glasses when cutting moldings, and ensure good ventilation when spray painting.
Budgeting Your IKEA Mirror Wall: Under $85!
One of the most appealing aspects of this DIY project is its incredible affordability. Here’s a quick breakdown of how you can achieve this stunning look for less than $85:
- IKEA LOTS Mirrors: At roughly $15 per 4-pack, seven packages would cost around $105. However, IKEA prices can vary and sales are common. Often, you can find deals or use fewer packages depending on your wall size, bringing this cost down significantly. For example, if you only need 5 packs, that’s $75.
- Round Moldings: These are typically inexpensive, often just a few dollars for a long strip. Estimating $15-$20 for all the necessary lengths.
- Sealant Glue: A tube of strong construction adhesive usually costs around $5-$10.
- Spray Paint: A can of quality spray paint is typically $5-$8.
By carefully selecting materials and taking advantage of IKEA’s competitive pricing, it’s entirely feasible to complete this project within the $85 budget, or even less, especially if you already have some of the basic tools like a miter saw or level bar.
Conclusion: Transform Your Space with This Stunning DIY
Creating a DIY IKEA mirror wall is an incredibly impactful and budget-friendly way to revolutionize your living room or any other space in your home. This clever hack instantly amplifies light, enhances the feeling of spaciousness, and adds a touch of modern elegance that rivals much more expensive custom installations. Not only will you achieve a beautiful aesthetic upgrade, but you’ll also gain the satisfaction of having crafted something truly unique with your own hands.
No longer do you have to compromise on style due to budget constraints or feel limited by a small room. This IKEA mirror wall project offers a practical, stylish, and affordable solution to common home decor challenges. So, gather your materials, follow these detailed steps, and get ready to enjoy a brighter, more expansive, and utterly transformed living space. Happy DIY-ing!
All images and the inspirational tutorial are credited to LivingDIY via YouTube. Be sure to visit their channel and subscribe for more fantastic DIY ideas!