
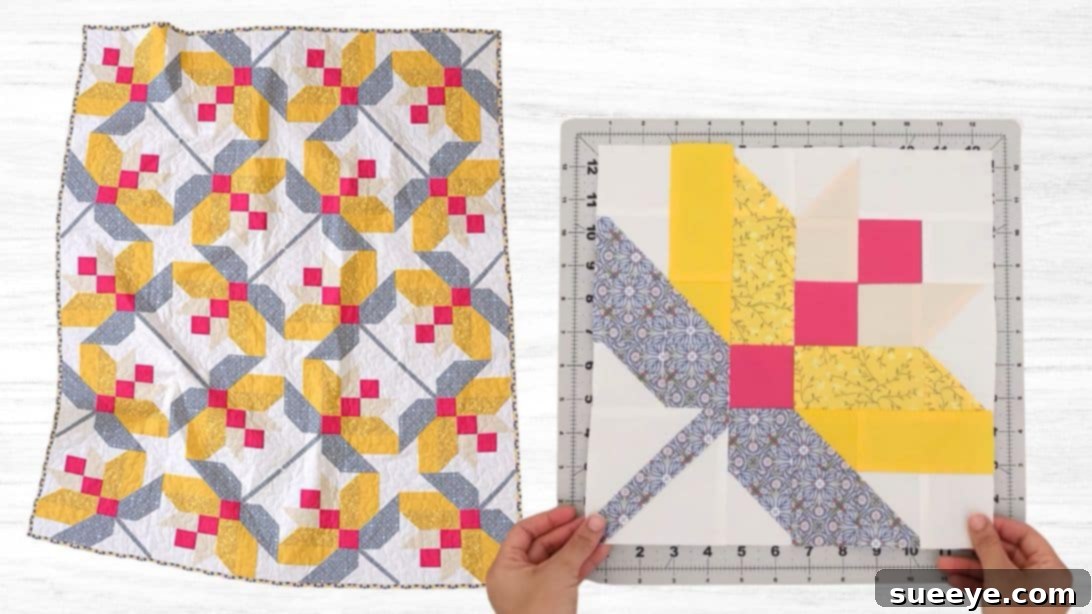
Are you searching for a quilt pattern that truly stands out and captures attention? Look no further than the remarkable Flora Quilt Block, a masterpiece brought to life by the renowned Art Gallery Fabrics. This particular block is celebrated for its intricate beauty and elegant design, promising to be a showstopper in any quilting project. While it may present a slightly greater challenge compared to some beginner patterns, the rewarding outcome—a stunning, conversation-starting piece—makes every stitch incredibly worthwhile. Prepare to receive an abundance of compliments when you incorporate this exquisite block into your next handmade creation.
RELATED: Enhance your skills with another beautiful design: Easy Flower Quilt Block
A significant portion of this project involves mastering the creation of half-square triangles (HSTs). If you’ve already honed your skills in making these versatile units, you’ll find assembling this block to be a smooth and enjoyable process. The Flora Quilt Block traditionally utilizes five distinct colored fabrics, carefully chosen to create its signature visual appeal. For those aiming to replicate the exact captivating look demonstrated in the original design, following the suggested fabric combinations is highly recommended. For a comprehensive visual guide and detailed instructions, be sure to watch the full tutorial video provided below.
Mastering the Exquisite Flora Quilt Block: A Comprehensive Guide
The Flora Quilt Block isn’t just another pattern; it’s an opportunity to create a piece of textile art that reflects sophistication and skill. Its unique arrangement of fabric shapes and colors evokes a blooming floral design, making it perfect for various applications, from throws and wall hangings to larger bed quilts. This guide will walk you through every step, ensuring you have the confidence and knowledge to tackle this rewarding project.
Why Choose the Flora Quilt Block for Your Next Project?
There are countless quilt patterns available, so what makes the Flora Quilt Block so special? Its allure lies in its intricate yet balanced design, which appears complex but is surprisingly achievable with patience and precision. This block offers several benefits for quilters:
- Stunning Aesthetic: The finished block boasts a beautiful, captivating design that truly impresses. It’s a statement piece on its own or as part of a larger quilt.
- Skill Development: It’s an excellent project for refining your half-square triangle (HST) techniques and improving your overall accuracy in cutting and piecing.
- Versatility: Once mastered, this block can be used in a multitude of ways. Create a series of blocks for a full quilt, incorporate it into a sampler quilt, or use a single block for a decorative pillow or bag.
- Creative Expression: While following the original fabric suggestions yields beautiful results, the Flora Quilt Block is also a fantastic canvas for experimenting with your own color palettes and fabric choices, allowing for truly personalized creations.
- Rewarding Challenge: For those looking to move beyond basic blocks, the Flora offers a satisfying challenge that culminates in a truly spectacular finished product.
Understanding Half-Square Triangles (HSTs): The Core of the Flora Block
The success of your Flora Quilt Block heavily relies on accurately constructed half-square triangles. HSTs are fundamental units in quilting, formed by sewing two squares together diagonally and then cutting them apart to yield two identical square units, each composed of two triangles. They are incredibly versatile and appear in countless quilt patterns, creating dynamic lines and shapes. For this specific pattern, we’ll be using a common and effective method to create them, focusing on precise cutting and sewing to ensure your block comes together beautifully.
The key to perfect HSTs is consistency in your seam allowance and diligent trimming. While the initial steps might seem a bit fiddly, remember that practice makes perfect, and the stunning visual effects created by these units are well worth the effort.
Selecting Your Fabrics: A Kaleidoscope of Color
The beauty of the Flora Quilt Block is significantly enhanced by the thoughtful selection of fabrics. The original design utilizes five distinct fabrics, labeled A through E (and an additional F in the materials list, suggesting a total of six different fabrics for the full block), each playing a crucial role in defining the pattern’s intricate details and overall visual flow. Here are some tips for choosing your fabrics:
- Contrast is Key: Ensure there’s a good contrast between your fabrics. This helps the different elements of the block “pop” and prevents the design from looking muddled. For example, pair lighter fabrics with darker ones, or busy prints with solids or tone-on-tone textures.
- Color Palette: Consider a harmonious color palette. Analogous colors (next to each other on the color wheel) create a smooth, flowing look, while complementary colors (opposite on the color wheel) offer vibrant contrast.
- Fabric Quality: High-quality 100% cotton quilting fabric is recommended. It’s easy to work with, holds its shape, and will ensure your quilt lasts for years.
- Print Scale: Vary the scale of your prints. A mix of small, medium, and large prints, or combining prints with solids, can add visual interest without overwhelming the design.
- Replicating the Look: If you love the look of the original Art Gallery Fabrics block, try to match the values (lightness/darkness) and general color families they used. Their choice of fabrics expertly highlights the “flora” aspect of the block.
Easy Flora Quilt Block Materials
To embark on this exciting quilting journey, gather your chosen fabrics and ensure they are well-pressed and ready for cutting. Accuracy in cutting is paramount for successful piecing, so take your time and use a sharp rotary cutter, a good quality ruler, and a self-healing mat.
For Fabric A (e.g., a background or accent color)
- 2 pieces 3 7/8” squares
- 4 pieces of 2 7/8” squares
- 1 piece of 2 ½” x 4 ½” rectangle
- 3 pieces of 2 ½” squares
For Fabric B (e.g., a contrasting accent)
- 3 pieces of 2 ½” squares
For Fabric C (e.g., a vibrant focal point)
- 1 piece of 2 7/8” square
- 2 pieces of 2 ½” squares
For Fabric D (e.g., a complementary shade)
- 1 piece of 2 7/8” squares
- 2 pieces of 2 ½” x 4 ½” rectangle
For Fabric E (e.g., another accent or unifying color)
- 1 piece of 2 7/8” squares
- 2 pieces of 2 ½” x 4 ½” rectangle
For Fabric F (e.g., the primary background or a dominant feature)
- 3 pieces of 2 7/8” squares
- 4 pieces of 2 ½” squares
- 1 piece of 4 ½” square
How to Make Flora Quilt Block: Step-by-Step Instructions
Follow these detailed steps carefully, paying close attention to seam allowances and pressing techniques. A consistent ¼” seam allowance is crucial for your block to come out the correct size and for all the pieces to fit together perfectly.
Step 1: Creating Your Half-Square Triangles (HSTs)
This initial step is foundational, as you’ll be creating ten half-square triangles that form the dynamic elements of the Flora block. Precision here will pay off immensely.
Begin by gathering all your 2 7/8” squares. Specifically, you will use 3 pieces from fabric F, 1 piece from fabric D, and 1 piece from fabric C. Now, pair them with fabric A and E squares:
- Place 2 fabric A squares on top of two of the fabric F squares, right sides together.
- Place the fabric E square on top of the remaining fabric F square, right sides together.
- Place the remaining fabric A squares on top of fabric D and C squares, respectively, right sides together.
For each of these five paired sets, use a ruler and a fabric marker to draw a diagonal line from one corner to the opposite corner. Next, sew a seam ¼” away from both sides of this drawn line. This will create two parallel stitch lines. Once sewn, cut directly along the drawn diagonal line, separating each pair into two units. Press your seams open or to the darker fabric (as preferred, but be consistent) and then carefully trim each HST unit to a precise 2 ½” square. After completing this step, you should have a total of 10 perfectly squared-up HSTs, featuring four different color combinations.
Step 2: Constructing the Central “Snowball” Unit
This step involves a technique often referred to as “snowballing” or adding corner triangles, which helps create a distinctive framed effect.
Take your 4 ½” square of fabric F. Position one 3 7/8” square of fabric A onto the left corner of the fabric F square, right sides together. Align it carefully so the raw edges meet at the corner. Draw a diagonal line from the top-right corner of the smaller (Fabric A) square to its bottom-left corner. Stitch precisely along this drawn diagonal line. After stitching, trim the excess fabric ¼” away from the seam line, towards the outside corner. Press the seam open or towards the fabric A triangle. Repeat this exact process with another 3 7/8” square of fabric A on the opposite corner (the right corner) of the same fabric F square, drawing the diagonal line from the top-left to the bottom-right. This creates a square with two contrasting corners, forming part of the central motif of your Flora block.
Step 3: Assembling a Corner Unit
Now we begin to piece together smaller sub-units that will eventually form the larger block. Take one 2 ½” square of fabric A and one of your FA HSTs (the ones you made in Step 1). Join these two pieces together by sewing them along one edge. Then, attach a 2 ½” square of fabric F to the other side of the FA HST. You should now have a strip of three joined pieces.
Step 4: Extending a Strip Unit
Continue building upon the previous unit. Take one 2 ½” x 4 ½” rectangle of fabric E and join it to one of your FE HSTs. Now, take the three-piece strip you created in Step 3 and sew it to the left side of this newly formed two-piece unit. Pay attention to how the colors and patterns align according to the overall block design.
Step 5: Creating Another Component Strip
This step involves combining an HST with a rectangle. Take one of your DA HSTs (from Step 1) and join it along its long edge to one of the 2 ½” x 4 ½” rectangles of fabric D. This creates another elongated unit that will be integrated into the block’s structure.
Step 6: Assembling a Three-Piece Row
Gather one CA HST, one 2 ½” square of fabric C, and one 2 ½” square of fabric B. Sew these three pieces together in a row, ensuring your ¼” seam allowance is consistent. This forms another distinct section of your quilt block, demonstrating how smaller units combine to build complexity.
Step 7: Constructing a Four-Patch Inspired Unit
This step mimics the construction of a traditional four-patch block, adding another layer of design. Start with a 2 ½” square of fabric B and a 2 ½” square of fabric A. Place a 2 ½” square of fabric C and one of your CA HSTs below these two pieces. Arrange them as if forming a two-by-two grid (a four-patch) and sew them together. Once these four smaller pieces are assembled into a square unit, join one of the 2 ½” x 4 ½” rectangles of fabric A to the top of this newly formed four-patch-like unit. This creates a larger, more complex component.
Step 8: Final Arrangement and Assembly
You now have several completed sub-units. This is the critical stage where you bring them all together. Carefully arrange all the pieced units you’ve created according to the design shown in the provided photo below. Lay them out on your workspace to visualize the complete Flora Quilt Block. Take your time to ensure every piece is in its correct orientation and position. Once satisfied with the arrangement, sew the units together in rows, and then sew the rows together to form the complete 12 ½” square Flora Quilt Block. Remember to nest your seams where possible and pin carefully to ensure precise alignment.
Tips for Success with Your Flora Quilt Block
Achieving a beautiful and accurate Flora Quilt Block is highly dependent on a few key quilting practices. Keep these tips in mind as you work:
- Measure Twice, Cut Once: Precision is the quilter’s best friend. Double-check all your measurements before making any cuts to ensure your pieces are exact.
- Accurate Seam Allowance: A consistent ¼” seam allowance is non-negotiable for this block. Use a ¼” foot on your sewing machine if you have one, or mark a guide on your machine bed.
- Pressing Matters: Pressing after each seam helps your blocks lie flat and keeps everything square. Decide whether to press seams open or to one side (usually the darker fabric) and maintain consistency throughout the block.
- Squaring Up: After creating your HSTs and other units, always square them up to the specified size (e.g., 2 ½” for HSTs). This step is crucial for ensuring all pieces fit together perfectly.
- Chain Piecing: For efficiency, especially when making multiple HSTs or joining repetitive units, consider chain piecing. This involves sewing multiple units one after another without lifting the presser foot or cutting threads in between.
- Take Breaks: If you feel frustrated or tired, step away for a bit. Quilting should be enjoyable, and returning with fresh eyes can prevent mistakes.
- Watch the Video: The provided video tutorial is an invaluable resource. Watching the visual demonstration can clarify any confusing steps and provide additional insights.
From Block to Quilt: Expanding Your Flora Project
Once you’ve successfully created your first Flora Quilt Block, you’ll likely be eager to see it transform into a larger project. Here’s how you can expand your design:
- Repeat Blocks: The most straightforward approach is to make multiple Flora Quilt Blocks and join them together. Decide on the desired size of your quilt (e.g., throw, twin, queen) and calculate how many blocks you’ll need.
- Sashing and Borders: To add definition and visual breathing room between your Flora blocks, consider adding sashing (strips of fabric sewn between blocks) and borders around the perimeter of your quilt top. This can also help adjust the overall size.
- Alternating Blocks: Pair the Flora Block with a simpler, complementary block (like a plain square or a four-patch) to create an interesting alternating pattern.
- Quilting: Once your quilt top is assembled, layer it with batting and backing fabric. Then, quilt it by machine or hand. The quilting design can either follow the lines of the piecing or create a contrasting pattern.
- Binding: Finish your quilt with a beautiful binding, a strip of fabric sewn around the edge, to enclose the raw edges and add a polished touch.
Flora Quilt Block Video Tutorial
For a detailed visual walkthrough of each step, from cutting to final assembly, be sure to watch the full tutorial from Art Gallery Fabrics. This video is an excellent companion to these written instructions, providing invaluable clarity and expert tips to guide you through the creation of your Flora Quilt Block.
Embark on this beautiful quilting adventure and enjoy the process of bringing the Flora Quilt Block to life. Happy quilting!