
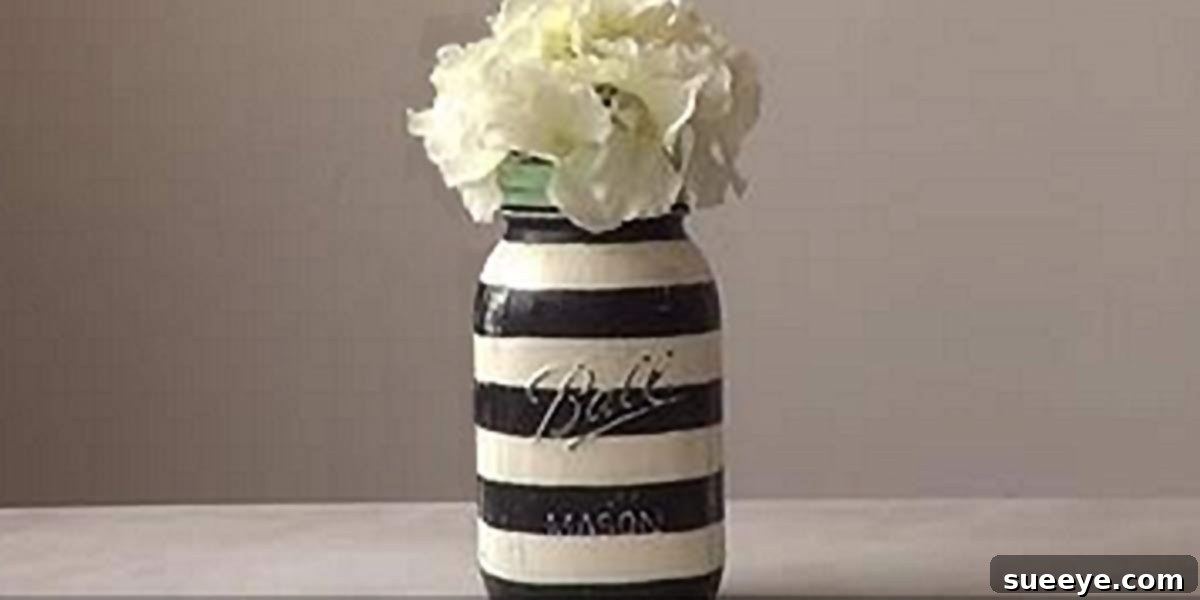
Transform Your Home with Stunning DIY Black & White Striped Mason Jars: A Timeless Decor Idea
Are you searching for a captivating and versatile decor piece that can effortlessly enhance any space in your home? Look no further than the humble mason jar, reimagined with a touch of classic sophistication. This easy-to-make DIY project transforms a simple glass jar into a stunning decorative accent, particularly when adorned with crisp black and white stripes. The timeless appeal of this color combination means it truly goes with anything, making it a perfect addition to modern, farmhouse, or eclectic interiors alike. Imagine it as an elegant flower vase, showcasing vibrant red blossoms, or holding your favorite kitchen utensils with a chic flair. The possibilities are endless, and the visual impact is undeniably striking!
This simple craft allows you to infuse personalized style into your living space without requiring extensive crafting experience or specialized tools. It’s a rewarding project that promises high visual impact for minimal effort, offering a fresh take on everyday home decor. Let’s delve into why this particular design is so effective and how you can create your own collection of these charming jars.
The Enduring Charm and Versatility of Mason Jars
Mason jars have long transcended their original purpose as canning vessels to become beloved staples in the world of home decor and DIY crafts. Their inherent qualities make them an ideal canvas for creativity: they are affordable, widely available, and possess a classic, rustic design that appeals to a broad range of tastes. From rustic chic to contemporary minimalist, a mason jar can adapt to almost any aesthetic with a simple transformation.
Their popularity in home styling stems from a unique blend of vintage charm and practical utility. They encourage repurposing and sustainable living, offering countless ways to organize, decorate, and personalize your environment. Whether used for storage, lighting, or as a decorative accent, mason jars provide a foundation for countless creative expressions. This particular striped design takes their potential to new heights, offering a sophisticated look that is both accessible and highly customizable.
Why Black & White Stripes? The Epitome of Timeless Elegance
While you have the creative freedom to paint any design or color combination on your mason jar, there’s a compelling reason why black and white stripes stand out. This classic pattern offers unparalleled versatility and a sophisticated edge that few other designs can match. Black and white stripes are inherently chic, modern, and yet carry a vintage sensibility, making them a chameleon in the world of interior design. This striking contrast ensures your mason jar will truly “pop” wherever it’s placed, drawing the eye without being overly busy.
The stark contrast of black and white creates a visually arresting effect that commands attention without overpowering other elements in a room. It adds a graphic pop that can anchor a space or serve as a vibrant accent. Picture this striped jar nestled beside a bold, colorful painting filled with reds, blues, and yellows – the black and white stripes would provide a grounding counterpoint, making the colors pop even more vividly. Alternatively, place it in a monochromatic setting, and it becomes a testament to subtle elegance and clean design. It introduces a layer of visual interest that is both understated and impactful, making it a favorite for designers and DIY enthusiasts alike.
Versatile Applications for Your Striped Masterpiece
Once you’ve crafted your beautiful striped mason jar, you’ll discover a myriad of ways to incorporate its handmade charm and elegance into your home decor:
- Stunning Flower Vase: The elegant stripes provide a perfect, sophisticated backdrop for fresh flowers, allowing their natural beauty and vibrant colors to truly shine. Imagine it filled with a bouquet of classic red roses, sunny yellow sunflowers, crisp white hydrangeas, or even simple wildflowers from your garden.
- Chic Kitchen Organizer: Bring style to your culinary space by using these jars to neatly store cooking utensils, coffee stirrers, or even small recipe cards. Envision a row of these jars holding vibrant red spatulas from KitchenAid, adding a delightful splash of color and organization to your countertop.
- Stylish Bathroom Caddy: Elevate your bathroom vanity by using these jars to keep everyday essentials organized and beautifully displayed. They are perfect for holding cotton balls, Q-tips, toothbrushes, makeup brushes, or hair ties.
- Desk & Office Essentials: Tame the clutter on your desk or in your craft room by using these elegant containers for pens, pencils, markers, scissors, or various small office and craft supplies. Their graphic appeal adds an element of design to functional storage.
- Party & Event Decor: These striped jars make fantastic centerpieces for any gathering, from casual brunches to elegant dinners. Fill them with candles for ambient lighting, arrange cutlery for a buffet, or even offer small, individually wrapped treats to guests.
- Thoughtful Gift Idea: Personalize a gift by filling a striped jar with homemade cookies, gourmet candies, a small potted plant, or a collection of self-care items. It’s a heartfelt and beautifully presented present for any occasion.
- Bedroom Accent: Place a striped jar on your nightstand to hold reading glasses, a watch, or simply as a charming decorative piece that complements your bedroom’s aesthetic.
Unleashing Your Creativity: Beyond Black & White
While the black and white stripe combination is undeniably captivating and a fantastic starting point, remember that this project is a wonderful opportunity for your own creative explorations. Don’t hesitate to experiment with different color palettes to perfectly match your specific decor, seasonal themes, or personal preferences. Consider soft pastels for a serene nursery, bold metallics like shimmering gold or silver for a touch of glamour, or vibrant primary colors for a playful and energetic look.
You can also vary the width of your stripes, combine thin and thick lines for added visual interest, or even try a diagonal pattern for a more dynamic and modern design. The core technique of using painter’s tape remains the same, but the possibilities for customization are truly limitless. Let your imagination guide you to create unique pieces that are perfectly tailored to your style.
Your Comprehensive Step-by-Step Guide to Crafting Stunning Striped Mason Jars
The beauty of this project lies in its simplicity and accessibility. You don’t need to be an experienced artist or a seasoned crafter to achieve professional-looking results. With a few basic supplies and a little patience, you’ll have a collection of gorgeous striped jars in no time. Let’s gather our materials and begin this rewarding craft adventure, transforming ordinary glass into extraordinary decor!
Gathering Your Essential Supplies:
- Mason Jar(s): Any size will work; wide-mouth jars are often easier to paint inside if you plan to paint the interior, but for this project, the exterior is the focus.
- White Paint: A good quality acrylic craft paint or white spray paint for the base coat. Spray paint often offers a smoother, more even, and faster-drying finish.
- Black Paint: Acrylic craft paint specifically for the stripes.
- Painter’s Tape: Crucial for creating crisp, straight lines. Invest in a good quality brand known for clean removal, such as FrogTape or Scotch Blue. Varying widths can be used to create different stripe effects.
- Paint Brushes: A flat brush (around ½ to 1 inch wide) for applying the black stripes and a small, fine-tipped brush for precision touch-ups.
- Sponge Brush (Optional but Recommended): Excellent for applying a smooth, streak-free base coat if you choose not to use spray paint.
- Fingernail File or Fine-Grit Sandpaper: For achieving that charming, aged, or distressed, vintage look on embossed lettering or rims.
- Clear Sealant (Optional): A matte or gloss clear spray sealant (like Mod Podge Clear Acrylic Sealer) will protect your paint job, make it more durable, and ensure longevity, especially if the jar will be handled frequently or exposed to moisture.
- Rubbing Alcohol or Glass Cleaner: Essential for thoroughly cleaning your jar before painting to ensure optimal paint adhesion.
- Drop Cloth or Newspaper: To protect your work surface from paint splatters and drips.
The Crafting Process: From Plain to Posh
Follow these easy, detailed steps to transform your ordinary mason jar into an extraordinary decorative piece that reflects your personal style:
- Prepare Your Mason Jar: Begin by thoroughly cleaning your mason jar. Use rubbing alcohol or glass cleaner to meticulously remove any dust, grime, or fingerprints. A perfectly clean and dry surface is absolutely essential for optimal paint adhesion and to prevent peeling later on. Allow the jar to dry completely before moving to the next step.
- Apply the Base Coat (White): This layer will serve as the bright background for your black stripes.
- If using spray paint: In a well-ventilated area (preferably outdoors or in a garage with open windows), apply several thin, even coats of white spray paint to the entire exterior of the jar. Hold the can about 8-12 inches away and use sweeping motions. Allow ample drying time (as per the specific paint instructions, usually 15-30 minutes) between each coat to prevent drips and ensure full, opaque coverage. Remember, a few thin coats are always superior to one thick, gloopy coat.
- If using brush-on acrylic paint: Use your sponge brush to apply a thin, even layer of white acrylic paint over the entire exterior surface of the jar. Let it dry completely. Apply additional coats as needed until you achieve opaque coverage, ensuring each layer is bone dry before applying the next.
Important: Allow the final white base coat to cure for several hours, or even overnight (24 hours is ideal), before proceeding to the taping step. This crucial curing time prevents the painter’s tape from lifting or peeling off your freshly painted base layer.
- Tape Your Stripes: Once your white base coat is fully dry and cured, it’s time to apply the painter’s tape to create your stripes. Carefully press strips of painter’s tape onto the jar to define your desired stripe pattern. For classic horizontal stripes, wrap the tape evenly around the jar. For vertical stripes, apply strips from top to bottom. Ensure the tape is firmly pressed down along all edges to prevent paint bleeding underneath. Use a credit card, a craft burnisher, or even your fingernail to really seal the edges of the tape, paying close attention to any curves or indentations on the jar. The exposed glass/white paint between the tape lines will be where you apply your black paint.
- Apply the Accent Color (Black Paint): With your flat paintbrush, carefully apply black acrylic paint in between the painter’s tape lines. Paint all the way up to and slightly over the edges of the tape. Take your time to ensure even and opaque coverage. You might need two thin coats of black paint for full opacity; if so, let the first coat dry to the touch before applying the second.
- The Critical Reveal: Remove Tape While Paint is Wet: This is a key step for achieving perfectly crisp, clean lines without any jagged edges or paint tearing. As soon as you’ve finished applying the black paint (or the second coat, if applicable), and while the paint is still slightly wet (but not dripping), carefully peel off the painter’s tape. Pull the tape slowly and deliberately at a sharp angle (almost parallel to the jar surface) away from the painted surface. Removing the tape before the paint fully dries helps prevent the paint from setting onto the tape, which can cause it to tear or create messy lines upon removal.
- Perfecting Your Lines (Touch-Ups): After removing the tape, you might notice a few minor imperfections, tiny smudges, or areas where the black paint bled slightly under the tape. Don’t worry, this is normal! Once the black paint is completely dry, use your small, fine-tipped paintbrush and a small amount of white paint to carefully touch up any uneven lines or unwanted black marks. Similarly, use black paint to refine any white areas that might have smeared. This step is essential for a truly polished and professional-looking finish. Patience here is key for meticulous results.
- Embrace the Vintage Look (Optional Distressing): If you desire a charming, aged, or rustic aesthetic for your jar, this is the perfect step. Once all the paint is thoroughly dry and cured (give it at least 24 hours, or even longer for best results), take your fingernail file or fine-grit sandpaper. Gently rub over the raised lettering (like “Ball” or “Mason”) on the jar, as well as around the rim, the base, and any embossed patterns. This will subtly remove some paint, exposing the clear glass underneath and giving your jar that coveted rustic, worn, and distressed look that adds character and depth.
- Sealing for Longevity (Optional): For added durability and to protect your beautiful paint job from chips, scratches, and moisture, especially if the jar will be frequently handled, washed (gently by hand), or used as a vase, apply a clear sealant. A matte or gloss spray sealant works best, providing an even coat. Apply in thin, even coats in a well-ventilated area, allowing adequate drying time between coats as per product instructions. This step is highly recommended for functional jars.
- Allow to Cure: Your stunning striped mason jar is now complete! However, for maximum durability and to ensure the paint and optional sealant are fully hardened, allow the jar to fully cure for several days (up to 72 hours, or as recommended by your specific paint/sealant brand) before heavy use or washing.
Tips for Success & Troubleshooting
Achieving a flawless finish for your DIY striped mason jars is well within reach with a few helpful tips and tricks:
- Cleanliness is Key: Always start with a thoroughly clean, dry, and grease-free jar. Any residue will compromise paint adhesion.
- Thin Coats are Best: Apply multiple thin coats of paint rather than one thick coat. This prevents drips, ensures even coverage, promotes better adhesion, and results in a more professional finish.
- Quality Tape Matters: Invest in good quality painter’s tape. Cheaper tapes are more likely to bleed or leave sticky residue.
- Press Tape Firmly: Before painting, ensure all edges of the painter’s tape are pressed down firmly and evenly. This is the best defense against paint bleeding underneath.
- Patience with Drying Times: Rushing the drying process between coats or before removing tape can lead to smudges, peeled paint, or a less durable finish. Trust the process and product recommendations.
- Experiment! Don’t be afraid to try different stripe widths, color combinations beyond black and white, or even unique patterns. Your creativity is your only limit, and each jar can be a unique expression.
- Practice Makes Perfect: If it’s your first time working with paint and tape on glass, consider doing a quick test run on a small, inexpensive glass item to get a feel for the technique.
- Ventilation: Always work in a well-ventilated area, especially when using spray paints or sealants.
Conclusion: Elevate Your Home with Handmade Charm
Crafting these black and white striped mason jars is more than just a simple DIY project; it’s an opportunity to infuse your home with personalized style, unique charm, and a touch of handcrafted elegance. The stunning visual appeal, coupled with the incredible versatility and endless applications of these jars, makes them an invaluable addition to almost any decor scheme. Whether gracefully gracing your dining table with a bouquet of fresh flowers, efficiently organizing your kitchen essentials, adding a sophisticated touch to your bathroom, or simply providing a graphic element of elegance to a shelf, these jars are sure to draw compliments and spark conversation.
So, gather your supplies, unleash your inner artist, and embark on this incredibly easy and rewarding craft adventure. You’ll not only create a beautiful and functional decor item but also experience the profound satisfaction of transforming something ordinary into something truly extraordinary with your own hands. Get ready to enjoy your stunning, custom-made striped mason jars – a testament to your creativity and a timeless, versatile accent for your cherished home.