
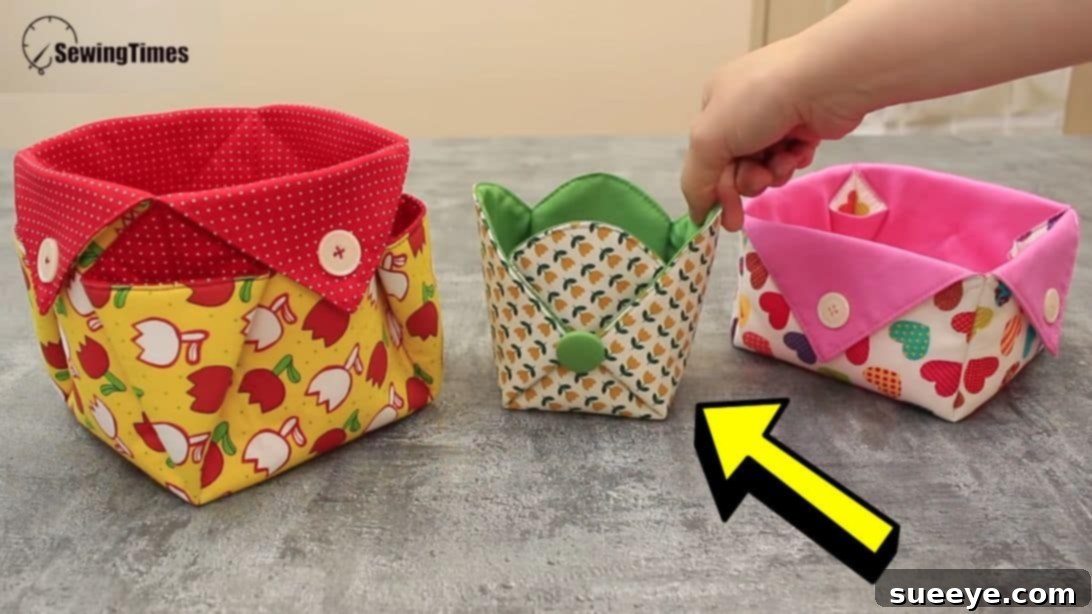
DIY Fabric Basket: Easy Sewing Tutorial for Stylish Home Organization
Are you searching for a delightful and practical sewing project to ignite your creativity? Look no further! This comprehensive guide will walk you through creating a charming and multi-purpose fabric basket, a fantastic project demonstrated by the talented sewingtimes on YouTube. Whether you’re a seasoned seamstress or just starting your sewing journey, this easy-to-follow tutorial offers a rewarding experience, resulting in a beautiful and functional item for your home.
This versatile DIY fabric basket is perfect for decluttering and organizing various items around your house. Imagine a dedicated spot for your sewing tools, a neat holder for your keys and wallet by the door, or a stylish container for pens and office supplies on your desk. Its adaptability means you can customize it to suit any need, making it an indispensable addition to any room. You’ll love the satisfaction of creating something both useful and beautiful with your own hands, especially as you select your favorite fabrics to match your personal style and home decor.
If you’re eager to expand your sewing skills, you might also find our related guide helpful: Easy Mini Fabric Basket Sewing Tutorial For Beginners. Dive into the instructions below and make sure to watch the accompanying video tutorial by sewingtimes for a visual step-by-step guide and additional tips.
Why Sew a DIY Fabric Basket?
Beyond being a fun craft, sewing your own fabric basket offers numerous advantages. Firstly, it’s an incredibly practical solution for home organization. These baskets are perfect for corralling small items that tend to create clutter, such as remote controls, charging cables, bathroom toiletries, children’s small toys, or even snacks. Secondly, it’s an excellent way to personalize your living space. By choosing fabrics that complement your existing decor, you can create unique pieces that truly reflect your taste, far superior to generic store-bought containers.
For those passionate about sustainability, a handmade fabric basket offers an eco-friendly alternative to plastic storage bins. It’s durable, washable, and reusable for years to come. Moreover, this project is ideal for using up fabric scraps from previous projects, turning remnants into something wonderful. It also makes a thoughtful and personal handmade gift for friends and family, perfect for housewarmings, birthdays, or holidays. The sense of accomplishment you’ll feel upon completing this project is truly invaluable, boosting your confidence in your sewing abilities.
Essential Materials for Your DIY Fabric Basket Craft
Gathering all your materials before you begin is key to a smooth and enjoyable sewing experience. Here’s what you’ll need, along with a brief explanation of why each item is important:
- Solid Fabric (for the lining): This fabric will form the inside of your basket, providing a neat finish and often adding an extra layer of stability. Choose a complementary color or pattern to your main fabric.
- Print Fabric (main exterior): This is the star of the show! Select a print that you love and that will stand out or blend beautifully with your home decor. Cotton is a popular choice for its ease of use and variety.
- Fusible Fleece Fabric: This is crucial for giving your fabric basket its shape, structure, and a soft, padded feel. Fusible fleece has adhesive on one side that bonds to your fabric when ironed, eliminating the need for separate basting.
- Button Covers: These add a decorative and sometimes functional element to the basket, helping to define its corners or add a charming embellishment.
- Marking Pen, Pencil, or Chalk: Essential for accurately transferring pattern lines and cutting guides onto your fabric, ensuring precise cuts and stitching.
- Ruler: A clear quilting ruler or a standard measuring ruler is indispensable for accurate measuring and cutting of fabric pieces.
- Needle and Thread: For any hand-stitching required, especially for attaching buttons or closing small openings. Choose a thread color that matches or complements your fabric.
- Fabric Clips (or pins): Far superior to pins for holding multiple layers of fabric, especially thicker materials like fleece, these clips prevent distortion and make sewing easier.
- Iron (for pressing): An absolute must for pressing seams flat, fusing fleece, and achieving crisp, professional-looking finishes throughout the project.
- Sewing Machine: The primary tool for constructing your basket efficiently. Ensure it’s in good working order and has a fresh needle suitable for your fabric type.
Step-by-Step: How to Make a DIY Fabric Basket
Follow these detailed instructions to create your very own stylish fabric basket. Take your time with each step for the best results.
Step 1: Preparing and Cutting Your Fabrics with Precision
The foundation of a well-structured fabric basket lies in precise cutting. Begin by cutting your lining and main print fabrics into perfect 10¾-inch squares. Accuracy here is vital for the basket’s final dimensions. Next, cut your fusible fleece into a 10-inch square. This slightly smaller size ensures that the fleece won’t extend into your seam allowances, reducing bulk. Finally, cut two small 2-inch squares from your lining fabric; these will be used for your button covers later on.
Now, let’s shape the corners of your fusible fleece. This unique curving technique is what gives the basket its distinctive rounded corners at the base. Take your 10-inch fleece square. Using your marking pen, pencil, or chalk, measure 2 inches across from one corner edge and 2 inches down from the same corner. Mark these two points. Carefully connect these two markings with a smooth, curved line. This curve will be the template for all four corners. To ensure all corners are identical, fold the fleece in half, aligning the edges perfectly. Now, cut along the curved line on the upper layer. Unfold the fleece, then fold it again in the opposite direction (e.g., if you folded it horizontally, now fold it vertically). Align the edges once more and cut the remaining two corners following the curved shape you’ve already established on the upper layer. Unfold your fleece; you should now have a square with four beautifully curved corners, ready for fusing.
Step 2: Constructing the Basket Body and Turning
With your fabric pieces prepared, it’s time to assemble the main body of your fabric basket. Lay your main print fabric square right side down on your ironing board. Carefully center the fusible fleece on top of the main fabric, ensuring there’s an even border of main fabric all around. The adhesive side of the fleece should be facing down, touching the wrong side of your main fabric. Using a hot iron, press down firmly and evenly to fuse the fleece to the main fabric according to the fleece manufacturer’s instructions. This step is crucial for giving your basket structure and stability. Take your time to ensure a strong, even bond.
Once the fleece is fused, place this combined main fabric piece (with fleece attached) on top of your lining fabric square, making sure their right sides are facing each other (RST). Align all edges perfectly. Now, using your sewing machine, stitch all the way around the edges of the fleece, keeping your stitches close to the edge of the fleece. As you stitch, remember to leave an opening of about 2 inches along one of the straight sides. This opening is essential for turning the fabric right side out later. Make sure to backstitch at the beginning and end of your stitching line, especially at the edges of the opening, to reinforce these points and prevent stitches from coming undone when turned.
After stitching, trim off any excess fabric around your seam, leaving a ¼-inch seam allowance. Crucially, clip the curves and corners without cutting through your stitching line. This reduces bulk in the seams and allows the fabric to lay smoothly when turned. Carefully turn the entire piece right side out through the 2-inch opening you left. Gently poke out all the corners and curves using a turning tool or a blunt object like a chopstick to achieve crisp, clean edges. Press the entire piece down nicely with your iron, ensuring all seams are flat and the edges are sharp. Finally, tuck the raw edges of the opening inward so they align with the sewn seam, and secure them with fabric clips. This creates a neat, finished edge ready for topstitching.
Step 3: Shaping, Finishing Touches, and Button Embellishments
The final step involves shaping your flat fabric piece into a three-dimensional basket and adding the finishing details. Begin by topstitching all the way around the entire perimeter of your fabric piece, very close to the edge. This not only gives your basket a professional, crisp finish but also permanently closes the opening you used for turning. This topstitching adds durability and helps the basket maintain its shape.
Next, it’s time to create the basket’s unique folded shape. First, fold the piece in half to form a rectangle. Using chalk or a marking pen, draw a line along this fold. Unfold, then fold it the other way (perpendicular to the first fold) and draw another line along that fold as well. These lines will help you align the fabric accurately. The video tutorial by sewingtimes will provide excellent visual guidance for the next steps: carefully fold the inside of the fabric along these marked lines, as demonstrated. These folds create the side walls and base of your basket. Use fabric clips to hold these folds securely in place as you work.
Now, to form the actual basket shape, bring the folded corners together at the sides. These are the corners that were originally curved on your fleece. Stitch these corners together firmly, creating the four walls and the distinct base of your basket. Depending on the design, these stitches might be visible or hidden. Finally, prepare your button covers using the two 2-inch lining fabric squares you cut earlier, following the manufacturer’s instructions for your button cover kit. Once prepared, attach these decorative buttons to the sides of your fabric box, usually at the top corners or strategic points, to help hold the sides up and add a charming, finished look. These buttons can be purely decorative or contribute to the structural integrity, depending on where and how you choose to place them.
Tips for a Perfect DIY Fabric Basket
To ensure your fabric basket turns out beautifully and lasts for a long time, consider these additional tips:
- Pre-wash Your Fabrics: Always wash and dry your fabrics before cutting and sewing. This prevents potential shrinkage after your basket is made, keeping its shape intact.
- Use a Rotary Cutter and Mat: For the most precise and straight cuts, especially for the initial squares, a rotary cutter with a self-healing mat and a quilting ruler is highly recommended.
- Pressing is Key: Ironing at every stage, not just fusing the fleece, makes a significant difference. Pressing seams open or to one side creates a much neater and more professional finish.
- Test Your Stitching: Before sewing on your final project, always test your machine’s tension and stitch length on a scrap piece of your chosen fabrics. This ensures smooth, even stitches.
- Go Slow on Curves: When stitching around the curved corners of the fleece or turning the project, take your time. Slow, controlled movements yield better results than rushing.
- Experiment with Fabric: While cotton is easy to work with, don’t hesitate to try other medium-weight fabrics like canvas or denim for a sturdier basket.
Variations and Customization Ideas
Once you’ve mastered the basic fabric basket, the possibilities for customization are endless:
- Different Sizes: Adjust the initial square dimensions to create larger laundry baskets or smaller trinket holders.
- Add Handles: Integrate fabric handles into the side seams before turning the basket right side out for easy portability.
- Pockets: Sew internal or external pockets for storing smaller items, enhancing the basket’s organizational capabilities.
- Embellishments: Add decorative trim, lace, embroidery, or appliqué designs for a unique touch.
- Fabric Choices: Use heavier-weight fabrics like decorator fabric for extra durability, or even incorporate patchwork for a unique look.
Conclusion: Your New Favorite Sewing Project!
Congratulations! You’ve successfully learned how to create a versatile and beautiful DIY fabric basket. This project is not only incredibly satisfying but also equips you with valuable sewing skills that can be applied to many other crafts. The joy of organizing your space with something you’ve made yourself is truly unparalleled. We hope this detailed tutorial has inspired you to pick up your needle and thread and embark on this wonderful creative journey.
Don’t forget to share your finished fabric baskets with us! We love seeing how you customize and utilize your handmade creations. A huge thank you and all image credit belong to sewingtimes via YouTube. Be sure to follow and subscribe to her channel for more inspiring and simple sewing tutorials!