
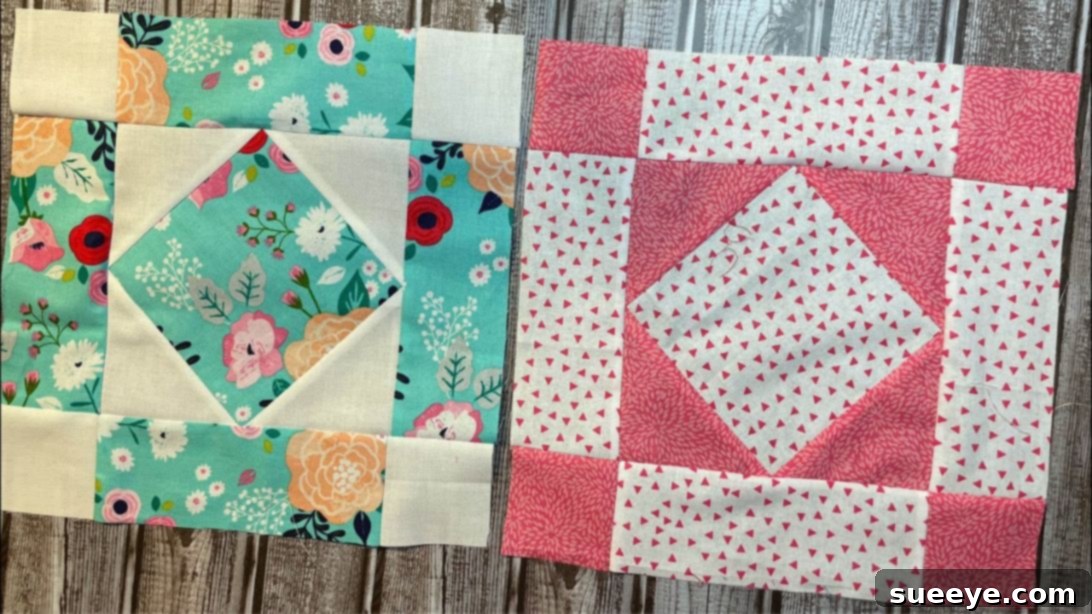
Master the Easy Aunt Quilt Block: A Beginner-Friendly Tutorial
Embark on a delightful journey into the world of quilting with this exceptionally clear and beginner-friendly tutorial for crafting the beautiful Aunt Quilt Block. Created and shared by the talented Cut and Create on YouTube, this project stands out for its simplicity and the charming aesthetic it brings to any quilting endeavor. If you’re looking for a quick and satisfying sewing project that yields stunning results, you’ve found your perfect match. The Aunt Quilt Block pattern, with its classic appeal, is incredibly versatile, making it ideal for creating everything from intricate bed quilts to decorative wall hangings, cozy throws, and even unique placemats or pillow covers. Its straightforward construction means even those new to quilting can achieve a professional-looking finish with confidence and ease.
This tutorial will guide you through each essential step, from preparing your fabric pieces with precision to expertly assembling the block using your sewing machine. We’ll focus on clear instructions, ensuring you understand not just what to do, but why each step is important for a beautifully finished block. Get ready to transform simple fabric squares and rectangles into a captivating design that will become a cherished part of your quilting repertoire. Let’s gather our supplies and dive into creating your very own Aunt Quilt Block!
Essential Materials for Your Aunt Quilt Block
Before you begin sewing, gathering all your materials and tools is crucial for a smooth and enjoyable quilting experience. Precision in cutting and a well-organized workspace will significantly contribute to the success of your quilt block. Here’s what you’ll need for one standard Aunt Quilt Block:
- 4 pieces of 2.5 x 2.5″ Fabric Squares: These small squares will form the corner accents of your block, adding definition and contrast. Choose colors that complement or contrast beautifully with your other fabrics.
- 2 pieces of 4 x 4″ Fabric Squares: These will be cut diagonally to create the foundational triangles that frame your central piece. Selecting a fabric that works well as a background or a subtle print can enhance the overall design.
- 1 piece of 5 x 5″ Fabric Square: This will be the prominent central piece of your Aunt Quilt Block. Consider a focal fabric, a vibrant print, or a solid color that you want to highlight.
- 4 pieces of 2.5 x 6¾” Fabric Rectangles: These longer rectangles will form the outer borders of your block, connecting the corner squares and completing the structure. These are excellent for using up fabric strips or adding another layer of color or pattern.
- Quilting Ruler: An essential tool for accurate measurements and precise cutting. A clear acrylic ruler with visible markings will make a significant difference in the quality of your cuts.
- Scissors or Rotary Cutter and a Cutting Mat: For crisp, clean cuts. A rotary cutter paired with a self-healing cutting mat is highly recommended for quilters as it offers unparalleled precision and speed, especially when cutting multiple layers or long strips. Ensure your rotary blade is sharp for effortless cutting.
- Iron, for pressing: A good quality iron is indispensable in quilting. Pressing seams correctly after each sewing step helps your block lie flat, reduces bulk, and ensures accurate alignment for subsequent pieces. Always press, don’t iron, to avoid stretching your fabric.
- Fabric Pins or Wonder Clips: To hold fabric pieces securely in place before sewing. High-quality, sharp pins will glide through fabric without snagging.
- Sewing Machine: A reliable sewing machine with a ¼” quilting foot (if available) will make stitching accurate seams much easier. Ensure your machine is threaded correctly and has a fresh needle suitable for quilting cottons.
When selecting your fabrics, consider pre-washing them to prevent future shrinkage and to test for colorfastness. This step, though optional for smaller projects, is good practice for larger quilts. Have all your tools within reach, and ensure your workspace is tidy to maintain focus and efficiency.
Step-by-Step Guide to Crafting Your Aunt Quilt Block
Follow these detailed instructions carefully to construct your beautiful Aunt Quilt Block. Precision and attention to detail at each stage will ensure a flawless and striking finished product.
Step 1: Preparing Your Fabric and Assembling the Center Unit
The foundation of any great quilt block lies in accurate cutting and thoughtful assembly. This initial step focuses on creating the central diamond element of your Aunt Quilt Block.
- Accurate Fabric Cutting: Begin by precisely cutting all your fabric pieces according to the measurements listed in the materials section. Using a rotary cutter, ruler, and cutting mat will yield the cleanest and most accurate results. Take your time with this step, as slight inaccuracies here can compound later on.
- Prepare the Corner Triangles: Take your two 4×4″ fabric squares. Stack them perfectly on top of each other, ensuring all edges align. Carefully cut these stacked squares in half diagonally from one corner to the opposite corner. This action will yield four perfect right-angle triangles. These triangles will form the “points” surrounding your central square.
- Marking for Precision (Optional but Recommended): For optimal placement, consider finding the midpoints of each side of your 5×5″ central square and also the midpoints along the straight (non-hypotenuse) edges of your four triangles. You can gently press a crease or mark with a fabric pencil. This will serve as a valuable guide for perfect alignment.
- Positioning the Triangles around the Center Square: Lay your 5×5″ fabric square flat on your workspace. Now, take each of the four triangles you just cut. Place one triangle on each side of the central 5×5″ square, ensuring their straight edges (not the diagonal one) perfectly align with the straight edges of the central square. The pointed tips of the triangles will extend beyond the corners of the 5×5″ square. If you marked the midpoints, align them now.
- Pin and Sew the Triangles: Carefully pin each triangle in place along the edge of the 5×5″ square. Use enough pins to prevent shifting. Head to your sewing machine and sew each triangle to the central square using a consistent ¼” seam allowance. It’s often easiest to sew two opposite sides first, press, and then sew the remaining two opposite sides.
- Pressing the Seams: After sewing all four triangles, carefully press your seams. You can press them open to reduce bulk, or press them towards the darker fabric to minimize shadow show-through. Pressing after each step is vital for a flat, crisp block, which helps in accurate subsequent piecing. At this point, you will have a square unit that looks like a diamond-shaped center framed by solid fabric.
Step 2: Trimming and Completing the Outer Borders
With your center unit constructed, the next step involves squaring it up and adding the final border pieces to complete the Aunt Quilt Block.
- Squaring Up the Center Patchwork: Once all four triangles are sewn and pressed, you’ll notice the patchwork is still somewhat irregular. Lay your block flat and carefully place a quilting ruler on top. You want to trim the outer edges to create a perfect square, making sure your central diamond shape is centered within this new square. Carefully trim any excess fabric from the sides to make them perfectly straight. This “squaring up” step is critical for ensuring your finished block is the correct size and has straight, even edges for joining with other blocks later.
- Arranging the Outer Pieces: Now, retrieve your four 2.5″ squares and four 2.5 x 6¾” rectangles. Envision the block as having three rows or sections. Place one 2.5″ square on each of the four outer corners of your squared-up central patchwork unit. Ensure their pointed corners (if any are visible) align neatly with the corners of your main block. Then, place one 2.5 x 6¾” rectangle in between each corner square, along each side of the central unit. This arrangement forms a complete outer frame around your diamond-centered unit.
- Sewing the Outer Rows:
- First Row (Top and Bottom): Take two of your 2.5″ squares and one 2.5 x 6¾” rectangle. Sew one 2.5″ square to one end of the rectangle, and the other 2.5″ square to the opposite end of the rectangle. This creates a strip (square-rectangle-square). Repeat this for the other top/bottom strip. Use a ¼” seam allowance.
- Second Row (Side Borders): Take your remaining two 2.5 x 6¾” rectangles. These will be sewn directly to the sides of your central, squared-up unit. Attach one rectangle to each side, again using a ¼” seam allowance.
Give each of these assembled rows a good press after sewing, always checking for accuracy.
- Assembling the Final Block: You now have five components: your central unit (with side rectangles attached), and two “square-rectangle-square” strips. Carefully align one of the “square-rectangle-square” strips to the top edge of your central unit, pinning it securely. Sew it in place with a ¼” seam allowance. Repeat this for the bottom edge, attaching the second “square-rectangle-square” strip.
- Final Pressing: Once all the rows are sewn together, give your entire Aunt Quilt Block a final, thorough press. Press all seams either open or to one side, ensuring the block lies perfectly flat and crisp. Congratulations! Your beautiful Aunt Quilt Block is now complete.
Tips for Quilting Success
- Precision is Paramount: In quilting, a small deviation in one cut or seam can throw off the entire block. Always strive for accurate ¼” seam allowances and precise cuts. Consider using a scant ¼” seam if your machine tends to sew slightly wider.
- Chain Piecing: To save time, especially if you’re making multiple blocks, consider chain piecing. This involves feeding multiple units through your sewing machine consecutively without cutting the thread in between. You then clip them apart and press.
- Pressing vs. Ironing: Remember to “press” your fabric, not “iron” it. Pressing involves lifting and placing the iron down, which helps to set seams and prevent distortion, whereas ironing involves sliding the iron, which can stretch and warp your fabric.
- Starch for Stability: A light spray of starch on your fabrics before cutting can add stiffness, making them easier to cut accurately and preventing stretching during sewing.
- Fabric Choices: Don’t be afraid to experiment with different fabric prints and colors. The Aunt Quilt Block lends itself beautifully to contrasting solids, complementary patterns, or even a mix of scraps for a truly unique look.
- Practice Makes Perfect: If this is your first quilt block, don’t worry if it’s not absolutely perfect. Every stitch is a learning experience. The more you practice, the more confident and skilled you’ll become.
Creative Variations and Project Ideas
The beauty of the Aunt Quilt Block lies in its adaptability. Once you’ve mastered this block, the possibilities for its use are endless:
- Full Quilt Project: Create several Aunt Quilt Blocks and stitch them together, adding sashing in between if desired, to form a stunning full-sized quilt.
- Smaller Items: Use a single block or a few blocks to make a charming placemat, a hot pad, a decorative pillow cover, or even a unique tote bag panel.
- Color Play: Experiment with a monochromatic color scheme for a sophisticated look, or go wild with a vibrant, scrappy approach using various leftover fabrics.
- Scaling: With careful calculation, you could adjust the initial fabric square and rectangle sizes to create a larger or smaller version of the Aunt Quilt Block, opening up even more project possibilities.
Conclusion: Your Journey into Quilting Starts Here
Congratulations on completing your Aunt Quilt Block! This simple yet elegant design is a fantastic accomplishment for any quilter, especially those just starting out. The clear instructions provided by Cut and Create on YouTube, combined with our detailed breakdown, have hopefully empowered you to create a beautiful piece of fabric art.
This block serves as an excellent foundation for understanding basic quilting principles like accurate cutting, precise piecing, and proper pressing – skills that are invaluable for any future quilting project. We encourage you to continue exploring the vast and rewarding world of quilting. Don’t hesitate to make more Aunt Quilt Blocks, experiment with different fabrics, and transform them into magnificent projects. Happy quilting, and enjoy the creative process!
*A special thank you to Cut and Create via YouTube for all images and for sharing such a wonderful tutorial. Be sure to visit her channel, subscribe, and show your support for her fantastic content!