
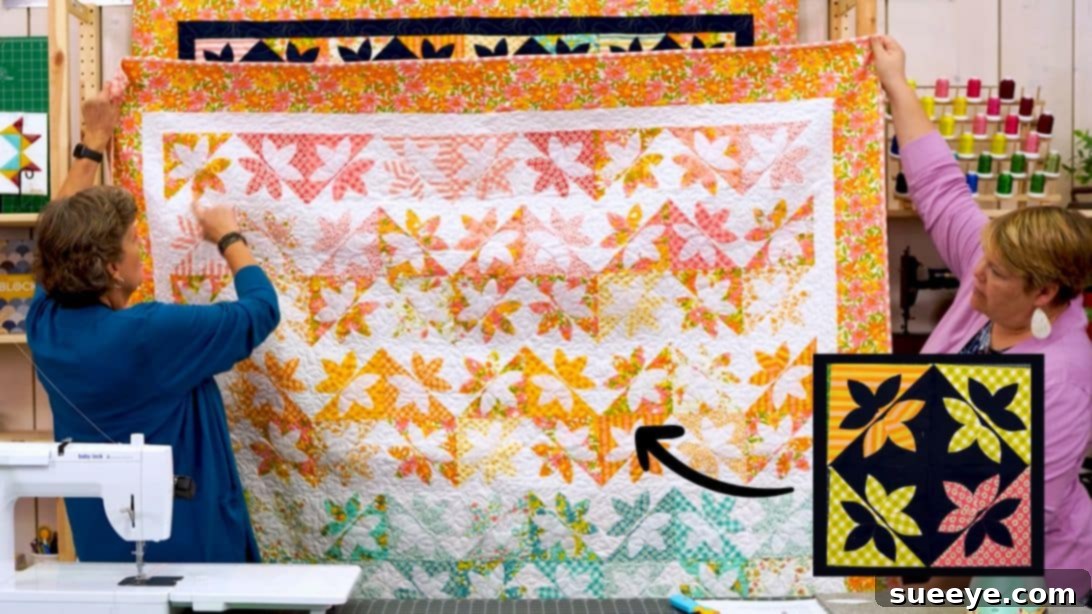
Mastering the Vintage Bouquet Quilt: A Comprehensive Guide to a Missouri Star Classic
Are you searching for a quilt pattern that offers endless design possibilities and is an absolute joy to create? Look no further than the enchanting Vintage Bouquet Quilt, a truly beloved design by the renowned Missouri Star Quilt Company. This pattern stands out for its incredible versatility, allowing you to arrange your blocks in numerous ways to achieve distinctly different visual effects, all from a single foundational block design. Imagine crafting a stunning quilt where each arrangement reveals a new dimension, a fresh pattern waiting to be discovered. It’s a project that promises creativity and satisfaction, made wonderfully accessible with the help of a simple orange template.
The Vintage Bouquet Quilt is celebrated for its ability to transform fabric into art, offering a dynamic interplay of color and shape. Whether you’re a seasoned quilter eager for a fresh challenge or a beginner looking to expand your skills, this project is designed to inspire and delight. Jenny Doan’s brilliant approach simplifies complex-looking designs, making them achievable for everyone. This detailed guide will walk you through each step, ensuring you have all the information needed to bring your own Vintage Bouquet Quilt to life. Prepare to fall in love with the process and the beautiful outcome. Happy quilting!
Why Choose the Vintage Bouquet Quilt? Unlocking Endless Design Potential
The allure of the Vintage Bouquet Quilt lies in its ingenious construction, which provides a canvas for incredible creativity. Unlike patterns that dictate a single layout, this design empowers you to be the artist, arranging your finished blocks in a multitude of configurations. With just one type of block, you can conjure a striking diamond in the center, a playful pinwheel, an elegant chevron, or even explore your own unique, abstract compositions. This adaptability means you can create multiple quilts using the same basic block, each with its own distinct personality.
Beyond its versatility, the Vintage Bouquet Quilt is also incredibly rewarding to construct. The process, while engaging, is straightforward, relying on fundamental quilting techniques like half-square triangles (HSTs) and simple appliqué. This makes it an excellent choice for quilters who want to build confidence in these core skills while producing a visually impressive piece. The use of pre-cut fabric squares, such as 10″ print and background squares, significantly speeds up the initial cutting phase, allowing you to dive straight into the fun of sewing and design. This pattern truly marries ease of construction with sophisticated design possibilities, making it a timeless addition to any quilter’s repertoire.
Gathering Your Quilting Supplies: Essential Ingredients for Your Vintage Bouquet
Before embarking on your Vintage Bouquet Quilt journey, having all your materials organized and ready is key to a smooth and enjoyable process. This project, like many Missouri Star favorites, is designed to be efficient, often utilizing pre-cut fabrics to save you valuable time. Here’s a comprehensive list of what you’ll need, along with a few tips for selecting your fabrics to achieve that perfect vintage aesthetic or a modern twist:
- 1 Pack of 10″ Print Squares (Layer Cakes): These pre-cut squares are perfect for the main decorative elements of your quilt blocks. Choose a collection with coordinating colors and patterns that appeal to your personal style. Florals, geometrics, or solids can all create stunning effects.
- 1 Pack of 10″ Background Squares (Layer Cakes): These will provide the contrasting backdrop for your print squares, making your design truly pop. A solid white, cream, or light gray is a classic choice, but don’t hesitate to experiment with subtle patterns or colors that complement your prints.
- 3/4 Yard for Inner Border: The inner border adds a subtle frame around your quilt top, helping to transition from the main design to the outer border. Select a fabric that either harmonizes with or provides a gentle contrast to your quilt blocks.
- 1 1/2 Yards for the Outer Border: This wider border provides a more substantial frame and can really tie the whole quilt together. Consider a fabric that repeats a color from your blocks or introduces a deeper tone for a dramatic finish.
- 3/4 Yards for Binding: The binding is the finishing touch that encases the raw edges of your quilt. A durable fabric that coordinates with your quilt top is essential. Stripes or small prints can add a professional touch.
- 5 1/4 Yards for Backing: The backing fabric should be comfortable and aesthetically pleasing, as it will be visible on the reverse side of your quilt. This is also an opportunity to use a fun, complementary print or a soft solid.
- 4 1/2 Yards of Heat and Bond Lite: This fusible web is crucial for the appliqué elements of your design. Heat and Bond Lite allows you to adhere fabric pieces without adding bulk, making stitching easier and giving a neat finish.
- Missouri Star Orange Peel Template (for 2.5″ Squares): This specialized template is the secret to creating the distinctive “orange peel” or leaf shapes that define the vintage bouquet look. Ensuring you have the correct size for 2.5″ squares will guarantee accurate and consistent appliqué pieces.
When selecting your fabrics, remember that contrast is key to making the “bouquet” elements stand out. Consider both color and value (lightness/darkness) to ensure your design has depth and visual interest. Don’t be afraid to mix and match patterns, but always check how they look together before making your final cuts!
Step-by-Step Instructions: Crafting Your Vintage Bouquet Quilt Block
Now that your supplies are gathered, let’s dive into the creative process of constructing your Vintage Bouquet Quilt. Each step is designed to be clear and manageable, guiding you towards beautifully finished blocks that will form your exquisite quilt.
Step 1: Creating Your Half-Square Triangles (HSTs)
Begin by taking one 10″ print square and one 10″ background square. Place them right sides together, ensuring all edges are aligned. Using your rotary cutter and ruler, trim 2″ off the top edge and 2″ off one side edge of the stacked squares. This will give you a slightly smaller, perfectly matched pair of squares to work with. Next, use a fabric marker or pencil to draw a diagonal line from one corner to the opposite corner on the top (background) square. This line will serve as your guide. Stitch a precise quarter-inch seam on both sides of this drawn diagonal line. Accuracy here is crucial for well-proportioned HSTs. Once stitched, carefully cut along the original diagonal line, separating your two units. Press each half-square triangle open, always pressing the seam allowance towards the darker fabric to prevent shadowing. Finally, using a square-up ruler, trim your HSTs to a consistent size, ensuring they are perfectly square. This squaring-up step is vital for ensuring your blocks fit together neatly later on.
Step 2: Preparing Your Appliqué with Heat and Bond Lite
For the charming “leaf” or “orange peel” elements of your bouquet, you’ll utilize Heat and Bond Lite. Begin by cutting two 2-inch wide strips from your Heat and Bond Lite. Take a 2-inch strip of fabric (which can be cut from your leftover 10″ print squares or a coordinating fabric) and carefully press it onto the paper side of the Heat and Bond Lite. Ensure the adhesive is firmly bonded to the fabric. This process creates a stable, fusible fabric strip that will be easy to cut and apply.
Step 3: Tracing and Cutting Your Orange Peel Shapes
With your fabric strips now backed with Heat and Bond Lite, it’s time to create your appliqué pieces. Place your Missouri Star Orange Peel template (designed for 2.5″ squares) onto the fabric strip. Trace the shape of the template onto the paper side of the Heat and Bond Lite. Position the template efficiently to minimize waste; you should be able to trace approximately three pieces from each 2-inch strip, depending on its length. Carefully cut out each traced “orange peel” shape. Precision in cutting will result in clean, defined appliqué elements for your blocks.
Step 4: Appliquéing the Orange Peel Shapes onto Your HSTs
Now comes the exciting part where your quilt blocks start to take shape. Take one of your squared-up half-square triangles. Peel off the paper backing from three of your cut “orange peel” leaf shapes. Position these three pieces onto one side of the HST, ensuring they are placed on the contrasting color fabric (e.g., if your HST has a dark print and a light background, place the appliqué on the darker print side for maximum visibility, or vice-versa for a more subtle effect). Arrange them symmetrically, forming a small cluster or partial “bouquet.” Once satisfied with the placement, lightly press them with an iron to fuse them temporarily in place. Repeat this process for all four sides of each half-square triangle. For each complete block in your quilt, you will need four of these appliquéd half-square triangle units. After fusing, secure the appliqué pieces by stitching around their edges. You can choose a simple straight stitch, a decorative zigzag, or even a satin stitch for a more finished look. The beauty of this step is the freedom to personalize your appliqué technique.
Step 5: Assembling Your Quilt Blocks and Exploring Layouts
Once you have created all your individual appliquéd half-square triangle units, the true magic of the Vintage Bouquet Quilt comes alive in the arrangement. The unique design of these units allows for an astounding variety of quilt block patterns. For instance, by rotating and positioning four units together, you can create a captivating diamond in the center, a dynamic pinwheel effect, or a striking chevron pattern. Lay out your completed units on a design wall or floor to experiment with different orientations. Play with turning units to the left, right, up, and down to see the incredible array of patterns that emerge. Once you have decided on your desired arrangement for each block, sew the four units together to form a complete quilt block. This iterative process of experimentation and assembly is one of the most enjoyable aspects of this particular quilt pattern. The video tutorial by Jenny Doan (linked below) offers excellent visual examples and further inspiration for block arrangements beyond these classic options, encouraging you to explore the full potential of this versatile design.
Finishing Your Vintage Bouquet Quilt: Bringing It All Together
After all your beautiful Vintage Bouquet blocks are sewn and arranged into your desired quilt top, the final steps involve layering, quilting, and binding to transform it into a complete, heirloom-quality piece. This phase is just as important as the block construction for the overall look and durability of your quilt.
Assembling the Quilt Top and Adding Borders
Once your individual quilt blocks are completed, arrange them according to your chosen layout. Carefully sew them together in rows, then sew the rows together to form the central quilt top. Pay close attention to nesting seams to ensure flat, precise junctions. After the main body is complete, attach your inner border. Measure your quilt top through the center, then cut and attach the inner border strips, pressing seams outwards. Repeat this process for the outer border, which will provide a grand frame for your Vintage Bouquet design. Accurate border application is crucial for keeping your quilt square.
Layering, Quilting, and Binding
With the quilt top finished, it’s time to create the “quilt sandwich.” Lay your backing fabric right side down, smooth it out completely, then place your batting on top, followed by your quilt top, right side up. Secure these three layers together with basting spray, safety pins, or hand basting stitches. Once basted, you can begin the quilting process. This can be done on a domestic sewing machine, a longarm machine, or even by hand. Popular quilting patterns for this design might include simple stitch-in-the-ditch around the block seams, an all-over free-motion design that complements the “bouquet” elements, or custom quilting that highlights each individual flower or leaf. Finally, prepare your binding strips. Join them end-to-end, press, and attach to the edges of your quilt, either by machine or a combination of machine and hand stitching, for a neat and durable finish. This step not only completes the quilt but also protects its edges for years to come.
Tips for a Perfect Vintage Bouquet Quilt
To ensure your Vintage Bouquet Quilt turns out as stunning as you envision, consider these helpful tips:
- Precision is Key: Accurate cutting and a consistent 1/4-inch seam allowance are paramount, especially when working with half-square triangles and appliqué. Invest in a good rotary cutter and ruler.
- Pressing Matters: Pressing seams correctly (often towards the darker fabric for HSTs or open for less bulk) can significantly impact how flat your blocks lie and how well they align.
- Test Your Appliqué Stitch: Before committing to your blocks, practice your chosen appliqué stitch on a scrap piece of fabric backed with Heat and Bond Lite. This ensures you’re happy with the tension and appearance.
- Design Wall Advantage: A design wall (even a flannel sheet pinned to a wall) is invaluable for arranging your blocks. It allows you to step back and visualize different layouts before sewing them together.
- Embrace Your Fabric Choices: Don’t be afraid to experiment with different fabric lines or colors. A “vintage” look can be achieved with reproduction fabrics, while modern prints can give the design a fresh, contemporary feel.
- Enjoy the Process: Quilting is a journey of creativity and relaxation. Take your time, savor each step, and don’t be afraid to make it your own!
Experience the Magic: Vintage Bouquet Quilt with Jenny Doan
For a dynamic visual guide and additional insights straight from the expert, we highly recommend watching the original tutorial by Jenny Doan from Missouri Star Quilt Company. Her engaging teaching style makes complex techniques approachable and inspires confidence in quilters of all skill levels. You can find the full instructional video here:
This video beautifully complements the written instructions, providing valuable demonstrations of cutting, sewing, and, most importantly, the myriad ways to arrange your blocks to create truly unique quilt tops. Seeing Jenny’s tips in action can often clarify any questions and spark even more creative ideas for your project.
Your Next Quilting Adventure Awaits!
The Vintage Bouquet Quilt pattern is more than just a sewing project; it’s an opportunity to create a stunning piece of textile art that reflects your personal style and creativity. With its flexible design and approachable techniques, it’s a pattern that promises both challenge and immense satisfaction. Whether you’re aiming for a comforting throw, a decorative wall hanging, or a cherished gift, this quilt will undoubtedly become a favorite. Embrace the joy of fabric, thread, and imagination, and prepare to be amazed by what you can create. We can’t wait to see your beautiful Vintage Bouquet Quilt!