
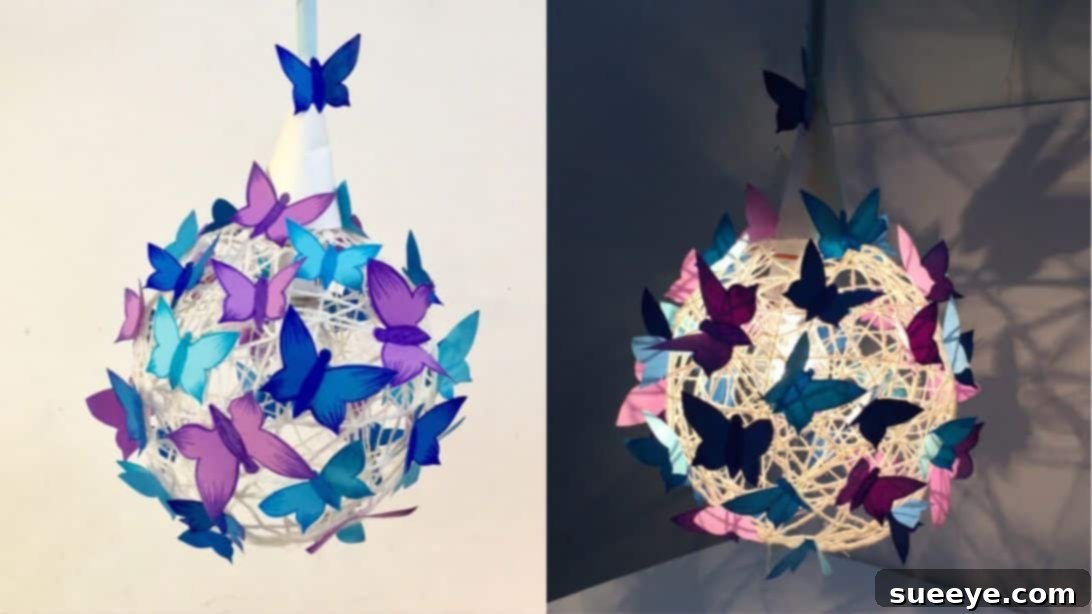
Create Your Own Enchanting DIY Butterfly Lantern: A Step-by-Step Guide
Are you searching for a truly unique and captivating statement piece to elevate your room’s aesthetic? Look no further than this enchanting DIY butterfly lantern! We were absolutely captivated by this brilliant idea from MASS Art and Craft on YouTube, and instantly knew it was a must-try project. Imagine the soft, ambient glow casting whimsical butterfly shadows across your walls – it’s pure magic, especially at night!
This comprehensive guide will walk you through every step of crafting your very own butterfly lantern, ensuring a delightful and rewarding experience. Whether you’re a seasoned crafter or just starting your DIY journey, the instructions are designed to be straightforward and easy to follow. Get ready to infuse your living space with a touch of handmade charm and a truly personalized glow that will surely spark joy and admiration.
Materials You’ll Need:
Gathering all your materials before you begin will make the crafting process smoother and more enjoyable. Most of these items are readily available at craft stores or even around your home.
- Balloon: A medium-sized round balloon works best as the base for your lantern.
- Tape: Standard clear or masking tape will be perfect for marking your balloon.
- Marker: A permanent marker is ideal for drawing on the balloon’s surface.
- Craft Glue: A good quality PVA glue or a strong white craft glue is essential for stiffening the yarn. Ensure it dries clear.
- Yarn: Choose a yarn that is not too thick or too thin. Cotton or acrylic yarn works well, offering good absorbency for the glue and maintaining its shape once dry. The color is up to your preference, as it will form the main structure of your lantern.
- Thick Paper or Cardstock: This will be used for crafting your beautiful butterflies and the inner cone. Opt for paper that holds its shape well but is still easy to cut. Various colors will add depth to your butterfly arrangement.
- Rectangles for Butterflies (from thick paper/cardstock):
- Small (A): Approximately 2.4″ by 6″ (6 cm by 15 cm)
- Medium (B): Approximately 2.75″ by 2″ (7 cm by 5 cm)
- Large (C): Approximately 3.15″ by 2.4″ (8 cm by 6 cm)
Having different sizes will create a dynamic and natural look for your butterfly swarm.
- Light Bulb & Cord Set: A small LED light bulb (cool to the touch) with a compatible cord set is crucial for safety and functionality. Ensure it’s suitable for a DIY lamp project.
- Super Glue (Optional but Recommended): For securely attaching the paper cone to the yarn lamp structure.
Step-by-Step Instructions: Crafting Your Butterfly Lantern
Follow these detailed steps carefully to bring your enchanting butterfly lantern to life. Patience is key, especially during drying times, to ensure a durable and beautiful finished product.
Step 1: Preparing Your Balloon Base
Begin by inflating your balloon to your desired lantern size. Tie off the end securely to prevent air from escaping. Next, place a piece of tape on the very bottom of the balloon. This tape acts as a guide for the opening where your light bulb will eventually go. Using your marker, carefully trace a circle around the edge of the tape. This marked area is crucial; it must remain free of yarn to allow access for the light fixture and proper air circulation.
Step 2: Coating the Yarn with Glue
Pour a generous amount of your craft glue into a shallow container. Now, take a very long strand of yarn – consider unwinding a significant portion from your ball or skein. Slowly dip and feed the yarn into the glue, making sure every inch is thoroughly coated. The yarn should be saturated but not dripping excessively. You can gently run the yarn between your fingers (wearing gloves is recommended!) to remove any excess glue, ensuring an even layer without clumps. This step is vital for the yarn to dry rigid and hold its spherical shape.
Step 3: Wrapping the Yarn Around the Balloon
With your glue-coated yarn, start wrapping it around the balloon in various directions. Experiment with criss-cross patterns, horizontal, and vertical lines to create an intricate web-like structure. Remember to leave the marked circle at the bottom completely clear – this will be your lantern’s opening. Continue wrapping until you achieve a good density that will provide stability and a beautiful light diffusion. Once satisfied, tie off the end of the yarn to secure it to the existing wrapped structure. Now comes the most important part: let the yarn-wrapped balloon dry completely. This could take anywhere from 12 to 24 hours, depending on the humidity and the amount of glue used. Ensure it’s perfectly dry and firm to the touch before proceeding. If you find the yarn structure feels too sparse after drying, you can repeat Step 2 and add another layer of glue-coated yarn.
Step 4: Releasing the Balloon
Once your yarn structure is completely dry and rigid, it’s time for the exciting reveal! Gently poke the balloon with a sharp object (like a pin or needle). As the balloon deflates, it will separate from the hardened yarn. Carefully remove the deflated balloon through the opening you created at the bottom. If the yarn structure has slightly flattened during this process, gently press it from the inside with your hands to bring it back to its original spherical shape. Handle with care to avoid deforming the dried yarn.
Step 5: Crafting Your Paper Butterflies
Now, let’s bring the ‘butterfly’ into your butterfly lantern! Take one of your medium (B) rectangles of thick paper. Fold it precisely in half. On the folded edge, draw half of a butterfly shape. Think about the symmetry and flow of a butterfly’s wing. Carefully cut out your drawn half-butterfly. When you unfold it, you’ll have a perfectly symmetrical butterfly. Get creative with designs: you can add intricate cut-outs within the wings, curl the edges slightly for a more dynamic look, or even emboss patterns. Once you’re happy with your design, gently fold the wings upwards along the body line to give them a lifelike, three-dimensional appearance. Repeat this process for all your rectangles (sizes A, B, and C), ensuring you create a beautiful assortment of butterflies in varying sizes and perhaps different colors to add visual interest and depth to your lantern. This variety will make your final lantern look more organic and captivating.
Step 6: Creating the Light Bulb Cone
The paper cone serves as a holder and stabilizer for your light bulb assembly. Take a piece of your thick paper and form it into a cone shape. Ensure the tip of the cone is open, large enough for the light bulb’s wire to pass through comfortably, but snug enough to hold the bulb’s base securely. The base of the cone should be wider than the opening of your yarn lantern. You can secure the cone’s shape with a strip of tape or a dab of glue.
Step 7: Installing the Light Fixture
This step involves working with electrical components, so always prioritize safety. Carefully insert the wire of your light bulb set into the yarn lamp structure through the bottom opening. Then, thread the wire through the open tip of the paper cone you just made. Position the light bulb so it hangs centrally within the yarn sphere. Now, using super glue or a very strong craft glue, secure the base of the paper cone to the inside edge of the yarn lantern’s opening. This ensures the light bulb remains stable. As an additional step, you can roll a small piece of paper around the wire just above the cone and glue it in place; this adds a neat finish and extra stability.
Step 8: Adorning Your Lantern with Butterflies
Now for the truly artistic part! Begin gluing your beautiful paper butterflies onto the yarn lantern. Play with the arrangement: alternate the sizes (A, B, C) and colors of each butterfly to create a dynamic and visually rich display. You can glue them directly onto the yarn strands, making some appear to be flying upwards, some downwards, and others clustered together. Don’t be afraid to experiment with placement – some on the inside of the lantern for a silhouette effect, and others on the outside for full visibility. If you wish to extend the magical effect, you can also glue a few butterflies along the light bulb’s cord, making it appear as if they are fluttering around the light source itself.
Tips for a Perfect DIY Butterfly Lantern
To ensure your butterfly lantern project is a resounding success, consider these helpful tips:
- Patience is a Virtue: The drying time for the yarn is critical. Rushing this step will result in a flimsy lantern that won’t hold its shape. Allow ample time for the glue to cure completely.
- Experiment with Yarn: Different types and colors of yarn can dramatically change the look of your lantern. Think about variegated yarns for a multicolored glow, or even glow-in-the-dark yarn for an extra magical touch!
- Butterfly Customization: Don’t limit yourself to simple cut-outs. Use punches for intricate patterns, add glitter, paint details, or even use different textures of paper for your butterflies. Origami paper, translucent vellum, or metallic cardstock can create stunning effects.
- Safety First with Lighting: Always use an LED light bulb for your lantern. They generate very little heat, significantly reducing any fire risk. Ensure your light bulb and cord set are in good condition and used according to manufacturer instructions.
- Glue Application: For attaching the butterflies, a quick-drying craft glue or a glue gun (on a low setting) can speed up the process. Apply glue sparingly to avoid visible residue.
- Display Considerations: Think about where your lantern will hang. Near a wall, the shadows cast by the butterflies will add another layer of enchantment.
- Involve the Family: This project is wonderful for all ages. Kids can help with drawing and cutting butterflies (with supervision for younger children), making it a fun family activity.
Caring for Your Handmade Lantern
Once your beautiful DIY butterfly lantern is complete, a little care will ensure its longevity:
- Cleaning: To dust your lantern, use a soft, dry brush or a can of compressed air. Avoid using wet cloths as this could damage the paper butterflies or soften the yarn structure.
- Placement: Hang your lantern indoors in a dry environment, away from direct sunlight, extreme heat, or high humidity, which could cause the paper to warp or the glue to weaken.
- Storage: If you need to store your lantern, place it in a sturdy box, ensuring it’s not crushed. You can stuff the inside with tissue paper to help it maintain its shape.
Frequently Asked Questions About DIY Butterfly Lanterns
Here are some common questions you might have as you embark on this crafting adventure:
Q1: Can I use different sizes or shapes of balloons?
Yes, absolutely! A larger balloon will create a bigger lantern, while an oval balloon could create a more unique, elongated shape. Just ensure your yarn coverage is consistent, and adjust the number of butterflies accordingly for visual balance.
Q2: What if my yarn doesn’t dry hard enough?
This usually happens if the yarn wasn’t thoroughly saturated with glue or if the drying conditions weren’t optimal (e.g., too humid). You can gently apply another layer of glue to the existing yarn structure, ensuring even coverage, and then allow it to dry completely for a longer period.
Q3: Can I use different materials instead of paper for the butterflies?
Certainly! You could experiment with vellum for a translucent effect, thin fabric like organza for a soft look, or even repurpose old book pages for a vintage feel. Just ensure the material is light enough not to weigh down the yarn structure.
Q4: How can I make my lantern glow brighter or dimmer?
The brightness depends on the wattage of your LED bulb. To change the light intensity, you can swap out the bulb for one with higher or lower lumens. Some cord sets also come with dimmer switches, offering adjustable brightness.
Q5: Is this project suitable for children?
Yes, many steps are suitable for children, especially drawing and cutting the butterflies. However, adult supervision is essential for steps involving glue saturation, sharp objects, and particularly the electrical light bulb installation for safety reasons.
Your DIY Butterfly Lantern Awaits!
There you have it – a comprehensive guide to creating a stunning DIY butterfly lantern that will undoubtedly become a focal point in any room. This project is not just about crafting; it’s about adding a personal touch, a sprinkle of magic, and a warm, inviting glow to your home. The satisfaction of seeing your handmade creation illuminate your space is truly unparalleled.
So, gather your materials, unleash your creativity, and embark on this wonderful crafting journey. Once your magnificent butterfly lantern is complete, we’d love to see your unique rendition! Share your creations and inspire others to add a touch of whimsical elegance to their own spaces. Happy crafting!