
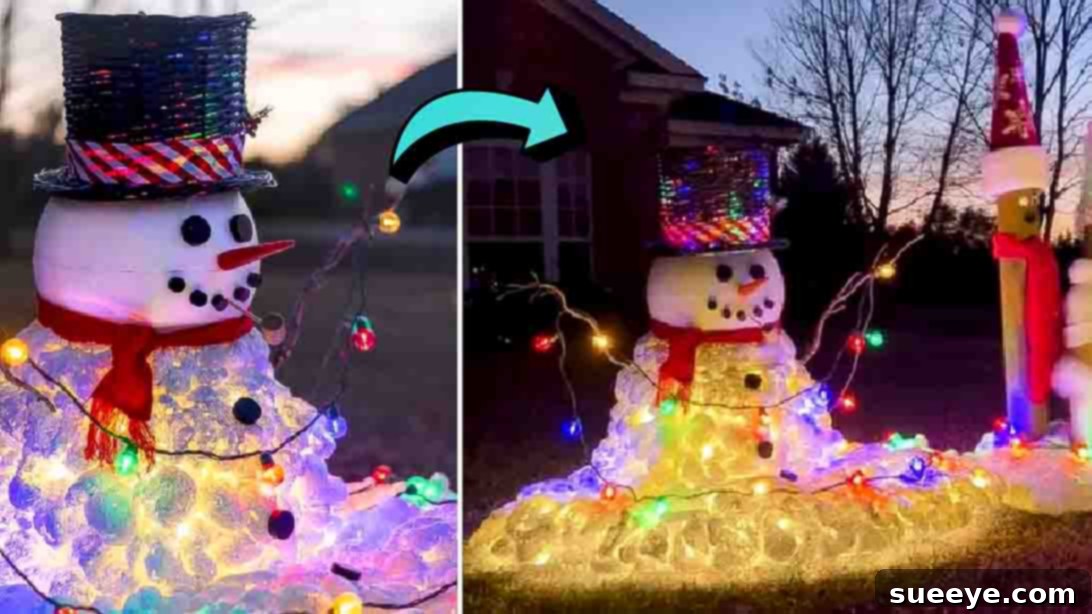
DIY Light-Up Melting Snowman: A Whimsical Holiday Decoration Guide
The holiday season is a magical time, filled with warmth, cheer, and the joy of transforming our homes into festive havens. While traditional decorations are always lovely, there’s something truly special about a unique, handcrafted piece that sparks wonder and delight. This year, why not enchant your neighborhood with a whimsical and eye-catching DIY light-up melting snowman? Inspired by the creative genius of @thenavagepatch on TikTok, this project is not only surprisingly straightforward to create but also promises to be an instant hit, especially when its gentle glow illuminates the night.
Imagine a snowy figure, seemingly melting into a cheerful puddle, yet radiating a warm, inviting light. This charming contradiction is what makes the melting snowman so captivating. It’s a playful nod to winter’s fleeting beauty, brought to life with a few simple materials and a touch of DIY spirit. Whether you’re an experienced crafter or new to the world of DIY, this guide will walk you through every step, ensuring you can bring this enchanting vision to your own front yard. Get ready to impress your friends, family, and neighbors with a truly unforgettable holiday display!
Why Craft a Light-Up Melting Snowman This Holiday Season?
In a sea of traditional holiday decorations, a light-up melting snowman stands out as a beacon of creativity and charm. But beyond its unique aesthetic, there are several compelling reasons why this DIY project is the perfect addition to your festive repertoire:
Uniqueness and Whimsy
Unlike standard snowmen, the “melting” effect adds a touch of playful realism and unexpected humor. It’s a conversation starter, drawing smiles and curious glances from everyone who passes by. This whimsical element captures the lighthearted spirit of the holidays, making your decor truly memorable.
Stunning Visual Impact, Day and Night
During the day, the bright white foam gives your snowman a pristine, freshly fallen snow appearance. But the real magic unfolds after dusk. Illuminated by embedded LED lights, your melting snowman transforms into a radiant spectacle, casting a soft, inviting glow that enhances your home’s curb appeal and creates a warm, festive ambiance.
Cost-Effective Holiday Decor
Store-bought holiday decorations, especially large, illuminated figures, can be quite expensive. This DIY project utilizes readily available and affordable materials, allowing you to create a high-impact decoration without breaking the bank. It’s a smart way to achieve a custom look on a budget.
Easy and Enjoyable Crafting Experience
Don’t let the impressive final result intimidate you. The construction process is surprisingly simple, making it an ideal project for crafters of all skill levels. It’s also a fantastic activity to share with family and friends, turning a creative endeavor into cherished holiday memories. Calling your friends to build one together can be a fun pre-holiday gathering!
Customization at Your Fingertips
This project is incredibly versatile. You have full creative freedom to personalize your snowman’s features, accessories, and overall look. From the shape of its melt puddle to the style of its hat, you can design a snowman that perfectly reflects your personal taste and holiday theme. Just remember to use LED lights for their energy efficiency and cool-to-the-touch safety, and bright white spray foam for the best snowy effect.
Materials You’ll Need for Your Whimsical Snowman
Before diving into the creative process, gather all your supplies. Most of these materials are easily found at hardware stores, craft shops, or even online. Choosing the right materials ensures durability and a stunning final product.
- 2 strings of 100 LED lights: LED lights are crucial for this project. They are energy-efficient, remain cool to the touch (preventing heat-related damage to the foam), and provide a vibrant, long-lasting glow. Two strings ensure ample illumination for both the snowman’s body and its melting base.
- Small plastic laundry basket: This serves as the core structure for your snowman’s body. An inverted laundry basket provides a sturdy, lightweight, and pre-shaped base, making it easy to build the foam around it.
- 2 cans of spray polyurethane foam (bright white color): This expanding foam is the star of the show, creating the snowy texture and the iconic melting effect. Opt for “bright white” to achieve a realistic, crisp snow look that won’t yellow prematurely. Ensure you have enough for multiple layers and touch-ups.
- White exterior paint: Once the foam cures, painting it white with exterior-grade paint is vital. This protects the foam from UV rays, which can cause yellowing over time, and ensures a uniform, brilliant white finish that withstands outdoor elements.
- 2 – half foam balls: These will form the snowman’s eyes. You can choose various sizes depending on the desired expression. Alternatively, you can use painted stones or large buttons.
- Hat for the snowman: A classic top hat, a cozy beanie, or even a festive Santa hat will complete your snowman’s look. Choose one that complements the size and style of your creation.
- Foam board adhesive: This specialized adhesive is perfect for attaching the foam head and other decorations to the polyurethane foam, ensuring a strong and lasting bond.
- Optional additions: Twigs for arms, a craft foam carrot for the nose, painted black craft foam or buttons for the mouth, a scarf, or even some glitter for extra sparkle.
Step-by-Step Guide to Crafting Your Light-Up Melting Snowman
Follow these detailed instructions to bring your whimsical light-up melting snowman to life. Take your time with each step to ensure a beautiful and durable result.
Step 1: Preparing the Base and Initial Lighting
Begin by setting up your workspace in a well-ventilated area, preferably outdoors, as spray foam can emit fumes. Place your small plastic laundry basket upside down on a protective surface. Carefully wrap one of the 100-count LED light strings around the basket, weaving it through the holes to secure it. Ensure the lights are evenly distributed, as these will illuminate the snowman’s body.
Next, take the second string of LED lights and arrange a portion of it on the ground directly in front of and around the base of the inverted basket. This will form the glowing “puddle” of melting snow. Now, using your bright white spray polyurethane foam, start creating the melting effect on the ground, covering the arranged lights. Build up the foam in layers, carefully extending it from the ground and gradually working your way up the sides of the basket. Ensure the foam adheres well to the basket and encases the lights without completely obscuring their glow. Allow the foam to expand and cure completely according to the manufacturer’s instructions. This usually takes a few hours, but full curing might take up to 24 hours. Once cured, apply a coat of white exterior paint to the entire foam structure. This protects the foam from UV yellowing and gives it a uniform, bright white finish that truly resembles fresh snow.
Step 2: Attaching the Head and Defining Features
Once the foam body is fully cured and painted, it’s time to add the snowman’s head and features. Secure one of the half foam balls (which will represent the head) on top of the cured foam body using a generous amount of foam board adhesive. Hold it firmly in place for a few moments to ensure a good bond. Once the head is secure, attach the chosen hat firmly on top of the foam ball.
Now, it’s time to bring your snowman’s personality to life. Use your foam board adhesive to attach the other two half foam balls as eyes. For the nose, you can cut a carrot shape from orange craft foam or use a real carrot if you don’t mind replacing it periodically. For the mouth, cut small circular or curved shapes from black craft foam, or use small black buttons. Arrange them to give your snowman a cheerful or whimsical expression.
For the arms, gather a couple of sturdy twigs from your yard. Carefully insert them into the cured foam body on either side, ensuring they are securely lodged. You can also weave any remaining Christmas lights from your second string around these twig arms or strategically place them over the snowman’s body for extra sparkle and illumination. And just like that, your charming light-up melting snowman is complete!
Pro Tips for a Perfect Light-Up Melting Snowman
To ensure your melting snowman looks fantastic and lasts throughout the holiday season, consider these additional tips:
Safety First with Spray Foam
When working with spray polyurethane foam, always ensure adequate ventilation. Wear gloves and eye protection to prevent skin contact and irritation. Read the manufacturer’s instructions carefully for safe application and curing times.
Weatherproofing for Outdoor Display
Since this snowman is designed for outdoor display, consider adding a clear, UV-resistant sealant spray over the entire painted surface once it’s fully dry. This will provide an extra layer of protection against rain, snow, and sun, helping to preserve its vibrant white color and structural integrity.
Creative Customization
Don’t be afraid to experiment! You can add a small scarf, attach buttons down the front, or even incorporate other small, weatherproof ornaments. For an extra festive touch, consider adding a light dusting of iridescent glitter to mimic sparkling snow.
Optimal Placement
Choose a prominent spot in your front yard where your melting snowman can be easily seen and admired. Near a pathway, by your front door, or among other holiday lights, ensure the power cord for the LED lights can safely reach an outdoor outlet without being a tripping hazard.
Thoughtful Storage
After the holidays, gently clean your snowman and store it in a dry, protected area. A large plastic bag or bin can keep it free from dust and damage, ensuring it’s ready to bring joy again next year.
Watch the Full Video Tutorial
Seeing the process in action can be incredibly helpful. For a complete visual guide on how @thenavagepatch assembled this charming melting snowman, watch the video tutorial below. It provides excellent step-by-step instructions and practical tips.
@thenavagepatch This light-up melting snowman is a fun and whimsical holiday decoration that can be scaled up or down to suit your needs. Inside or out, melting Frosty is sure to be a hit! Be sure to follow @michaelscraftstore for more craft fun and inspiration!
#sponsored
#MakeitwithMichaels
#Christmas
#Christmas2022
#Christmasiscoming
#Christmasishere
#Christmas
#christmascrafts
#christmasdiy
#diychristmas
#learnontiktok
#christmasiscoming
#holidaycrafts
#christmasdecor
#christmasdecorating
#christmasdecorations
#christmasdiyideas
#diychristmasdecor
#snowman♬ original sound – TheNavagePatch – DIY & Crafts
Conclusion: Light Up Your Holidays with a Handcrafted Masterpiece
Crafting your own light-up melting snowman is more than just a DIY project; it’s an opportunity to inject personal charm and unique artistry into your holiday celebrations. This whimsical decoration promises to be a conversation starter, a beacon of festive cheer, and a testament to your creativity. It’s an easy, budget-friendly way to create a memorable outdoor display that stands out from the ordinary.
So, gather your materials, invite some friends, and embark on this delightful crafting journey. The satisfaction of seeing your handcrafted snowman come to life, glowing softly in the winter night, is a reward in itself. Get ready to illuminate your front yard with a touch of magic and make this holiday season truly unforgettable. Happy crafting!