
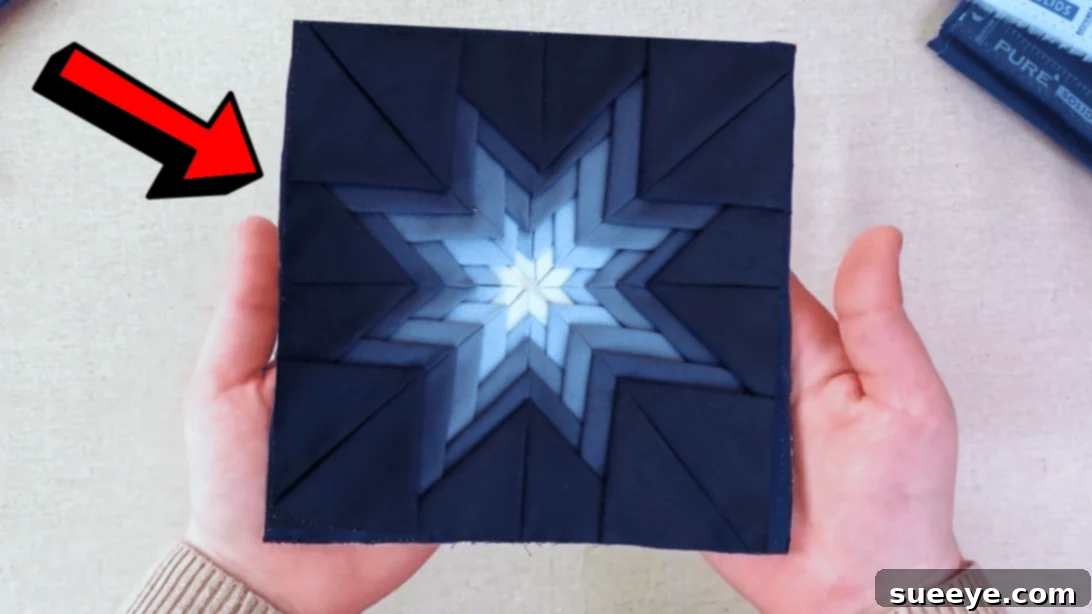
Mastering the Folded Star Quilt Block: A Comprehensive DIY Guide for Quilters
Step into the enchanting world of quilting with the mesmerizing Folded Star Quilt Block. Renowned for its intricate appearance and captivating three-dimensional texture, this block often strikes awe and can initially seem intimidating, especially for burgeoning quilters. However, as elegantly demonstrated by the creative minds at Art Gallery Fabrics, constructing this stunning design is a surprisingly accessible and incredibly rewarding process. This in-depth guide is crafted to demystify each step, providing clear instructions and invaluable tips to help you successfully create your own beautiful folded star, regardless of your experience level.
The Folded Star Quilt Block offers a unique blend of visual complexity and tactile delight. Its layered folds transform flat fabric into a sculptural masterpiece, adding extraordinary depth and a sophisticated touch to any project. While its elaborate look suggests advanced techniques, the underlying construction relies on precise folding and straightforward stitching – making it an ideal project for enhancing fundamental quilting skills. Whether your ambition is to craft a charming pot holder, a distinctive coaster, or to integrate this striking block into a larger quilt masterpiece, its versatility and impressive aesthetic promise truly remarkable results. Prepare to be amazed by what you can create!
RELATED: Explore More Textured Sewing Projects: How To Sew A Textured Flower Pillow
Why the Folded Star Quilt Block is a Must-Try for Every Quilter
Beyond its undeniable visual allure, the Folded Star Quilt Block presents numerous compelling reasons for both novice and experienced quilters to embrace this delightful project:
- Stunning Three-Dimensional Impact: The clever layering of fabric creates a dynamic, raised effect, making the star appear to literally leap from the surface. This dimensionality instantly elevates the visual interest and artistry of your finished piece.
- Surprisingly Beginner-Friendly: Despite its sophisticated facade, the core techniques involve repetitive, straightforward folding and basic machine stitching. With a focus on accuracy and a dash of patience, even those new to quilting can achieve remarkably professional and satisfying outcomes.
- Unleash Creative Versatility: The design is a perfect canvas for experimentation with an infinite spectrum of fabric colors, patterns, and textures. Your fabric choices will profoundly influence the block’s final character, allowing for boundless personal expression and unique designs.
- Adaptable for Diverse Projects: From practical, smaller items like charming hot pads, trivets, and placemats, to more elaborate decorative pieces such as eye-catching throw pillows, artistic wall hangings, or even as accent blocks within a grander quilt design, the applications are incredibly broad and inspiring.
- Excellent Skill-Building Opportunity: Engaging with this project sharpens crucial quilting competencies, including meticulous cutting, accurate pressing (which is vital for crisp folds), and consistent seam allowances. These fundamental skills are transferable and essential for progressing to more complex quilting endeavors.
Essential Materials for Your Folded Star Quilt Block
A successful quilting project begins with carefully selected materials. For this particular Folded Star Quilt Block, you will need a range of fabric squares in graduating shades to achieve the captivating depth shown in the tutorial, along with a few standard quilting tools. The suggested color palette below guides you towards a beautiful gradient, but remember to feel empowered to personalize your star with your own unique fabric collection.
- (4) 4″ squares of Tranquil Waters: Typically a light, airy blue or soft teal. This shade will form the innermost, brightest points of your star.
- (8) 4″ squares of Aero Blue: A slightly deeper blue, building on the gradient. These squares expand the initial star points.
- (8) 4″ squares of Denim Blue: A classic, medium blue, adding another layer of depth and rich color.
- (8) 4″ squares of Night Sea: A rich, dark blue, providing a striking contrast and defining the mid-section of the star.
- (4) 4″ squares of Nocturnal: The deepest, darkest shade. These squares will create the innermost points of the larger star arms.
- (4) 6½” squares of Nocturnal: These larger squares, in the darkest shade, are crucial for forming the prominent, outermost points of your star, giving it its grand, finished shape.
- (1) 7″ square of scrap fabric, for your foundation: Select a stable, plain-colored fabric that won’t show through your top layers. This piece acts as the sturdy base upon which all your folded layers will be stitched, providing necessary stability and structure.
- Marking pen, pencil, or tailor’s chalk: Indispensable for accurately drawing guide lines and transferring patterns onto your fabric.
- Quilting Ruler: A transparent acrylic ruler, preferably with ¼-inch and 45-degree markings, is critical for precise measurements and perfectly straight cuts.
- Sharp Scissors or Rotary Cutter and a Self-Healing Cutting Mat: For unparalleled accuracy and efficiency, especially when cutting multiple fabric layers, a rotary cutter paired with a self-healing mat is highly recommended over scissors.
- Fabric Pins: Essential for securely holding multiple fabric layers in place, preventing shifting during the stitching process. Long, sharp pins are ideal.
- Coordinating Needle and Thread: Choose a high-quality polyester or cotton thread that either matches your fabrics or is a neutral color that blends seamlessly. Ensure your sewing machine needle is sharp and appropriate for quilting.
- Iron and Ironing Board: A well-heated iron is a quilter’s best friend. Pressing after each key fold and seam is vital for achieving crisp lines, sharp points, and a professional, flat finish.
- Sewing Machine: While hand-stitching is an option for the patient, a sewing machine significantly speeds up construction and ensures consistent stitch length, contributing to the durability and neatness of your block.
Step-by-Step Guide: How to Make a Folded Star Quilt Block
Embark on your journey to create this stunning Folded Star Quilt Block by following these meticulously detailed instructions. Precision in cutting, folding, and pressing is paramount to achieving a symmetrical and polished finish. Work methodically through each step, and don’t hesitate to consult the original video tutorial by Art Gallery Fabrics for visual clarity whenever needed.
Step 1: Preparing Your Foundation and Fabric Squares for Folding
The foundation piece will serve as the stable base for your intricate star, ensuring it maintains its structure and symmetrical shape. The smaller, colored fabric squares will be expertly folded to construct the individual points of your radiant star.
- Prepare the Foundation Piece: Take your 7″ square of sturdy scrap fabric. First, fold it precisely in half horizontally and press firmly with a hot iron to create a sharp crease. Unfold the fabric. Next, fold it in half vertically and press again. Unfold this crease. Now, fold the square diagonally from one corner to the opposite corner and press, then unfold. Repeat this diagonal fold for the remaining two corners, pressing and unfolding. At this point, your foundation square should clearly display an “X” shape intersecting with a “+” shape, effectively dividing it into eight perfectly equal triangular segments. These defined creases are crucial as they will serve as your guiding lines for accurate fabric placement. Set this meticulously prepared foundation aside.
- Prepare a Single Colored Square for Folding: Select one of your 4″ colored fabric squares (e.g., from your ‘Tranquil Waters’ stack). Begin by folding this square in half horizontally and pressing firmly. Then, fold it in half vertically and press once more. These two folds will reduce your square into a smaller square, comprising four layers of fabric.
- Create the Signature Triangular Folds: Gently unfold the square just once, so it now forms a rectangle with a single, clear crease running horizontally across its center. Orient this rectangle so the central crease is parallel to your work surface. Take the top-left corner of the fabric and carefully fold it downwards towards the central horizontal crease, ensuring the raw edge of the corner aligns perfectly with the crease line, forming a precise 45° angle. Press this fold down firmly and crisply. Now, repeat this exact folding action with the top-right corner, bringing it down to meet the central crease. This will create a distinctive smaller triangle shape at the top of your fabric square. It’s imperative to press these folds exceptionally well; crisp folds are key to a sharp, well-defined star point.
- Repeat for All Colored Squares: Continue this precise folding and pressing process for every single one of your remaining 4″ colored squares (including all ‘Tranquil Waters’, ‘Aero Blue’, ‘Denim Blue’, ‘Night Sea’, and 4″ ‘Nocturnal’ pieces). Consistency in the neatness of your folds and the firmness of your pressing is absolutely vital to ensure each star point is uniform, leading to a beautifully symmetrical finished block.
Step 2: Layering the Inner Star Points onto the Foundation
This critical phase involves meticulously placing and stitching your precisely folded fabric triangles onto the prepared foundation, systematically building the star from its center outwards. You’ll begin with the lightest color, ‘Tranquil Waters’, and gradually progress through ‘Aero Blue’, ‘Denim Blue’, ‘Night Sea’, and finally the 4″ ‘Nocturnal’ squares.
- Position the First Layer (Lightest Triangles): Retrieve your foundation piece, which should clearly show its eight creased segments. Take one of your folded ‘Tranquil Waters’ (or your designated lightest color) squares. Carefully position this folded triangle onto one of the eight triangular segments of your foundation, ensuring the right side of the fabric is facing upwards. Align the two raw, unfolded edges of the folded triangle precisely with two of the diagonal crease lines of your foundation. The folded point of the triangle should meet exactly at the very center point of the foundation. Pin this first triangle securely in place to prevent any movement during stitching.
- Stitch the First Layer: Using your sewing machine, stitch around the two raw, open edges of the pinned ‘Tranquil Waters’ triangle, firmly securing it to the foundation fabric. Maintain a consistent ¼-inch seam allowance along these edges. Remember to backstitch briefly at the beginning and end of your seam for added strength and security.
- Add the Next Layer (Second Color): Select your next folded triangle, which should be from the ‘Aero Blue’ (or your second lightest color) squares. Place this new ‘Aero Blue’ triangle directly on top of the previously stitched ‘Tranquil Waters’ triangle. Position it so that its folded point also extends towards the center of the foundation. Crucially, its two raw edges should be placed approximately 3/8 inch *away* from the raw edges of the previous ‘Tranquil Waters’ triangle. This precise offset creates the stunning layered, three-dimensional effect of the folded star. Pin this ‘Aero Blue’ triangle firmly.
- Stitch the Second Layer: Stitch around the two raw edges of the ‘Aero Blue’ triangle, securing it to the foundation and slightly overlapping the first layer. The objective is to create a series of neatly layered triangles that gradually expand outwards from the center.
Step 3: Completing the Star’s Inner Layers and Defining Outer Points
Continue to build your folded star by progressively adding darker colors, working outwards. Once the inner star is formed, you will integrate the larger outer squares to sharply define the star’s magnificent shape and complete the block.
- Build with Remaining Triangles of Each Color: For each subsequent color (e.g., ‘Aero Blue’, ‘Denim Blue’, ‘Night Sea’, and the 4″ ‘Nocturnal’ squares), after you have placed and stitched your first triangle of that color, take the remaining folded triangles of the *same* color and size. Place these additional triangles onto the adjacent segments of your foundation piece, working your way around the central point in a consistent clockwise or counter-clockwise direction. Ensure each new triangle is neatly lined up with the diagonal crease lines of the foundation and that it slightly overlaps the previously stitched triangle of the same color, maintaining that beautiful layered aesthetic. Stitch firmly around the raw edges of each triangle. Press after completing all triangles of a single color before moving to the next shade; this helps keep your block flat and your folds crisp.
- Progressive Layering with Successive Colors: Systematically proceed through the ‘Denim Blue’, ‘Night Sea’, and finally the 4″ ‘Nocturnal’ squares. For each color, repeat the layering, pinning, and stitching process, always ensuring that each successive layer sits slightly further out from the block’s center, gradually forming the distinct points of the star. Consistent alignment with the foundation creases and a uniform overlap are vital for a harmoniously symmetrical appearance.
- Adding the Outer Points (6½” Nocturnal Squares): Once all the 4″ colored squares are securely stitched down and the intricate inner star has taken shape, it’s time to incorporate the four larger 6½” ‘Nocturnal’ squares. These pieces will create the prominent, defining outer points of your star. Fold each of these larger squares in half diagonally and press firmly to create a sharp crease. Place one of these folded large triangles over one of the outermost smaller triangles of your inner star, carefully aligning its raw edges with the remaining visible foundation lines and the outer edge of the smaller star point. Pin this larger outer point securely into position. Stitch these larger points into place along their raw edges, using your consistent seam allowance. Repeat this for all four outer points, taking care to ensure they are evenly spaced and perfectly symmetrical to complete the star’s grand silhouette.
- Trim and Square Up the Block: Once all layers and outer points have been meticulously stitched, carefully trim any excess fabric from the edges of your foundation piece. Use your ruler and rotary cutter to square up the entire block, aiming for a clean, even edge. This ensures your finished quilt block is the correct size and ready for incorporation into larger projects.
- Final Tacking Stitches for Security: To enhance the durability and neatness of your folded star, make a few small, discreet tacking stitches on each fold of each triangle, particularly where the points meet the fabric below. These tiny, nearly invisible stitches will secure the folds, preventing them from shifting or lifting over time, thereby preserving the integrity and crispness of your beautiful folded star. With these finishing touches, your captivating Folded Star Quilt Block is now complete!
Expert Tips for a Perfectly Crafted Folded Star Quilt Block
Achieving a truly flawless folded star design demands meticulous attention to detail and the application of a few seasoned quilting techniques. Keep these invaluable tips in mind throughout your crafting process to ensure a beautiful and professional outcome:
- Precision Cutting is Paramount: The foundation of a symmetrical and striking star begins with exact fabric cuts. Invest in and utilize a high-quality rotary cutter, a clear quilting ruler, and a self-healing cutting mat for the most accurate and repeatable results. Even a slight discrepancy in your initial squares can lead to an uneven star.
- Master the Art of Pressing: In quilting, pressing is not merely about flattening fabric; it’s a crucial step that “sets” your stitches and “trains” your fabric. Pressing firmly after each significant fold and after adding each layer is essential for creating crisp, defined lines and ensuring your star points are sharp, well-creased, and lay perfectly flat. Avoid ironing (gliding the iron); instead, lift and press.
- Maintain a Consistent Seam Allowance: A uniform seam allowance (typically ¼ inch for most quilting projects) throughout the entire stitching process is non-negotiable for the overall symmetry and integrity of your quilt block. Use a ¼-inch presser foot on your sewing machine if available, or mark your machine’s throat plate as a guide.
- Choose Quality Thread Wisely: Opt for a high-quality thread, such as a fine polyester or 50wt cotton, that either matches your fabric colors perfectly or is a neutral shade (like light grey or ecru) that blends in. Good thread offers strength without adding unnecessary bulk, ensuring your seams are durable yet discreet.
- Pin Generously and Strategically: Do not hesitate to use plenty of pins! Secure each fabric layer meticulously before stitching. This is especially important with the multiple layers and folded edges involved in the folded star block, as it prevents fabric shifting, puckering, and ensures precise alignment.
- Practice on Scrap Fabrics: If this is your first attempt at a folded star quilt block, consider making a practice block or two using inexpensive scrap fabrics. This allows you to familiarize yourself with the unique folding techniques and layering process without the pressure of using your chosen project fabrics. It’s a fantastic way to build confidence and refine your technique.
Creative Variations and Project Ideas for Your Folded Star
The inherent beauty of the Folded Star Quilt Block lies in its remarkable adaptability. Once you have confidently mastered the foundational technique, a universe of customization and inspiring project possibilities opens up before you. Let your imagination soar!
- Play with Color and Contrast:
- Bold Contrasts: Instead of a subtle gradient, try using dramatically contrasting colors for a more striking and dynamic visual impact. Think brights against darks, or complementary colors across the color wheel.
- Pattern Mixing: Experiment with a mix of solids, subtle tone-on-tone prints, and more vibrant patterned fabrics. The interplay of patterns can add an exciting layer of complexity.
- Themed Palettes: Design your star with seasonal themes in mind—think vibrant reds and greens for a festive Christmas star, soft pastels for an Easter or spring-themed piece, or rich autumnal hues for a fall decoration.
- Explore Fabric Textures: While quilting cotton is the standard, consider introducing other fabric types for added tactile interest, especially for decorative projects where durability isn’t the primary concern. Imagine using chambray, linen, or even small patches of silk or velvet for a truly luxurious feel.
- Beyond the Single Block – Inspiring Project Applications:
- Functional Coasters and Hot Pads: As initially suggested, these make fantastic, quick gifts and practical additions to your kitchen decor, protecting surfaces with style.
- Stunning Pillow Covers: Stitch several folded star blocks together to form a larger pattern, or use a single, prominent block as the central motif for an exquisite throw pillow that instantly elevates any living space.
- Unique Tote Bags and Purses: Embellish a plain canvas tote bag or a custom-sewn purse with a beautifully placed folded star to create a one-of-a-kind, handmade accessory that showcases your crafting prowess.
- Artistic Wall Hangings: Frame a single, perfectly executed folded star block, or combine multiple blocks in different sizes and colors to design an eye-catching piece of textile art that adds depth and texture to any room.
- Quilt Borders or Sashing Accents: Integrate these dimensional blocks as special, standout accents within the borders or sashing of a larger, more traditional quilt design, adding unexpected visual interest.
- Apparel Embellishment: For a personalized touch, carefully hand-stitch or machine-appliqué a smaller version of the folded star onto a denim jacket, a plain skirt, or even a sturdy canvas apron.
Caring for Your Folded Star Quilted Creations
To ensure your magnificent folded star projects retain their beauty and integrity for many years to come, proper care is absolutely essential. Generally, for items made with quilting cotton, machine wash on a gentle cycle using cold water and a mild, pH-neutral detergent. To prevent distortion of the delicate folds, tumble dry on a very low heat setting or, ideally, lay flat to air dry. Always avoid harsh chemical cleaners or excessive heat, especially if you have incorporated more delicate or synthetic fabrics into your design. For projects with significant embellishments or particularly delicate fabrics, gentle hand washing might be the safest and most recommended option.
We enthusiastically encourage you to experiment with a myriad of fabric combinations, explore diverse color palettes, and discover innovative applications for your folded star blocks. Please share your unique creations with the vibrant quilting community and inspire fellow crafters! The profound satisfaction derived from transforming simple fabric squares into such an intricate, beautiful, and visually captivating design is an incredibly rewarding experience that truly fuels the creative spirit.
*All image credits and tutorial inspiration for this comprehensive guide belong to Art Gallery Fabrics via YouTube. We highly recommend visiting and subscribing to their official channel for an abundance of inspiring quilting tutorials, insightful fabric showcases, and a wealth of creative project ideas that will further fuel your passion for textile artistry.