
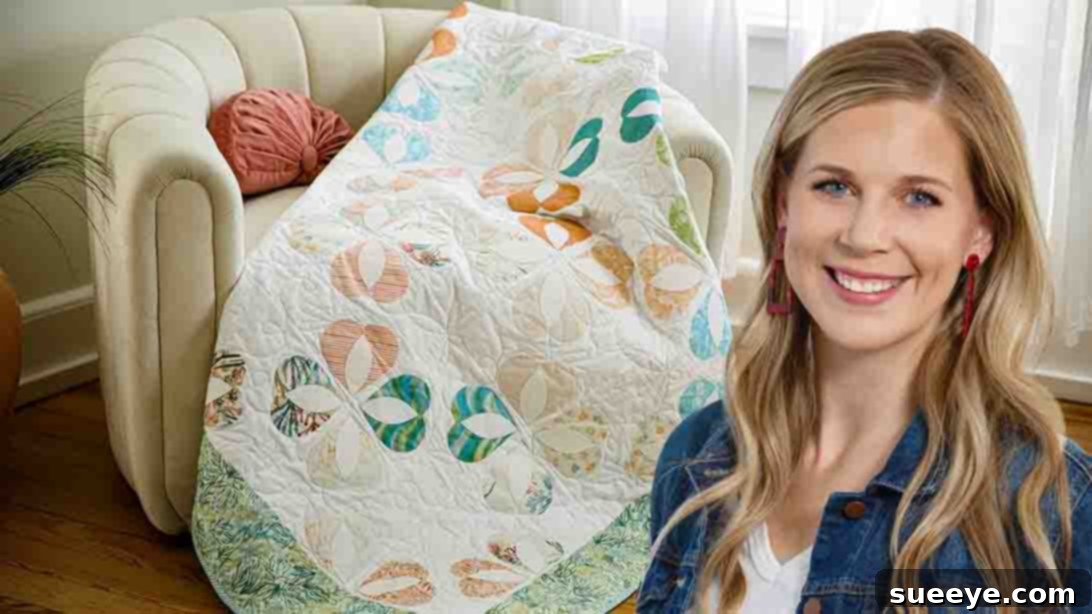
Embark on a delightful quilting journey with this enchanting Heart Flower Throw Quilt pattern, brought to life by the creative minds at Missouri Star on YouTube. If you’ve always admired appliquéd quilt designs but felt intimidated by their perceived complexity, this tutorial is your perfect entry point. It masterfully combines intricate-looking elements with surprisingly straightforward techniques, making it an ideal project for beginners eager to explore the world of appliqué quilting. The finished product is a cozy, charming throw quilt adorned with elegant heart flowers, perfect for adding a touch of handmade warmth to any living space or gifting to a loved one. The best part? You’ll only need two vibrant charm packs and a selection of background yardage to bring this captivating design to fruition.
This comprehensive guide will walk you through each phase of creating your own Heart Flower Throw Quilt, from selecting your fabrics to the final stitches of binding. You’ll learn essential appliqué skills, discover clever tips for efficient cutting and pressing, and understand how to assemble your blocks to reveal the beautiful floral motif. Prepare to transform simple fabric squares into a stunning textile art piece that you’ll cherish for years to come.
RELATED: How to Make Granny’s Pretty Sunflower Quilt
For a visual step-by-step experience, make sure to watch the detailed video tutorial provided by Missouri Star. It complements these written instructions beautifully, offering clear demonstrations of each technique.
Materials & Essential Tools for Your Heart Flower Quilt
Before diving into the creative process, gathering all your materials and tools is crucial for a smooth and enjoyable quilting experience. This quilt is designed to be accessible, primarily utilizing pre-cut charm packs to simplify fabric selection.
Required Materials:
- 2 packs of 5″ squares (Charm Packs): Charm packs are pre-cut fabric bundles, typically containing 42 squares from a specific fabric line. They are perfect for this project as they offer a curated collection of coordinating fabrics, eliminating the need to select and cut numerous small pieces. Choose packs with good contrast and colors that complement each other for your heart appliqués.
- 1 yard Border Fabric: This fabric will frame your quilt top, providing a polished edge and a visual break between the blocks and the outer binding. Select a color that harmonizes with or provides a pleasing contrast to your block fabrics.
- 3 1/2 yards Backing Fabric (or Wide Fabrics): The backing is the bottom layer of your quilt sandwich. Using wide fabrics (typically 90-108 inches) can often help avoid needing to piece multiple widths together, simplifying the process. Choose a soft, durable fabric that complements the quilt top.
- 2 7/8 yards Background Fabric: This fabric will form the base of your quilt blocks, against which your heart and orange peel appliqués will stand out. A solid or subtle print in a neutral color (like white, cream, or light grey) is often ideal to make the appliqués pop, but feel free to experiment with a color that enhances your charm packs.
- 1/2 yard Binding Fabric: The binding provides a clean, durable finish to the edges of your quilt, enclosing the raw edges of the quilt sandwich. It can match your border, contrast sharply, or be a scrappy mix of leftover fabrics for a whimsical touch.
- Fusible Web (lightweight, paper-backed): Essential for appliqué, fusible web temporarily adheres your fabric shapes to the background fabric with heat from an iron, making it easier to stitch them down.
- Printed Paper Template (Heart & Mini Orange Peel): A template ensures consistency in the shape and size of your appliqués. You can find the free heart flower throw quilt pattern here, which includes the necessary templates.
Essential Quilting Tools:
- Rotary Cutter, Mat, and Quilting Ruler: These tools are indispensable for precise and efficient fabric cutting. A 24-inch ruler and an 18×24 inch mat are good starting points.
- Fabric Scissors: For trimming threads and detailed cuts.
- Iron and Ironing Board: Crucial for pressing seams flat and applying fusible web smoothly. A dry iron is often preferred for appliqué to prevent steam distortion.
- Sewing Machine: A basic machine capable of a straight stitch and potentially a decorative stitch (like a blanket stitch or zig-zag) for appliqué.
- Coordinating Thread: For piecing and topstitching. Choose colors that blend with or subtly highlight your fabrics.
- Fabric Markers or Pencils: For tracing templates onto fusible web and fabric.
- Pins or Fabric Clips: For holding fabric layers together before sewing.
- Quilting Needles: For your sewing machine, suitable for quilting through multiple layers.
Directions: Crafting Your Heart Flower Throw Quilt Step-by-Step
This project is broken down into manageable steps, guiding you from raw fabric to a beautifully finished quilt. Precision and patience are key, especially in the appliqué stages, but the techniques are designed to be accessible for quilters of all levels.
Step 1: Preparing Your Appliqué Elements – The Heart Petals
Begin by taking your background fabric yardage and cutting it into 8-inch squares. These squares will serve as the canvas for your heart flower blocks. The 8-inch size allows ample room for appliqué placement and provides a comfortable seam allowance when assembling the blocks. Next, select two coordinating 5-inch squares from each of your charm packs. The beauty of this pattern lies in using a variety of fabrics for the hearts, creating a dynamic and visually interesting quilt. To prepare these squares for appliqué, take a 5-inch square of fusible web and place it on the wrong side of each chosen charm pack square, then press it firmly with a dry iron according to the manufacturer’s instructions. This step is crucial for securing your appliqué pieces later.
Once the fusible web is applied and cooled, fold each fabric square in half, with the right sides together. Now, retrieve your printed heart template (from the free pattern). Align the dashed edge of the template along the fold of your fabric square, ensuring the curve of the heart is facing the raw edges. Carefully trace the heart shape onto the paper backing of the fusible web using a fabric marker or pencil. To expedite this process, you can layer several folded, fused squares neatly on top of each other before tracing and cutting. This technique allows you to cut multiple hearts simultaneously, ensuring consistency and saving time. Once cut, you will have two mirror-image heart shapes from each fabric square. Remember, you’ll need two of these beautifully cut hearts for every single block you plan to make, so prepare a sufficient quantity for your desired quilt size.
Step 2: Precision Placement – Positioning the Heart Appliqués
With your background squares and heart appliqués ready, it’s time to assemble the base of your block. Take one of your 8-inch background squares and gently fold it in half diagonally, pressing a light crease in the center. This crease will serve as a helpful guide for symmetrical placement. Carefully peel the paper backing from one of your prepared heart appliqués, exposing the fusible web. Align the center of the heart with the diagonal crease you just made, ensuring that the bottom point of the heart is approximately half an inch from the bottom edge of the background square. This spacing is important for the subsequent placement of the “orange peel” element and for maintaining consistent seam allowances when blocks are joined.
Once the first heart is in position, take its matching heart appliqué, peel off its paper backing, and place it on the opposite side of the background square. Ensure that the two hearts are symmetrically placed, creating a balanced “V” shape at the top. The top curves of the hearts should be near the center of the block, with their points extending towards the outer edges. Once you are satisfied with their placement, press them nicely with a hot iron. Apply firm, even pressure for the recommended time (check your fusible web instructions) to securely adhere the hearts to the background fabric. This initial pressing ensures that the appliqués stay put during subsequent steps, preventing any shifting that could distort your design.
Step 3: Adding the “Orange Peel” Effect and Block Assembly
To introduce the charming “orange peel” element that transforms the hearts into a flower, you’ll repeat a similar appliqué preparation process. Take your chosen white (or contrasting) fabric for the orange peels and fuse lightweight fusible web to its wrong side. Using your mini orange peel template, trace and cut out the required number of orange peel shapes. Precision here ensures a neat finish. Once cut, carefully peel off the paper backing from each orange peel. Position one orange peel directly below the bottom point of each heart, ensuring it lines up perfectly and extends slightly beyond the heart’s tip. This placement creates the illusion of petals extending from the base of the heart, forming a cohesive flower design. Press them firmly in place with your iron to secure them.
Now that all your appliqué elements are positioned and fused, it’s time for topstitching. This step not only permanently secures your appliqués but also adds a decorative touch. Using your sewing machine, carefully stitch around the edge of each heart and each orange peel. You can choose a simple straight stitch, a small zigzag stitch, or a blanket stitch for a more traditional appliqué look. Use thread that either blends seamlessly with your appliqué fabrics or provides a subtle contrasting outline. Take your time, especially around curves, to achieve smooth and consistent stitching. Once all the appliqués are securely stitched, your individual Heart Flower Quilt blocks are complete.
To finish the block assembly for this stage, you will arrange four of these completed Heart Flower Quilt blocks into a four-patch unit. Lay them out side by side, ensuring that the central points where the four blocks meet visually create a more prominent flower shape. The design is engineered so that when four blocks are placed together, the heart points and orange peels converge to form a larger, cohesive floral motif in the center. Carefully sew these four blocks together, first sewing two pairs, and then joining the two pairs to form a larger 16-inch square. Pay attention to pressing your seams to reduce bulk and ensure your block lies flat.
How to Make a Heart Flower Throw Quilt: From Blocks to Finished Treasure
Completing your individual blocks is a significant milestone! Now, let’s look at the remaining steps to transform these charming blocks into a complete and beautiful throw quilt.
Step 4: Assembling Your Quilt Top – Rows and Columns
Once you have all your four-patch Heart Flower units assembled (each being made of four 8-inch blocks), it’s time to arrange them into the full quilt top. Lay out all your assembled four-patch units on a design wall or a large flat surface. Experiment with different arrangements until you achieve a layout that is visually appealing and balanced. Consider how the colors flow and how the flower motifs interact across the quilt. Once you’re happy with the arrangement, begin sewing the units together into rows. Stitch each unit to its neighbor with a consistent 1/4-inch seam allowance. Press your seams open or to one side, alternating direction with each row to help the seams “nest” when you join the rows. After sewing all the units into rows, carefully join the rows together, again using a 1/4-inch seam. Take extra care to match up the seams between units to ensure your points and lines align beautifully. This stage is where your quilt truly starts to take shape as a unified piece.
Step 5: Adding the Borders for a Polished Frame
Borders add a lovely frame to your quilt top, giving it a finished and professional look while also adding to the overall size. Measure the exact length of your quilt top down the center, and cut two border strips from your border fabric to this measurement. Attach these strips to the opposing long sides of your quilt top, pressing the seams outward. Next, measure the width of your quilt top (including the newly added side borders) through the center. Cut two more border strips to this exact measurement and attach them to the remaining top and bottom edges of the quilt. Ensure your borders are cut accurately and attached without stretching or waving, which can cause ripples in the finished quilt. Take your time with this step; well-applied borders significantly enhance the quilt’s appearance.
Step 6: Creating the Quilt Sandwich – Layers of Comfort
The “quilt sandwich” consists of three layers: your beautiful quilt top, a layer of batting, and the backing fabric. Lay your backing fabric flat on a clean floor or large table, right side down, and smooth out any wrinkles. Tape the edges down to secure it. Next, center your batting layer on top of the backing, ensuring it extends a few inches beyond the quilt top on all sides (this provides extra wiggle room for quilting). Finally, carefully place your finished quilt top on top of the batting, right side up, smoothing it out thoroughly. The goal is to eliminate any wrinkles or puckers in any of the layers. Once aligned, you need to “baste” these layers together to prevent shifting during the quilting process. You can use various methods for basting: safety pins placed every 4-6 inches across the quilt, basting spray (a temporary adhesive), or even long basting stitches. Choose the method you find most comfortable and effective.
Step 7: The Art of Quilting – Bringing it All Together
Quilting is the process of stitching through all three layers of your quilt sandwich, which serves two main purposes: it secures the layers together, preventing the batting from shifting, and it adds texture and design to the quilt. For a beginner-friendly approach, consider straight-line quilting. You can use a walking foot on your sewing machine to quilt straight lines either diagonally across the blocks, horizontally, or vertically, following the seams. Another simple option is “stitch-in-the-ditch,” where you stitch directly along the seams of your pieced blocks. If you feel more adventurous, a simple meandering free-motion quilting pattern can also be effective. Start quilting from the center of the quilt and work your way out to the edges to avoid pushing fabric and creating puckers. Take your time, practice on a scrap sandwich if needed, and enjoy the process of bringing your quilt to life with stitches.
Step 8: Finishing with Binding – The Final Touch
The final step in completing your Heart Flower Throw Quilt is to add the binding, which encases the raw edges of your quilt sandwich, giving it a clean, durable, and professional finish. From your binding fabric, cut 2.5-inch wide strips. Join these strips together using diagonal seams to create one continuous long strip. Press the seams open and then press the entire strip in half lengthwise, wrong sides together, to create your binding. Starting on one side of your quilt, align the raw edge of your folded binding strip with the raw edge of your quilt top. Sew the binding to the quilt using a 1/4-inch seam allowance. Miter the corners as you go to create crisp, clean turns. Once sewn to the front, flip the binding over to the back of the quilt, wrapping it around the raw edge. You can then hand-stitch the binding down for an invisible finish or machine-stitch it for a quicker, visible seam. Trim any excess batting or backing fabric before binding. This final step truly completes your masterpiece.
Congratulations! You have now created a gorgeous Heart Flower Throw Quilt, a testament to your creativity and patience. This project, while seeming intricate, has guided you through fundamental quilting and appliqué techniques, proving that stunning results are achievable even for beginners. Enjoy the warmth and beauty of your handmade quilt, and don’t hesitate to share your creation with others. May this be just the first of many beautiful quilts you bring into the world!