
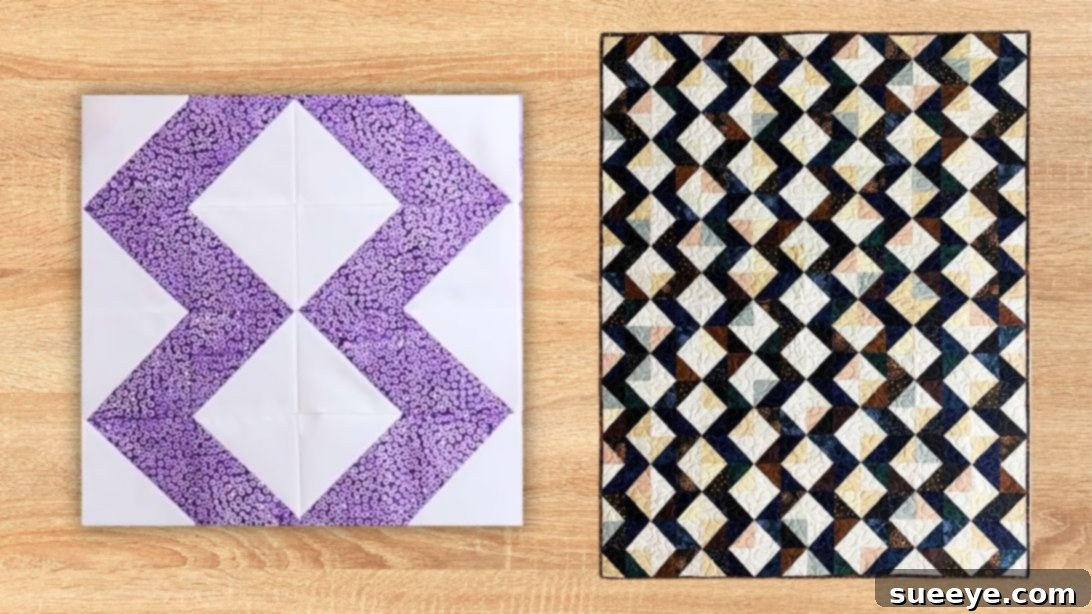
Master the Crazy Eights Quilt: An Easy Half-Square Triangle Project for All Skill Levels
Are you searching for a captivating yet beginner-friendly quilt project that beautifully utilizes half-square triangles (HSTs)? Look no further! The Crazy Eights Quilt is an ingenious design that transforms simple HST units into a stunning, intricate-looking pattern. Inspired by the fantastic tutorial on Sew Yeah’s YouTube channel, we’re thrilled to share an enhanced guide that makes this project accessible and enjoyable for every quilter.
Half-square triangles are widely regarded as one of the most fundamental and versatile blocks in quilting. Their straightforward construction makes them a favorite among novices, while their endless design possibilities captivate seasoned crafters. With the right techniques, even a complete beginner can confidently create a gorgeous Crazy Eights Quilt, achieving impressive results in a surprisingly short amount of time.
RELATED: Explore 18 More Free & Easy Quilt Patterns for Your Next Project
Why You’ll Love Crafting the Crazy Eights Quilt
The Crazy Eights Quilt isn’t just another pattern; it’s a delightful journey into the heart of quilting. Here’s why this project is quickly becoming a favorite:
- Beginner-Friendly: While the finished quilt might look complex, it’s entirely built from basic half-square triangles, making it perfect for those new to quilting.
- Efficient Creation: This pattern leverages the “magic 8 method” for HSTs, allowing you to create eight units simultaneously. This efficiency dramatically speeds up the block creation process.
- Visually Striking: The arrangement of HSTs forms a captivating design resembling the number eight, creating a dynamic and engaging visual texture.
- Versatile Design: The Crazy Eights block is incredibly adaptable. Experiment with different fabric combinations to achieve unique looks, from modern and bold to classic and comforting.
- Skill Building: You’ll gain confidence in essential quilting techniques like accurate cutting, precise sewing, efficient HST creation, and block assembly.
Understanding Half-Square Triangles (HSTs): The Core of Your Quilt
At the heart of the Crazy Eights Quilt lies the half-square triangle, or HST. An HST is exactly what it sounds like: a square block divided diagonally into two triangles of different fabrics. When sewn together, these two triangles form a perfect square, creating a striking contrast that is fundamental to many quilt designs.
There are numerous methods for making HSTs, each with its own advantages. For this particular Crazy Eights Quilt, we’ll focus on the incredibly popular and efficient “magic 8 method.” This technique is a game-changer for quilters, as it allows you to produce eight perfectly sized HSTs from just two fabric squares at once, drastically reducing your cutting and sewing time. This makes it an ideal choice for projects like the Crazy Eights Quilt, which requires a significant number of HSTs to form its distinctive design.
Essential Materials for Your Crazy Eights Quilt
Before you begin sewing, gathering all your materials is crucial. This project is designed to be accessible, often utilizing pre-cut fabric bundles like fat quarters, which offer a beautiful variety without the need to purchase large quantities of many different fabrics. Here’s what you’ll need:
- 14 Light Fat Quarters: Fat quarters are pre-cut pieces of fabric measuring approximately 18″ x 22″. Selecting 14 light-colored fat quarters will provide a wonderful range of prints and shades for your quilt’s lighter elements, offering depth and visual interest.
- 14 Dark Fat Quarters: Similarly, 14 dark-colored fat quarters will create a beautiful contrast against your light fabrics, making the “eight” design truly pop. Consider a mix of solids and prints to add complexity to your quilt.
- 5/8 Yard for Binding: The binding is the finished edge of your quilt. This amount provides enough fabric to create a neat and durable border for your finished project. Choose a color that complements or contrasts with your quilt top.
- 4 7/8 Yards for Backing: The backing is the fabric on the underside of your quilt. This larger piece will require seaming to achieve the full size needed for a throw-sized quilt. You can choose a single complementary fabric or piece together several fabrics for a creative back.
Additional Recommended Tools:
- Sewing machine with a 1/4″ seam foot
- Rotary cutter, cutting mat, and quilting rulers (especially a square-up ruler for HSTs)
- Fabric scissors
- Good quality thread (cotton is recommended for quilting)
- Iron and ironing board
- Fabric marking tool (e.g., Frixion pen, chalk pencil)
- Pins or wonder clips
How to Make the Crazy Eights Quilt: A Step-by-Step Guide
This tutorial will walk you through creating the individual Crazy Eights quilt blocks, emphasizing precision and efficiency. Remember, consistency in your seam allowance and pressing will lead to beautiful, professional-looking results.
Step 1: Fabric Preparation and Cutting
Accurate cutting is the cornerstone of a successful quilt. Before you start, ensure your fabrics are pressed smooth and free of wrinkles. From each of your assorted light and dark fat quarters, you will carefully cut your starting squares:
- From each assorted print (both light and dark): Cut two pieces of 10″ x 10″ squares. These larger squares will be used to create the majority of your HSTs using the “magic 8 method.”
- From each assorted print (both light and dark): Cut four pieces of 5″ x 5″ squares. These smaller squares will yield additional HSTs needed to complete the intricate block design.
Take your time with this step, using a sharp rotary cutter and a reliable quilting ruler for precise, straight cuts. This initial accuracy will prevent frustration later on.
Step 2: Mastering the Magic 8 Method for Large HSTs
This is where the magic happens! The “magic 8 method” is incredibly efficient for producing multiple HSTs quickly.
- Take one 10″ x 10″ square of dark fabric and one 10″ x 10″ square of light fabric. Place them right sides together, aligning all edges perfectly.
- On the wrong side of one of the fabrics (typically the lighter one for better visibility), draw a diagonal line from corner to corner in both directions, forming an “X.”
- Using your sewing machine, sew a 1/4″ seam allowance on both sides of each drawn diagonal line. You will have four parallel lines of stitching (two sets of pairs, parallel to each diagonal).
- Once sewn, use your rotary cutter to cut directly on the two drawn diagonal lines. Then, cut the block down the middle horizontally and vertically. You should now have 8 perfectly formed half-square triangles.
- Carefully press each HST open. Many quilters prefer to press seams open for a flatter block, while others press to the darker fabric to minimize bulk. Choose a consistent method for your entire quilt.
- Finally, trim each HST to its desired finished size (e.g., 4.5″ x 4.5″ if your block is designed to finish at 16″ x 16″). A square-up ruler designed for HSTs is invaluable here for precision.
Repeat this process with all your 10″ x 10″ square pairings. This will generate a significant number of your primary HST units.
Step 3: Creating Smaller HSTs for Block Details
To complement your larger HSTs and add finer detail to your Crazy Eights block, you’ll create additional smaller HSTs from your 5″ squares:
- Take one dark 5″ x 5″ square and one light 5″ x 5″ square. Place them right sides together, aligning edges.
- Draw a single diagonal line from corner to corner on the wrong side of one fabric.
- Sew a 1/4″ seam allowance on both sides of the drawn diagonal line.
- Cut directly on the drawn diagonal line to yield two half-square triangles.
- Press these HSTs open and trim them to the appropriate size (e.g., 2.5″ x 2.5″ if your block is finishing at 16″ x 16″).
Repeat this process with your remaining 5″ square pairings to generate all the necessary smaller HSTs.
Step 4: Arranging Your HSTs into the Iconic ‘8’ Block
Now comes the exciting part: seeing your block take shape! Each Crazy Eights block will be composed of 16 half-square triangles. This step is about careful arrangement before you start sewing.
- Lay out a total of 16 HSTs (a combination of your larger and smaller units, as dictated by the pattern design) on a design wall or a flat surface.
- Arrange them into a specific grid formation that visually creates the shape of an “8” (or two stacked squares, each appearing as an “8” when rotated). Refer closely to the provided photo below for the correct orientation and placement of light and dark triangles.
- Pay close attention to how the light and dark fabrics interact to define the shape. It’s often helpful to step back and view your layout from a distance to ensure the pattern is clear and symmetrical.
- Once you are satisfied with the arrangement, take a quick photo with your phone. This serves as a helpful reference as you move pieces to your sewing machine, preventing mix-ups.
Step 5: Assembling Your Quilt Block with Precision
With your layout confirmed, it’s time to sew your HSTs into a cohesive block.
- Sew in Rows: Working row by row (typically 4 HSTs per row for a 16-unit block), take the first two units of a row, place them right sides together, and sew with a 1/4″ seam allowance. Add the next unit to the pair, and so on, until the entire row is sewn. Press the seams for each row, alternating the direction of the press (e.g., press seams to the left for row 1, to the right for row 2, etc.). This technique, called “nesting seams,” helps the rows interlock perfectly when joined.
- Join the Rows: Once all rows are sewn and pressed, it’s time to join them. Place row 1 and row 2 right sides together, carefully matching up the seams and points. Pin generously, especially at the seam intersections. Sew with a 1/4″ seam. Repeat for the remaining rows until your entire block is assembled.
- Final Pressing: Give your finished block a final, thorough press to flatten all seams and ensure it lays perfectly flat.
Congratulations! You have just completed your first Crazy Eights quilt block. Repeat these same steps for the remaining HSTs, creating as many blocks as needed for your desired quilt size.
Beyond the Block: Assembling Your Full Quilt
Once you’ve crafted all your individual Crazy Eights blocks, the next exciting phase is assembling them into a complete quilt top. Here’s a general guide to help you bring your vision to life:
- Lay Out Your Blocks: Arrange all your finished blocks on a design wall or a large floor space. Experiment with different orientations and placements to achieve your desired overall pattern. This is also the time to decide if you want to add sashing (strips of fabric between blocks) or cornerstones for added design elements.
- Join Blocks into Rows: Following your chosen layout, sew the blocks together into horizontal rows, paying close attention to matching seams and pressing.
- Join Rows into Quilt Top: Once all rows are complete, sew the rows together vertically to form the full quilt top. Again, careful pinning and pressing will ensure your quilt top lies flat and square.
- Prepare for Quilting: Once your quilt top is complete, you’ll create a “quilt sandwich.” This involves layering your quilt backing fabric (right side down), a layer of batting, and then your quilt top (right side up). Smooth out all layers, ensuring no wrinkles.
- Basting: Secure your quilt sandwich using basting spray, pins, or hand-basting stitches. This prevents shifting during the quilting process.
- Quilting: This is where you add stitches through all three layers to hold them together and add texture. You can machine quilt (using your domestic machine or a longarm), or hand quilt. Choose a quilting design that complements your Crazy Eights pattern.
- Binding: The final step is to bind your quilt. This involves attaching strips of fabric around the perimeter of the quilt, neatly finishing the edges and adding a durable border.
Expert Tips for a Successful Crazy Eights Quilt Project
To ensure your quilting journey is smooth and rewarding, keep these tips in mind:
- Pressing is Your Friend: Proper pressing at each stage is crucial for flat blocks and accurate seams. Don’t skip it!
- Accurate Seam Allowance: A consistent 1/4″ seam allowance is vital for all your blocks to fit together perfectly. Test your seam allowance on scrap fabric before you start.
- Trim HSTs Accurately: Even with the “magic 8 method,” trimming your HSTs to the exact size ensures sharp points and square blocks. Invest in a good square-up ruler.
- Chain Piecing: For efficiency, especially when sewing multiple HST units or blocks, use chain piecing. This involves sewing units one after another without cutting your thread between them, saving time and thread.
- Organize Your Pieces: Keep your cut squares and finished HSTs organized by color or size to prevent confusion as you work through the steps.
- Don’t Be Afraid to Practice: If you’re new to HSTs or the “magic 8 method,” practice a few units with scrap fabric until you feel confident.
- Enjoy the Process: Quilting is a journey of creativity and relaxation. Don’t stress over perfection; embrace the handmade charm of your quilt.
Variations and Creative Ideas for Your Crazy Eights Quilt
The beauty of the Crazy Eights pattern lies in its versatility. Once you’ve mastered the basic block, consider these ideas to personalize your quilt:
- Color Play: Experiment with different color palettes. Use a rainbow of colors, a monochromatic scheme, or focus on just two contrasting colors for a striking effect.
- Fabric Selection: Mix and match solids, small prints, large prints, or even fussy-cut fabrics to feature specific motifs within your HSTs.
- Alternate Blocks: Combine Crazy Eights blocks with solid squares or other simple blocks (like Four Patch blocks) to create unique layouts and adjust the overall density of the pattern.
- Scale It Up or Down: Adjust the starting square sizes to create larger or smaller Crazy Eights blocks, which can alter the finished quilt’s dimensions or allow you to use the block in smaller projects like placemats, tote bags, or pillows.
- Quilting Designs: Choose quilting patterns that complement the angular nature of the HSTs, or go for a softer, organic quilting design to create contrast.