
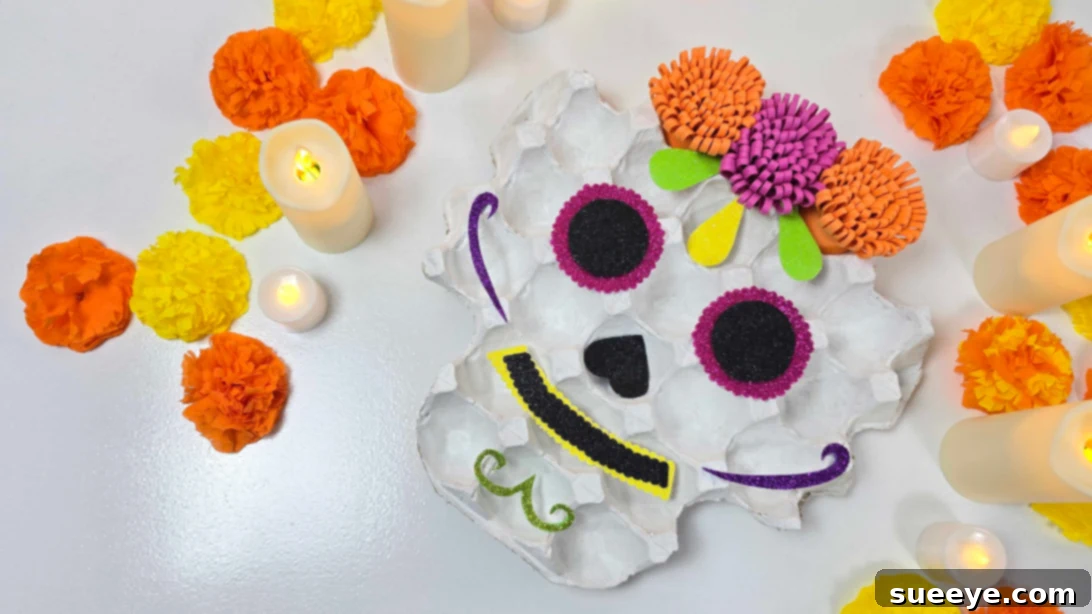
Dia de Los Muertos is a truly magnificent celebration, a time for joyous remembrance and honoring cherished loved ones who have passed. This deeply meaningful holiday is steeped in rich traditions, vibrant colors, captivating music, and beautiful, heartfelt decorations. While there are countless ways to partake in the festivities, one of the most rewarding and personal approaches is through creating DIY Dia de Los Muertos crafts. These projects not only offer a fun and engaging activity but also allow you to infuse your celebrations with profound personal meaning and creativity. If you’re seeking a unique crafting endeavor that promises to stand out and requires minimal specialized supplies, you’ve arrived at the perfect guide.
In today’s captivating craft tutorial, we’re going to transform an ordinary egg tray into an extraordinary and dazzling sugar skull. This project masterfully combines humble materials like glitter foam and EVA foam with a touch of ingenuity to produce a stunning decorative piece. This easy sugar skull DIY is much more than just a craft; it’s an opportunity for boundless creativity. You have complete freedom to choose any color palette that speaks to you and add intricate details to make your sugar skull as festive, intricate, or whimsical as your heart desires. Imagine the joy of crafting a piece that perfectly reflects your unique style and honors the memory of your loved ones.
RELATED: If you love crafting for Dia de Los Muertos, explore our DIY La Catrina Using a Coca-Cola Bottle tutorial for another inspiring project!
This charming and beautifully handcrafted sugar skull makes an absolutely perfect addition to your Dia de Los Muertos ofrenda. Its unique charm and personalized touch are sure to impress everyone who sees it, sparking conversations and admiration. The beauty of this project lies in its simplicity: with just a few readily available materials, you can create a gorgeous Dia de Los Muertos decoration that boasts a professional finish and radiates festive spirit. It’s a wonderful way to contribute to the colorful tapestry of the celebration, making your altar truly special.
Prepare to unleash your inner artist as you follow along with our comprehensive step-by-step tutorial. We’ll guide you through each stage, demonstrating how to magically transform a mundane egg tray into a vibrant, eye-catching sugar skull that truly captures the essence of Dia de Los Muertos. Whether you’re actively searching for simple yet captivating Halloween crafts to engage the family, or specifically seeking creative and meaningful Dia de Los Muertos projects, this particular craft is guaranteed to delight and amaze crafters of all ages, from enthusiastic children to seasoned adults.
Why Embrace DIY Dia de Los Muertos Crafts?
Creating your own decorations for Dia de Los Muertos offers a unique blend of personal expression, cultural connection, and creative fulfillment. Unlike store-bought items, handmade crafts carry a special energy and a story. This particular egg tray sugar skull project is not just about making something beautiful; it’s about engaging with the tradition, fostering creativity, and even practicing sustainability. It’s an activity that can bring families together, allowing children and adults alike to contribute to the festive atmosphere and learn about the significance of each symbol.
The Symbolism of Sugar Skulls in Dia de Los Muertos
Sugar skulls, or calaveras de azúcar, are one of the most iconic and recognizable symbols of Dia de Los Muertos. Far from being macabre, these elaborately decorated skulls are a joyful representation of life and death, serving as a reminder that death is a natural part of the life cycle and should be celebrated rather than feared. They often bear the name of a departed loved one or a living friend, representing a playful embrace of mortality. Our egg tray sugar skull project embodies this spirit, allowing you to create a personalized tribute filled with vibrant colors and intricate designs, just like traditional sugar skulls.
What You’ll Need for Your Vibrant Egg Tray Sugar Skull
Gathering your materials is the first exciting step in any DIY adventure. For this project, you’ll be pleased to know that most items are either readily available around your home or can be found at any craft store. The beauty of this craft lies in its accessibility and the opportunity to transform everyday objects into something extraordinary. Here’s a detailed look at what you’ll need:
- Egg Tray or Egg Carton: The star of our project! An empty cardboard egg tray provides the perfect base for shaping our skull. Choose one that is clean and sturdy.
- Primer Paint or White Acrylic Paint: This is crucial for giving your egg tray a smooth, uniform base coat. It ensures that any subsequent colors pop vibrantly and adhere beautifully.
- Sharp Scissors or Craft Knife: Essential for precise cutting and shaping. Always exercise caution when using sharp tools, especially if crafting with children.
- Hot Glue Gun and Glue Sticks: Your trusty adhesive for quickly and securely assembling all the decorative elements. Make sure to have extra glue sticks on hand!
- Glitter Foam Sheets: These add that iconic sparkle and festive flair. Choose a variety of bright, contrasting colors to make your skull truly dazzling. Pink, black, yellow, green, and purple are great starting points.
- EVA Foam Sheets (also known as craft foam): This versatile foam is perfect for creating dimensional elements like the delicate flowers. It’s easy to cut and manipulate. Again, vibrant colors work best.
Consider adding other embellishments if you wish, such as sequins, small beads, or even permanent markers for fine details. The more personal, the better!
How to Make an Egg Tray Sugar Skull: A Step-by-Step Guide
Now that you have all your materials ready, let’s dive into the creative process! Follow these detailed steps to craft your beautiful Dia de Los Muertos sugar skull.
-
Step 1: Shape and Prepare the Egg Tray Skull Base

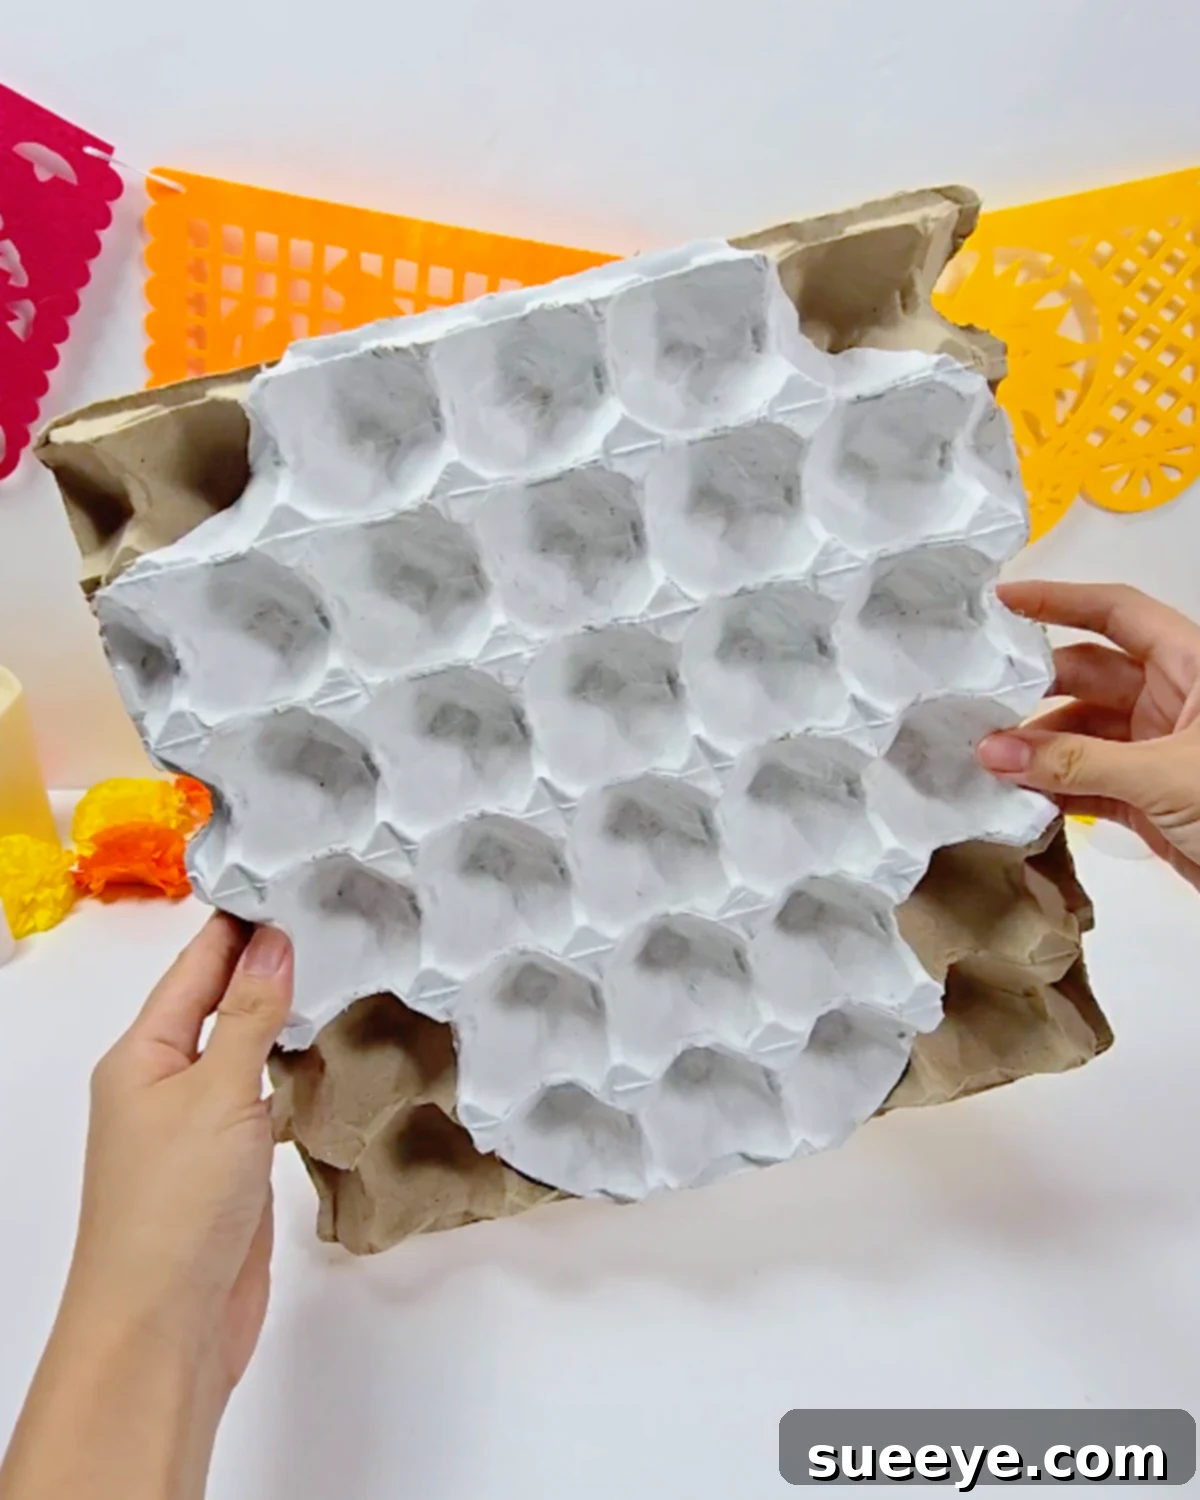
Begin by carefully cutting out one individual egg cup from each of the top corners of your egg tray. This will start to define the upper shape of the skull. Next, trim two egg cups downward from each bottom side of the tray; these sections will form the jawline of your skull. Once these initial cuts are made, gently round the bottom edge of the entire piece to create a distinct chin shape. Take your time to refine the overall outline, constantly looking at the piece to ensure it resembles a skull. Don’t worry about perfection; a slightly imperfect shape adds character. After shaping, apply a coat of primer paint or white acrylic paint to the entire egg tray base. This base coat will help your subsequent decorations stand out brightly and ensures a uniform canvas.
-
Step 2: Craft the Glitter Foam Skull Details
Now, let’s bring some sparkle to your sugar skull with glitter foam details. Precision here will make your skull truly pop.
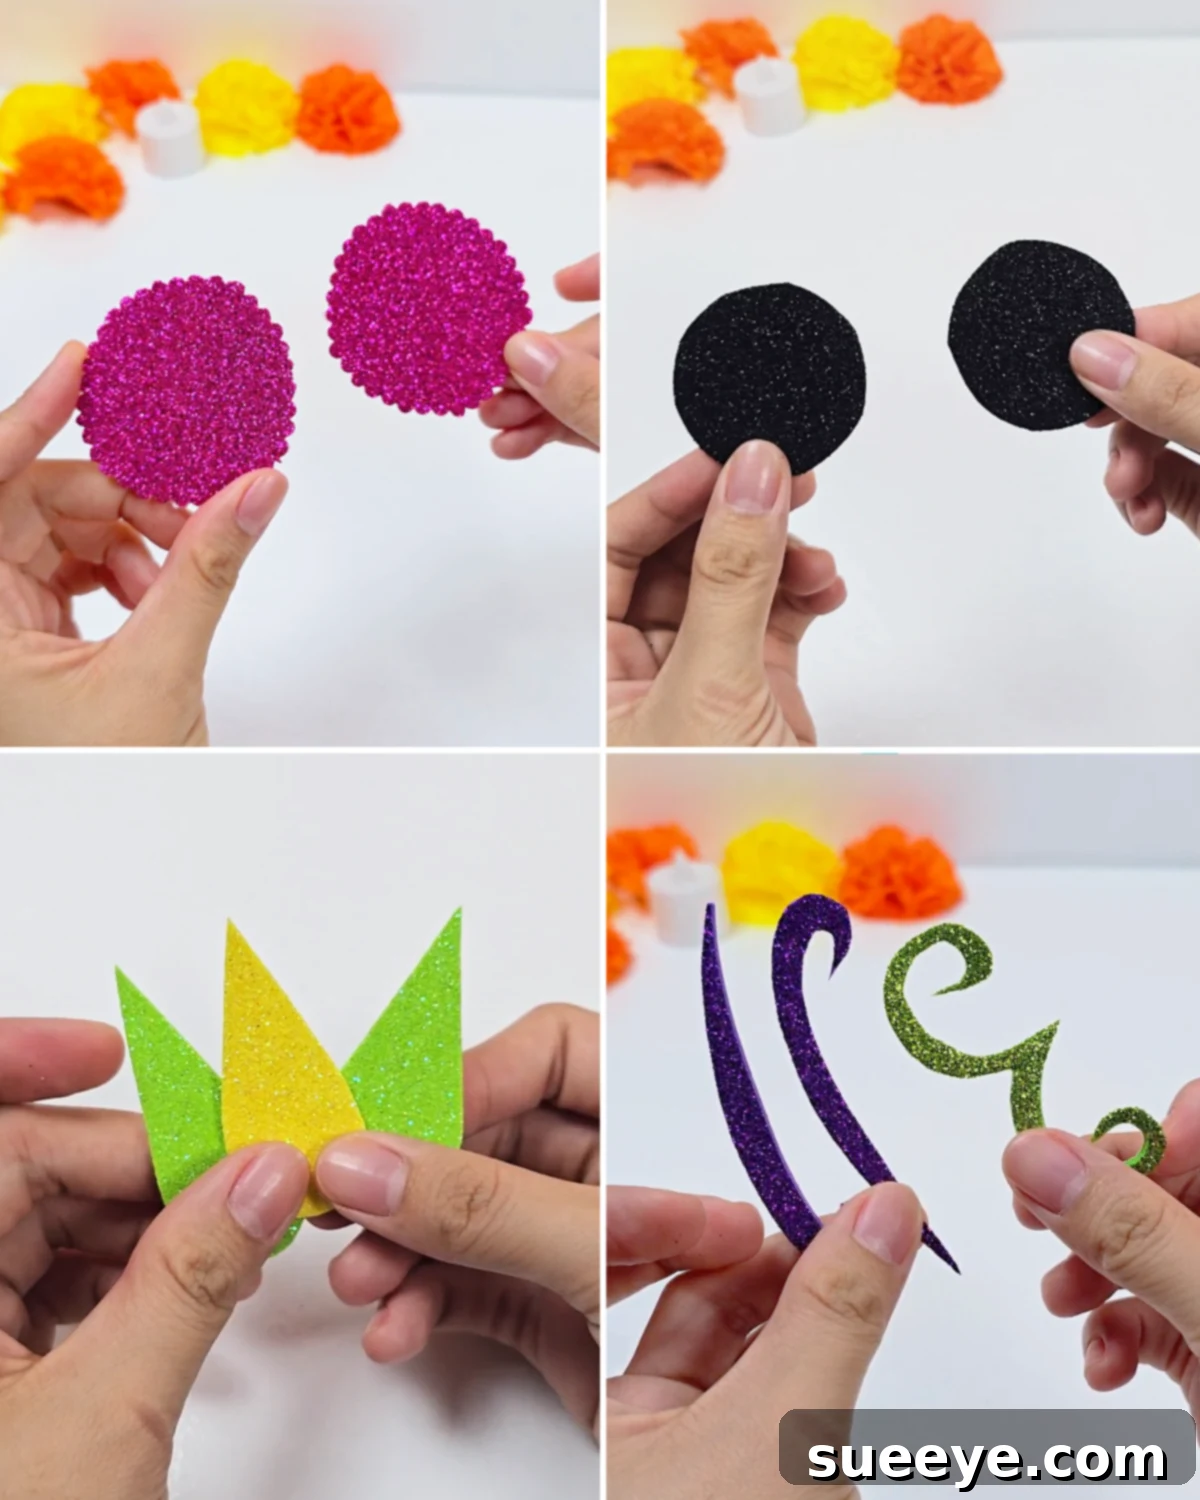
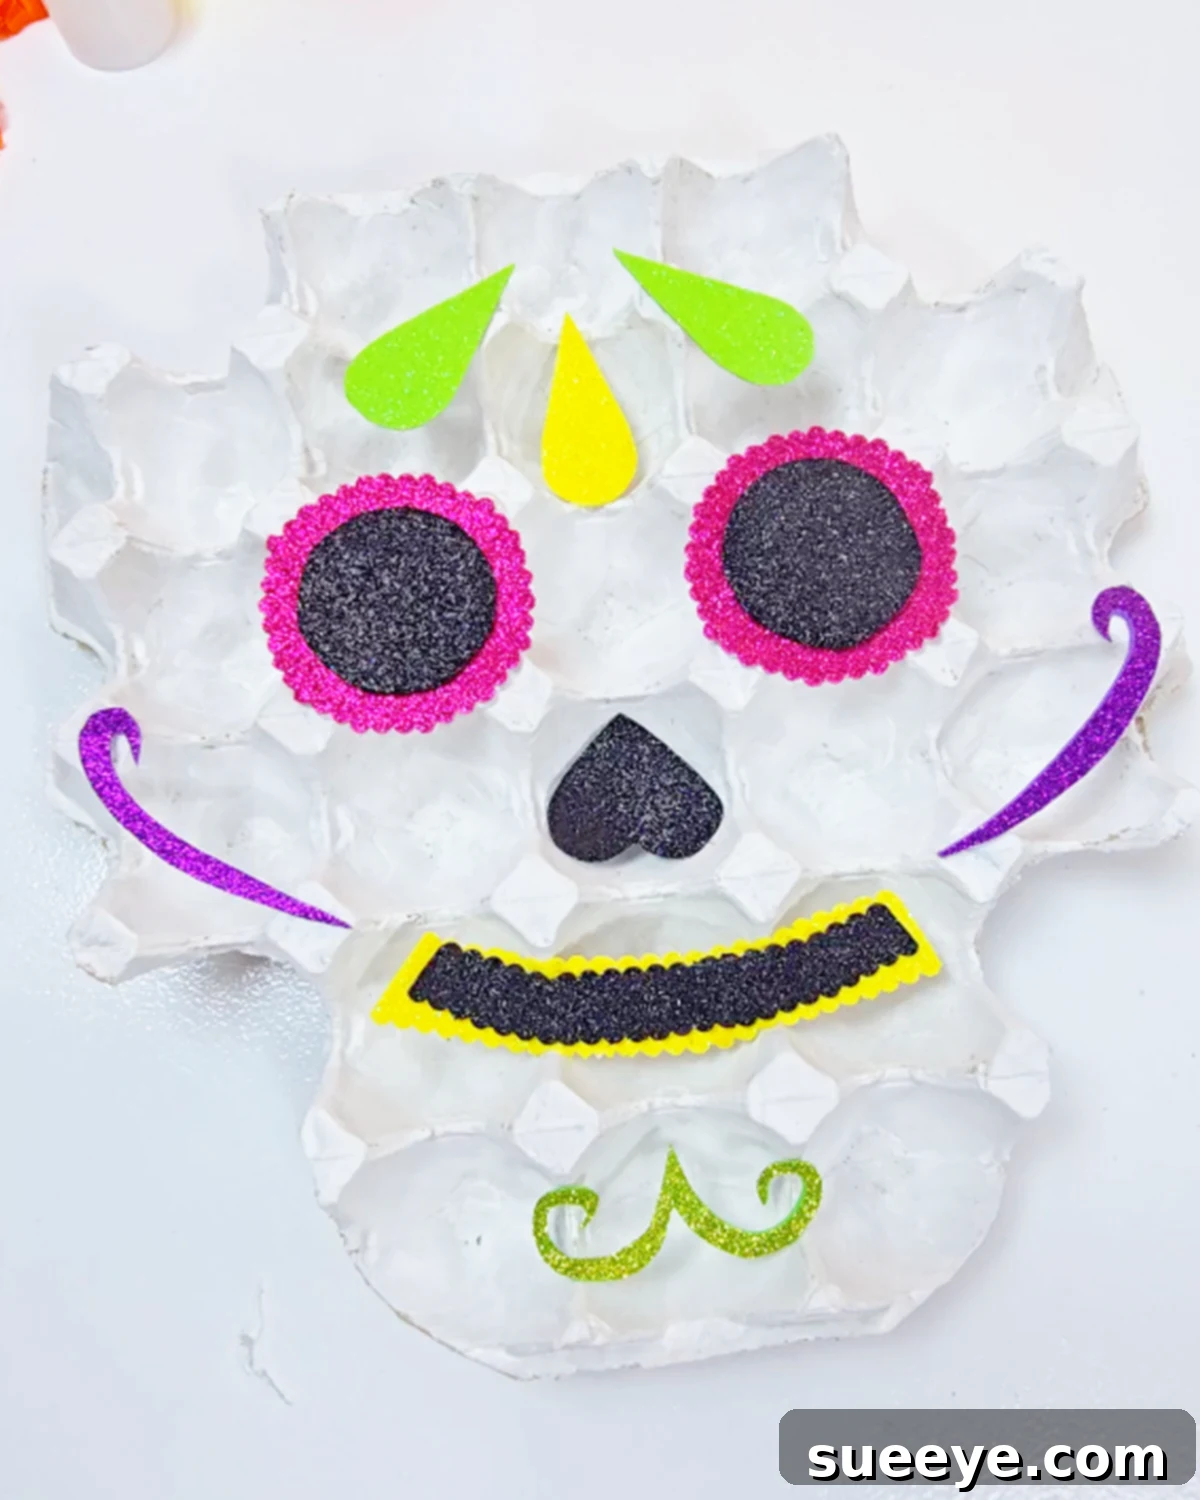
For the Eyes: Take your pink glitter foam. Find a small round object, like a coin or a bottle cap, to trace two perfectly circular shapes. Cut these circles out using pinking shears; the serrated edge will add a charming, decorative border to the base of the eyes. Then, from your black glitter foam, cut two slightly smaller plain black circles using regular scissors. These will form the inner pupils, adding depth and contrast.
For the Forehead Decoration: Select yellow and green glitter foam sheets. Carefully draw three elegant teardrop shapes onto these sheets. These shapes will be arranged on the skull’s forehead, adding a traditional touch. Cut out all three pieces with care, ensuring smooth edges.
For the Mustache/Swirls: Using purple and green glitter foam, cut out decorative swirl shapes as shown in the provided photo. These flourishes add a whimsical and classic sugar skull element. Feel free to experiment with different swirl patterns to personalize your design even further.
-
Step 3: Create and Assemble the Skull Teeth
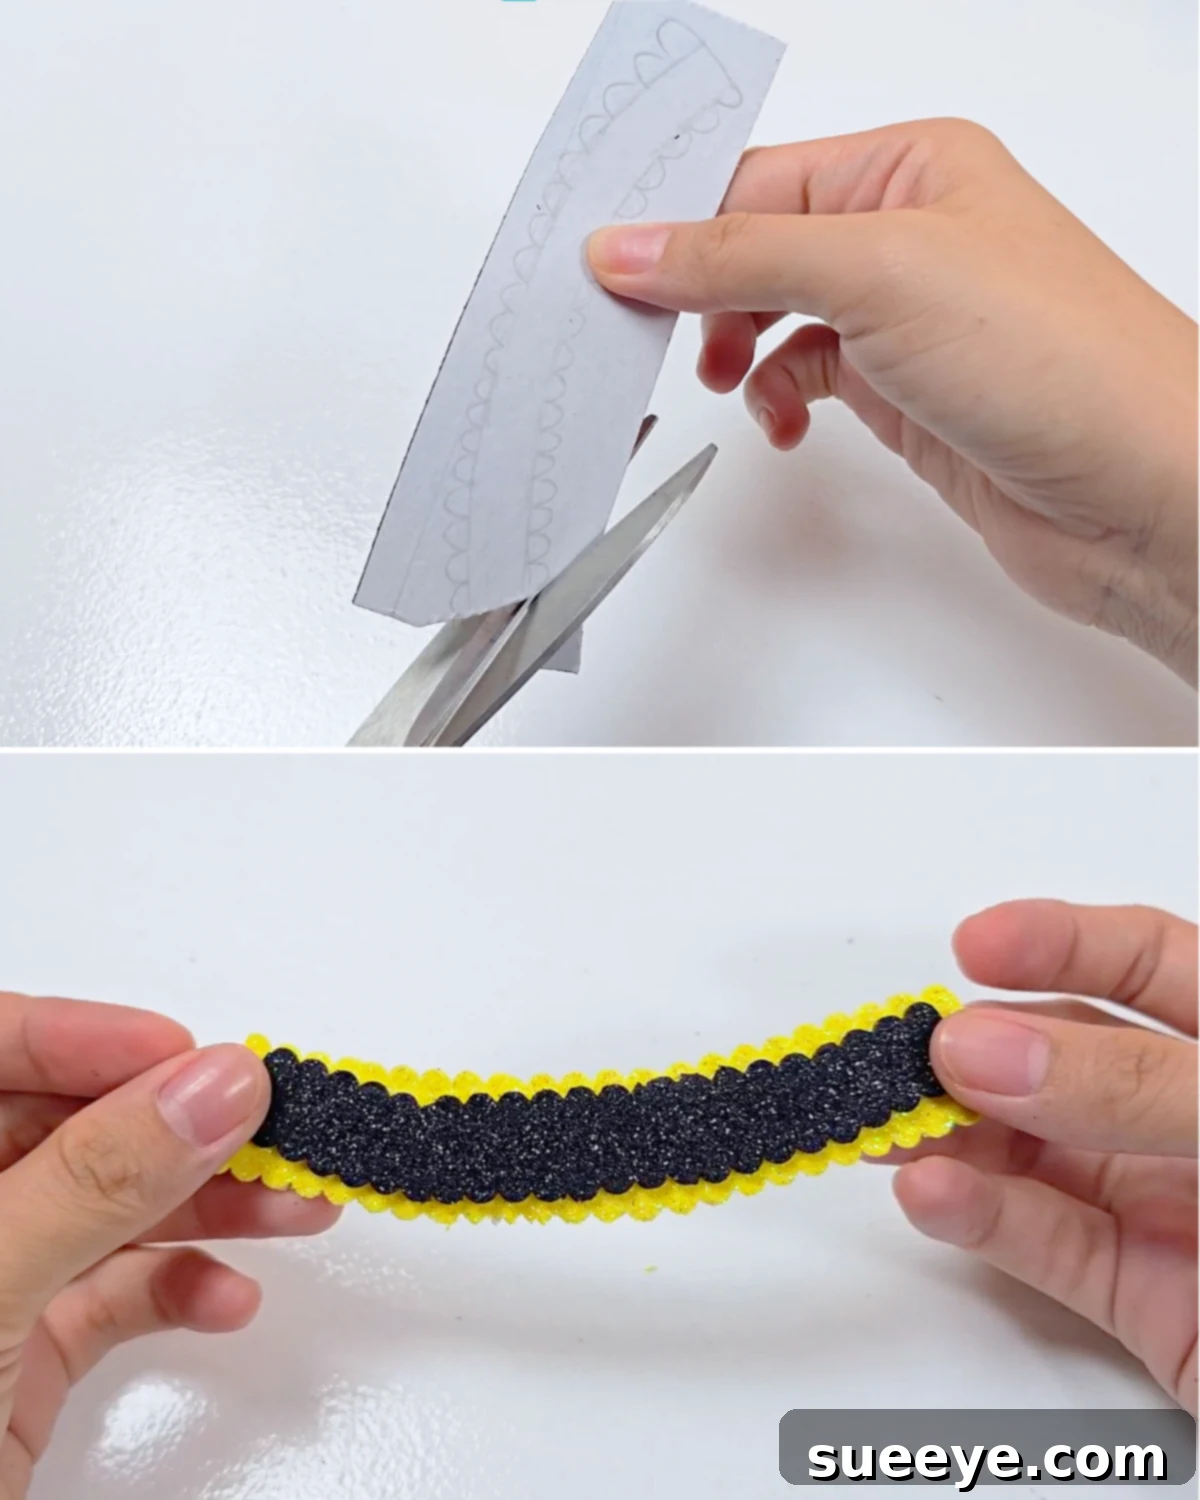
The teeth are a crucial element for that iconic sugar skull smile. From your yellow glitter foam, cut a curved strip with either scalloped or wavy edges, making it fairly substantial in size. This will serve as the base layer for the teeth. Next, from your contrasting black glitter foam, cut a slightly smaller curved strip, also with decorative edges. This will be the top layer, creating a striking visual effect. Once both pieces are cut, carefully center the smaller black strip onto the larger yellow one. Use your hot glue gun to securely attach them together. This layered approach adds dimension and visual interest to the mouth area.
-
Step 4: Assemble All Glitter Foam Details onto the Egg Tray Skull
With all your glitter foam pieces ready, it’s time to bring your sugar skull to life! Begin by carefully positioning the pink and black layered eyes onto the upper part of the egg tray skull. Once satisfied with their placement, secure them with hot glue. Next, arrange the yellow and green teardrop shapes on the forehead, creating a decorative pattern. Follow by attaching the purple and green swirl “mustache” shapes below the nose area. Finally, carefully position and hot glue the layered teeth assembly onto the lower jaw of the skull. Continuously refer to the photo for guidance to ensure all parts are placed correctly, forming a cohesive and cheerful skull face. Take your time to align everything perfectly before gluing.
-
Step 5: Prepare the EVA Foam Strips for Flowers
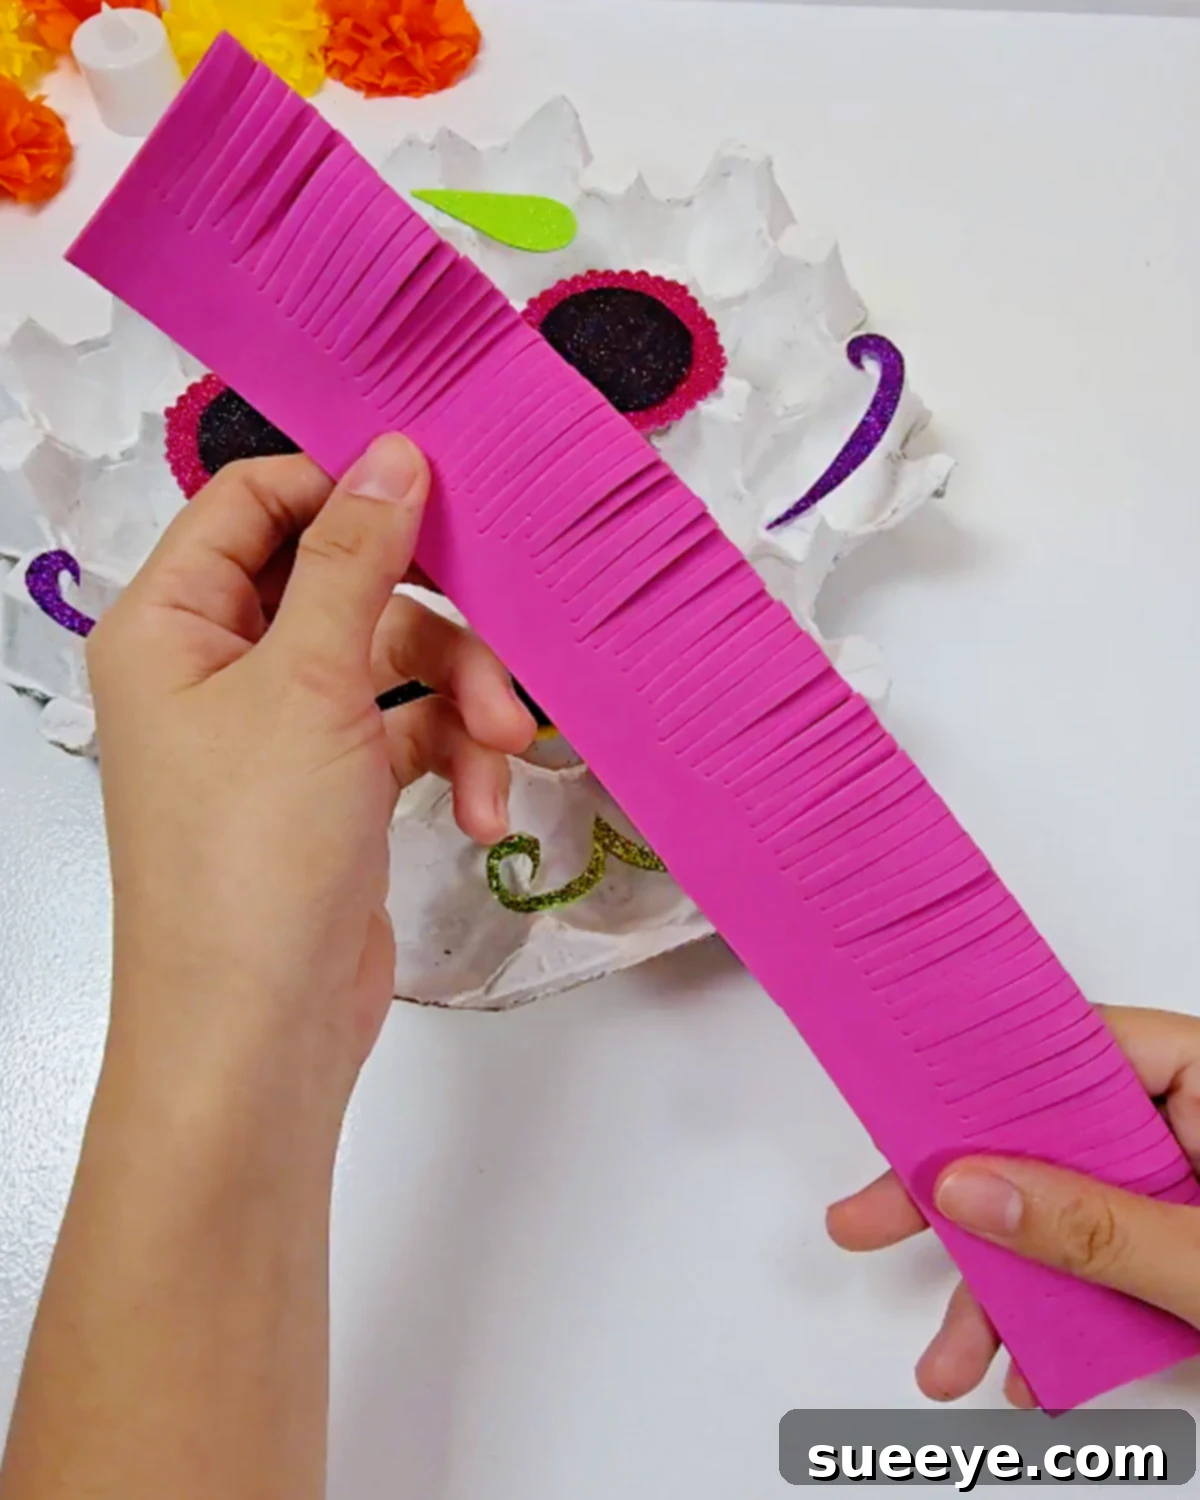
Now, let’s add some beautiful dimensional flowers using EVA foam to adorn your sugar skull. Take a sheet of EVA foam (choose a bright, complementary color) and cut it in half lengthwise. Then, take one of those halves and fold it lengthwise. Apply a thin line of hot glue along the top edges of the folded foam and press them together firmly, creating a closed loop. Once secured, use your scissors to make thin, even cuts along the folded edge, stopping just short of the glued top edge. Continue these cuts along the entire length of the foam piece. The goal is to create many thin “petals” that will unfurl into a flower. Repeat this process for the other half of the EVA foam if you want more flowers.
-
Step 6: Roll the Foam into a Blooming Flower
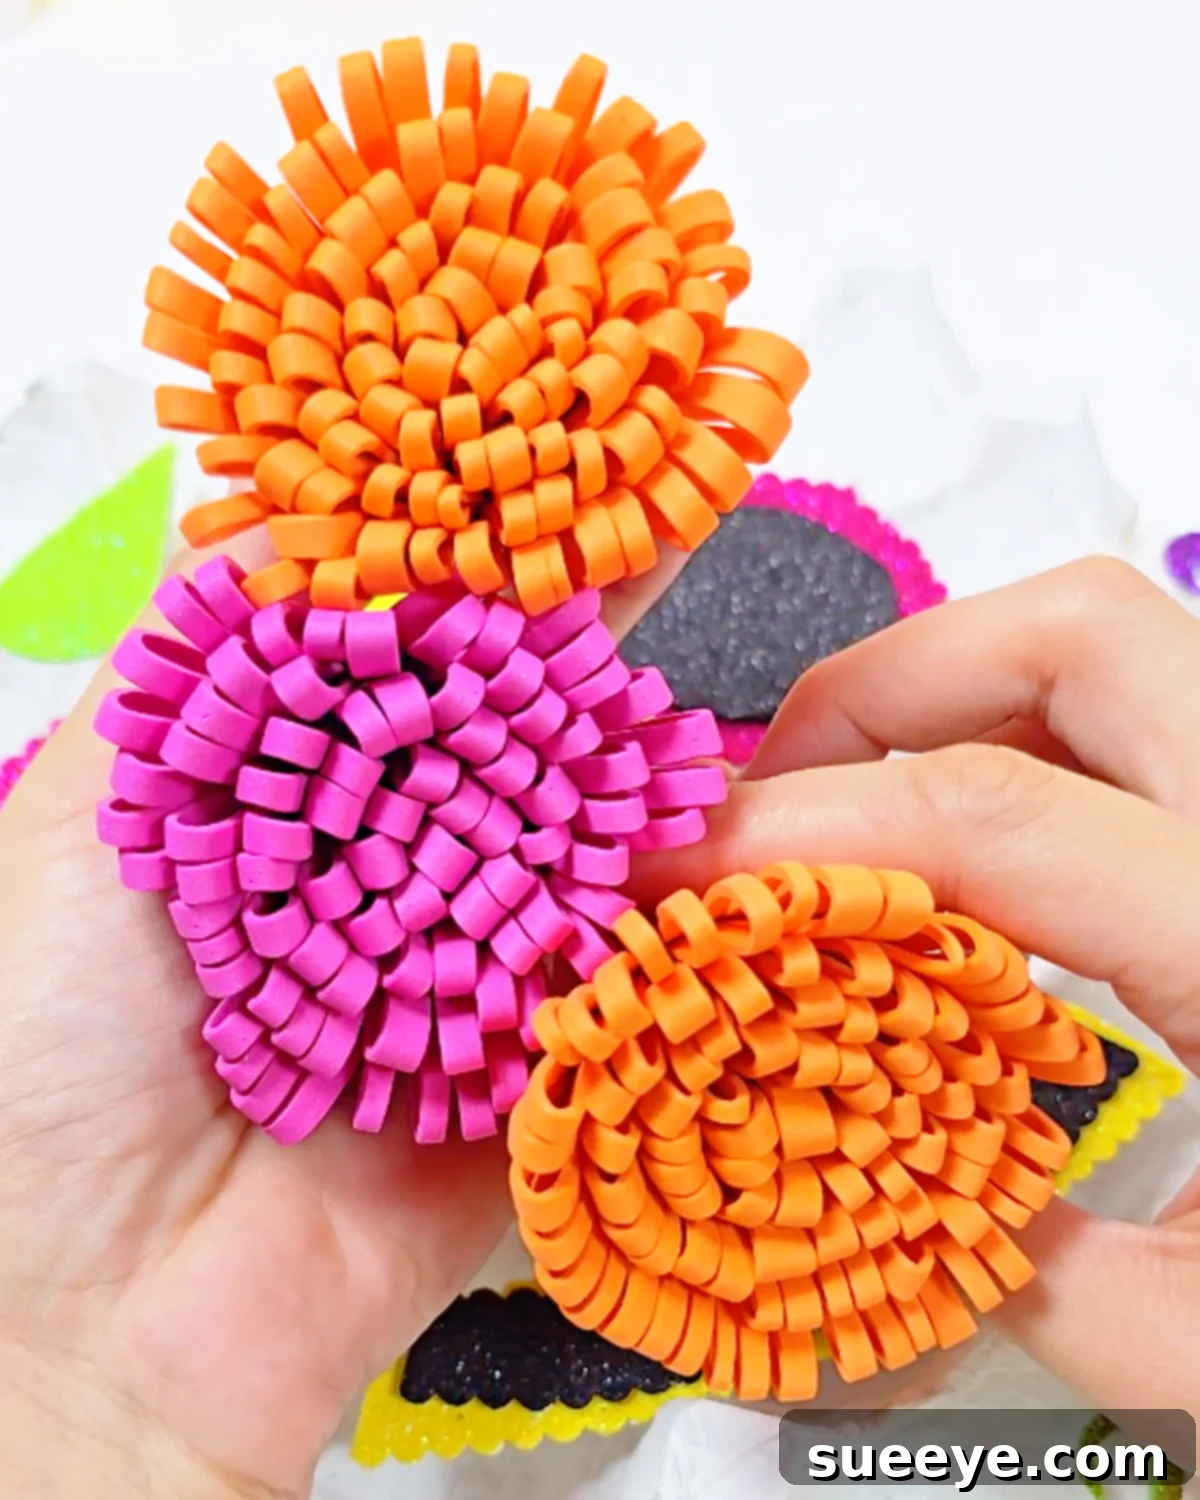
With your fringed EVA foam strip ready, it’s time to transform it into a lovely flower. Apply a thin bead of hot glue to the top, glued edge where you previously secured the foam. Starting from one end, carefully begin to roll the foam strip tightly. As you roll, the cut fringes will naturally splay outwards, forming the petals of your flower. Continue rolling until you reach the end of the strip, securing the final edge with a dab of hot glue. Fluff the petals gently to give your flower a full, organic look. Aim to make at least three of these charming EVA foam rolls; more flowers will create a lusher, more festive look.
-
Step 7: Adorn the Skull’s Forehead with Foam Flowers
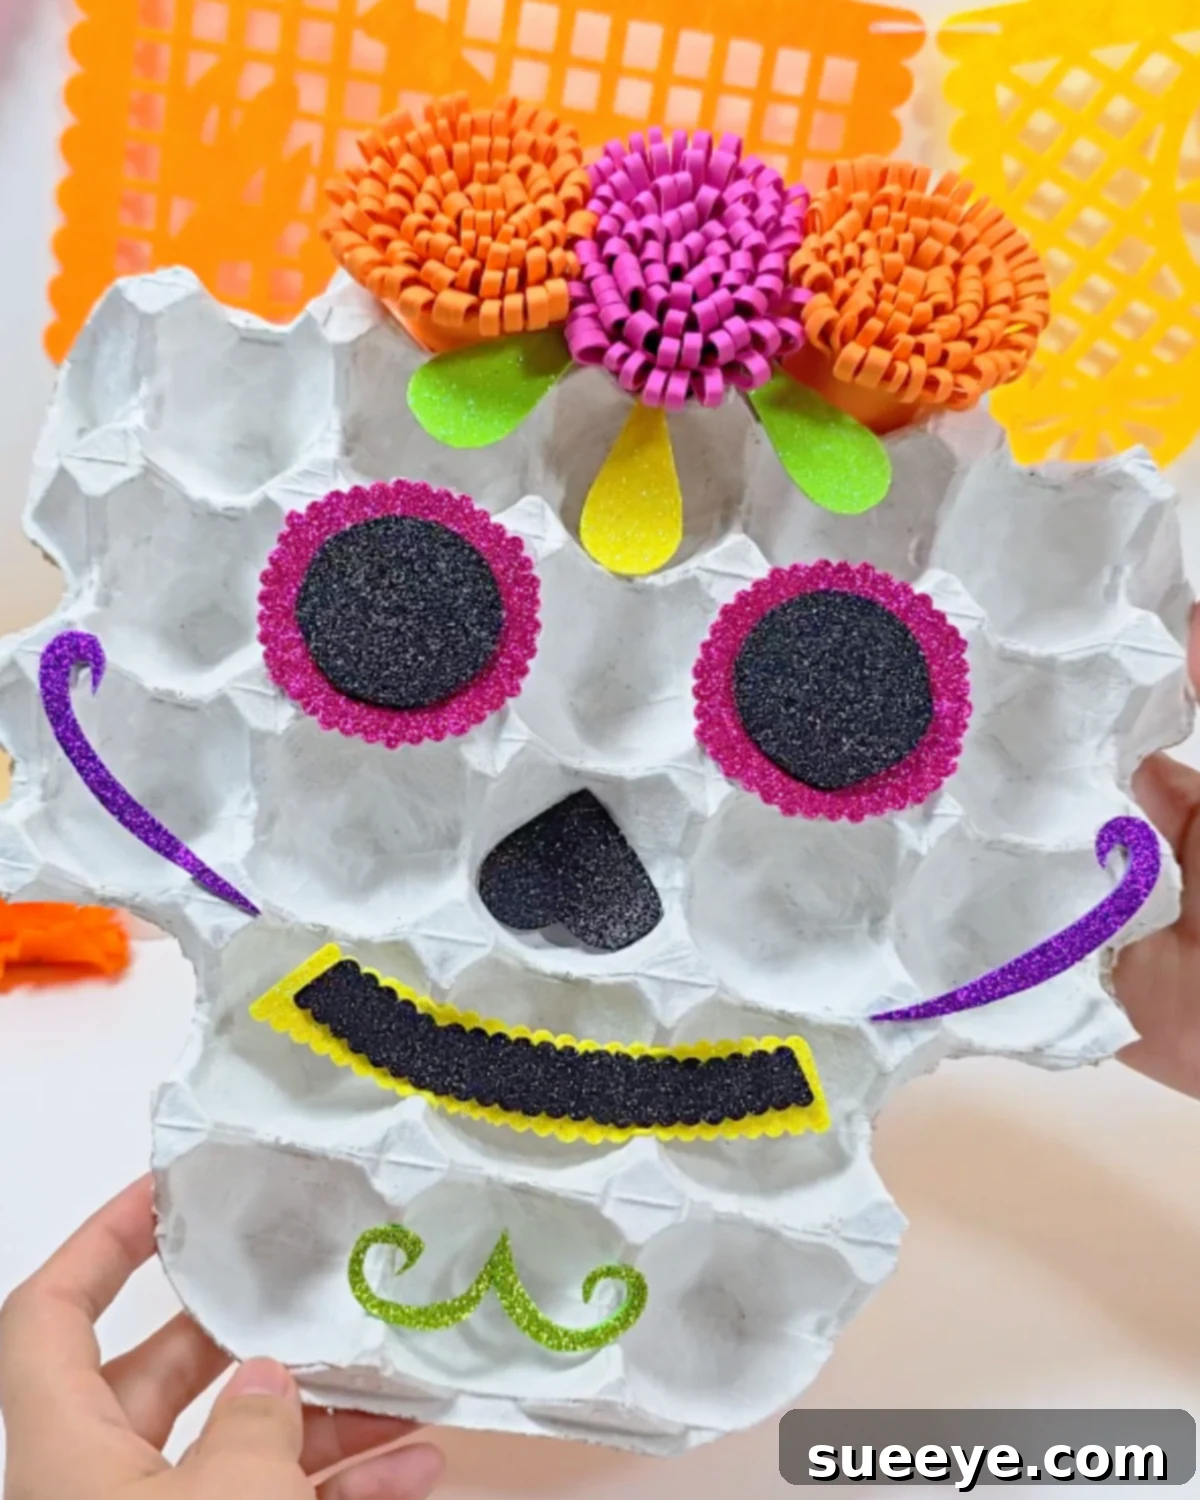
The final touch! Take your beautifully crafted EVA foam flowers and arrange them aesthetically on the forehead of your sugar skull. You can place them in a cluster, a line, or any pattern you find appealing. Once you’ve decided on their placement, use a generous amount of hot glue to firmly attach each flower to the egg tray base. Hold them in place for a few seconds until the glue sets. And just like that, your stunning, personalized Dia de Los Muertos egg tray sugar skull is complete and ready to bring joy and color to your celebration!

Why You’ll Adore Crafting This Egg Tray Sugar Skull
This particular Dia de Los Muertos craft offers a multitude of benefits, making it an ideal project for anyone looking to add a touch of handmade charm to their celebrations:
- Eco-Friendly and Budget-Friendly: You’re giving new life to discarded egg trays, actively participating in upcycling and reducing waste. This also means you’re creating beautiful decorations without breaking the bank, utilizing materials you might already have.
- Infinitely Customizable: The design possibilities are truly endless! Feel free to experiment with a vast array of paint colors, glitter shades, beads, sequins, ribbons, or even small fabric scraps. Make your sugar skull a unique reflection of your personal style and the vibrant spirit of Dia de Los Muertos.
- Perfect for All Ages: The steps are straightforward enough for children to participate and enjoy, fostering creativity and fine motor skills. Simultaneously, adults will find immense pleasure in customizing and perfecting their own festive masterpiece, making it a wonderful family activity.
- Festive and Meaningful Décor: Beyond its visual appeal, this craft adds a deeply personal and handmade touch to your cherished Día de los Muertos ofrenda. Each sugar skull you create can represent a loved one, making your altar even more significant and heartfelt.
- A Wonderful Learning Experience: Engaging in traditional crafts like these can be a fantastic way to learn more about the cultural significance of Dia de Los Muertos and its beautiful customs.
Expert Tips for a Flawless Sugar Skull Craft
To ensure your crafting experience is as enjoyable and successful as possible, consider these additional tips:
- Patience is Key: Don’t rush the drying time for the primer or paint. A fully dry base ensures that your glitter foam adheres properly and prevents smudging.
- Experiment with Colors: While traditional sugar skulls are often brightly colored, feel free to explore different color combinations that resonate with you. Monochromatic themes or pastel palettes can also be strikingly beautiful.
- Safety First with Hot Glue: Always supervise children when using a hot glue gun. Ensure proper ventilation and be mindful of hot surfaces.
- Add More Embellishments: Beyond glitter foam and EVA foam, consider adding small rhinestones, tiny pompoms, marker details for facial expressions, or even small paper flowers.
- Practice Cuts: If you’re new to cutting foam, do a few practice cuts on scrap pieces to get a feel for the material and your scissors/knife.
- Display Creatively: Your finished sugar skull can be placed on your ofrenda, hung as a wall decoration, or even attached to a stick to be held as a festive prop.
Customization and Display Ideas for Your Egg Tray Sugar Skull
This egg tray sugar skull is a fantastic starting point, but the true magic happens when you infuse it with your unique style. Here are some ideas to make your creation truly one-of-a-kind:
- Glitter Galore: Don’t limit yourself to glitter foam. Apply craft glue and sprinkle loose glitter in various colors over your painted skull for an extra dazzling effect.
- Painted Patterns: Before adding foam details, use fine-tipped paintbrushes or permanent markers to draw intricate patterns, swirls, or traditional Dia de Los Muertos motifs directly onto the painted egg tray base.
- Floral Headpieces: Instead of just EVA foam flowers, consider adding tiny silk flowers, paper flowers, or even small fabric bows to the skull’s “hair” area for a different texture.
- Names and Messages: Write the name of a loved one or a heartfelt message on the forehead or jaw of the skull using a fine-tipped permanent marker. This personalizes it beautifully for your ofrenda.
- Varying Sizes: If you have different sized egg cartons (e.g., smaller six-egg cartons), you can create a family of sugar skulls in various sizes, adding depth to your display.
- Integration into an Ofrenda: Place your finished sugar skull prominently on your altar alongside candles, marigolds, photographs, and favorite foods of the departed. It will serve as a cheerful invitation for spirits to return.
- Festive Garland: Create several smaller egg tray sugar skulls and string them together with colorful beads or fabric scraps to form a vibrant garland.
Embrace the Spirit of Dia de Los Muertos with DIY
Creating this DIY Dia de Los Muertos sugar skull from an egg tray is more than just a craft; it’s an act of remembrance, a burst of creativity, and a meaningful way to engage with a cherished cultural tradition. It allows you to transform simple, often discarded materials into a vibrant symbol of life, death, and enduring love. We hope this comprehensive guide has inspired you to pick up your scissors and glue gun and start crafting your own unique sugar skull. The joy of making something with your own hands, especially for such a significant occasion, is truly unparalleled.
We encourage you to share your creations and embrace the festive spirit of Dia de Los Muertos through thoughtful, handmade decorations. Your personalized sugar skull will not only enhance your ofrenda but also serve as a beautiful testament to the memories you hold dear.
*If you loved this craft and are eager for more creative inspiration, be sure to visit our official website, follow our vibrant Facebook page, and subscribe to our YouTube channel for an endless stream of fun and unique DIY projects! Happy crafting!