
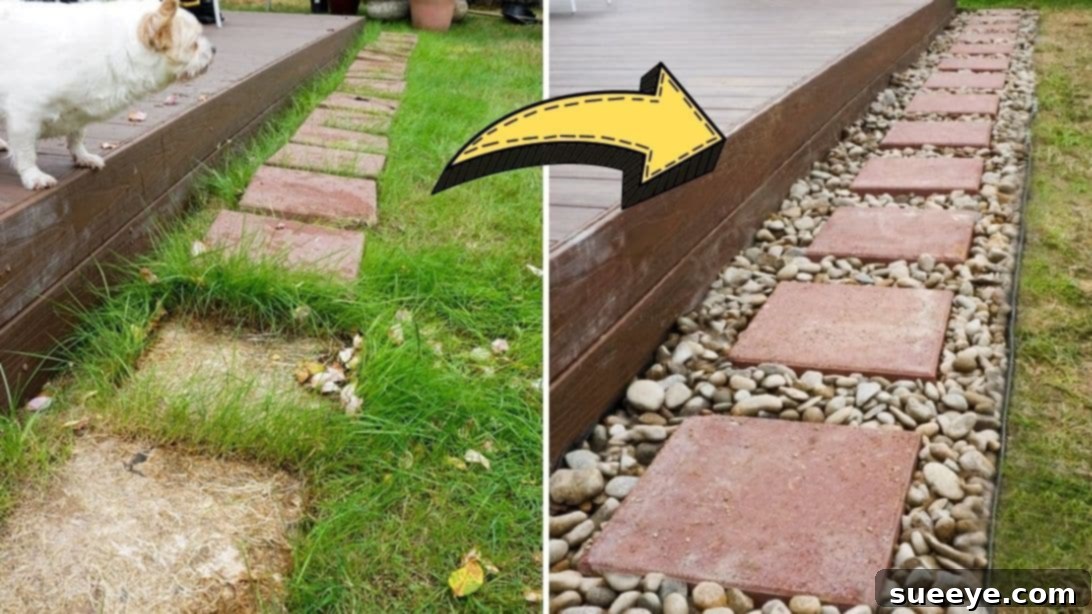
Transform your outdoor living space and give your home the aesthetic upgrade it deserves this spring season! A beautifully installed paver walkway not only enhances your garden’s curb appeal but also provides a durable, functional path that can last for years. If you’ve always dreamed of a charming pathway leading to your front door, patio, or garden shed, you’re in the right place. This comprehensive guide will walk you through every step of installing a paver walkway on your own, turning a seemingly daunting project into an achievable and rewarding DIY endeavor. Get ready to revitalize your landscape and create a stunning focal point with a handcrafted paver path.
For a visual aid to complement these instructions, you can refer to the detailed video tutorial by Fix This House on YouTube. This resource will provide a clear demonstration of each technique discussed, ensuring you have all the information needed for a successful installation.
Why Choose a Paver Walkway?
Paver walkways offer a myriad of benefits over other path materials like concrete or gravel. Their interlocking design provides exceptional durability, allowing for natural expansion and contraction with temperature changes without cracking. This flexibility also makes repairs incredibly easy; individual pavers can be replaced without disturbing the entire path. Beyond their structural integrity, pavers come in a vast array of colors, shapes, and textures, offering endless design possibilities to perfectly complement your home’s architectural style and garden aesthetic. They are also permeable, allowing rainwater to seep into the ground, which helps with drainage and reduces runoff. Investing in a paver walkway is an investment in both the beauty and functionality of your outdoor space, adding significant value to your property.
Planning Your Paver Walkway Project
Before you even pick up a shovel, thorough planning is crucial for a successful paver walkway installation. Begin by visualizing the path’s route, considering its purpose (e.g., main entrance, garden access, utility path) and how it will integrate with your existing landscape. Sketch out your design, marking any curves, turns, or special features. Think about the width of your walkway – typically 3 to 4 feet is comfortable for two people to walk side-by-side. Carefully measure the length and width of your proposed path to accurately calculate the materials needed, including the number of pavers, base material, and sand.
It’s also essential to check for any underground utilities before you dig. Contact your local “dig safe” service (often 811 in the U.S.) a few days before starting to have utility lines marked. This crucial step prevents accidental damage to water pipes, gas lines, electrical cables, or communication wires, ensuring both your safety and avoiding costly repairs. Finally, consider the slope of your property. Proper drainage is paramount to prevent water pooling and shifting pavers. Aim for a gentle slope of approximately 1/4 inch per linear foot away from your house or other structures to direct water effectively.
Materials & Tools for Your DIY Paver Walkway
Having all your materials and tools ready before you start will make the installation process much smoother and more efficient. Here’s a comprehensive list of what you’ll need:
- Square Spade Shovel: Ideal for precise digging and cutting edges.
- Transfer Shovel (Scoop Shovel): Excellent for scooping and moving loose dirt, gravel, and sand.
- 8×8 Inch Tamper Tool (or Plate Compactor): Essential for compacting the base layers. A manual tamper works for smaller projects, but a rented plate compactor is highly recommended for larger areas for better compaction and efficiency.
- Garden Plastic Edger: A flexible solution for defining the walkway’s perimeter and holding pavers in place.
- Garden Aluminum Edger: A more rigid and durable option for long-term edge stability.
- Spray Paint (Landscape Marking Paint): For clearly marking the outline of your walkway.
- Paver Base (Crushed Stone or Gravel): The foundational layer that provides stability and drainage.
- Paver Sand (Bedding Sand or Concrete Sand): Used as a leveling bed for the pavers and to fill joints.
- Paver Stones: Choose your desired style, color, and size. Ensure you purchase about 5-10% extra for cuts and potential breakage.
- 2-Inch PVC Pipes: Used as screed rails to ensure a perfectly level and consistent sand bed.
- Exotic Pebbles Rock / Mini Snow White Pebbles: For decorative borders or filling wider gaps, adding a touch of elegance.
- Weed Barrier Roll (Landscape Fabric): Prevents weeds from growing through your walkway and helps stabilize the base.
- Garden String / Mason’s Line: For creating straight lines and maintaining consistent widths during layout.
- Steel Pegs / Stakes: To hold string lines and edging in place.
- Rubber Mallet: For gently tapping pavers into place and adjusting their level.
- Spirit Level (4-foot and Torpedo Level): Crucial for checking the level and slope at every stage.
- Wheelbarrow: For easily transporting excavated dirt, gravel, and sand.
- Safety Glasses and Gloves: Always wear appropriate personal protective equipment.
- Utility Knife: For cutting the weed barrier.
- Straightedge (2×4 board or metal screed board): For leveling the sand bed over the PVC pipes.
- Paver Cutter or Wet Saw (optional, but highly recommended for cuts): To precisely cut pavers for edges, curves, or specific patterns.
Step-by-Step Guide: Installing Your Paver Walkway
Step 1: Site Preparation and Excavation
The success of your paver walkway heavily relies on a well-prepared base. Begin by clearing the area of any existing structures, old pathways, or vegetation. If you have an old paver walkway, carefully remove the stones and set them aside if you plan to reuse or dispose of them properly. Once the area is clear, use your previously measured dimensions to mark out the exact path of your new walkway. Drive steel pegs or stakes at each end of the walkway and at any turns, then tightly tie a garden string between them. This string line will serve as your precise guide. Double-check your measurements along the string line to ensure accuracy. Then, using spray paint, carefully trace the outline of your walkway onto the ground along the string line. Once the outline is complete, remove the string and pegs.
Now, it’s time to start digging. The depth of your excavation is critical and will depend on the thickness of your pavers, the paver sand layer (typically 1 inch), and the paver base layer (usually 4-6 inches for pedestrian walkways). For example, if your pavers are 2 inches thick, you’ll need to excavate approximately 7-9 inches deep (2″ paver + 1″ sand + 4-6″ base). Begin digging the marked area using your square spade shovel. For tougher soil or compacted areas, a pickaxe can significantly speed up the process. Systematically scoop out the excavated dirt into a wheelbarrow and transfer it to a designated area. As you dig, pay close attention to the bottom of the trench, aiming to keep it as level as possible. Use a long spirit level to frequently check the depth and ensure an even subgrade. Once the digging is complete, use your tamper tool to thoroughly compact the exposed soil at the bottom of the trench. This initial compaction helps create a stable foundation and prevents future settling.
Step 2: Laying the Weed Barrier and Edging
With the excavation complete and the subgrade compacted, the next step is to lay down a weed barrier. This landscape fabric serves multiple crucial purposes: it prevents weeds from sprouting up through your pavers, helps stabilize the underlying soil, and acts as a separation layer between the soil and the paver base, preventing the base material from sinking into the earth over time. Unroll the weed barrier across the entire excavated area, ensuring it extends slightly up the sides of the trench. Overlap seams by at least 6-12 inches to ensure complete coverage. Trim any excess fabric with a utility knife.
Next, install your chosen edging material around the perimeter of the walkway. Edging is vital as it locks the pavers in place, preventing them from spreading or shifting over time due to foot traffic or freeze-thaw cycles. You can opt for flexible plastic edging, which is easy to install, especially around curves, or a more robust aluminum or concrete edging for a firmer, more permanent border. Position the edging along the inner edge of your marked pathway. Secure the edging firmly into the ground using specialized plastic or metal spikes, typically driven through pre-drilled holes in the edging. Space the spikes according to the manufacturer’s recommendations, usually every 1-2 feet, to ensure the edging remains stable and holds its shape.
Step 3: Installing the Paver Base Layer
The paver base is the structural heart of your walkway, providing strength, stability, and drainage. This layer typically consists of crushed stone or gravel with varying particle sizes, which interlock to form a dense, load-bearing foundation. Begin by spreading the paver base material evenly over the weed barrier, aiming for a consistent depth of 4 to 6 inches after compaction. Use your transfer shovel and a bow rake to distribute the gravel, ensuring there are no significant high or low spots. Once a section is evenly spread, it’s time to compact it thoroughly. For smaller projects, a hand tamper can work, but for better results and larger areas, consider renting a plate compactor. Operate the compactor in multiple passes, going in different directions (e.g., length-wise, cross-wise) to achieve maximum density. The goal is to reduce voids and create a firm, unyielding surface. After compaction, check the height and ensure you maintain the proper slope for drainage. You may need to add more base material in some areas and re-compact until the entire base is level, firm, and sloped correctly.
Step 4: Creating a Level Sand Bed
The paver sand layer, also known as the bedding layer, sits directly on top of the compacted paver base. Its primary purpose is to provide a perfectly smooth and level surface for your pavers to rest on, ensuring they are stable and uniform. It also acts as a cushion, preventing pavers from grinding against the rigid base. To create a precise sand bed, you’ll use screed pipes (your 2-inch PVC pipes) and a straightedge. Place the two PVC pipes parallel to each other, running the length of your walkway, on top of the compacted paver base. Ensure they are spaced slightly narrower than the width of your straightedge. Use your spirit level to make sure the pipes are perfectly level with each other, or set them to the desired drainage slope.
Pour paver sand generously between the two PVC pipes, overfilling the area slightly. Then, take your straightedge and, resting it on top of the two pipes, slowly pull it along the pipes in a sawing motion. This action will “screed” the sand, creating a perfectly flat and consistent 1-inch thick bed. As you pull the straightedge, excess sand will be pushed forward. Once a section is screeded, carefully remove the PVC pipes, filling in the voids they left with additional sand and hand-troweling it smooth. Avoid stepping on the screeded sand bed, as this will create depressions that can lead to uneven pavers. If you need to walk on it, use kneeling boards to distribute your weight evenly. Repeat this process in sections until the entire length of your walkway has a consistently level sand bed.
Step 5: Laying the Paver Stones
This is where your walkway truly begins to take shape! Start laying your paver stones from one end of the walkway, ideally working from a fixed edge or corner. If your walkway is against a house or structure, start there and work outwards. Place the first paver gently onto the screeded sand bed, ensuring it’s snug against the edging. Continue laying pavers one by one, working in a consistent pattern (e.g., running bond, herringbone). Avoid sliding pavers into place, as this can disturb the sand bed. Instead, lower them straight down.
As you lay each paver, gently tap it with a rubber mallet to seat it firmly into the sand. Use your torpedo level to check that each paver is level with its neighbors and that the overall slope is maintained. Adjust as needed with additional taps or by lifting and adding a small amount of sand underneath. Maintain consistent joint gaps (typically 1/8 to 1/4 inch) between pavers. For sections where full pavers don’t fit, you will need to cut pavers. Use a paver splitter or a wet saw with a diamond blade for clean, precise cuts. Always wear appropriate safety gear, including eye and ear protection, when cutting pavers. Continually check your alignment and level as you proceed, making small adjustments to keep your walkway straight and even.
Step 6: Finishing Touches and Joint Stabilization
Once all your pavers are laid, it’s time for the final crucial steps that lock everything into place. Begin by spreading a generous layer of joint sand over the entire surface of the newly laid pavers. You can use regular fine-grained paver sand or, for superior weed inhibition and stability, polymeric sand. Polymeric sand contains additives that, when activated with water, harden to form a strong bond within the joints. Use a stiff broom to sweep the sand into all the gaps and crevices between the pavers, ensuring every joint is completely filled. Sweep in multiple directions to work the sand deep into the joints.
After sweeping, use your plate compactor (with a protective pad underneath to prevent scratching pavers) or hand tamper to go over the entire walkway. This vibration will settle the sand deeper into the joints and further seat the pavers. You will notice the sand level in the joints drop, so sweep more sand over the surface and repeat the compaction process. Do this two or three times until the joints are consistently filled to the bottom of the chamfer (the beveled edge) of the pavers.
If you are using polymeric sand, carefully follow the manufacturer’s instructions for wetting. Typically, this involves lightly misting the surface with water until the sand is saturated but not pooled. Allow it to cure completely, which can take 12-24 hours, depending on humidity. Finally, add any decorative elements like exotic pebbles or mini snow white pebbles around the edges of your walkway or in specific design areas, creating an attractive border and tying the path into your landscape. Give the entire area a final sweep to remove any loose sand or debris, and admire your handiwork.
Maintenance Tips for Your New Paver Walkway
To keep your newly installed paver walkway looking pristine and performing optimally for years to come, a little routine maintenance goes a long way. Regularly sweep your walkway to remove leaves, dirt, and other debris that can accumulate in the joints and promote weed growth. For deeper cleaning, a mild detergent and a stiff brush, or a power washer set to a low-pressure fan spray, can remove stubborn stains, moss, or algae. Be careful with high-pressure washing, as it can dislodge joint sand.
Inspect the joints periodically. If you notice sand washing out or weeds starting to emerge, replenish the joint sand as needed. For long-term weed control, consider reapplying polymeric sand every few years. You can also apply a paver sealer after the initial installation and every 2-5 years thereafter. Sealing protects the pavers from stains, enhances their color, and provides an additional barrier against moisture and UV damage, further extending the life and beauty of your walkway. With proper care, your DIY paver walkway will continue to be a source of pride and enjoyment for decades.
Conclusion
Installing a paver walkway is a substantial DIY project, but as you’ve seen, it’s entirely achievable with careful planning, the right tools, and a systematic approach. From the initial excavation and precise leveling to the careful placement of each paver and the final joint stabilization, every step contributes to a durable and visually appealing outcome. You’ve not only created a beautiful, functional path but also added significant value and charm to your home’s exterior. Embrace the transformation of your garden and enjoy the satisfaction of knowing you built it with your own hands. Step out onto your new paver walkway and take pride in your hard work, enjoying the beauty and longevity it brings to your outdoor space for many seasons to come.